开始使用 GitHub Actions 以自动执行工作流,并将其从 GitHub 部署到 Azure 应用服务。
先决条件
- 具有活动订阅的 Azure 帐户。 创建帐户。
- 一个 GitHub 帐户。 如果你没有帐户,可免费注册一个。
创建应用时设置 GitHub Actions 部署
GitHub Actions 部署已集成到默认应用创建向导。 只需在“部署”选项卡中将“持续部署”设置为“启用”,并配置所需的组织、存储库和分支。
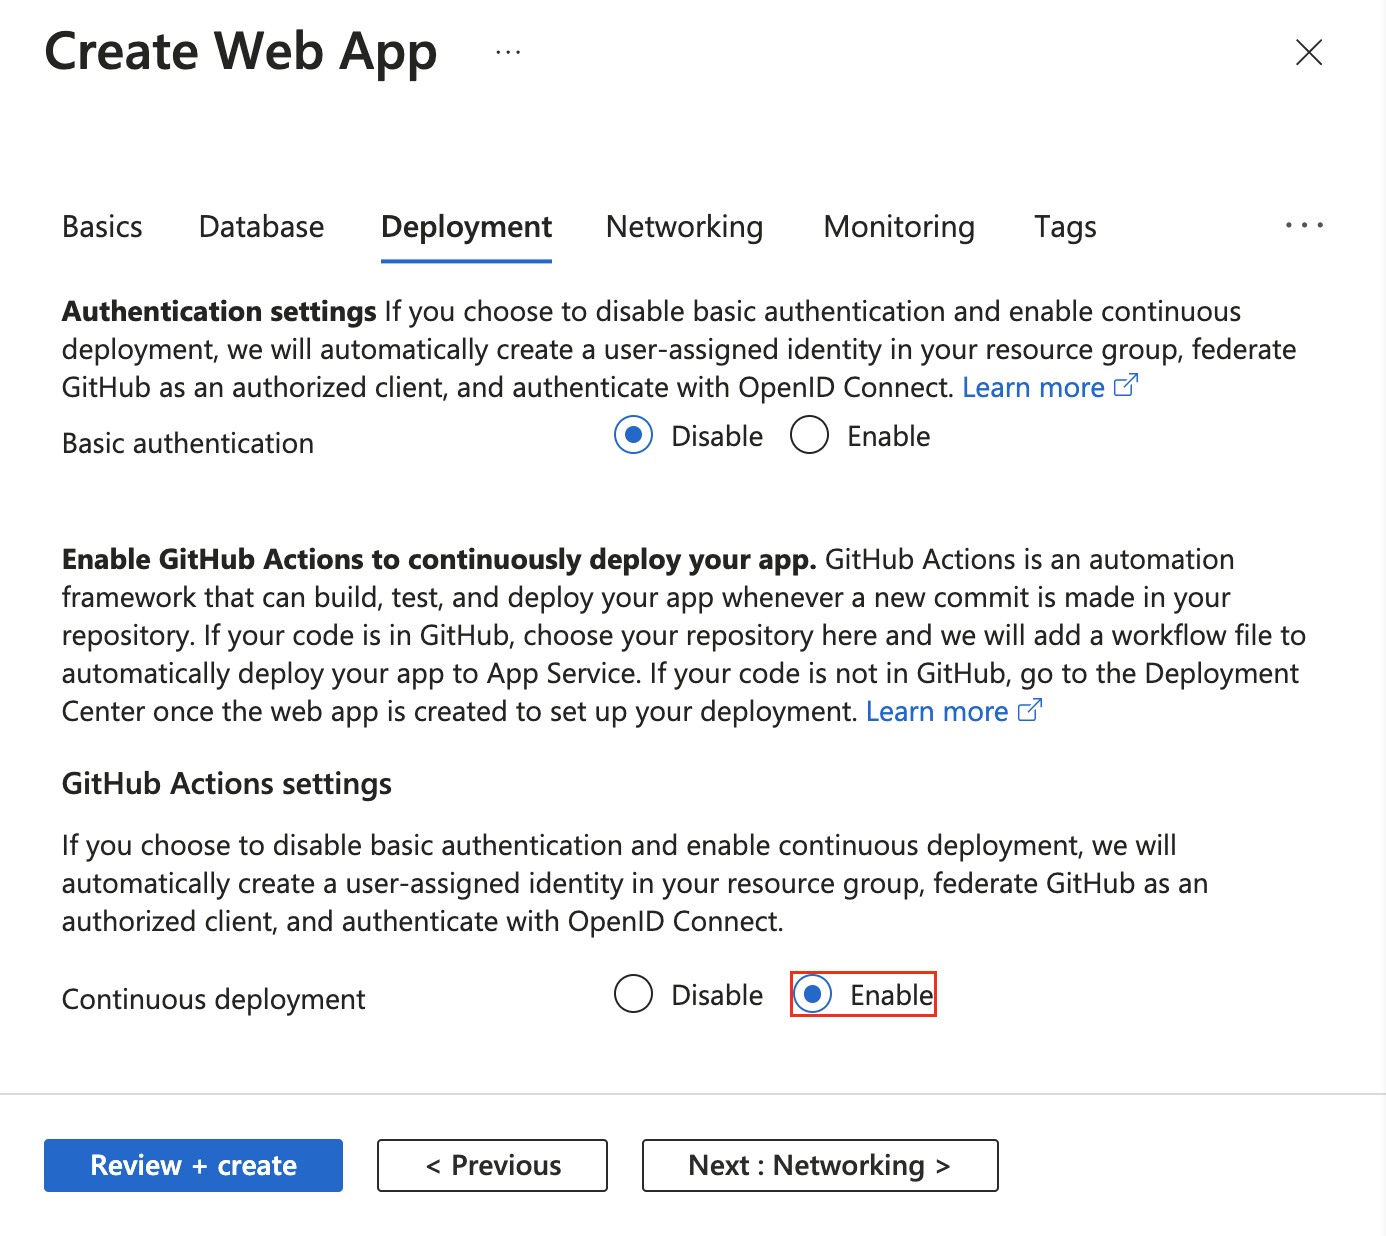
启用持续部署后,应用创建向导会根据基本身份验证选择自动选取身份验证方法,并相应地配置应用和 GitHub 存储库:
从部署中心设置 GitHub Actions 部署
对于现有应用,可以使用应用服务部署中心快速开始使用 GitHub Actions。 此“交钥匙”方法将自动生成基于应用程序堆栈的 GitHub Actions 工作流文件,并将它提交到 GitHub 存储库。
使用部署中心还可以通过“用户分配的标识”选项轻松配置更安全的 OpenID Connect 身份验证。
如果你的 Azure 帐户具有所需的权限,可以选择创建用户分配的标识。 否则,可以在“标识”下拉列表中选择现有的用户分配的托管标识。 可以与 Azure 管理员协作,使用网站参与者角色创建用户分配的托管标识。
有关详细信息,请参阅持续部署到 Azure 应用服务。
手动设置 GitHub Actions 工作流
也可以在不使用部署中心的情况下部署工作流。 在这种情况下,需要执行 3 个步骤:
- 生成部署凭据
- 配置 GitHub 机密
- 将工作流文件添加到 GitHub 存储库
1.生成部署凭据
对于 GitHub Actions,若要通过 Azure 应用服务进行身份验证,建议使用 OpenID Connect。 这是一种使用短期令牌的身份验证方法。 使用 GitHub Actions 设置 OpenID Connect 更为复杂,但提供更强的安全性。
或者,可以使用用户分配的托管标识、服务主体或发布配置文件进行身份验证。
下面将引导你完成使用 Azure CLI 语句创建 Active Directory 应用程序、服务主体和联合凭据的步骤。 若要了解如何在 Azure 门户中创建 Active Directory 应用程序、服务主体和联合凭据,请参阅连接 GitHub 和 Azure。
如果没有现有的应用程序,请注册一个可访问资源的新 Active Directory 应用程序和服务主体。 创建 Active Directory 应用程序。
az ad app create --display-name myApp
此命令将输出 JSON,其中 appId 为你的 client-id。 保存该值,稍后将其用作 AZURE_CLIENT_ID GitHub 机密。
使用图形 API 创建联合凭据时,将使用 objectId 值,并将其引用为 APPLICATION-OBJECT-ID。
创建服务主体。 将 $appID 替换为 JSON 输出中的 appId。
此命令使用不同的 objectId 生成 JSON 输出,将在下一步中使用。 新的 objectId 是 assignee-object-id。
复制 appOwnerTenantId 以在稍后用作 AZURE_TENANT_ID 的 GitHub 机密。
az ad sp create --id $appId
按订阅和对象创建新的角色分配。 默认情况下,角色分配将绑定到默认订阅。 将 $subscriptionId 替换为你的订阅 ID,将 $resourceGroupName 替换为你的资源组名称,将 $webappName 替换为你的 Web 应用名称,将 $assigneeObjectId 替换为生成的 id。 了解如何使用 Azure CLI 管理 Azure 订阅。
az role assignment create --role contributor --subscription $subscriptionId --assignee-object-id $assigneeObjectId --scope /subscriptions/$subscriptionId/resourceGroups/$resourceGroupName/providers/Microsoft.Web/sites/$webappName --assignee-principal-type ServicePrincipal
运行以下命令,为 Active Directory 应用程序创建新的联合标识凭据。
- 将
APPLICATION-OBJECT-ID 替换为 Active Directory 应用程序的 appId(在创建应用时生成)。
- 为
CREDENTIAL-NAME 设置一个值供以后引用。
- 设置
subject。 它的值由 GitHub 根据工作流来定义:
- GitHub Actions 环境中的作业:
repo:< Organization/Repository >:environment:< Name >
- 对于未绑定到环境的作业,请根据用于触发工作流的 ref 路径包括分支/标记的 ref 路径:
repo:< Organization/Repository >:ref:< ref path>。 例如 repo:n-username/ node_express:ref:refs/heads/my-branch 或 repo:n-username/ node_express:ref:refs/tags/my-tag。
- 对于由拉取请求事件触发的工作流:
repo:< Organization/Repository >:pull_request。
az ad app federated-credential create --id <APPLICATION-OBJECT-ID> --parameters credential.json
("credential.json" contains the following content)
{
    "name": "<CREDENTIAL-NAME>",
    "issuer": "https://token.actions.githubusercontent.com",
    "subject": "repo:organization/repository:ref:refs/heads/main",
    "description": "Testing",
    "audiences": [
        "api://AzureADTokenExchange"
    ]
}
发布配置文件是应用级凭据。 将发布配置文件设置为 GitHub 机密。
在 Azure 门户中转到应用服务。
在“概述”页上,选择“获取发布配置文件” 。
保存下载的文件。 你将使用该文件的内容来创建 GitHub 机密。
注意
从 2020 年 10 月起,Linux Web 应用在下载发布配置文件之前,需要将应用设置 WEBSITE_WEBDEPLOY_USE_SCM 设置为 true。 未来将删除此要求。
可以使用 Azure CLI 中的 az ad sp create-for-rbac 命令创建服务主体。 请使用 Azure 门户中的 Azure Cloud Shell 或选择“试用”按钮运行此命令。
az ad sp create-for-rbac --name "myApp" --role contributor \
                            --scopes /subscriptions/<subscription-id>/resourceGroups/<group-name>/providers/Microsoft.Web/sites/<app-name> \
                            --json-auth
在之前的示例中,请将占位符替换为你的订阅 ID、资源组名称和应用名称。 输出是一个 JSON 对象,包含的角色分配凭据可提供对应用服务应用的访问权限,如下方 JSON 片段所示。 复制此 JSON 对象供以后使用。
  {
    "clientId": "<GUID>",
    "clientSecret": "<GUID>",
    "subscriptionId": "<GUID>",
    "tenantId": "<GUID>",
    (...)
  }
重要
始终应授予最小访问权限。 上一个示例中的范围仅限于特定的应用服务应用而不是整个资源组。
需要向“Azure/登录”操作提供应用程序的“客户端 ID”、“租户 ID”和“订阅 ID”。 这些值可直接在工作流中提供,或可存储在 GitHub 机密中并在工作流中引用。 将这些值保存为 GitHub 机密是更安全的选择。
打开 GitHub 存储库,然后转到“设置”>“安全性”>“机密和变量”>“操作”>“新建存储库机密”。
为 AZURE_CLIENT_ID、AZURE_TENANT_ID 和 AZURE_SUBSCRIPTION_ID 创建机密。 将 Active Directory 应用程序中的这些值用于 GitHub 机密:
| GitHub 机密 |
Active Directory 应用程序 |
| AZURE_CLIENT_ID |
应用程序(客户端)ID |
| AZURE_TENANT_ID |
目录(租户)ID |
| AZURE_SUBSCRIPTION_ID |
订阅 ID |
通过选择“添加机密”来保存每个机密。
在 GitHub 中,浏览你的存储库。 选择“设置”>“安全性”>“机密和变量”>“操作”>“新建存储库机密”。
若要使用应用级凭据,请将下载的发布配置文件的内容粘贴到机密的值字段中。 将机密命名为 AZURE_WEBAPP_PUBLISH_PROFILE。
以后配置 GitHub 工作流文件时,请在部署 Azure Web 应用操作中使用 AZURE_WEBAPP_PUBLISH_PROFILE。 例如:
- uses: azure/webapps-deploy@v2
  with:
    publish-profile: ${{ secrets.AZURE_WEBAPP_PUBLISH_PROFILE }}
在 GitHub 中,浏览你的存储库。 选择“设置”>“安全性”>“机密和变量”>“操作”>“新建存储库机密”。
若要使用用户级凭据,请将 Azure CLI 命令的整个 JSON 输出粘贴到机密的“值”字段中。 将机密命名为 AZURE_CREDENTIALS。
以后配置 GitHub 工作流文件时,请使用该机密作为“Azure/登录”的输入 creds。 例如:
- uses: azure/login@v2
  with:
    creds: ${{ secrets.AZURE_CREDENTIALS }}
3.将工作流文件添加到 GitHub 存储库
工作流是由 GitHub 存储库中 /.github/workflows/ 路径中的 YAML (.yml) 文件定义的。 此定义包含组成工作流的各种步骤和参数。
工作流文件至少会执行以下不同的步骤:
- 使用创建的 GitHub 机密对应用服务进行身份验证。
- 构建 Web 应用。
- 部署 Web 应用。
若要将代码部署到应用服务应用,请使用 azure/webapps-deploy@v3 操作。 该操作需要 app-name 中的 Web 应用的名称,以及要在 package 中部署的 *.zip、*.war、*.jar 或文件夹的路径(具体取决于语言堆栈)。 有关 azure/webapps-deploy@v3 操作的可能输入的完整列表,请参阅 action.yml 定义。
以下示例显示了以不同受支持的语言生成 Web 应用的工作流部分。
若要使用配置的托管标识通过 OpenID Connect 进行部署,请将 azure/login@v1 操作与 client-id、tenant-id 和 subscription-id 密钥配合使用,并引用之前创建的 GitHub 机密。
name: .NET Core

on: [push]

permissions:
      id-token: write
      contents: read

env:
  AZURE_WEBAPP_NAME: my-app    # set this to your application's name
  AZURE_WEBAPP_PACKAGE_PATH: '.'      # set this to the path to your web app project, defaults to the repository root
  DOTNET_VERSION: '6.0.x'           # set this to the dot net version to use

jobs:
  build:
    runs-on: ubuntu-latest

    steps:
      # Checkout the repo
      - uses: actions/checkout@main
      - uses: azure/login@v1
        with:
          client-id: ${{ secrets.AZURE_CLIENT_ID }}
          tenant-id: ${{ secrets.AZURE_TENANT_ID }}
          subscription-id: ${{ secrets.AZURE_SUBSCRIPTION_ID }}


      # Setup .NET Core SDK
      - name: Setup .NET Core
        uses: actions/setup-dotnet@v3
        with:
          dotnet-version: ${{ env.DOTNET_VERSION }}

      # Run dotnet build and publish
      - name: dotnet build and publish
        run: |
          dotnet restore
          dotnet build --configuration Release
          dotnet publish -c Release --property:PublishDir='${{ env.AZURE_WEBAPP_PACKAGE_PATH }}/myapp'

      # Deploy to Azure Web apps
      - name: 'Run Azure webapp deploy action using publish profile credentials'
        uses: azure/webapps-deploy@v3
        with:
          app-name: ${{ env.AZURE_WEBAPP_NAME }} # Replace with your app name
          package: '${{ env.AZURE_WEBAPP_PACKAGE_PATH }}/myapp'

      - name: logout
        run: |
          az logout
使用 Azure 服务主体生成 ASP.NET MVC 应用并将其部署到 Azure。 该示例将 GitHub 机密用于 client-id、tenant-id 和 subscription-id 值。 你还可以直接在登录操作中传递这些值。
name: Deploy ASP.NET MVC App deploy to Azure Web App

on: [push]

permissions:
      id-token: write
      contents: read

env:
  AZURE_WEBAPP_NAME: my-app    # set this to your application's name
  AZURE_WEBAPP_PACKAGE_PATH: '.'      # set this to the path to your web app project, defaults to the repository root
  NUGET_VERSION: '5.3.x'           # set this to the dot net version to use

jobs:
  build-and-deploy:
    runs-on: windows-latest
    steps:

    # checkout the repo
    - uses: actions/checkout@main

    - uses: azure/login@v1
      with:
        client-id: ${{ secrets.AZURE_CLIENT_ID }}
        tenant-id: ${{ secrets.AZURE_TENANT_ID }}
        subscription-id: ${{ secrets.AZURE_SUBSCRIPTION_ID }}

    - name: Install Nuget
      uses: nuget/setup-nuget@v1
      with:
        nuget-version: ${{ env.NUGET_VERSION}}
    - name: NuGet to restore dependencies as well as project-specific tools that are specified in the project file
      run: nuget restore

    - name: Add msbuild to PATH
      uses: microsoft/setup-msbuild@v1.0.2

    - name: Run MSBuild
      run: msbuild .\SampleWebApplication.sln

    - name: 'Run Azure webapp deploy action using publish profile credentials'
      uses: azure/webapps-deploy@v3
      with:
        app-name: ${{ env.AZURE_WEBAPP_NAME }} # Replace with your app name
        package: '${{ env.AZURE_WEBAPP_PACKAGE_PATH }}/SampleWebApplication/'

    # Azure logout
    - name: logout
      run: |
        az logout
使用 Azure 服务主体生成 Java Spring 应用并将其部署到 Azure。 该示例将 GitHub 机密用于 client-id、tenant-id 和 subscription-id 值。 你还可以直接在登录操作中传递这些值。
name: Java CI with Maven

on: [push]

permissions:
      id-token: write
      contents: read

jobs:
  build:

    runs-on: ubuntu-latest

    steps:
    - uses: actions/checkout@v4
    - uses: azure/login@v1
      with:
        client-id: ${{ secrets.AZURE_CLIENT_ID }}
        tenant-id: ${{ secrets.AZURE_TENANT_ID }}
        subscription-id: ${{ secrets.AZURE_SUBSCRIPTION_ID }}
    - name: Set up JDK 1.8
      uses: actions/setup-java@v3
      with:
        java-version: 1.8
    - name: Build with Maven
      run: mvn -B package --file pom.xml
      working-directory: complete
    - name: Azure WebApp
      uses: Azure/webapps-deploy@v3
      with:
        app-name: my-app-name
        package: my/target/*.jar

    # Azure logout
    - name: logout
      run: |
        az logout
name: Build and deploy WAR app to Azure Web App using OpenID Connect

env:
  JAVA_VERSION: '11'                  # set this to the Java version to use
  DISTRIBUTION: microsoft             # set this to the Java distribution
  AZURE_WEBAPP_NAME: sampleapp        # set this to the name of your web app

on: [push]

permissions:
  id-token: write
  contents: read

jobs:
  build:
    runs-on: ubuntu-latest

    steps:
      - uses: actions/checkout@v4

      - name: Set up Java version
        uses: actions/setup-java@v3.0.0
        with:
          java-version: ${{ env.JAVA_VERSION }}
          distribution: ${{ env.DISTRIBUTION }}
          cache: 'maven'

      - name: Build with Maven
        run: mvn clean install

      - name: Login to Azure
        uses: azure/login@v2
        with:
          client-id: ${{ secrets.AZURE_CLIENT_ID }}
          tenant-id: ${{ secrets.AZURE_TENANT_ID }}
          subscription-id: ${{ secrets.AZURE_SUBSCRIPTION_ID }}

      - name: Deploy to Azure Web App
        id: deploy-to-webapp
        uses: azure/webapps-deploy@v3
        with:
          app-name: ${{ env.AZURE_WEBAPP_NAME }}
          package: '*.war'
还可以在此处找到使用多个作业进行生成和部署的完整示例。
name: JavaScript CI

on: [push]

permissions:
      id-token: write
      contents: read

name: Node.js

env:
  AZURE_WEBAPP_NAME: my-app   # set this to your application's name
  AZURE_WEBAPP_PACKAGE_PATH: 'my-app-path'      # set this to the path to your web app project, defaults to the repository root
  NODE_VERSION: '18.x'                # set this to the node version to use

jobs:
  build-and-deploy:
    runs-on: ubuntu-latest
    steps:
    # checkout the repo
    - name: 'Checkout GitHub Action'
      uses: actions/checkout@main

    - uses: azure/login@v1
      with:
        client-id: ${{ secrets.AZURE_CLIENT_ID }}
        tenant-id: ${{ secrets.AZURE_TENANT_ID }}
        subscription-id: ${{ secrets.AZURE_SUBSCRIPTION_ID }}

    - name: Setup Node ${{ env.NODE_VERSION }}
      uses: actions/setup-node@v4
      with:
        node-version: ${{ env.NODE_VERSION }}

    - name: 'npm install, build, and test'
      run: |
        npm install
        npm run build --if-present
        npm run test --if-present
      working-directory:  my-app-path

    # deploy web app using Azure credentials
    - uses: azure/webapps-deploy@v3
      with:
        app-name: ${{ env.AZURE_WEBAPP_NAME }}
        package: ${{ env.AZURE_WEBAPP_PACKAGE_PATH }}

    # Azure logout
    - name: logout
      run: |
        az logout
name: Python application

on:
  [push]

permissions:
      id-token: write
      contents: read

env:
  AZURE_WEBAPP_NAME: my-app # set this to your application's name
  AZURE_WEBAPP_PACKAGE_PATH: '.' # set this to the path to your web app project, defaults to the repository root

jobs:
  build:
    runs-on: ubuntu-latest
    steps:
    - uses: actions/checkout@v4

    - uses: azure/login@v1
      with:
        client-id: ${{ secrets.AZURE_CLIENT_ID }}
        tenant-id: ${{ secrets.AZURE_TENANT_ID }}
        subscription-id: ${{ secrets.AZURE_SUBSCRIPTION_ID }}

    - name: Set up Python 3.x
      uses: actions/setup-python@v4
      with:
        python-version: 3.x
    - name: Install dependencies
      run: |
        python -m pip install --upgrade pip
        pip install -r requirements.txt
    - name: Deploy web App using GH Action azure/webapps-deploy
      uses: azure/webapps-deploy@v3
      with:
        app-name: ${{ env.AZURE_WEBAPP_NAME }}
        package: ${{ env.AZURE_WEBAPP_PACKAGE_PATH }}
    - name: logout
      run: |
        az logout
publish-profile 输入应引用之前创建的 AZURE_WEBAPP_PUBLISH_PROFILE GitHub 机密。
name: .NET Core CI

on: [push]

env:
  AZURE_WEBAPP_NAME: my-app-name    # set this to your application's name
  AZURE_WEBAPP_PACKAGE_PATH: '.'      # set this to the path to your web app project, defaults to the repository root
  DOTNET_VERSION: '6.0.x'           # set this to the dot net version to use

jobs:
  build:
    runs-on: ubuntu-latest

    steps:
      # Checkout the repo
      - uses: actions/checkout@main

      # Setup .NET Core SDK
      - name: Setup .NET Core
        uses: actions/setup-dotnet@v3
        with:
          dotnet-version: ${{ env.DOTNET_VERSION }}

      # Run dotnet build and publish
      - name: dotnet build and publish
        run: |
          dotnet restore
          dotnet build --configuration Release
          dotnet publish -c Release --property:PublishDir='${{ env.AZURE_WEBAPP_PACKAGE_PATH }}/myapp'

      # Deploy to Azure Web apps
      - name: 'Run Azure webapp deploy action using publish profile credentials'
        uses: azure/webapps-deploy@v3
        with:
          app-name: ${{ env.AZURE_WEBAPP_NAME }} # Replace with your app name
          publish-profile: ${{ secrets.AZURE_WEBAPP_PUBLISH_PROFILE  }} # Define secret variable in repository settings as per action documentation
          package: '${{ env.AZURE_WEBAPP_PACKAGE_PATH }}/myapp'
生成并部署使用 NuGet 和 publish-profile 进行身份验证的 ASP.NET MVC 应用。
name: Deploy ASP.NET MVC App deploy to Azure Web App

on: [push]

env:
  AZURE_WEBAPP_NAME: my-app    # set this to your application's name
  AZURE_WEBAPP_PACKAGE_PATH: '.'      # set this to the path to your web app project, defaults to the repository root
  NUGET_VERSION: '5.3.x'           # set this to the dot net version to use

jobs:
  build-and-deploy:
    runs-on: windows-latest
    steps:

    - uses: actions/checkout@main

    - name: Install Nuget
      uses: nuget/setup-nuget@v1
      with:
        nuget-version: ${{ env.NUGET_VERSION}}
    - name: NuGet to restore dependencies as well as project-specific tools that are specified in the project file
      run: nuget restore

    - name: Add msbuild to PATH
      uses: microsoft/setup-msbuild@v1.0.2

    - name: Run MSBuild
      run: msbuild .\SampleWebApplication.sln

    - name: 'Run Azure webapp deploy action using publish profile credentials'
      uses: azure/webapps-deploy@v3
      with:
        app-name: ${{ env.AZURE_WEBAPP_NAME }} # Replace with your app name
        publish-profile: ${{ secrets.AZURE_WEBAPP_PUBLISH_PROFILE  }} # Define secret variable in repository settings as per action documentation
        package: '${{ env.AZURE_WEBAPP_PACKAGE_PATH }}/SampleWebApplication/'
使用 Azure 发布配置文件生成 Java Spring 应用并将其部署到 Azure。 publish-profile 输入引用之前创建的 AZURE_WEBAPP_PUBLISH_PROFILE 机密。
name: Java CI with Maven

on: [push]

jobs:
  build:

    runs-on: ubuntu-latest

    steps:
    - uses: actions/checkout@v4
    - name: Set up JDK 1.8
      uses: actions/setup-java@v3
      with:
        java-version: 1.8
    - name: Build with Maven
      run: mvn -B package --file pom.xml
      working-directory: my-app-path
    - name: Azure WebApp
      uses: Azure/webapps-deploy@v3
      with:
        app-name: my-app-name
        publish-profile: ${{ secrets.AZURE_WEBAPP_PUBLISH_PROFILE }}
        package: my/target/*.jar
若要部署 war 而不是 jar,请更改 package 值。
    - name: Azure WebApp
      uses: Azure/webapps-deploy@v3
      with:
        app-name: my-app-name
        publish-profile: ${{ secrets.AZURE_WEBAPP_PUBLISH_PROFILE }}
        package: my/target/*.war
使用 Azure 发布配置文件生成 Tomcat 应用并将其部署到 Azure。 publish-profile 输入引用之前创建的 AZURE_WEBAPP_PUBLISH_PROFILE 机密。
name: Build and deploy WAR app to Azure Web App using publish profile

env:
  JAVA_VERSION: '11'                  # set this to the Java version to use
  DISTRIBUTION: microsoft             # set this to the Java distribution
  AZURE_WEBAPP_NAME: sampleapp        # set this to the name of your web app

on: [push]

permissions:
  id-token: write
  contents: read

jobs:
  build:
    runs-on: ubuntu-latest

    steps:
      - uses: actions/checkout@v4

      - name: Set up Java version
        uses: actions/setup-java@v3.0.0
        with:
          java-version: ${{ env.JAVA_VERSION }}
          distribution: ${{ env.DISTRIBUTION }}
          cache: 'maven'

      - name: Build with Maven
        run: mvn clean install

      - name: Deploy to Azure Web App
        id: deploy-to-webapp
        uses: azure/webapps-deploy@v3
        with:
          app-name: ${{ env.AZURE_WEBAPP_NAME }}
          publish-profile: ${{ secrets.AZURE_WEBAPP_PUBLISH_PROFILE }}
          package: '*.war'
还可以在此处找到使用多个作业进行生成和部署的完整示例。
使用应用的发布配置文件生成 Node.js 应用并将其部署到 Azure。 publish-profile 输入引用之前创建的 AZURE_WEBAPP_PUBLISH_PROFILE 机密。
# File: .github/workflows/workflow.yml
name: JavaScript CI

on: [push]

env:
  AZURE_WEBAPP_NAME: my-app-name   # set this to your application's name
  AZURE_WEBAPP_PACKAGE_PATH: 'my-app-path'      # set this to the path to your web app project, defaults to the repository root
  NODE_VERSION: '18.x'                # set this to the node version to use

jobs:
  build-and-deploy:
    name: Build and Deploy
    runs-on: ubuntu-latest
    steps:
    - uses: actions/checkout@main
    - name: Use Node.js ${{ env.NODE_VERSION }}
      uses: actions/setup-node@v4
      with:
        node-version: ${{ env.NODE_VERSION }}
    - name: npm install, build, and test
      run: |
        # Build and test the project, then
        # deploy to Azure Web App.
        npm install
        npm run build --if-present
        npm run test --if-present
      working-directory: my-app-path
    - name: 'Deploy to Azure WebApp'
      uses: azure/webapps-deploy@v3
      with:
        app-name: ${{ env.AZURE_WEBAPP_NAME }}
        publish-profile: ${{ secrets.AZURE_WEBAPP_PUBLISH_PROFILE }}
        package: ${{ env.AZURE_WEBAPP_PACKAGE_PATH }}
使用应用的发布配置文件生成 Python 应用并将其部署到 Azure。 请注意 publish-profile 输入如何引用之前创建的 AZURE_WEBAPP_PUBLISH_PROFILE 机密。
name: Python CI

on:
  [push]

env:
  AZURE_WEBAPP_NAME: my-web-app # set this to your application's name
  AZURE_WEBAPP_PACKAGE_PATH: '.' # set this to the path to your web app project, defaults to the repository root

jobs:
  build:
    runs-on: ubuntu-latest
    steps:
    - uses: actions/checkout@v4
    - name: Set up Python 3.x
      uses: actions/setup-python@v4
      with:
        python-version: 3.x
    - name: Install dependencies
      run: |
        python -m pip install --upgrade pip
        pip install -r requirements.txt
    - name: Building web app
      uses: azure/appservice-build@v2
    - name: Deploy web App using GH Action azure/webapps-deploy
      uses: azure/webapps-deploy@v3
      with:
        app-name: ${{ env.AZURE_WEBAPP_NAME }}
        publish-profile: ${{ secrets.AZURE_WEBAPP_PUBLISH_PROFILE }}
        package: ${{ env.AZURE_WEBAPP_PACKAGE_PATH }}
若要使用配置的服务主体进行部署,请将 azure/login@v1 操作与 creds 密钥配合使用,并引用之前创建的 AZURE_CREDENTIALS 机密。
name: .NET Core

on: [push]

env:
  AZURE_WEBAPP_NAME: my-app    # set this to your application's name
  AZURE_WEBAPP_PACKAGE_PATH: '.'      # set this to the path to your web app project, defaults to the repository root
  DOTNET_VERSION: '6.0.x'           # set this to the dot net version to use

jobs:
  build:
    runs-on: ubuntu-latest

    steps:
      # Checkout the repo
      - uses: actions/checkout@main
      - uses: azure/login@v1
        with:
          creds: ${{ secrets.AZURE_CREDENTIALS }}


      # Setup .NET Core SDK
      - name: Setup .NET Core
        uses: actions/setup-dotnet@v3
        with:
          dotnet-version: ${{ env.DOTNET_VERSION }}

      # Run dotnet build and publish
      - name: dotnet build and publish
        run: |
          dotnet restore
          dotnet build --configuration Release
          dotnet publish -c Release --property:PublishDir='${{ env.AZURE_WEBAPP_PACKAGE_PATH }}/myapp'

      # Deploy to Azure Web apps
      - name: 'Run Azure webapp deploy action using Azure Credentials'
        uses: azure/webapps-deploy@v3
        with:
          app-name: ${{ env.AZURE_WEBAPP_NAME }} # Replace with your app name
          package: '${{ env.AZURE_WEBAPP_PACKAGE_PATH }}/myapp'

      - name: logout
        run: |
          az logout
使用 Azure 服务主体生成 ASP.NET MVC 应用并将其部署到 Azure。 请注意 creds 输入如何引用之前创建的 AZURE_CREDENTIALS 机密。
name: Deploy ASP.NET MVC App deploy to Azure Web App

on: [push]

env:
  AZURE_WEBAPP_NAME: my-app    # set this to your application's name
  AZURE_WEBAPP_PACKAGE_PATH: '.'      # set this to the path to your web app project, defaults to the repository root
  NUGET_VERSION: '5.3.x'           # set this to the dot net version to use

jobs:
  build-and-deploy:
    runs-on: windows-latest
    steps:

    # checkout the repo
    - uses: actions/checkout@main

    - uses: azure/login@v1
      with:
        creds: ${{ secrets.AZURE_CREDENTIALS }}

    - name: Install Nuget
      uses: nuget/setup-nuget@v1
      with:
        nuget-version: ${{ env.NUGET_VERSION}}
    - name: NuGet to restore dependencies as well as project-specific tools that are specified in the project file
      run: nuget restore

    - name: Add msbuild to PATH
      uses: microsoft/setup-msbuild@v1.0.2

    - name: Run MSBuild
      run: msbuild .\SampleWebApplication.sln

    - name: 'Run Azure webapp deploy action using Azure Credentials'
      uses: azure/webapps-deploy@v3
      with:
        app-name: ${{ env.AZURE_WEBAPP_NAME }} # Replace with your app name
        package: '${{ env.AZURE_WEBAPP_PACKAGE_PATH }}/SampleWebApplication/'

    # Azure logout
    - name: logout
      run: |
        az logout
使用 Azure 服务主体生成 Java Spring 应用并将其部署到 Azure。 请注意 creds 输入如何引用之前创建的 AZURE_CREDENTIALS 机密。
name: Java CI with Maven

on: [push]

jobs:
  build:

    runs-on: ubuntu-latest

    steps:
    - uses: actions/checkout@v4
    - uses: azure/login@v1
      with:
        creds: ${{ secrets.AZURE_CREDENTIALS }}
    - name: Set up JDK 1.8
      uses: actions/setup-java@v3
      with:
        java-version: 1.8
    - name: Build with Maven
      run: mvn -B package --file pom.xml
      working-directory: complete
    - name: Azure WebApp
      uses: Azure/webapps-deploy@v3
      with:
        app-name: my-app-name
        package: my/target/*.jar

    # Azure logout
    - name: logout
      run: |
        az logout
使用 Azure 服务主体生成 Tomcat 应用并将其部署到 Azure。 请注意 creds 输入如何引用之前创建的 AZURE_CREDENTIALS 机密。
name: Build and deploy WAR app to Azure Web App using Service Principal Connect

env:
  JAVA_VERSION: '11'                  # set this to the Java version to use
  DISTRIBUTION: microsoft             # set this to the Java distribution
  AZURE_WEBAPP_NAME: sampleapp        # set this to the name of your web app

on: [push]

permissions:
  contents: read

jobs:
  build:
    runs-on: ubuntu-latest

    steps:
      - uses: actions/checkout@v4

      - name: Set up Java version
        uses: actions/setup-java@v3.0.0
        with:
          java-version: ${{ env.JAVA_VERSION }}
          distribution: ${{ env.DISTRIBUTION }}
          cache: 'maven'

      - name: Build with Maven
        run: mvn clean install

      - name: Login to Azure
        uses: azure/login@v2
        with:
          creds: ${{ secrets.AZURE_CREDENTIALS }}

      - name: Deploy to Azure Web App
        id: deploy-to-webapp
        uses: azure/webapps-deploy@v3
        with:
          app-name: ${{ env.AZURE_WEBAPP_NAME }}
          package: '*.war'
还可以在此处找到使用多个作业进行生成和部署的完整示例。
使用 Azure 服务主体生成 Node.js 应用并将其部署到 Azure。 请注意 creds 输入如何引用之前创建的 AZURE_CREDENTIALS 机密。
name: JavaScript CI

on: [push]

name: Node.js

env:
  AZURE_WEBAPP_NAME: my-app   # set this to your application's name
  AZURE_WEBAPP_PACKAGE_PATH: 'my-app-path'      # set this to the path to your web app project, defaults to the repository root
  NODE_VERSION: '18.x'                # set this to the node version to use

jobs:
  build-and-deploy:
    runs-on: ubuntu-latest
    steps:
    # checkout the repo
    - name: 'Checkout GitHub Action'
      uses: actions/checkout@main

    - uses: azure/login@v1
      with:
        creds: ${{ secrets.AZURE_CREDENTIALS }}

    - name: Setup Node ${{ env.NODE_VERSION }}
      uses: actions/setup-node@v4
      with:
        node-version: ${{ env.NODE_VERSION }}

    - name: 'npm install, build, and test'
      run: |
        npm install
        npm run build --if-present
        npm run test --if-present
      working-directory:  my-app-path

    # deploy web app using Azure credentials
    - uses: azure/webapps-deploy@v3
      with:
        app-name: ${{ env.AZURE_WEBAPP_NAME }}
        package: ${{ env.AZURE_WEBAPP_PACKAGE_PATH }}

    # Azure logout
    - name: logout
      run: |
        az logout
使用 Azure 服务主体生成 Python 应用并将其部署到 Azure。 请注意 creds 输入如何引用之前创建的 AZURE_CREDENTIALS 机密。
name: Python application

on:
  [push]

env:
  AZURE_WEBAPP_NAME: my-app # set this to your application's name
  AZURE_WEBAPP_PACKAGE_PATH: '.' # set this to the path to your web app project, defaults to the repository root

jobs:
  build:
    runs-on: ubuntu-latest
    steps:
    - uses: actions/checkout@v4

    - uses: azure/login@v1
      with:
        creds: ${{ secrets.AZURE_CREDENTIALS }}

    - name: Set up Python 3.x
      uses: actions/setup-python@v4
      with:
        python-version: 3.x
    - name: Install dependencies
      run: |
        python -m pip install --upgrade pip
        pip install -r requirements.txt
    - name: Deploy web App using GH Action azure/webapps-deploy
      uses: azure/webapps-deploy@v3
      with:
        app-name: ${{ env.AZURE_WEBAPP_NAME }}
        package: ${{ env.AZURE_WEBAPP_PACKAGE_PATH }}
    - name: logout
      run: |
        az logout
常见问题
如何通过 Maven 插件部署 WAR 文件?
如果使用 Maven 插件配置 Java Tomcat 项目,还可以通过此插件部署到 Azure 应用服务。 如果使用 Azure CLI GitHub 操作,它将使用你的 Azure 登录凭据。
    - name: Azure CLI script file
      uses: azure/cli@v2
      with:
        inlineScript: |
          mvn package azure-webapp:deploy
有关 Maven 插件以及使用和配置方式的详细信息,请参阅 Azure 应用服务的 Maven 插件 wiki。
如何通过 Az CLI 部署 WAR 文件?
如果首选使用 Azure CLI 部署到应用服务,则可以使用适用于 Azure CLI 的 GitHub Actions。
- name: Azure CLI script
  uses: azure/cli@v2
  with:
    inlineScript: |
      az webapp deploy --src-path '${{ github.workspace }}/target/yourpackage.war' --name ${{ env.AZURE_WEBAPP_NAME }} --resource-group ${{ env.RESOURCE_GROUP }}  --async true --type war
有关适用于 CLI 的 GitHub 操作以及使用和配置方式的详细信息,请参阅 Azure CLI GitHub 操作。
有关 az webapp deploy 命令的详细信息、使用方式和参数详细信息,请参阅 az webapp deploy 文档。
如何部署启动文件?
使用适用于 CLI 的 GitHub Actions。 例如:
- name: Deploy startup script
  uses: azure/cli@v2
  with:
    inlineScript: |
      az webapp deploy --src-path ${{ github.workspace }}/src/main/azure/createPasswordlessDataSource.sh --name ${{ env.AZURE_WEBAPP_NAME }} --resource-group ${{ env.RESOURCE_GROUP }} --type startup --track-status false
如何部署到容器?
借助 Azure Web 部署操作,可以使用 GitHub Actions 自动执行工作流以将自定义容器部署到应用服务。 有关使用 GitHub Actions 部署的步骤的详细信息,请参阅部署到容器。
部署后如何更新 Tomcat 配置?
若要在部署后更新任何 Web 应用设置,可以使用应用服务设置操作。
    - uses: azure/appservice-settings@v1
      with:
        app-name: 'my-app'
        slot-name: 'staging'  # Optional and needed only if the settings have to be configured on the specific deployment slot
        app-settings-json: '[{ "name": "CATALINA_OPTS", "value": "-Dfoo=bar" }]'
        connection-strings-json: '${{ secrets.CONNECTION_STRINGS }}'
        general-settings-json: '{"alwaysOn": "false", "webSocketsEnabled": "true"}' #'General configuration settings as Key Value pairs'
      id: settings
有关此操作以及使用和配置方式的详细信息,请参阅应用服务设置存储库。
后续步骤
查看有关 Azure GitHub Actions 和工作流的参考: