Azure Premium SSD v2 is designed for IO-intense enterprise workloads that require sub-millisecond disk latencies and high IOPS and throughput at a low cost. Premium SSD v2 is suited for a broad range of workloads such as SQL server, Oracle, MariaDB, SAP, Cassandra, Mongo DB, big data/analytics, gaming, on virtual machines or stateful containers. For conceptual information on Premium SSD v2, see Premium SSD v2.
Premium SSD v2 support a 4k physical sector size by default, but can be configured to use a 512E sector size as well. While most applications are compatible with 4k sector sizes, some require 512 byte sector sizes. Oracle Database, for example, requires release 12.2 or later in order to support 4k native disks.
Limitations
- Premium SSD v2 disks can't be used as an OS disk.
- Premium SSD v2 disks can't be used with Azure Compute Gallery.
- Currently, Premium SSD v2 disks are only available in select regions.
- For regions that support availability zones, Premium SSD v2 disks can only be attached to zonal VMs. When creating a new VM or Virtual Machine Scale Set, specify the availability zone you want before adding Premium SSD v2 disks to your configuration.
- Encrypting Premium SSD v2 disks with customer-managed keys using Azure Key Vaults stored in a different Microsoft Entra ID tenant isn't currently supported.
- Azure Disk Encryption (guest VM encryption via BitLocker/DM-Crypt) isn't supported for VMs with Premium SSD v2 disks. We recommend you to use encryption at rest with platform-managed or customer-managed keys, which is supported for Premium SSD v2.
- Currently, Premium SSD v2 disks can't be attached to VMs in Availability Sets.
- Azure Site Recovery isn't supported for VMs with Premium SSD v2 disks.
- Premium SSDv2 doesn't support host caching.
Regional availability
Currently only available in the following regions:
- China North 3 (Three availability zones)
Prerequisites
Determine region availability programmatically
Since not every region and zone supports Premium SSD v2, you can use the Azure CLI or PowerShell to determine region and zone supportability.
To determine the regions and zones that support Premium SSD v2, replace yourSubscriptionId with your subscription, and then run the az vm list-skus command:
az cloud set -n AzureChinaCloud
az login

subscriptionId="<yourSubscriptionId>"

az account set --subscription $subscriptionId

az vm list-skus --resource-type disks --query "[?name=='PremiumV2_LRS'].{Region:locationInfo[0].location, Zones:locationInfo[0].zones}"
To determine the regions and zones that support Premium SSD v2, replace yourSubscriptionId with your subscription, and then run the Get-AzComputeResourceSku command:
Connect-AzAccount -Environment AzureChinaCloud

$subscriptionId="yourSubscriptionId"

Set-AzContext -Subscription $subscriptionId

Get-AzComputeResourceSku | where {$_.ResourceType -eq 'disks' -and $_.Name -eq 'Premiumv2_LRS'}
To programmatically determine the regions and zones you can deploy to, use either the Azure CLI, Azure PowerShell Module.
Now that you know the region and zone to deploy to, follow the deployment steps in this article to create a Premium SSD v2 disk and attach it to a VM.
Use Premium SSD v2 in Regions with Availability Zones
Create a Premium SSD v2 disk in an availability zone by using the az disk create command. Then create a VM in the same region and availability zone that supports Premium Storage and attach the disk to it by using the az vm create command.
The following script creates a Premium SSD v2 with a 4k sector size, to deploy one with a 512 sector size, update the $logicalSectorSize parameter. Replace the values of all the variables with your own, then run the following script:
## Initialize variables
diskName="yourDiskName"
resourceGroupName="yourResourceGroupName"
region="yourRegionName"
zone="yourZoneNumber"
##Replace 4096 with 512 to deploy a disk with 512 sector size
logicalSectorSize=4096
vmName="yourVMName"
vmImage="Win2016Datacenter"
adminPassword="yourAdminPassword"
adminUserName="yourAdminUserName"
vmSize="Standard_D4s_v3"

## Create a Premium SSD v2 disk
az disk create -n $diskName -g $resourceGroupName \
--size-gb 100 \
--disk-iops-read-write 5000 \
--disk-mbps-read-write 150 \
--location $region \
--zone $zone \
--sku PremiumV2_LRS \
--logical-sector-size $logicalSectorSize

## Create the VM
az vm create -n $vmName -g $resourceGroupName \
--image $vmImage \
--zone $zone \
--authentication-type password --admin-password $adminPassword --admin-username $adminUserName \
--size $vmSize \
--location $region \
--attach-data-disks $diskName
Create a Premium SSD v2 disk in an availability zone by using the New-AzDiskConfig to define the configuration of your disk and the New-AzDisk command to create your disk. Next, create a VM in the same region and availability zone that supports Premium Storage by using the az vm create. Finally, attach the disk to it by using the Get-AzVM command to identify variables for the virtual machine, the Get-AzDisk command to identify variables for the disk, the Add-AzVMDataDisk command to add the disk, and the Update-AzVM command to attach the new disk to the virtual machine.
The following script creates a Premium SSD v2 with a 4k sector size, to deploy one with a 512 sector size, update the $logicalSectorSize parameter. Replace the values of all the variables with your own, then run the following script:
# Initialize variables
$resourceGroupName = "yourResourceGroupName"
$region = "useast"
$zone = "yourZoneNumber"
$diskName = "yourDiskName"
$diskSizeInGiB = 100
$diskIOPS = 5000
$diskThroughputInMBPS = 150
#To use a 512 sector size, replace 4096 with 512
$logicalSectorSize=4096
$lun = 1
$vmName = "yourVMName"
$vmImage = "Win2016Datacenter"
$vmSize = "Standard_D4s_v3"
$vmAdminUser = "yourAdminUserName"
$vmAdminPassword = ConvertTo-SecureString "yourAdminUserPassword" -AsPlainText -Force
$credential = New-Object System.Management.Automation.PSCredential ($vmAdminUser, $vmAdminPassword);

# Create a Premium SSD v2
$diskconfig = New-AzDiskConfig `
-Location $region `
-Zone $zone `
-DiskSizeGB $diskSizeInGiB `
-DiskIOPSReadWrite $diskIOPS `
-DiskMBpsReadWrite $diskThroughputInMBPS `
-AccountType PremiumV2_LRS `
-LogicalSectorSize $logicalSectorSize `
-CreateOption Empty

New-AzDisk `
-ResourceGroupName $resourceGroupName `
-DiskName $diskName `
-Disk $diskconfig

# Create the VM
New-AzVm `
    -ResourceGroupName $resourceGroupName `
    -Name $vmName `
    -Location $region `
    -Zone $zone `
    -Image $vmImage `
    -Size $vmSize `
    -Credential $credential

# Attach the disk to the VM
$vm = Get-AzVM -ResourceGroupName $resourceGroupName -Name $vmName
$disk = Get-AzDisk -ResourceGroupName $resourceGroupName -Name $diskName
$vm = Add-AzVMDataDisk -VM $vm -Name $diskName -CreateOption Attach -ManagedDiskId $disk.Id -Lun $lun
Update-AzVM -VM $vm -ResourceGroupName $resourceGroupName
Sign in to the Azure portal.
Navigate to Virtual machines and follow the normal VM creation process.
On the Basics page, select a supported region and set Availability options to Availability zone.
Select one of the zones.
Fill in the rest of the values on the page as you like.
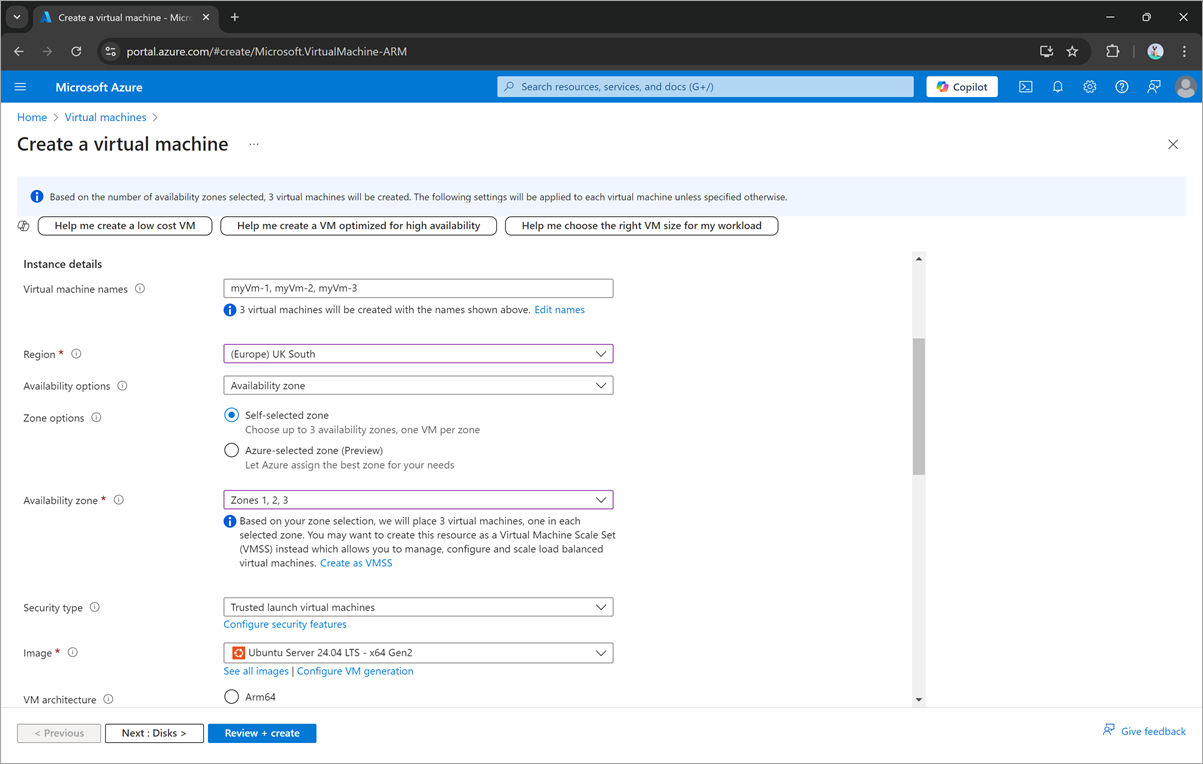
Proceed to the Disks page.
Under Data disks select Create and attach a new disk.

Select the Disk SKU and select Premium SSD v2.
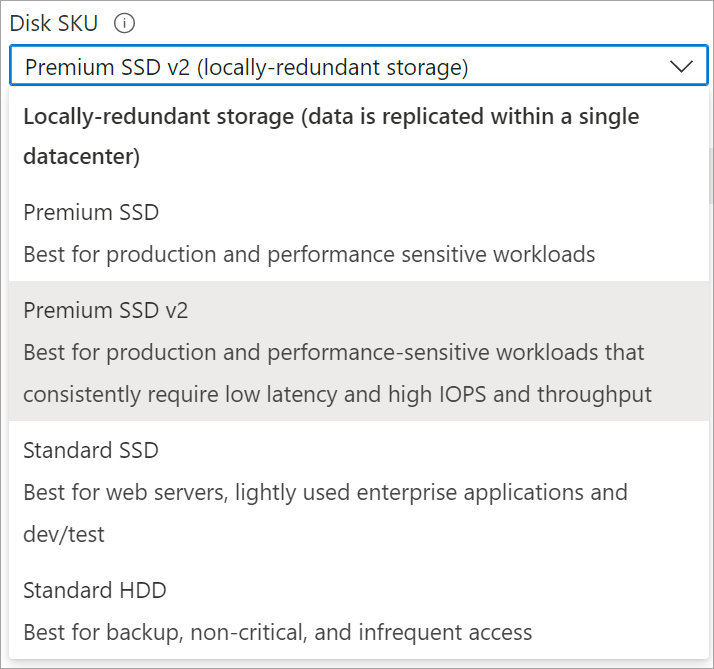
Select whether you'd like to deploy a 4k or 512 logical sector size.
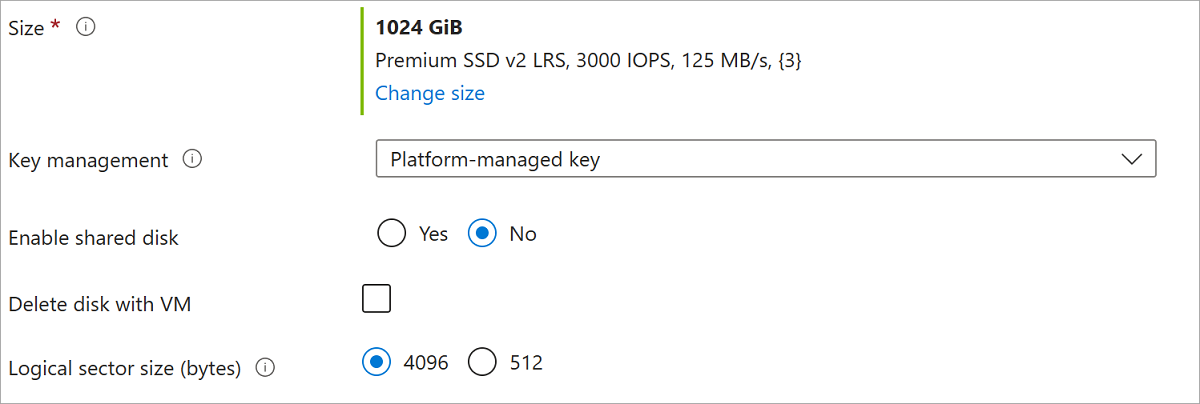
Proceed through the rest of the VM deployment, making any choices that you desire.
You've now deployed a VM with a premium SSD v2.
Use a Premium SSD v2 in non-AZ Regions
Create a Premium SSD v2 disk in a region without availability zone support by using the az disk create command. Then create a VM in the same region that supports Premium Storage and attach the disk to it by using the az vm create command.
The following script creates a Premium SSD v2 disk with a 4k sector size. To create a disk with a 512 sector size, update the $logicalSectorSize parameter. Replace the values of all the variables with your own, then run the following script:
## Initialize variables
diskName="yourDiskName"
resourceGroupName="yourResourceGroupName"
region="yourRegionName"
##Replace 4096 with 512 to deploy a disk with 512 sector size
logicalSectorSize=4096
vmName="yourVMName"
vmImage="Win2016Datacenter"
adminPassword="yourAdminPassword"
adminUserName="yourAdminUserName"
vmSize="Standard_D4s_v3"

## Create a Premium SSD v2 disk
az disk create -n $diskName -g $resourceGroupName \
--size-gb 100 \
--disk-iops-read-write 5000 \
--disk-mbps-read-write 150 \
--location $region \
--sku PremiumV2_LRS \
--logical-sector-size $logicalSectorSize

## Create the VM
az vm create -n $vmName -g $resourceGroupName \
--image $vmImage \
--zone $zone \
--authentication-type password --admin-password $adminPassword --admin-username $adminUserName \
--size $vmSize \
--location $region \
--attach-data-disks $diskName
Create a Premium SSD v2 disk in a region without availability zone support by using the New-AzDiskConfig to define the configuration of your disk and the New-AzDisk command to create your disk. Next, create a VM in the same region and availability zone that supports Premium Storage by using the az vm create. Finally, attach the disk to it by using the Get-AzVM command to identify variables for the virtual machine, the Get-AzDisk command to identify variables for the disk, the Add-AzVMDataDisk command to add the disk, and the Update-AzVM command to attach the new disk to the virtual machine.
The following script creates a Premium SSD v2 disk with a 4k sector size. To create a disk with a 512 sector size, update the $logicalSectorSize parameter. Replace the values of all the variables with your own, then run the following script:
# Initialize variables
$resourceGroupName = "yourResourceGroupName"
$region = "useast"
$diskName = "yourDiskName"
$diskSizeInGiB = 100
$diskIOPS = 5000
$diskThroughputInMBPS = 150
#To use a 512 sector size, replace 4096 with 512
$logicalSectorSize=4096
$lun = 1
$vmName = "yourVMName"
$vmImage = "Win2016Datacenter"
$vmSize = "Standard_D4s_v3"
$vmAdminUser = "yourAdminUserName"
$vmAdminPassword = ConvertTo-SecureString "yourAdminUserPassword" -AsPlainText -Force
$credential = New-Object System.Management.Automation.PSCredential ($vmAdminUser, $vmAdminPassword);

# Create a Premium SSD v2 disk
$diskconfig = New-AzDiskConfig `
-Location $region `
-DiskSizeGB $diskSizeInGiB `
-DiskIOPSReadWrite $diskIOPS `
-DiskMBpsReadWrite $diskThroughputInMBPS `
-AccountType PremiumV2_LRS `
-LogicalSectorSize $logicalSectorSize `
-CreateOption Empty

New-AzDisk `
-ResourceGroupName $resourceGroupName `
-DiskName $diskName `
-Disk $diskconfig

# Create the VM
New-AzVm `
    -ResourceGroupName $resourceGroupName `
    -Name $vmName `
    -Location $region `
    -Image $vmImage `
    -Size $vmSize `
    -Credential $credential

# Attach the disk to the VM
$vm = Get-AzVM -ResourceGroupName $resourceGroupName -Name $vmName
$disk = Get-AzDisk -ResourceGroupName $resourceGroupName -Name $diskName
$vm = Add-AzVMDataDisk -VM $vm -Name $diskName -CreateOption Attach -ManagedDiskId $disk.Id -Lun $lun
Update-AzVM -VM $vm -ResourceGroupName $resourceGroupName
- Sign in to the Azure portal.
- Navigate to Disks and create a new disk.
- Select a supported region.
- Select Change size and change the disk type to Premium SSD v2.
- If you like, change the size of the disk, as well as the performance, then select OK.
- Set Availability zone to No infrastructure redundancy required.
- Proceed through the rest of the deployment, making any choices that you desire.
- On the Advanced tab, select whether you'd like to deploy a 4k or 512 logical sector size, then deploy the disk.
Once the disk is successfully deployed, attach it to a new or existing VM.
You can adjust the performance of a Premium SSD v2 disk four times within a 24 hour period. Creating a disk counts as one of these times, so for the first 24 hours after creating a premium SSD v2 disk you can only adjust its performance up to three times.
For conceptual information on adjusting disk performance, see Premium SSD v2 performance.
Use the az disk update command to change the performance configuration of your Premium SSD v2 disk. For example, you can use the disk-iops-read-write parameter to adjust the max IOPS limit, and the disk-mbps-read-write parameter to adjust the max throughput limit of your Premium SSD v2 disk.
The following command adjusts the performance of your disk. Update the values in the command, and then run it:
az disk update --subscription $subscription --resource-group $rgname --name $diskName --disk-iops-read-write=5000 --disk-mbps-read-write=200
Use the New-AzDiskUpdateConfig command to define your new performance configuration values for your Premium SSD v2 disks, and then use the Update-AzDisk command to apply your configuration changes to your disk. For example, you can use the DiskIOPSReadWrite parameter to adjust the max IOPS limit, and the DiskMBpsReadWrite parameter to adjust the max throughput limit of your Premium SSD v2 disk.
The following command adjusts the performance of your disk. Update the values in the command, and then run it:
$diskupdateconfig = New-AzDiskUpdateConfig -DiskIOPSReadWrite 5000 -DiskMBpsReadWrite 200
Update-AzDisk -ResourceGroupName $resourceGroup -DiskName $diskName -DiskUpdate $diskupdateconfig
- Navigate to the disk you'd like to modify in the Azure portal.
- Select Size + Performance
- Set the values for Disk IOPS or Disk throughput (MB/s) or both, to meet your needs, then select Save.
Next steps
Add a data disk by using either the Azure portal, Azure CLI, or PowerShell.
Provide feedback on Premium SSD v2.


