Note
Access to this page requires authorization. You can try signing in or changing directories.
Access to this page requires authorization. You can try changing directories.
This article shows how to run your Jupyter notebooks inside your workspace of Azure Machine Learning studio. There are other ways to run the notebook as well: Jupyter, JupyterLab, and Visual Studio Code. VS Code Desktop can be configured to access your compute instance. Or use VS Code for the Web, directly from the browser, and without any required installations or dependencies.
Tip
We recommend you try VS Code for the Web to take advantage of the easy integration and rich development environment it provides. VS Code for the Web gives you many of the features of VS Code Desktop that you love, including search and syntax highlighting while browsing and editing. For more information about using VS Code Desktop and VS Code for the Web, see Launch Visual Studio Code integrated with Azure Machine Learning and Work in VS Code remotely connected to a compute instance.
No matter which solution you use to run the notebook, you have access to all the files from your workspace. For information on how to create and manage files, including notebooks, see Create and manage files in your workspace.
This article shows the experience for running the notebook directly in studio.
Important
Features marked as (preview) are provided without a service level agreement, and it's not recommended for production workloads. Certain features might not be supported or might have constrained capabilities.
Prerequisites
- An Azure subscription. If you don't have an Azure subscription, create a trial subscription before you begin.
- A Machine Learning workspace. See Create workspace resources.
- Your user identity must have access to your workspace's default storage account. Whether you can read, edit, or create notebooks depends on your access level to your workspace. For example, a Contributor can edit the notebook, while a Reader could only view it.
Access notebooks from your workspace
Use the Notebooks section of your workspace to edit and run Jupyter notebooks.
- Sign into Azure Machine Learning studio
- Select your workspace, if it isn't already open
- On the left, select Notebooks
Edit a notebook
To edit a notebook, open any notebook located in the User files section of your workspace. Select the cell you wish to edit. If you don't have any notebooks in this section, see Create and manage files in your workspace.
You can edit the notebook without connecting to a compute instance. When you want to run the cells in the notebook, select or create a compute instance. If you select a stopped compute instance, it will automatically start when you run the first cell.
When a compute instance is running, you can also use code completion, powered by Intellisense, in any Python notebook.
When a compute instance is running, you can launch Jupyter or JupyterLab from the notebook toolbar. Azure Machine Learning doesn't provide updates and fix bugs from Jupyter or JupyterLab as they're Open Source products outside of the boundary of Azure Support.
Focus mode
Use focus mode to expand your current view so you can focus on your active tabs. Focus mode hides the Notebooks file explorer.
In the terminal window toolbar, select Focus mode to turn on focus mode. Depending on your window width, the tool may be located under the ... menu item in your toolbar.
While in focus mode, return to the standard view by selecting Standard view.
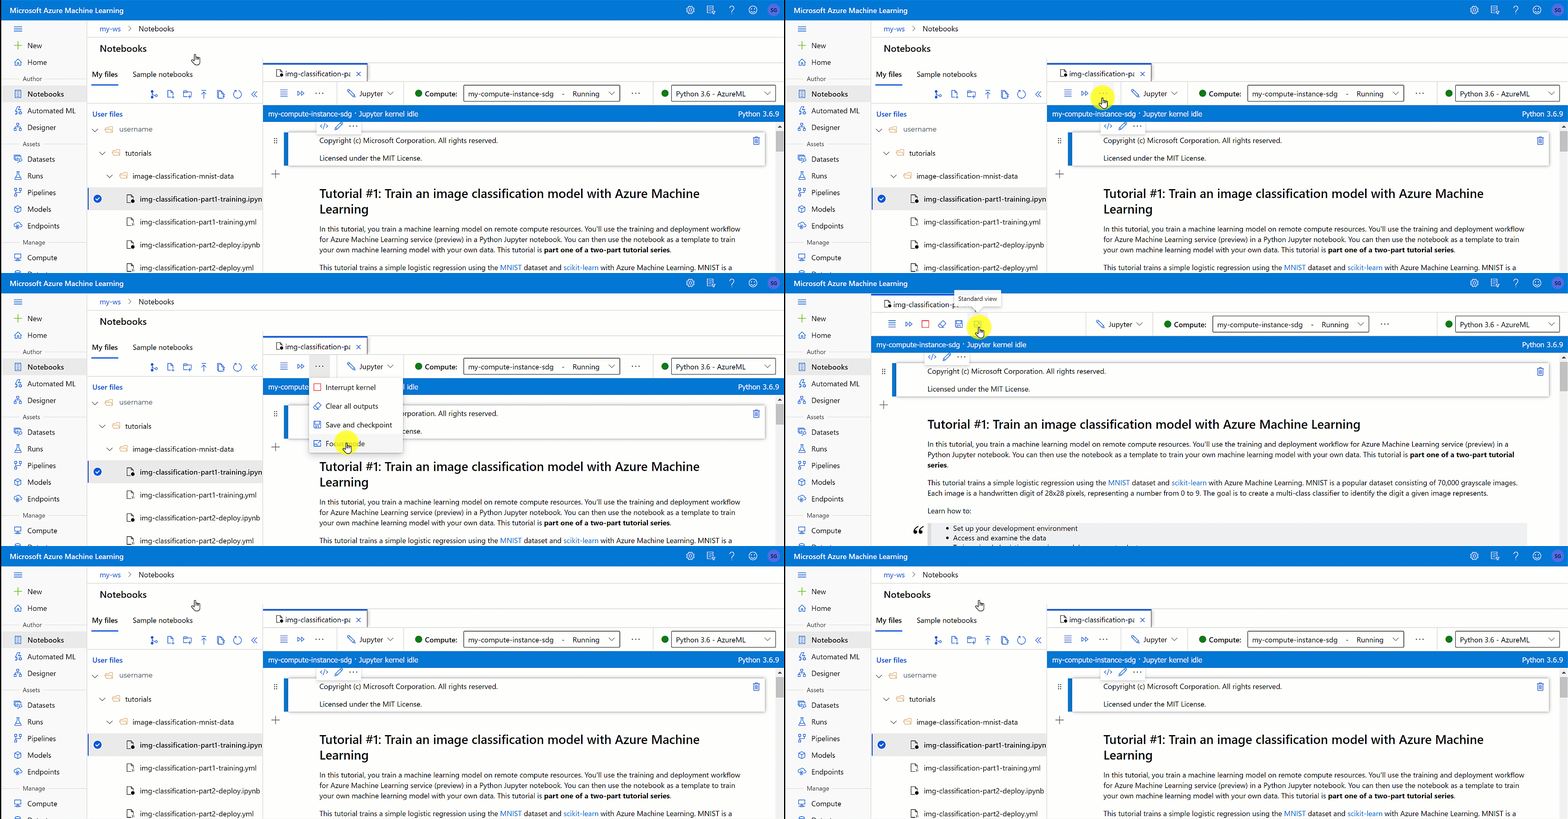
Code completion (IntelliSense)
IntelliSense is a code-completion aid that includes many features: List Members, Parameter Info, Quick Info, and Complete Word. With only a few keystrokes, you can:
- Learn more about the code you're using
- Keep track of the parameters you're typing
- Add calls to properties and methods
Share a notebook
Your notebooks are stored in your workspace's storage account, and can be shared with others, depending on their access level to your workspace. They can open and edit the notebook as long as they have the appropriate access. For example, a Contributor can edit the notebook, while a Reader could only view it.
Other users of your workspace can find your notebook in the Notebooks, User files section of Azure Machine Learning studio. By default, your notebooks are in a folder with your username, and others can access them there.
You can also copy the URL from your browser when you open a notebook, then send to others. As long as they have appropriate access to your workspace, they can open the notebook.
Since you don't share compute instances, other users who run your notebook will use their own compute instance.
Collaborate with notebook comments
Use a notebook comment to collaborate with others who have access to your notebook.
Toggle the comments pane on and off with the Notebook comments tool at the top of the notebook. If your screen isn't wide enough, find this tool by first selecting the ... at the end of the set of tools.

Whether the comments pane is visible or not, you can add a comment into any code cell:
- Select some text in the code cell. You can only comment on text in a code cell.
- Use the New comment thread tool to create your comment.

- If the comments pane was previously hidden, it opens now.
- Type your comment and post it with the tool or use Ctrl+Enter.
- Once a comment is posted, select ... in the top right to:
- Edit the comment
- Resolve the thread
- Delete the thread
Commented text appears with a purple highlight in the code. When you select a comment in the comments pane, your notebook scrolls to the cell that contains the highlighted text.
Note
Comments are saved into the code cell's metadata.
Clean your notebook (preview)
Over the course of creating a notebook, you typically end up with cells you used for data exploration or debugging. The gather feature helps you produce a clean notebook without these extraneous cells.
- Run all of your notebook cells.
- Select the cell containing the code you wish the new notebook to run. For example, the code that submits an experiment, or perhaps the code that registers a model.
- Select the Gather icon that appears on the cell toolbar.
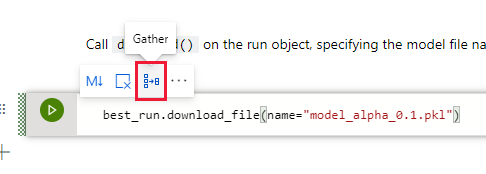
- Enter the name for your new "gathered" notebook.
The new notebook contains only code cells, with all cells required to produce the same results as the cell you selected for gathering.
Save and checkpoint a notebook
Azure Machine Learning creates a checkpoint file when you create an ipynb file.
In the notebook toolbar, select the menu and then File>Save and checkpoint to manually save the notebook and it adds a checkpoint file associated with the notebook.
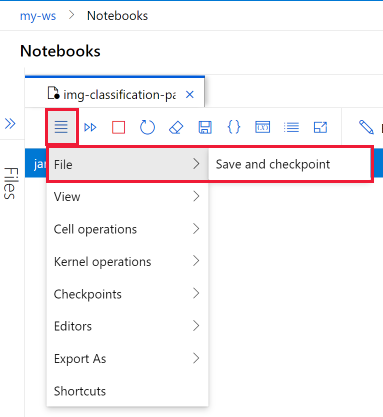
Every notebook is autosaved every 30 seconds. AutoSave updates only the initial ipynb file, not the checkpoint file.
Select Checkpoints in the notebook menu to create a named checkpoint and to revert the notebook to a saved checkpoint.
Export a notebook
In the notebook toolbar, select the menu and then Export As to export the notebook as any of the supported types:
- Python
- HTML
- LaTeX
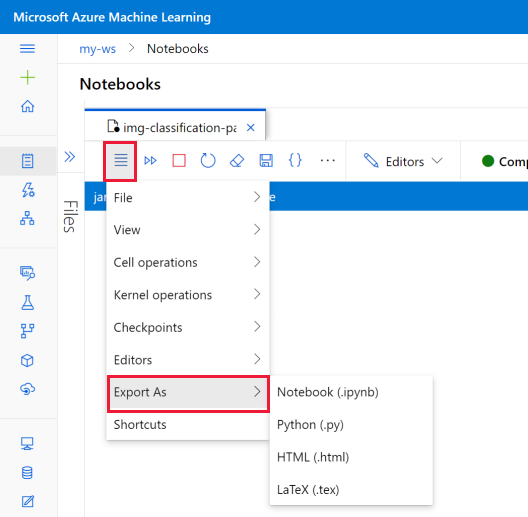
The exported file is saved on your computer.
Run a notebook or Python script
To run a notebook or a Python script, you first connect to a running compute instance.
If you don't have a compute instance, use these steps to create one:
- In the notebook or script toolbar, to the right of the Compute dropdown, select + New Compute. Depending on your screen size, the control might be located under a ... menu.

- Name the Compute and choose a Virtual Machine Size.
- Select Create.
- The compute instance is connected to the file automatically. You can now run the notebook cells or the Python script using the tool to the left of the compute instance.
- In the notebook or script toolbar, to the right of the Compute dropdown, select + New Compute. Depending on your screen size, the control might be located under a ... menu.
If you have a stopped compute instance, select Start compute to the right of the Compute dropdown. Depending on your screen size, the control might be located under a ... menu.

Once you're connected to a compute instance, use the toolbar to run all cells in the notebook, or Control + Enter to run a single selected cell.
Only you can see and use the compute instances you create. Your User files are stored separately from the machine and are shared among all compute instances in the workspace.
Explore variables in the notebook
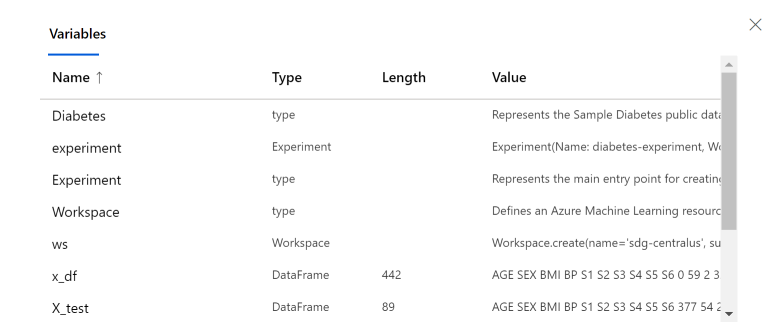
On the notebook toolbar, use the Variable explorer tool to show the name, type, length, and sample values for all variables that have been created in your notebook.
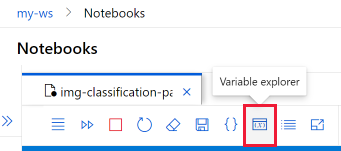
Select the tool to show the variable explorer window.
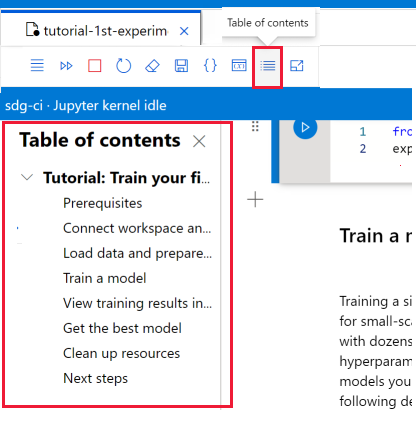
Navigate with a TOC
On the notebook toolbar, use the Table of contents tool to display or hide the table of contents. When you start a markdown cell with a heading, it is added to the table of contents. Select an entry in the table to scroll to that cell in the notebook.
Change the notebook environment
The notebook toolbar allows you to change the environment on which your notebook runs.
These actions don't change the notebook state or the values of any variables in the notebook:
| Action | Result |
|---|---|
| Stop the kernel | Stops any running cell. Running a cell automatically restarts the kernel. |
| Navigate to another workspace section | Running cells are stopped. |
These actions reset the notebook state and resets all variables in the notebook.
| Action | Result |
|---|---|
| Change the kernel | Notebook uses new kernel |
| Switch compute | Notebook automatically uses the new compute. |
| Reset compute | Starts again when you try to run a cell |
| Stop compute | No cells will run |
| Open notebook in Jupyter or JupyterLab | Notebook opened in a new tab. |
Add new kernels
Use the terminal to create and add new kernels to your compute instance. The notebook will automatically find all Jupyter kernels installed on the connected compute instance.
Change to any of the installed kernels using the kernel dropdown on the right.
Manage packages
Since your compute instance has multiple kernels, make sure use %pip or %conda magic functions, which install packages into the currently running kernel. Don't use !pip or !conda, which refers to all packages (including packages outside the currently running kernel).
Status indicators
An indicator next to the Compute dropdown shows its status. The status is also shown in the dropdown itself.
| Color | Compute status |
|---|---|
| Green | Compute running |
| Red | Compute failed |
| Black | Compute stopped |
| Light Blue | Compute creating, starting, restarting, setting Up |
| Gray | Compute deleting, stopping |
An indicator next to the Kernel dropdown shows its status.
| Color | Kernel status |
|---|---|
| Green | Kernel connected, idle, busy |
| Gray | Kernel not connected |
Find compute details
Find details about your compute instances on the Compute page in studio.
Useful keyboard shortcuts
Similar to Jupyter Notebooks, Azure Machine Learning studio notebooks have a modal user interface. The keyboard does different things depending on which mode the notebook cell is in. Azure Machine Learning studio notebooks support the following two modes for a given code cell: command mode and edit mode.
Command mode shortcuts
A cell is in command mode when there's no text cursor prompting you to type. When a cell is in Command mode, you can edit the notebook as a whole but not type into individual cells. Enter command mode by pressing ESC or using the mouse to select outside of a cell's editor area.
| Shortcut | Description |
|---|---|
| Enter | Enter edit mode |
| Shift + Enter | Run cell, select below |
| Control/Command + Enter | Run cell |
| Alt + Enter | Run cell, insert code cell below |
| Control/Command + Alt + Enter | Run cell, insert markdown cell below |
| Alt + R | Run all |
| Y | Convert cell to code |
| M | Convert cell to markdown |
| Up/K | Select cell above |
| Down/J | Select cell below |
| A | Insert code cell above |
| B | Insert code cell below |
| Control/Command + Shift + A | Insert markdown cell above |
| Control/Command + Shift + B | Insert markdown cell below |
| X | Cut selected cell |
| C | Copy selected cell |
| Shift + V | Paste selected cell above |
| V | Paste selected cell below |
| D D | Delete selected cell |
| O | Toggle output |
| Shift + O | Toggle output scrolling |
| I I | Interrupt kernel |
| 0 0 | Restart kernel |
| Shift + Space | Scroll up |
| Space | Scroll down |
| Tab | Change focus to next focusable item (when tab trap disabled) |
| Control/Command + S | Save notebook |
| 1 | Change to h1 |
| 2 | Change to h2 |
| 3 | Change to h3 |
| 4 | Change to h4 |
| 5 | Change to h5 |
| 6 | Change to h6 |
Edit mode shortcuts
Edit mode is indicated by a text cursor prompting you to type in the editor area. When a cell is in edit mode, you can type into the cell. Enter edit mode by pressing Enter or select a cell's editor area. You see the cursor prompt in the cell in Edit mode.
Using the following keystroke shortcuts, you can more easily navigate and run code in Azure Machine Learning notebooks when in Edit mode.
| Shortcut | Description |
|---|---|
| Escape | Enter command mode |
| Control/Command + Space | Activate IntelliSense |
| Shift + Enter | Run cell, select below |
| Control/Command + Enter | Run cell |
| Alt + Enter | Run cell, insert code cell below |
| Control/Command + Alt + Enter | Run cell, insert markdown cell below |
| Alt + R | Run all cells |
| Up | Move cursor up or previous cell |
| Down | Move cursor down or next cell |
| Control/Command + S | Save notebook |
| Control/Command + Up | Go to cell start |
| Control/Command + Down | Go to cell end |
| Tab | Code completion or indent (if tab trap enabled) |
| Control/Command + M | Enable/disable tab trap |
| Control/Command + ] | Indent |
| Control/Command + [ | Dedent |
| Control/Command + A | Select all |
| Control/Command + Z | Undo |
| Control/Command + Shift + Z | Redo |
| Control/Command + Y | Redo |
| Control/Command + Home | Go to cell start |
| Control/Command + End | Go to cell end |
| Control/Command + Left | Go one word left |
| Control/Command + Right | Go one word right |
| Control/Command + Backspace | Delete word before |
| Control/Command + Delete | Delete word after |
| Control/Command + / | Toggle comment on cell |
Troubleshooting
Connecting to a notebook: If you can't connect to a notebook, ensure that web socket communication is not disabled. For compute instance Jupyter functionality to work, web socket communication must be enabled. Ensure your network allows websocket connections to *.instances.ml.azure.cn and *.instances.ml.azure.cn.
Private endpoint: When a compute instance is deployed in a workspace with a private endpoint, it can only be accessed from within virtual network. If you're using custom DNS or hosts file, add an entry for < instance-name >.< region >.instances.ml.azure.cn with the private IP address of your workspace private endpoint. For more information, see the custom DNS article.
Kernel crash: If your kernel crashed and was restarted, you can run the following command to look at Jupyter log and find out more details:
sudo journalctl -u jupyter. If kernel issues persist, consider using a compute instance with more memory.Expired token: If you run into an expired token issue, sign out of your Azure Machine Learning studio, sign back in, and then restart the notebook kernel.
File upload limit: When uploading a file through the notebook's file explorer, you're limited files that are smaller than 5 TB. If you need to upload a file larger than this, we recommend that you use the SDK to upload the data to a datastore. For more information, see Create data assets.