Note
Access to this page requires authorization. You can try signing in or changing directories.
Access to this page requires authorization. You can try changing directories.
APPLIES TO:  Azure Data Factory
  Azure Synapse Analytics
You can customize your Azure-SQL Server Integration Services (SSIS) Integration Runtime (IR) in Azure Data Factory (ADF) or Synapse Pipelines via custom setups. They allow you to add your own steps during the provisioning or reconfiguration of your Azure-SSIS IR.
By using custom setups, you can alter the default operating configuration or environment of your Azure-SSIS IR. For example, to start additional Windows services, persist access credentials for file shares, or use only strong cryptography/more secure network protocol (TLS 1.2). Or you can install additional components, such as assemblies, drivers, or extensions, on each node of your Azure-SSIS IR. They can be custom-made, Open Source, or 3rd party components. For more information about built-in/preinstalled components, see Built-in/preinstalled components on Azure-SSIS IR.
You can do custom setups on your Azure-SSIS IR in either of two ways:
- Standard custom setup with a script: Prepare a script and its associated files, and upload them all together to a blob container in your Azure Storage account. You then provide a Shared Access Signature (SAS) Uniform Resource Identifier (URI) for your blob container when you set up or reconfigure your Azure-SSIS IR. Each node of your Azure-SSIS IR then downloads the script and its associated files from your blob container and runs your custom setup with elevated permissions. When your custom setup is finished, each node uploads the standard output of execution and other logs to your blob container.
- Express custom setup without a script: Run some common system configurations and Windows commands or install some popular or recommended additional components without using any scripts.
You can install both free (unlicensed) and paid (licensed) components with standard and express custom setups. If you're an independent software vendor (ISV), see Develop paid or licensed components for Azure-SSIS IR.
Important
To benefit from future enhancements, we recommend using v3 or later series of nodes for your Azure-SSIS IR with custom setup.
Current limitations
The following limitations apply only to standard custom setups:
If you want to use gacutil.exe in your script to install assemblies in the global assembly cache (GAC), you need to provide gacutil.exe as part of your custom setup. Or you can use the copy that's provided in the Sample folder of our Public Preview blob container, see the Standard custom setup samples section below.
If you want to reference a subfolder in your script, msiexec.exe doesn't support the
.\notation to reference the root folder. Use a command such asmsiexec /i "MySubfolder\MyInstallerx64.msi" ...instead ofmsiexec /i ".\MySubfolder\MyInstallerx64.msi" ....Administrative shares, or hidden network shares that are automatically created by Windows, are currently not supported on the Azure-SSIS IR.
The IBM iSeries Access ODBC driver is not supported on the Azure-SSIS IR. You might see installation errors during your custom setup. If you do, contact IBM support for assistance.
Prerequisites
Note
We recommend that you use the Azure Az PowerShell module to interact with Azure. See Install Azure PowerShell to get started. To learn how to migrate to the Az PowerShell module, see Migrate Azure PowerShell from AzureRM to Az.
To customize your Azure-SSIS IR, you need the following items:
An Azure Storage account. Not required for express custom setups. For standard custom setups, you upload and store your custom setup script and its associated files in a blob container. The custom setup process also uploads its execution logs to the same blob container.
Instructions
You can provision or reconfigure your Azure-SSIS IR with custom setups on ADF UI. If you want to do the same using PowerShell, download and install Azure PowerShell.
Standard custom setup
To provision or reconfigure your Azure-SSIS IR with standard custom setups on ADF UI, complete the following steps.
Prepare your custom setup script and its associated files (for example, .bat, .cmd, .exe, .dll, .msi, or .ps1 files).
- You must have a script file named main.cmd, which is the entry point of your custom setup.
- To ensure that the script can be silently executed, you should test it on your local machine first.
- If you want additional logs generated by other tools (for example, msiexec.exe) to be uploaded to your blob container, specify the predefined environment variable,
CUSTOM_SETUP_SCRIPT_LOG_DIR, as the log folder in your scripts (for example, msiexec /i xxx.msi /quiet /lv %CUSTOM_SETUP_SCRIPT_LOG_DIR%\install.log).
Download, install, and open Azure Storage Explorer.
a. Under Local and Attached, right-click Storage Accounts, and then select Connect to Azure Storage.
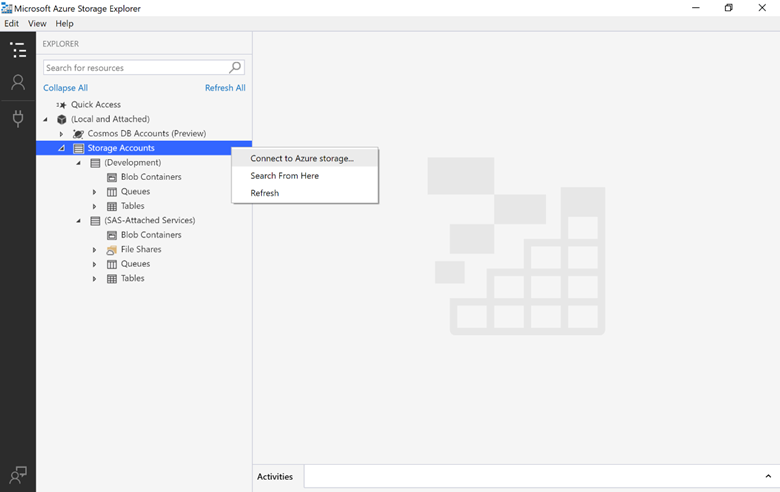
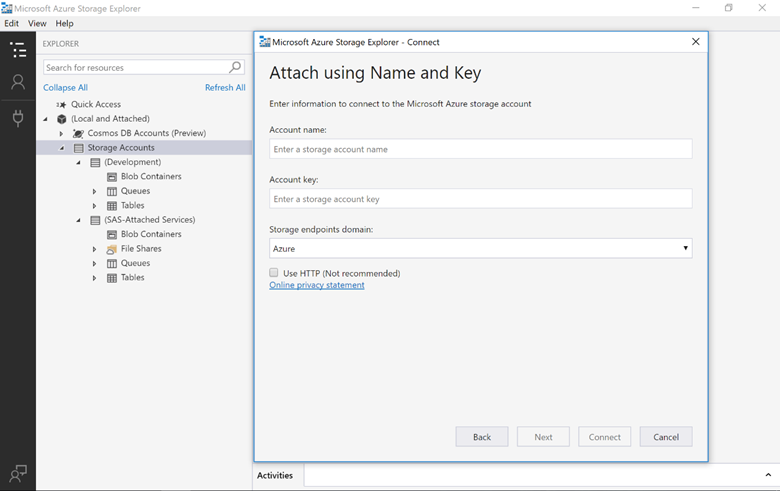
b. Select Storage account or service, select Account name and key, and then select Next.
c. Enter your Azure Storage account name and key, select Next, and then select Connect.
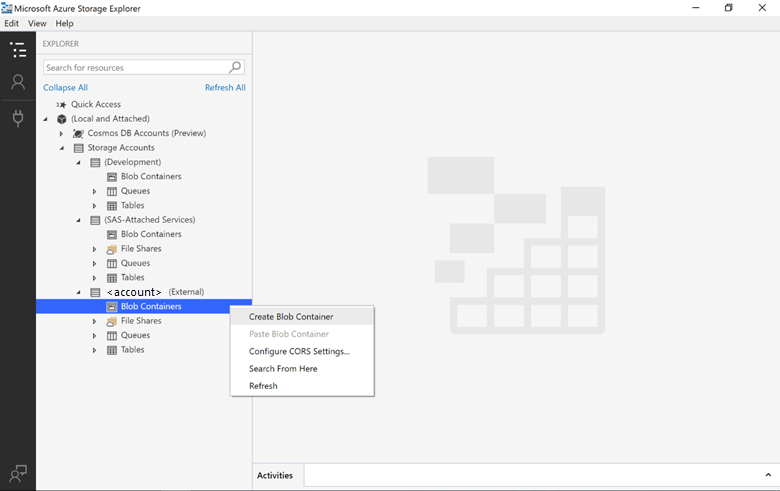
d. Under your connected Azure Storage account, right-click Blob Containers, select Create Blob Container, and name the new blob container.
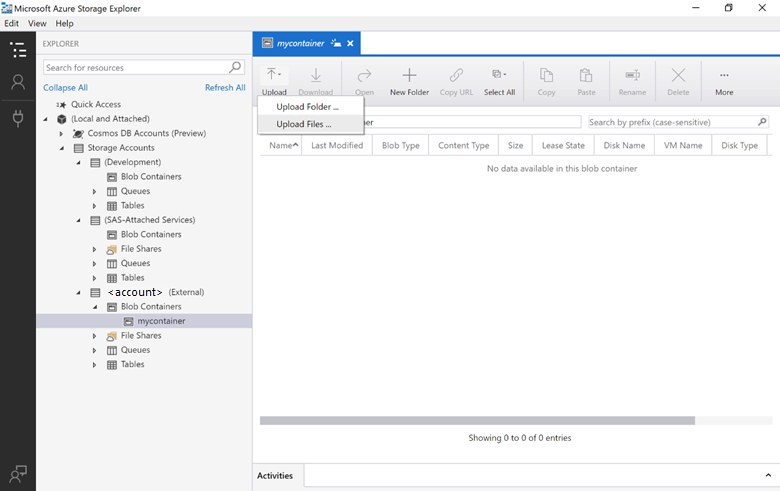
e. Select the new blob container, and upload your custom setup script and its associated files. Make sure that you upload main.cmd at the top level of your blob container, not in any folder. Your blob container should contain only the necessary custom setup files, so downloading them to your Azure-SSIS IR later won't take a long time. The maximum duration of a custom setup is currently set at 45 minutes before it times out. This includes the time to download all files from your blob container and install them on the Azure-SSIS IR. If setup requires more time, raise a support ticket.
f. Right-click the blob container, and then select Get Shared Access Signature.
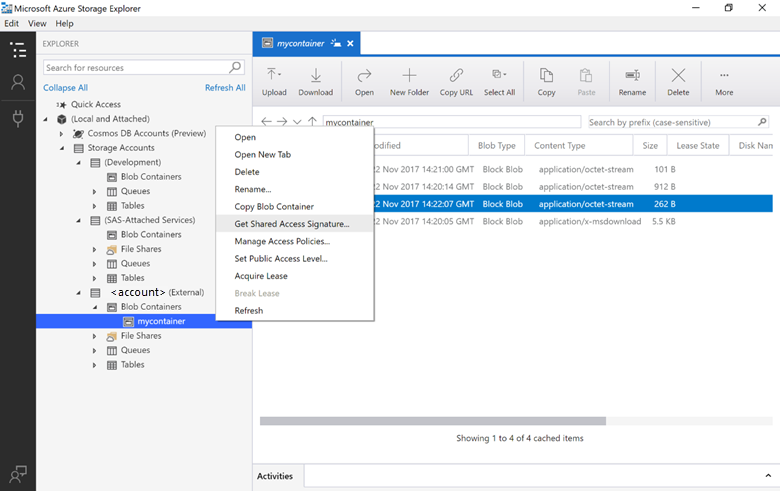
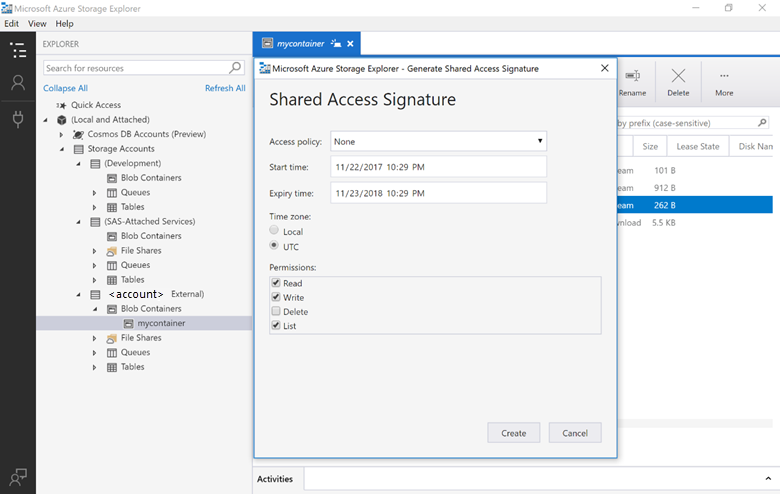
g. Create the SAS URI for your blob container with a sufficiently long expiration time and with read/write/list permission. You need the SAS URI to download and run your custom setup script and its associated files. This happens whenever any node of your Azure-SSIS IR is reimaged or restarted. You also need write permission to upload setup execution logs.
Important
Ensure that the SAS URI doesn't expire and the custom setup resources are always available during the whole lifecycle of your Azure-SSIS IR, from creation to deletion, especially if you regularly stop and start your Azure-SSIS IR during this period.
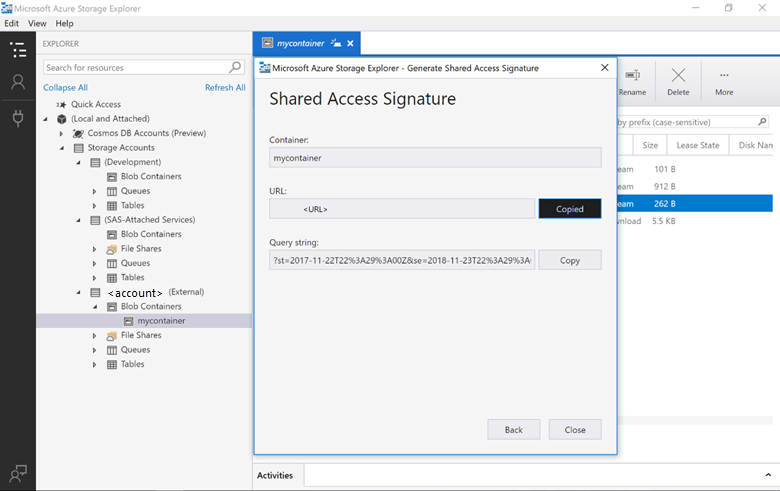
h. Copy and save the SAS URI of your blob container.
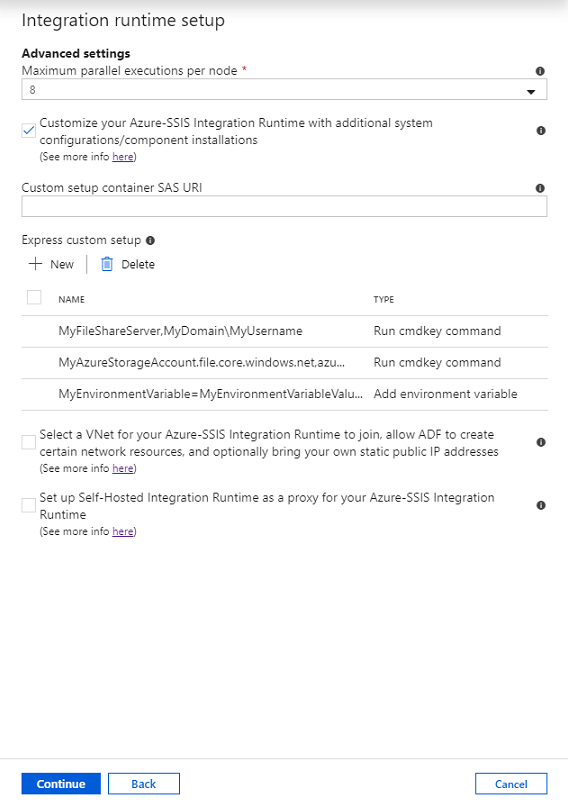
Select the Customize your Azure-SSIS Integration Runtime with additional system configurations/component installations check box on the Advanced settings page of Integration runtime setup pane. Next, enter the SAS URI of your blob container in the Custom setup container SAS URI text box.
After your standard custom setup finishes and your Azure-SSIS IR starts, you can find all custom setup logs in the main.cmd.log folder of your blob container. They include the standard output of main.cmd and other execution logs.
Express custom setup
To provision or reconfigure your Azure-SSIS IR with express custom setups on ADF UI, complete the following steps.
Select the Customize your Azure-SSIS Integration Runtime with additional system configurations/component installations check box on the Advanced settings page of Integration runtime setup pane.
Select New to open the Add express custom setup pane, and then select a type in the Express custom setup type drop-down list. We currently offer express custom setups for running cmdkey command, adding environment variables, installing Azure PowerShell, and installing licensed components.
Running cmdkey command
If you select the Run cmdkey command type for your express custom setup, you can run the Windows cmdkey command on your Azure-SSIS IR. To do so, enter your targeted computer name or domain name, username or account name, and password or account key in the /Add, /User, and /Pass text boxes, respectively. This will allow you to persist access credentials for SQL Servers, file shares, or Azure Files on your Azure-SSIS IR. For example, to access Azure Files, you can enter YourAzureStorageAccountName.file.core.chinacloudapi.cn, azure\YourAzureStorageAccountName, and YourAzureStorageAccountKey for /Add, /User, and /Pass, respectively. This is similar to running the Windows cmdkey command on your local machine.
Adding environment variables
If you select the Add environment variable type for your express custom setup, you can add a Windows environment variable on your Azure-SSIS IR. To do so, enter your environment variable name and value in the Variable name and Variable value text boxes, respectively. This will allow you to use the environment variable in your packages that run on Azure-SSIS IR, for example in Script Components/Tasks. This is similar to running the Windows set command on your local machine.
Installing Azure PowerShell
If you select the Install Azure PowerShell type for your express custom setup, you can install the Az module of PowerShell on your Azure-SSIS IR. To do so, enter the Az module version number (x.y.z) you want from a list of supported ones. This will allow you to run Azure PowerShell cmdlets/scripts in your packages to manage Azure resources, for example Azure Analysis Services (AAS).
Installing licensed components
If you select the Install licensed component type for your express custom setup, you can then select an integrated component from our ISV partners in the Component name drop-down list:
If you select the SentryOne's Task Factory component, you can install the Task Factory suite of components from SentryOne on your Azure-SSIS IR by entering the product license key that you purchased from them in the License key box. The current integrated version is 2021.18.1.
If you select the oh22's HEDDA.IO component, you can install the HEDDA.IO data quality/cleansing component from oh22 on your Azure-SSIS IR. To do so, you need to purchase their service beforehand. The current integrated version is 1.0.14.
If you select the oh22's SQLPhonetics.NET component, you can install the SQLPhonetics.NET data quality/matching component from oh22 on your Azure-SSIS IR. To do so, enter the product license key that you purchased from them beforehand in the License key text box. The current integrated version is 1.0.45.
If you select the KingswaySoft's SSIS Integration Toolkit component, you can install the SSIS Integration Toolkit suite of connectors for CRM/ERP/marketing/collaboration apps, such as Microsoft Dynamics/SharePoint/Project Server, Oracle/Salesforce Marketing Cloud, etc. from KingswaySoft on your Azure-SSIS IR by entering the product license key that you purchased from them in the License key box. The current integrated version is 23.1.
If you select the KingswaySoft's SSIS Productivity Pack component, you can install the SSIS Productivity Pack suite of components from KingswaySoft on your Azure-SSIS IR by entering the product license key that you purchased from them in the License key box. The current integrated version is 23.1.
If you select the Theobald Software's Xtract IS component, you can install the Xtract IS suite of connectors for SAP system (ERP, S/4HANA, BW) from Theobald Software on your Azure-SSIS IR by dragging & dropping/uploading the product license file that you purchased from them into the License file box. The current integrated version is 6.9.3.26.
If you select the AecorSoft's Integration Service component, you can install the Integration Service suite of connectors for SAP and Salesforce systems from AecorSoft on your Azure-SSIS IR. To do so, enter the product license key that you purchased from them beforehand in the License key text box. The current integrated version is 3.0.00.
If you select the CData's SSIS Standard Package component, you can install the SSIS Standard Package suite of most popular components from CData, such as Microsoft SharePoint connectors, on your Azure-SSIS IR. To do so, enter the product license key that you purchased from them beforehand in the License key text box. The current integrated version is 21.7867.
If you select the CData's SSIS Extended Package component, you can install the SSIS Extended Package suite of all components from CData, such as Microsoft Dynamics 365 Business Central connectors and other components in their SSIS Standard Package, on your Azure-SSIS IR. To do so, enter the product license key that you purchased from them beforehand in the License key text box. The current integrated version is 21.7867. Due to its large size, to avoid installation timeout, please ensure that your Azure-SSIS IR has at least 4 CPU cores per node.
Your added express custom setups will appear on the Advanced settings page. To remove them, select their check boxes, and then select Delete.
Azure PowerShell
To provision or reconfigure your Azure-SSIS IR with custom setups using Azure PowerShell, complete the following steps.
If your Azure-SSIS IR is already started/running, stop it first.
You can then add or remove custom setups by running the
Set-AzDataFactoryV2IntegrationRuntimecmdlet before you start your Azure-SSIS IR.$ResourceGroupName = "[your Azure resource group name]" $DataFactoryName = "[your data factory name]" $AzureSSISName = "[your Azure-SSIS IR name]" # Custom setup info: Standard/express custom setups $SetupScriptContainerSasUri = "" # OPTIONAL to provide a SAS URI of blob container for standard custom setup where your script and its associated files are stored $ExpressCustomSetup = "[RunCmdkey|SetEnvironmentVariable|InstallAzurePowerShell|SentryOne.TaskFactory|oh22is.SQLPhonetics.NET|oh22is.HEDDA.IO|KingswaySoft.IntegrationToolkit|KingswaySoft.ProductivityPack|Theobald.XtractIS|AecorSoft.IntegrationService|CData.Standard|CData.Extended or leave it empty]" # OPTIONAL to configure an express custom setup without script # Add custom setup parameters if you use standard/express custom setups if(![string]::IsNullOrEmpty($SetupScriptContainerSasUri)) { Set-AzDataFactoryV2IntegrationRuntime -ResourceGroupName $ResourceGroupName ` -DataFactoryName $DataFactoryName ` -Name $AzureSSISName ` -SetupScriptContainerSasUri $SetupScriptContainerSasUri } if(![string]::IsNullOrEmpty($ExpressCustomSetup)) { if($ExpressCustomSetup -eq "RunCmdkey") { $addCmdkeyArgument = "YourFileShareServerName or YourAzureStorageAccountName.file.core.chinacloudapi.cn" $userCmdkeyArgument = "YourDomainName\YourUsername or azure\YourAzureStorageAccountName" $passCmdkeyArgument = New-Object Microsoft.Azure.Management.DataFactory.Models.SecureString("YourPassword or YourAccessKey") $setup = New-Object Microsoft.Azure.Management.DataFactory.Models.CmdkeySetup($addCmdkeyArgument, $userCmdkeyArgument, $passCmdkeyArgument) } if($ExpressCustomSetup -eq "SetEnvironmentVariable") { $variableName = "YourVariableName" $variableValue = "YourVariableValue" $setup = New-Object Microsoft.Azure.Management.DataFactory.Models.EnvironmentVariableSetup($variableName, $variableValue) } if($ExpressCustomSetup -eq "InstallAzurePowerShell") { $moduleVersion = "YourAzModuleVersion" $setup = New-Object Microsoft.Azure.Management.DataFactory.Models.AzPowerShellSetup($moduleVersion) } if($ExpressCustomSetup -eq "SentryOne.TaskFactory") { $licenseKey = New-Object Microsoft.Azure.Management.DataFactory.Models.SecureString("YourLicenseKey") $setup = New-Object Microsoft.Azure.Management.DataFactory.Models.ComponentSetup($ExpressCustomSetup, $licenseKey) } if($ExpressCustomSetup -eq "oh22is.SQLPhonetics.NET") { $licenseKey = New-Object Microsoft.Azure.Management.DataFactory.Models.SecureString("YourLicenseKey") $setup = New-Object Microsoft.Azure.Management.DataFactory.Models.ComponentSetup($ExpressCustomSetup, $licenseKey) } if($ExpressCustomSetup -eq "oh22is.HEDDA.IO") { $setup = New-Object Microsoft.Azure.Management.DataFactory.Models.ComponentSetup($ExpressCustomSetup) } if($ExpressCustomSetup -eq "KingswaySoft.IntegrationToolkit") { $licenseKey = New-Object Microsoft.Azure.Management.DataFactory.Models.SecureString("YourLicenseKey") $setup = New-Object Microsoft.Azure.Management.DataFactory.Models.ComponentSetup($ExpressCustomSetup, $licenseKey) } if($ExpressCustomSetup -eq "KingswaySoft.ProductivityPack") { $licenseKey = New-Object Microsoft.Azure.Management.DataFactory.Models.SecureString("YourLicenseKey") $setup = New-Object Microsoft.Azure.Management.DataFactory.Models.ComponentSetup($ExpressCustomSetup, $licenseKey) } if($ExpressCustomSetup -eq "Theobald.XtractIS") { $jsonData = Get-Content -Raw -Path YourLicenseFile.json $jsonData = $jsonData -replace '\s','' $jsonData = $jsonData.replace('"','\"') $licenseKey = New-Object Microsoft.Azure.Management.DataFactory.Models.SecureString($jsonData) $setup = New-Object Microsoft.Azure.Management.DataFactory.Models.ComponentSetup($ExpressCustomSetup, $licenseKey) } if($ExpressCustomSetup -eq "AecorSoft.IntegrationService") { $licenseKey = New-Object Microsoft.Azure.Management.DataFactory.Models.SecureString("YourLicenseKey") $setup = New-Object Microsoft.Azure.Management.DataFactory.Models.ComponentSetup($ExpressCustomSetup, $licenseKey) } if($ExpressCustomSetup -eq "CData.Standard") { $licenseKey = New-Object Microsoft.Azure.Management.DataFactory.Models.SecureString("YourLicenseKey") $setup = New-Object Microsoft.Azure.Management.DataFactory.Models.ComponentSetup($ExpressCustomSetup, $licenseKey) } if($ExpressCustomSetup -eq "CData.Extended") { $licenseKey = New-Object Microsoft.Azure.Management.DataFactory.Models.SecureString("YourLicenseKey") $setup = New-Object Microsoft.Azure.Management.DataFactory.Models.ComponentSetup($ExpressCustomSetup, $licenseKey) } # Create an array of one or more express custom setups $setups = New-Object System.Collections.ArrayList $setups.Add($setup) Set-AzDataFactoryV2IntegrationRuntime -ResourceGroupName $ResourceGroupName ` -DataFactoryName $DataFactoryName ` -Name $AzureSSISName ` -ExpressCustomSetup $setups } Start-AzDataFactoryV2IntegrationRuntime -ResourceGroupName $ResourceGroupName ` -DataFactoryName $DataFactoryName ` -Name $AzureSSISName ` -Force
Standard custom setup samples
You can view and reuse some samples of standard custom setups:
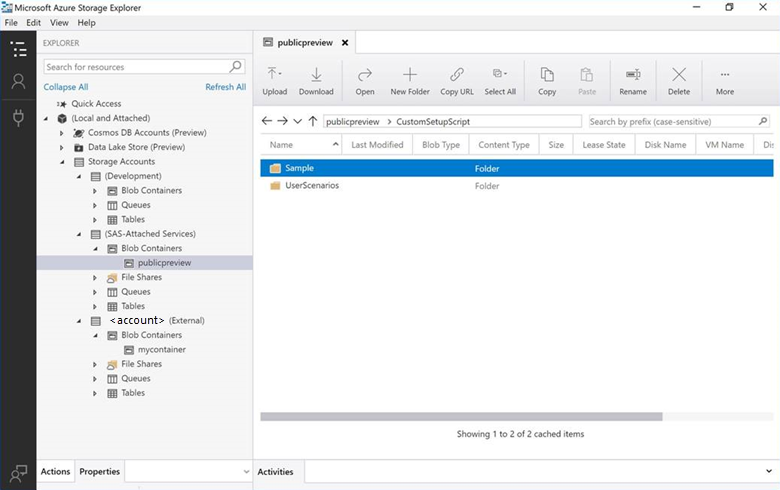
a. In this folder are the following items:
A Sample folder, which contains a custom setup to install a basic task on each node of your Azure-SSIS IR. The task does nothing but sleep for a few seconds. The folder also contains a gacutil folder, whose entire content (gacutil.exe, gacutil.exe.config, and 1033\gacutlrc.dll) can be copied as is to your blob container.
A UserScenarios folder, which contains several custom setup samples from real user scenarios. If you want to install multiple samples on your Azure-SSIS IR, you can combine their custom setup script (main.cmd) files into a single one and upload it with all of their associated files into your blob container.
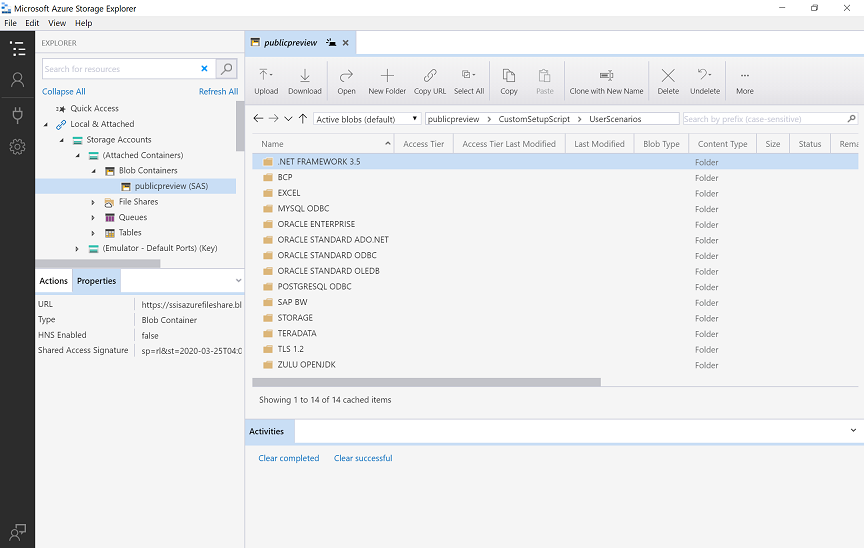
b. Double-click the UserScenarios folder to find the following items:
A .NET FRAMEWORK 3.5 folder, which contains a custom setup script (main.cmd) to install an earlier version of the .NET Framework on each node of your Azure-SSIS IR. This version might be required by some custom components.
A BCP folder, which contains a custom setup script (main.cmd) to install SQL Server command-line utilities (MsSqlCmdLnUtils.msi) on each node of your Azure-SSIS IR. One of those utilities is the bulk copy program (bcp).
A DNS SUFFIX folder, which contains a custom setup script (main.cmd) to append your own DNS suffix (for example test.com) to any unqualified single label domain name and turn it into a Fully Qualified Domain Name (FQDN) before using it in DNS queries from your Azure-SSIS IR.
An EXCEL folder, which contains a custom setup script (main.cmd) to install some C# assemblies and libraries on each node of your Azure-SSIS IR. You can use them in Script Tasks to dynamically read and write Excel files.
First, download ExcelDataReader.dll and DocumentFormat.OpenXml.dll, and then upload them all together with main.cmd to your blob container. Alternatively, if you just want to use the standard Excel connectors (Connection Manager, Source, and Destination), the Access Redistributable that contains them is already preinstalled on your Azure-SSIS IR, so you don't need any custom setup.
A MYSQL ODBC folder, which contains a custom setup script (main.cmd) to install the MySQL ODBC drivers on each node of your Azure-SSIS IR. This setup lets you use the ODBC connectors (Connection Manager, Source, and Destination) to connect to the MySQL server.
First, download the latest 64-bit and 32-bit versions of the MySQL ODBC driver installers (for example, mysql-connector-odbc-8.0.13-winx64.msi and mysql-connector-odbc-8.0.13-win32.msi), and then upload them all together with main.cmd to your blob container.
If Data Source Name (DSN) is used in connection, DSN configuration is needed in setup script. For example: C:\Windows\SysWOW64\odbcconf.exe /A {CONFIGSYSDSN "MySQL ODBC 8.0 Unicode Driver" "DSN=<dsnname>|PORT=3306|SERVER=<servername>"}
An ORACLE ENTERPRISE folder, which contains a custom setup script (main.cmd) to install the Oracle connectors and OCI driver on each node of your Azure-SSIS IR Enterprise Edition. This setup lets you use the Oracle Connection Manager, Source, and Destination to connect to the Oracle server.
First, download Microsoft Connectors v5.0 for Oracle (AttunitySSISOraAdaptersSetup.msi and AttunitySSISOraAdaptersSetup64.msi) from Microsoft Download Center and the latest Oracle Instant Client (for example, instantclient-basic-windows.x64-21.3.0.0.0.zip) from Oracle. Next, upload them all together with main.cmd to your blob container. If you use TNS to connect to Oracle, you also need to download tnsnames.ora, edit it, and upload it to your blob container. In this way, it can be copied to the Oracle installation folder during setup.
An ORACLE STANDARD ADO.NET folder, which contains a custom setup script (main.cmd) to install the Oracle ODP.NET driver on each node of your Azure-SSIS IR. This setup lets you use the ADO.NET Connection Manager, Source, and Destination to connect to the Oracle server.
First, download the latest Oracle ODP.NET driver (for example, ODP.NET_Managed_ODAC122cR1.zip), and then upload it together with main.cmd to your blob container.
An ORACLE STANDARD ODBC folder, which contains a custom setup script (main.cmd) to install the Oracle ODBC driver on each node of your Azure-SSIS IR. The script also configures the Data Source Name (DSN). This setup lets you use the ODBC Connection Manager, Source, and Destination or Power Query Connection Manager and Source with the ODBC data source type to connect to the Oracle server.
First, download the latest Oracle Instant Client (Basic Package or Basic Lite Package) and ODBC Package, and then upload them all together with main.cmd to your blob container:
- Download 64-bit packages (Basic Package: instantclient-basic-windows.x64-18.3.0.0.0dbru.zip; Basic Lite Package: instantclient-basiclite-windows.x64-18.3.0.0.0dbru.zip; ODBC Package: instantclient-odbc-windows.x64-18.3.0.0.0dbru.zip)
- Download 32-bit packages (Basic Package: instantclient-basic-nt-18.3.0.0.0dbru.zip; Basic Lite Package: instantclient-basiclite-nt-18.3.0.0.0dbru.zip; ODBC Package: instantclient-odbc-nt-18.3.0.0.0dbru.zip)
An ORACLE STANDARD OLEDB folder, which contains a custom setup script (main.cmd) to install the Oracle OLEDB driver on each node of your Azure-SSIS IR. This setup lets you use the OLEDB Connection Manager, Source, and Destination to connect to the Oracle server.
First, download the latest Oracle OLEDB driver (for example, ODAC122010Xcopy_x64.zip), and then upload it together with main.cmd to your blob container.
A POSTGRESQL ODBC folder, which contains a custom setup script (main.cmd) to install the PostgreSQL ODBC drivers on each node of your Azure-SSIS IR. This setup lets you use the ODBC Connection Manager, Source, and Destination to connect to the PostgreSQL server.
First, download the latest 64-bit and 32-bit versions of PostgreSQL ODBC driver installers (for example, psqlodbc_x64.msi and psqlodbc_x86.msi), and then upload them all together with main.cmd to your blob container.
A SAP BW folder, which contains a custom setup script (main.cmd) to install the SAP .NET connector assembly (librfc32.dll) on each node of your Azure-SSIS IR Enterprise Edition. This setup lets you use the SAP BW Connection Manager, Source, and Destination to connect to the SAP BW server.
First, upload the 64-bit or the 32-bit version of librfc32.dll from the SAP installation folder together with main.cmd to your blob container. The script then copies the SAP assembly to the %windir%\SysWow64 or %windir%\System32 folder during setup.
A STORAGE folder, which contains a custom setup script (main.cmd) to install Azure PowerShell on each node of your Azure-SSIS IR. This setup lets you deploy and run SSIS packages that run Azure PowerShell cmdlets/scripts to manage your Azure Storage.
Copy main.cmd, a sample AzurePowerShell.msi (or use the latest version), and storage.ps1 to your blob container. Use PowerShell.dtsx as a template for your packages. The package template combines an Azure Blob Download Task, which downloads a modifiable PowerShell script (storage.ps1), and an Execute Process Task, which executes the script on each node.
A TERADATA folder, which contains a custom setup script (main.cmd), its associated file (install.cmd), and installer packages (.msi). These files install the Teradata connectors, the Teradata Parallel Transporter (TPT) API, and the ODBC driver on each node of your Azure-SSIS IR Enterprise Edition. This setup lets you use the Teradata Connection Manager, Source, and Destination to connect to the Teradata server.
First, download the Teradata Tools and Utilities 15.x zip file (for example, TeradataToolsAndUtilitiesBase__windows_indep.15.10.22.00.zip), and then upload it together with the previously mentioned .cmd and .msi files to your blob container.
A TLS 1.2 folder, which contains a custom setup script (main.cmd) to use only strong cryptography/more secure network protocol (TLS 1.2) on each node of your Azure-SSIS IR. The script also disables older SSL/TLS versions (SSL 3.0, TLS 1.0, TLS 1.1) at the same time.
A ZULU OPENJDK folder, which contains a custom setup script (main.cmd) and PowerShell file (install_openjdk.ps1) to install the Zulu OpenJDK on each node of your Azure-SSIS IR. This setup lets you use Azure Data Lake Store and Flexible File connectors to process ORC and Parquet files. For more information, see Azure Feature Pack for Integration Services.
First, download the latest Zulu OpenJDK (for example, zulu8.33.0.1-jdk8.0.192-win_x64.zip), and then upload it together with main.cmd and install_openjdk.ps1 to your blob container.
c. To reuse these standard custom setup samples, copy the content of selected folder to your blob container.
When you provision or reconfigure your Azure-SSIS IR on ADF UI, select the Customize your Azure-SSIS Integration Runtime with additional system configurations/component installations check box on the Advanced settings page of Integration runtime setup pane. Next, enter the SAS URI of your blob container in the Custom setup container SAS URI text box.
When you provision or reconfigure your Azure-SSIS IR using Azure PowerShell, stop it if it's already started/running, run the
Set-AzDataFactoryV2IntegrationRuntimecmdlet with the SAS URI of your blob container as the value forSetupScriptContainerSasUriparameter, and then start your Azure-SSIS IR.After your standard custom setup finishes and your Azure-SSIS IR starts, you can find all custom setup logs in the main.cmd.log folder of your blob container. They include the standard output of main.cmd and other execution logs.