Note
Access to this page requires authorization. You can try signing in or changing directories.
Access to this page requires authorization. You can try changing directories.
Write stateful functions in a serverless environment using durable functions, a feature of Azure Functions. Scenarios where durable functions is useful include orchestrating microservices and workflows, stateful patterns like fan-out/fan-in, and long-running tasks.
Durable functions supports several storage providers, also known as backends, for storing orchestration and entity runtime state.
In this quickstart, you configure a durable functions app to use the durable task scheduler as the backend and deploy the app to Azure using Visual Studio Code.
Note
To learn more about the benefit of using durable task scheduler, see durable functions backend providers overview.
Migrating task hub data across backend providers currently isn't supported. Function apps that have existing runtime data need to start with a fresh, empty task hub after they switch to the durable task scheduler. Similarly, the task hub contents that are created by using the scheduler resource can't be preserved if you switch to a different backend provider.
Durable task scheduler currently only supports durable functions running on Functions Premium and App Service plans.
Prerequisites
This quickstart assumes you already have an Azure Functions project on your local computer with:
- Durable functions added to your project including:
- An orchestrator function.
- A client function that triggers the durable functions app.
- The project configured for local debugging.
If you don't meet these prerequisites, we recommend that you begin with one of the following quickstarts to set up a local Functions project:
You also need:
- Docker installed to run the durable task scheduler emulator.
- Azurite installed.
- An HTTP test tool that keeps your data secure.
Add the durable task scheduler package
Note
The durable task scheduler extension requires Microsoft.Azure.Functions.Worker.Extensions.DurableTask version 1.2.2 or higher.
Install the latest version of the Microsoft.Azure.Functions.Worker.Extensions.DurableTask.AzureManaged package by using the dotnet add package command:
dotnet add package Microsoft.Azure.Functions.Worker.Extensions.DurableTask.AzureManaged --prerelease
In host.json, update the extensionBundle property to use the preview version that contains the durable task scheduler package:
{
  "extensionBundle": {
    "id": "Microsoft.Azure.Functions.ExtensionBundle.Preview",
    "version": "[4.29.0, 5.0.0)"
  }
}
Update host.json
Update the host.json as follows to use durable task scheduler as the backend.
{
  "extensions": {
    "durableTask": {
      "hubName": "%TASKHUB_NAME%",
      "storageProvider": {
        "type": "azureManaged",
        "connectionStringName": "DURABLE_TASK_SCHEDULER_CONNECTION_STRING"
      }
    }
  }
}
Configure local.settings.json
Add connection information for local development:
{
  "IsEncrypted": false,
  "Values": {
    "FUNCTIONS_WORKER_RUNTIME": "<DEPENDENT ON YOUR PROGRAMMING LANGUAGE>",
    "AzureWebJobsStorage": "UseDevelopmentStorage=true",
    "DURABLE_TASK_SCHEDULER_CONNECTION_STRING": "Endpoint=http://localhost:8080;Authentication=None",
    "TASKHUB_NAME": "default"
  }
}
Get the durable task scheduler emulator port number in the next step.
Set up durable task scheduler emulator
Pull the docker image containing the emulator.
docker pull mcr.microsoft.com/dts/dts-emulator:v0.0.5Run the emulator.
docker run -d -p 8080:8080 -p 8082:8082 mcr.microsoft.com/dts/dts-emulator:v0.0.5The following output indicates the emulator started successfully.

Make note of the ports exposed on Docker desktop. The scheduler exposes multiple ports for different purposes:
8080: gRPC endpoint that allows an app to connect to the scheduler8082: Endpoint for durable task scheduler dashboard

Test locally
Go to the root directory of your app and start Azurite.
azurite startRun the application.
func startYou should see a list of the functions in your app. If you created your app following one of the durable functions quickstarts, you should see something similar to the following output:

Start an orchestration instance by sending an HTTP
POSTrequest to the URL endpoint using the HTTP test tool you chose.Copy the URL value for
statusQueryGetUriand paste it in your browser's address bar. You should see the status on the orchestration instance:{ "name": "DurableFunctionsOrchestrationCSharp1", "instanceId": "b50f8b723f2f44149ab9fd2e3790a0e8", "runtimeStatus": "Completed", "input": null, "customStatus": null, "output": [ "Hello Tokyo!", "Hello Seattle!", "Hello London!" ], "createdTime": "2025-02-21T21:09:59Z", "lastUpdatedTime": "2025-02-21T21:10:00Z" }To view more details about the orchestration instance, go to http://localhost:8082/ access the durable task scheduler dashboard.
Click on the default task hub to see its dashboard.
Note
Learn more about the durable task scheduler dashboard.
The durable task scheduler emulator stores orchestration data in memory, which means all data is lost when it shuts down.
Running into issues testing? See the troubleshooting guide.
Run your app in Azure
Create required resources
Create a durable task scheduler instance and Azure Functions app on Azure following the Function app integrated creation flow. This experience will automatically set up identity-based access and configure the required environment variables for the app to access the scheduler.
Navigate to the Function app creation blade and select Functions Premium or App Service as a hosting option.
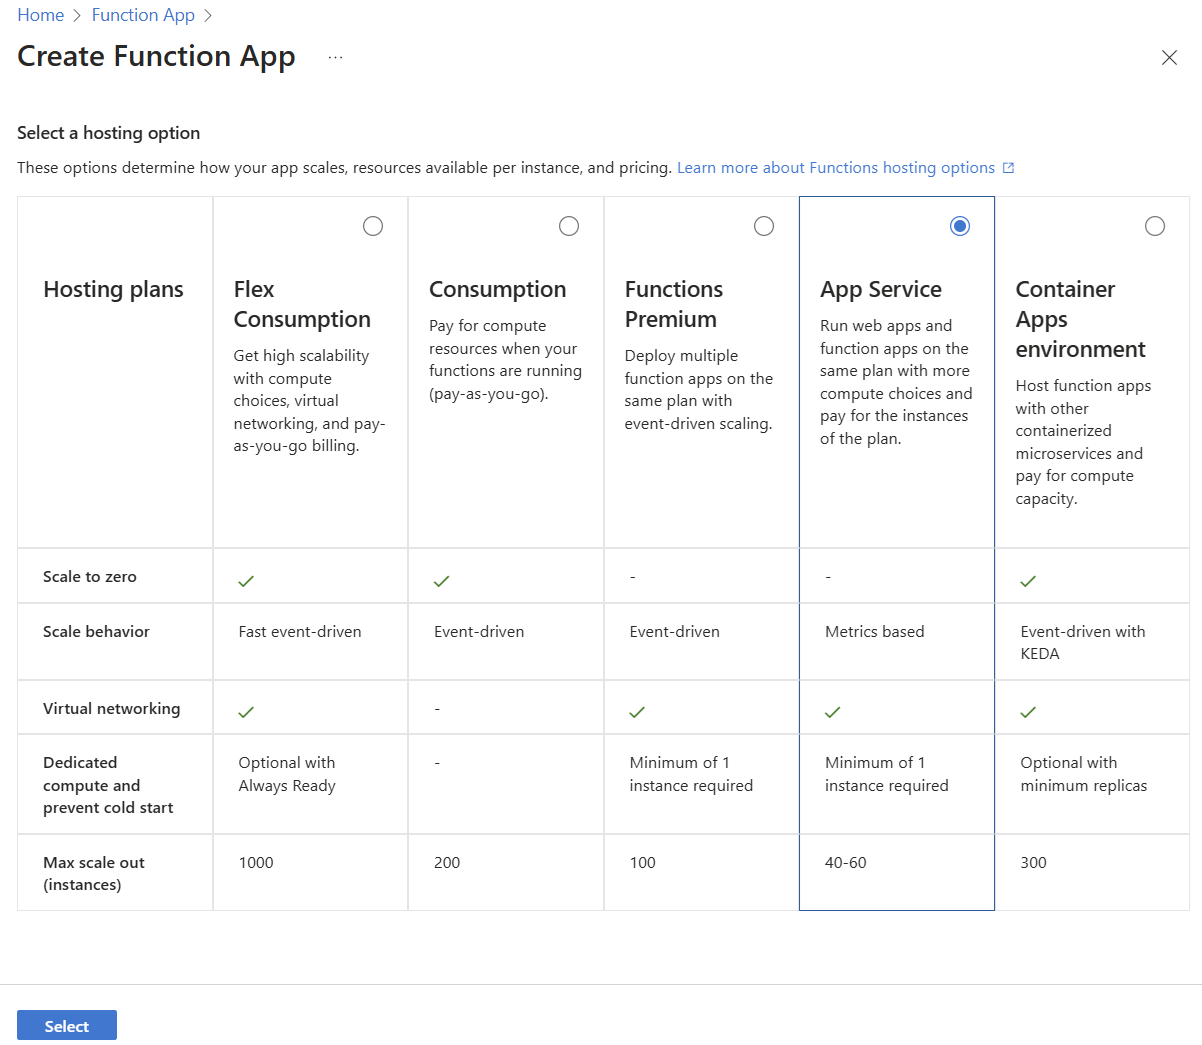
In the Create Function App (App Service) blade, fill in the information in the Basics tab.
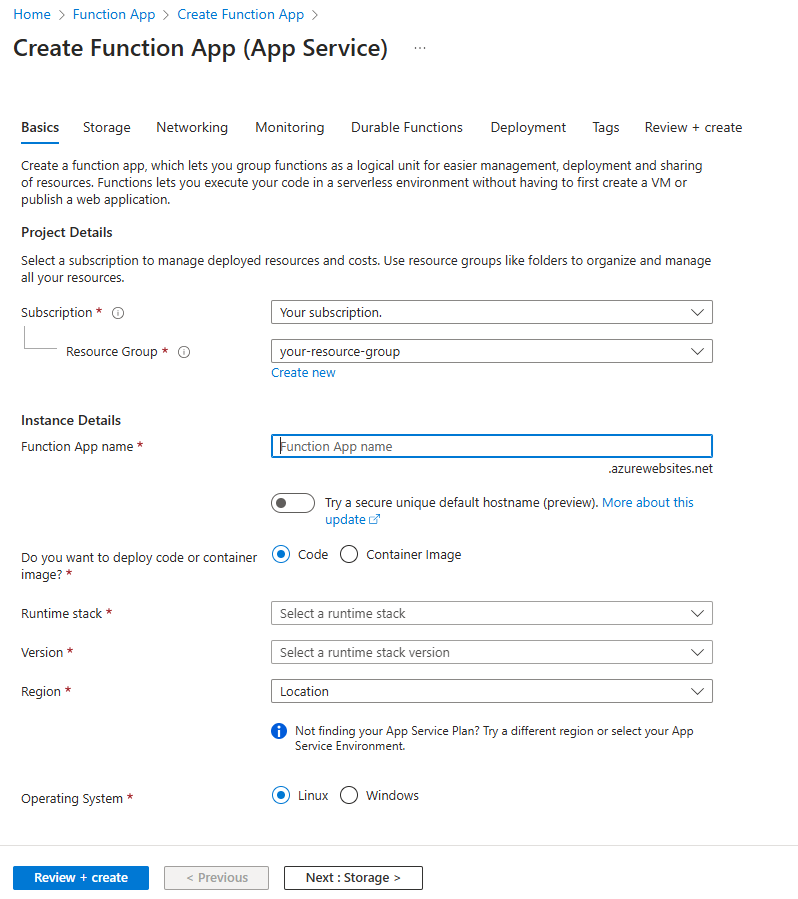
Field Description Subscription Select your Azure subscription. Resource Group Select an existing resource group or click Create new to create a new one. Function App name Create a unique name for your function app. Do you want to deploy code or container image? Keep the Code option selected. Runtime stack Select the runtime you're using for this quickstart. Version Select your runtime stack version. Region Select one of the supported regions. Operating System Select your operating system. Select the Durable Functions tab.
Choose Durable Task Scheduler as the backend provider for your durable functions.
Create a scheduler resource. This action automatically creates a task hub.
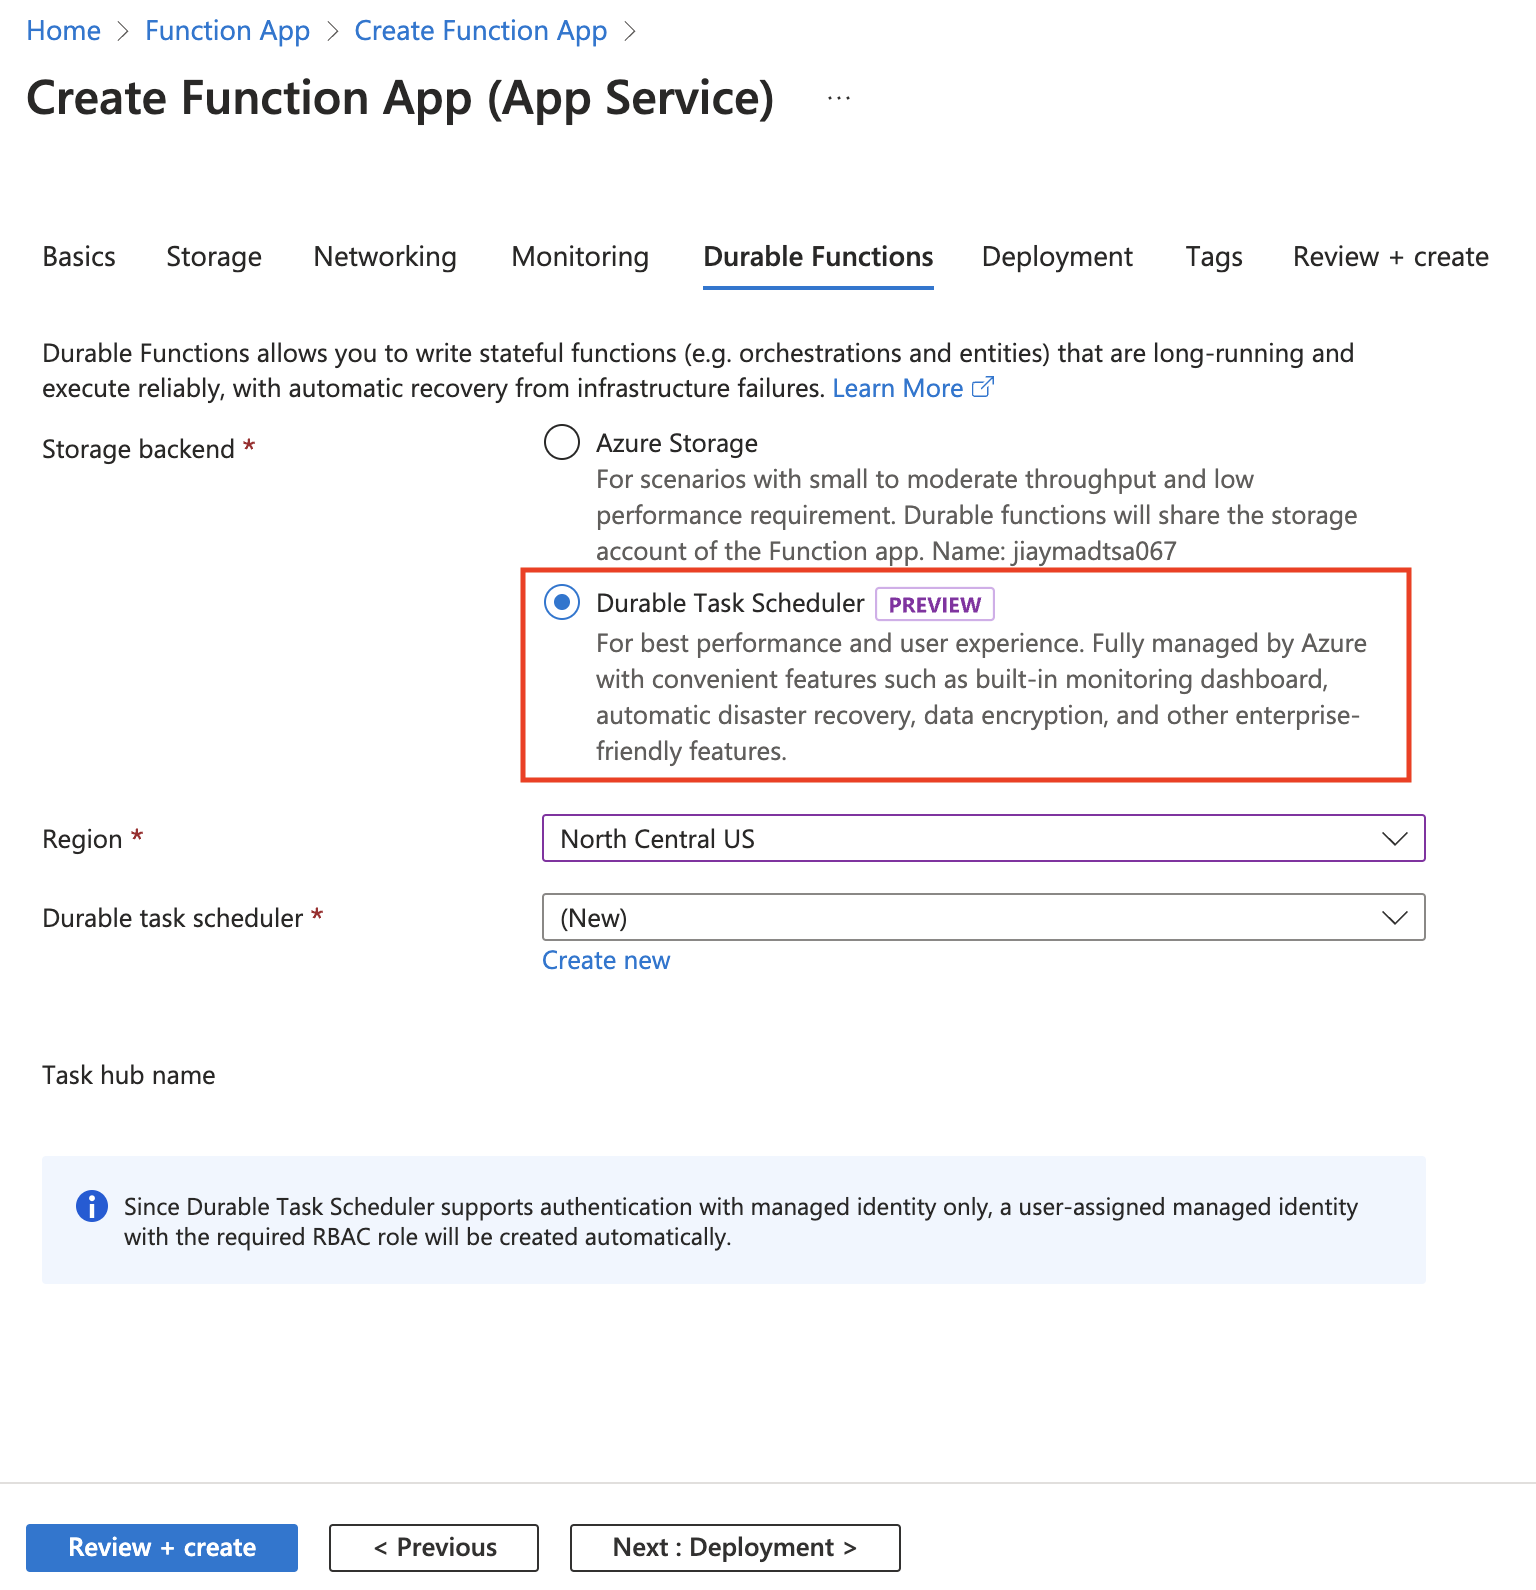
Field Description Storage backend Select Durable Task Scheduler. Region It's recommended that the scheduler and function app regions should be the same. Durable task scheduler Use the scheduler name offered, or click Create new to create a custom name. Plan Only Dedicated is available at the moment. Capacity units Currently, you can only choose one Capacity Unit as an option. Click Review + create to review the resource creation.
A user-assigned managed identity with the required role-based access control (RBAC) permission is created automatically so that the Function app can access durable task scheduler. You can find in the summary view information related to the managed identity resource, such as:
The RBAC assigned to it (Durable Task Data Contributor)
The assignment scope (the scheduler or task hub name)
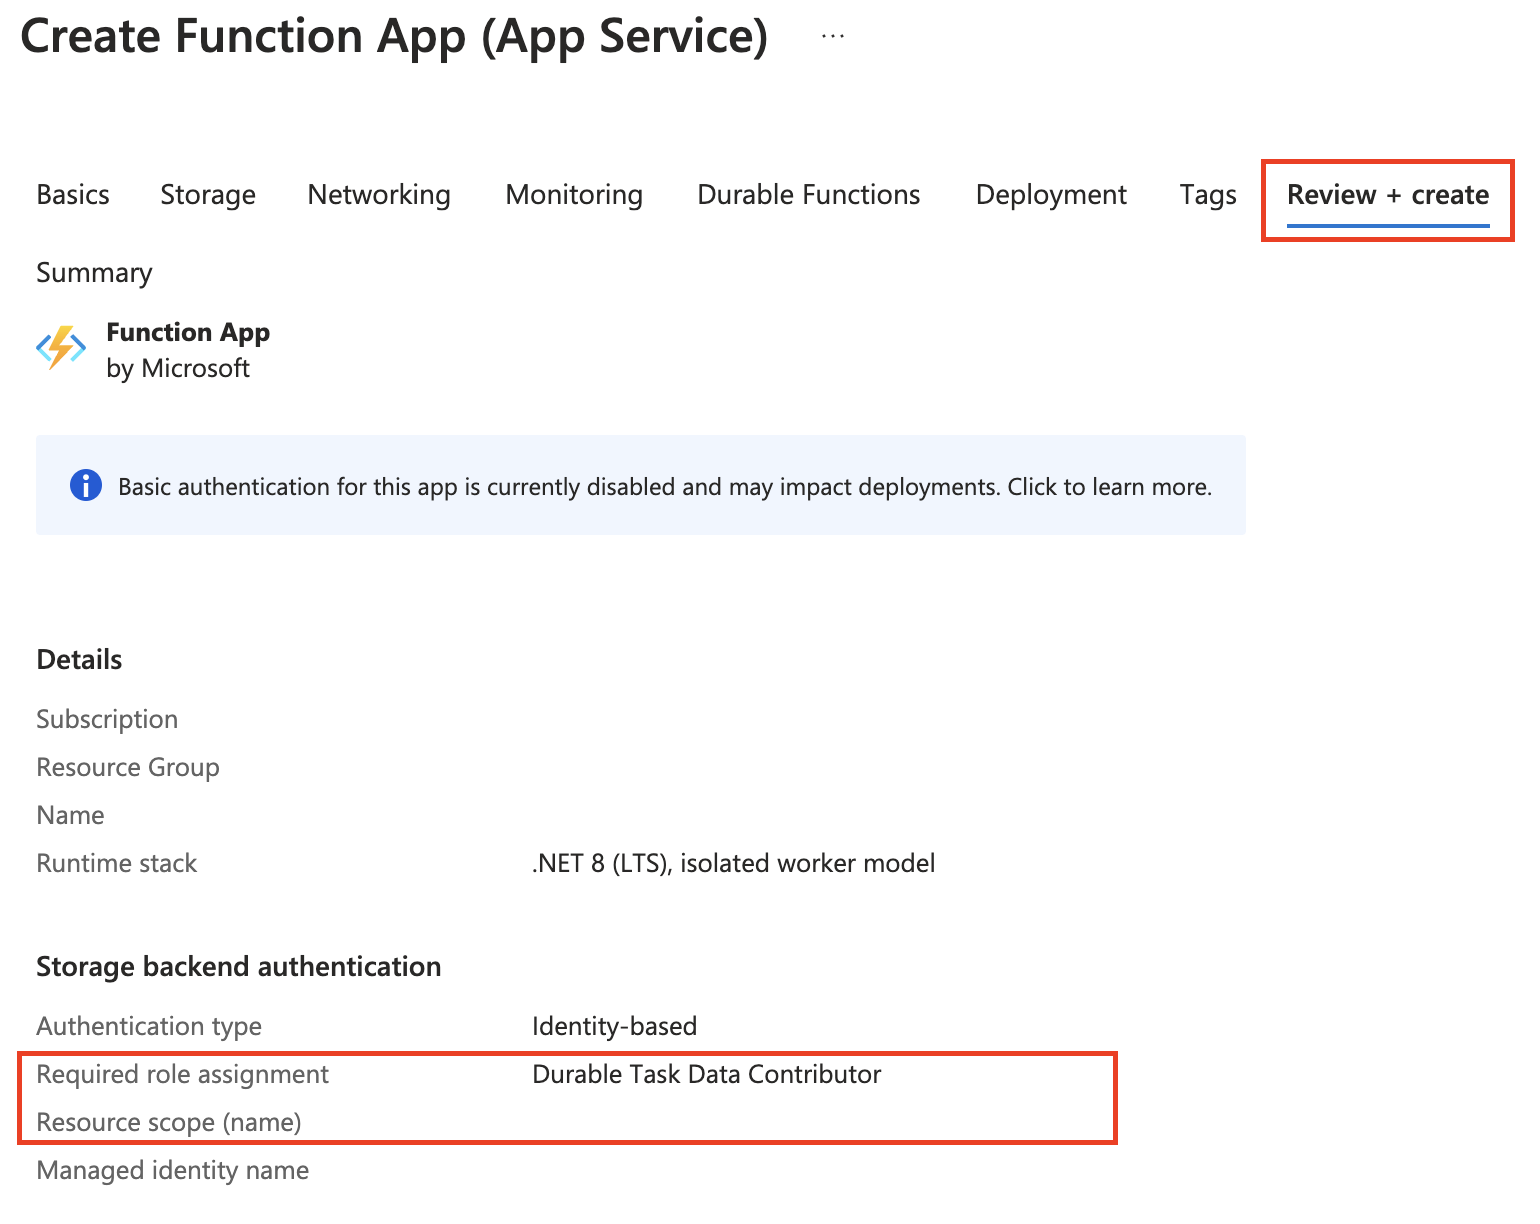
Click Create once validation passes.
Resource deployment could take around 15 to 20 minutes. Once that is finished, you can deploy your app to Azure.
Deploy your function app to Azure
Important
Deploying to an existing function app always overwrites the contents of that app in Azure.
Choose the Azure icon in the Activity bar, then in the Workspace area, select your project folder and select the Deploy... button.

Select Deploy to Function App..., choose the function app you just created, and select Deploy.
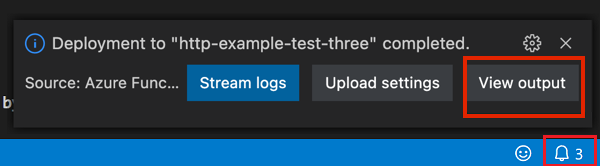
After deployment completes, select View Output to view the creation and deployment results, including the Azure resources that you created. If you miss the notification, select the bell icon in the lower right corner to see it again.
Apps on Functions Premium plan
If your app is running on the Functions Premium plan, turn on the Runtime Scale Monitoring setting after deployment to ensure your app autoscales based on load:
az resource update -g <resource_group> -n <function_app_name>/config/web --set properties.functionsRuntimeScaleMonitoringEnabled=1 --resource-type Microsoft.Web/sites
Test your function app
Run the following command to get your function's URL:
az functionapp function list --resource-group <RESOURCE_GROUP_NAME> --name <FUNCTION_APP_NAME> --query '[].{Function:name, URL:invokeUrlTemplate}' --output json
Check orchestration status
Check the status of the orchestration instance and activity details on the durable task scheduler dashboard. Accessing the dashboard requires you to log in.
Note
The following instruction shows a role assignment scoped to a specific task hub. If you need access to all task hubs in a scheduler, perform the assignment on the scheduler level.
Navigate to the durable task scheduler resource on the portal.
Click on a task hub name.
In the left menu, select Access control (IAM).
Click Add to add a role assignment.

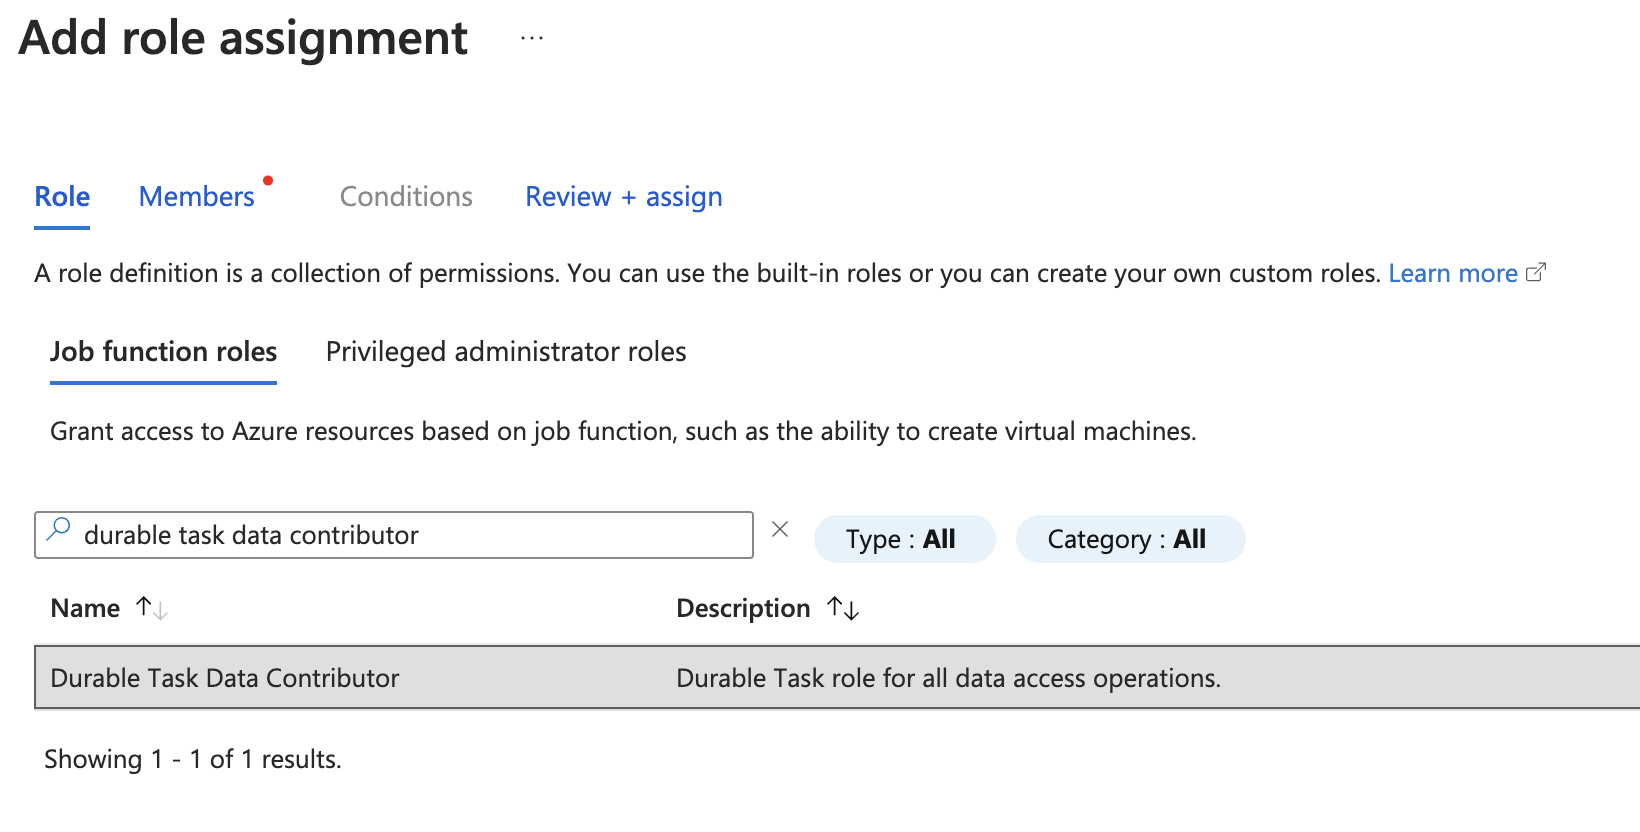
Search for and select Durable Task Data Contributor. Click Next.
On the Members tab, for Assign access to, select User, group, or service principal.
For Members, click + Select members.
In the Select members pane, search for your name or email:
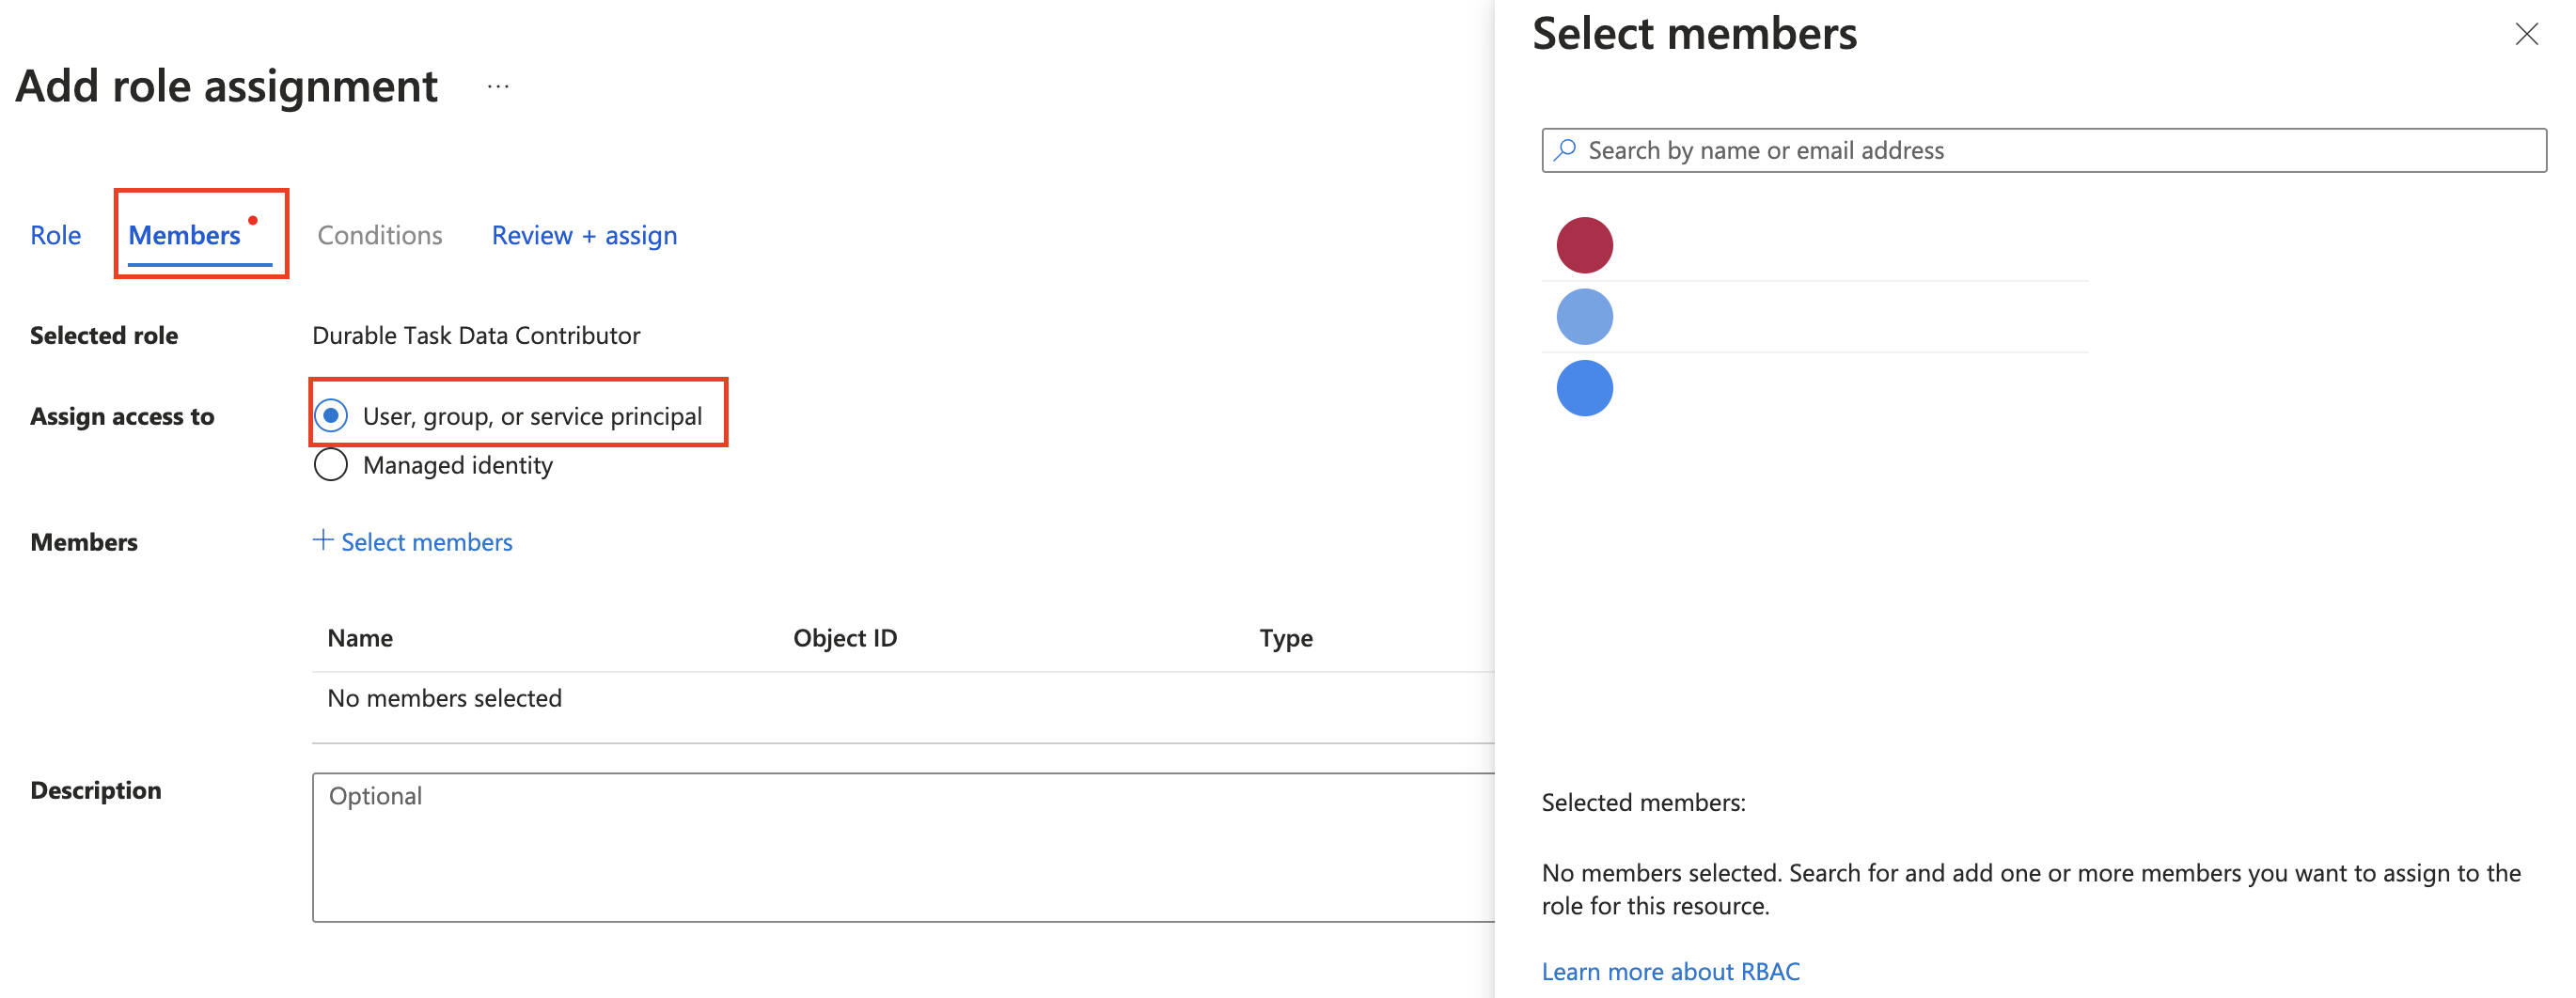
Pick your email and click the Select button.
Click Review + assign to finish assigning the role.
Once the role is assigned, click Overview on the left menu of the task hub resource and navigate to the dashboard URL located at the top Essentials section.
Clean up resources
If you no longer need the resources that you created to complete the quickstart, to avoid related costs in your Azure subscription, delete the resource group and all related resources.
Next steps
- Learn more about the durable task scheduler dashboard.
- Troubleshoot any errors you may encounter while using durable task scheduler.