适用于 Python 的 Azure 队列存储客户端库入门。 Azure 队列存储是一项可存储大量消息供以后检索和处理的服务。 请按照以下步骤安装程序包并试用基本任务的示例代码。
API 参考文档 | 库源代码 | 包 (Python 包索引) | 示例
使用适用于 Python 的 Azure 队列存储客户端库完成以下操作:
- 创建队列
- 向队列添加消息
- 查看队列中的消息
- 更新队列中的消息
- 获取队列长度
- 从队列接收消息
- 从队列中删除消息
- 删除队列
先决条件
- Azure 订阅 - 创建一个试用帐户
- Azure 存储帐户 - 创建存储帐户
- Python 3.8+
设置
本部分逐步指导你准备一个项目,使其与适用于 Python 的 Azure 队列存储客户端库配合使用。
创建项目
创建名为 queues-quickstart 的 Python 应用程序。
在控制台窗口(例如 cmd、PowerShell 或 Bash)中,为项目创建新目录。
mkdir queues-quickstart切换到新创建的 queues-quickstart 目录。
cd queues-quickstart
安装包
从项目目录中,使用 pip install 命令安装适用于 Python 包的 Azure 队列存储客户端库。 与 Azure 服务的无密码连接需要 azure-identity 包。
pip install azure-storage-queue azure-identity
设置应用框架
在代码编辑器中打开新文本文件
添加
import语句为程序创建结构,包括基本的异常处理
代码如下:
import os, uuid
from azure.identity import DefaultAzureCredential
from azure.storage.queue import QueueServiceClient, QueueClient, QueueMessage, BinaryBase64DecodePolicy, BinaryBase64EncodePolicy

try:
    print("Azure Queue storage - Python quickstart sample")
    # Quickstart code goes here
except Exception as ex:
    print('Exception:')
    print(ex)
在 queues-quickstart 目录中将新文件另存为 queues-quickstart.py。
向 Azure 进行身份验证
对大多数 Azure 服务的应用程序请求必须获得授权。 要在代码中实现与 Azure 服务的无密码连接,推荐使用 Azure 标识客户端库提供的 DefaultAzureCredential 类。
还可以直接使用密码、连接字符串或其他凭据授权对 Azure 服务的请求。 但是,应谨慎使用此方法。 开发人员必须尽量避免在不安全的位置公开这些机密。 任何可获得密码或密钥的人员都可进行身份验证。 DefaultAzureCredential 提供比帐户密钥更好的管理和安全优势,来实现无密码身份验证。 以下示例演示了这两个选项。
DefaultAzureCredential 是适用于 Python 的 Azure 标识客户端库提供的类。 有关 DefaultAzureCredential 的详细信息,请参阅 DefaultAzureCredential 概述。 DefaultAzureCredential 支持多种身份验证方法,并确定应在运行时使用哪种方法。 通过这种方法,你的应用可在不同环境(本地与生产)中使用不同的身份验证方法,而无需实现特定于环境的代码。
例如,应用可在本地开发时使用 Visual Studio Code 登录凭据进行身份验证,然后在部署到 Azure 后使用托管标识。 此转换不需要进行任何代码更改。
在本地进行开发时,请确保访问队列数据的用户帐户具有正确的权限。 需有“存储队列数据参与者”角色才能读取和写入队列数据。 若要为你自己分配此角色,需要具有“用户访问管理员”角色,或者具有包含 Microsoft.Authorization/roleAssignments/write 操作的其他角色。 可使用 Azure 门户、Azure CLI 或 Azure PowerShell 向用户分配 Azure RBAC 角色。 可以在范围概述页上详细了解角色分配的可用范围。
在此方案中,你将为用户帐户分配权限(范围为存储帐户)以遵循最低权限原则。 这种做法仅为用户提供所需的最低权限,并创建更安全的生产环境。
以下示例将“存储队列数据参与者”角色分配给用户帐户,该角色提供对存储帐户中的队列数据的读取和写入访问权限。
重要
在大多数情况下,角色分配在 Azure 中传播需要一两分钟的时间,但极少数情况下最多可能需要 8 分钟。 如果在首次运行代码时收到身份验证错误,请稍等片刻再试。
在 Azure 门户中,使用主搜索栏或左侧导航找到存储帐户。
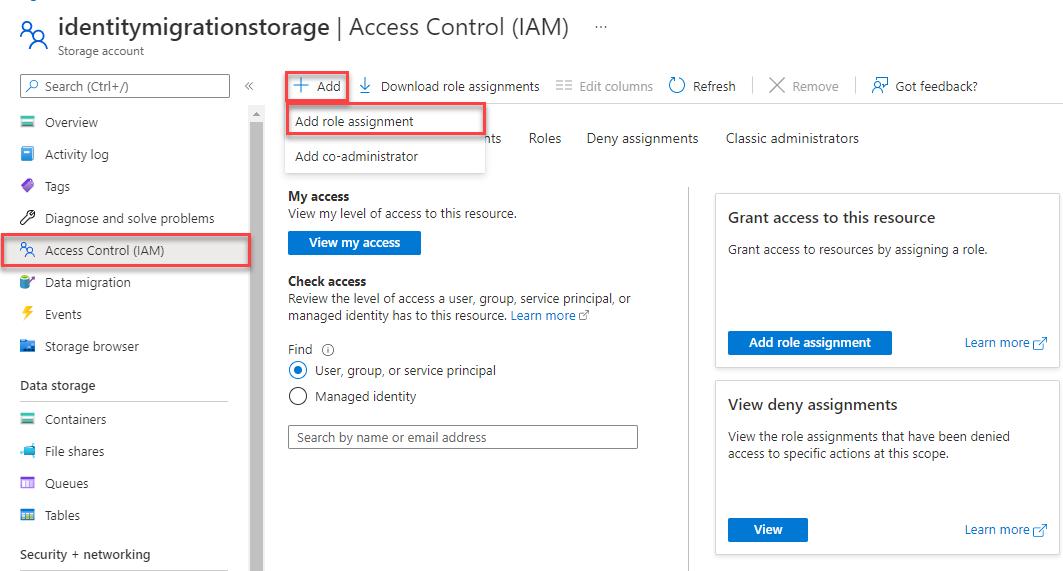
在存储帐户概述页的左侧菜单中选择“访问控制 (IAM)”。
在“访问控制 (IAM)”页上,选择“角色分配”选项卡。
从顶部菜单中选择“+ 添加”,然后从出现的下拉菜单中选择“添加角色分配”。

使用搜索框将结果筛选为所需角色。 在此示例中,请搜索“存储队列数据参与者”并选择匹配的结果,然后选择“下一步”。
在“访问权限分配对象”下,选择“用户、组或服务主体”,然后选择“+ 选择成员”。
在对话框中,搜索 Microsoft Entra ID 用户名(通常是 user@domain 电子邮件地址),然后选中对话框底部的“选择”。
选择“查看 + 分配”转到最后一页,然后再次选择“查看 + 分配”完成该过程。
对象模型
Azure 队列存储是一项可存储大量消息的服务。 队列消息大小最大可为 64 KB。 一个队列可以包含数百万条消息,直至达到存储帐户的总容量限值。 队列通常用于创建要异步处理的积压工作 (backlog)。 队列存储提供了三种类型的资源:
- 存储帐户:对 Azure 存储的所有访问都要通过存储帐户来完成。 有关存储帐户的详细信息,请参阅存储帐户概述
- 队列:一个队列包含一组消息。 所有消息必须位于相应的队列中。 请注意,队列名称必须全部小写。 有关命名队列的信息,请参阅 命名队列和元数据。
- 消息:一条消息(无论哪种格式)的最大大小为 64 KB。 消息最多可以在队列中保留 7 天。 在 2017-07-29 或更高版本中,最大生存时间可以是任何正数,或者是 -1(表示消息不会过期)。 如果省略此参数,则默认的生存时间为 7 天。
以下图示显示了这些资源之间的关系。

使用以下 Python 类与这些资源进行交互:
QueueServiceClient:可以通过QueueServiceClient管理存储帐户中的所有队列。QueueClient:可以通过QueueClient类管理和操作单个队列及其消息。QueueMessage:QueueMessage类表示在队列上调用receive_messages时返回的单个对象。
代码示例
这些示例代码片段演示如何使用适用于 Python 的 Azure 队列存储客户端库执行以下操作:
授予访问权限并创建客户端对象
确保使用分配了该角色的同一 Microsoft Entra 帐户进行身份验证。 可通过 Azure CLI、Visual Studio Code 或 Azure PowerShell 进行身份验证。
使用以下命令通过 Azure CLI 登录到 Azure:
az login
进行身份验证后,可以使用 DefaultAzureCredential 创建和授权 QueueClient 对象,以便访问存储帐户中的队列数据。 DefaultAzureCredential 将自动发现并使用你在上一步用来登录的帐户。
若要使用 DefaultAzureCredential 进行授权,请确保已添加 azure-identity 包,如安装包中所述。 此外,请确保在 queues-quickstart.py 文件中添加以下 import 语句:
from azure.identity import DefaultAzureCredential
请确定队列的名称并创建 QueueClient 类的实例,使用 DefaultAzureCredential 进行授权。 我们使用此客户端对象创建存储帐户中的队列资源并与之交互。
重要
队列名称只能包含小写字母、数字和连字符,并且必须以字母或数字开头。 每个连字符的前后必须为非连字符字符。 名称的长度还必须介于 3 到 63 个字符之间。 若要详细了解如何命名队列,请参阅命名队列和元数据。
在 try 块中添加以下代码,并确保替换 <storage-account-name> 占位符值:
    print("Azure Queue storage - Python quickstart sample")

    # Create a unique name for the queue
    queue_name = "quickstartqueues-" + str(uuid.uuid4())

    account_url = "https://<storageaccountname>.queue.core.chinacloudapi.cn"
    default_credential = DefaultAzureCredential()

    # Create the QueueClient object
    # We'll use this object to create and interact with the queue
    queue_client = QueueClient(account_url, queue_name=queue_name ,credential=default_credential)
队列消息以文本形式存储。 如果要存储二进制数据,请在将消息放入队列之前设置 Base64 编码和解码函数。
可以在创建客户端对象时配置 Base64 编码和解码函数:
# Setup Base64 encoding and decoding functions
base64_queue_client = QueueClient.from_connection_string(
                            conn_str=connect_str, queue_name=q_name,
                            message_encode_policy = BinaryBase64EncodePolicy(),
                            message_decode_policy = BinaryBase64DecodePolicy()
                        )
创建队列
使用 QueueClient 对象,通过调用 create_queue 方法在存储帐户中创建队列。
将此代码添加到 try 块的末尾:
    print("Creating queue: " + queue_name)

    # Create the queue
    queue_client.create_queue()
向队列添加消息
以下代码片段通过调用 send_message 方法,将消息添加到队列。 它还保存从第三个 send_message 调用返回的 QueueMessage。 saved_message 用于在稍后的程序中更新消息内容。
将此代码添加到 try 块的末尾:
    print("\nAdding messages to the queue...")

    # Send several messages to the queue
    queue_client.send_message(u"First message")
    queue_client.send_message(u"Second message")
    saved_message = queue_client.send_message(u"Third message")
查看队列中的消息
通过调用 peek_messages 方法,查看队列中的消息。 此方法从队列前面检索一条或多条消息,但不更改消息的可见性。
将此代码添加到 try 块的末尾:
    print("\nPeek at the messages in the queue...")

    # Peek at messages in the queue
    peeked_messages = queue_client.peek_messages(max_messages=5)

    for peeked_message in peeked_messages:
        # Display the message
        print("Message: " + peeked_message.content)
更新队列中的消息
通过调用 update_message 方法来更新消息的内容。 此方法可以更改消息的可见性超时和内容。 消息内容必须是最大为 64 KB 的 UTF-8 编码字符串。 除了新内容,还会传入代码中之前保存的消息中的值。 saved_message 值标识要更新的消息。
    print("\nUpdating the third message in the queue...")

    # Update a message using the message saved when calling send_message earlier
    queue_client.update_message(saved_message, pop_receipt=saved_message.pop_receipt, \
        content="Third message has been updated")
获取队列长度
可以获取队列中消息的估计数。
get_queue_properties 方法返回包括 approximate_message_count 在内的队列属性。
properties = queue_client.get_queue_properties()
count = properties.approximate_message_count
print("Message count: " + str(count))
结果是近似值,因为在服务响应请求之后,可能添加或删除了消息。
从队列接收消息
可以通过调用 receive_messages 方法,下载以前添加的消息。
将此代码添加到 try 块的末尾:
    print("\nReceiving messages from the queue...")

    # Get messages from the queue
    messages = queue_client.receive_messages(max_messages=5)
调用 receive_messages 方法时,可以选择为 max_messages 指定一个值,该值是要从队列中检索的消息数。 默认值为 1 条消息,最大值为 32 条消息。 还可以为 visibility_timeout 指定一个值,该值代表在超时期间对其他操作隐藏的消息数。 默认为 30 秒。
从队列中删除消息
接收并处理消息后,从队列中删除消息。 在本例中,“处理”即在控制台上显示消息。
在处理和删除消息之前,应用会调用 input 以暂停并等待用户输入。 在删除资源之前,请先在 Azure 门户中验证资源已正确创建。 任何未显式删除的消息最终会再次显示在队列中,以便处理它们。
将此代码添加到 try 块的末尾:
    print("\nPress Enter key to 'process' messages and delete them from the queue...")
    input()

    for msg_batch in messages.by_page():
            for msg in msg_batch:
                # "Process" the message
                print(msg.content)
                # Let the service know we're finished with
                # the message and it can be safely deleted.
                queue_client.delete_message(msg)
删除队列
以下代码使用 delete_queue 方法来删除队列,以便清除该应用所创建的资源。
将此代码添加到 try 块的末尾并保存文件:
    print("\nPress Enter key to delete the queue...")
    input()

    # Clean up
    print("Deleting queue...")
    queue_client.delete_queue()

    print("Done")
运行代码
此应用创建三条消息并将其添加到 Azure 队列。 此代码列出队列中的消息,然后检索并删除它们,最后删除队列。
在控制台窗口中,导航到包含 queues-quickstart.py 文件的目录,然后使用以下 python 命令来运行应用。
python queues-quickstart.py
应用的输出类似于以下示例:
Azure Queue Storage client library - Python quickstart sample
Creating queue: quickstartqueues-<UUID>

Adding messages to the queue...

Peek at the messages in the queue...
Message: First message
Message: Second message
Message: Third message

Updating the third message in the queue...

Receiving messages from the queue...

Press Enter key to 'process' messages and delete them from the queue...

First message
Second message
Third message has been updated

Press Enter key to delete the queue...

Deleting queue...
Done
当应用在接收到消息之前暂停时,请在 Azure 门户中检查存储帐户。 验证消息是否在队列中。
按 Enter 接收和删除消息。 出现提示时,请再次按 Enter,删除队列并完成演示。
后续步骤
在本快速入门中,你学习了如何使用 Python 代码创建队列并向其添加消息。 然后,你了解如何查看、检索和删除消息。 最后,你还了解了如何删除消息队列。
有关教程、示例、快速入门和其他文档,请访问:
- 有关使用已弃用的 Python 版本 2 SDK 的相关代码示例,请参阅使用 Python 版本 2 的代码示例。
- 若要了解详细信息,请参阅适用于 Python 的 Azure 存储库。
- 如需更多 Azure 队列存储示例应用,请参阅适用于 Python 的 Azure 队列存储客户端库 - 示例。

