注意
基本、标准和企业计划将从 2025 年 3 月中旬开始弃用,停用期为 3 年。 建议转换到 Azure 容器应用。 有关详细信息,请参阅 Azure Spring Apps 停用公告。
标准消耗和专用计划将于 2024 年 9 月 30 日开始弃用,并在六个月后完全关闭。 建议转换到 Azure 容器应用。
本文介绍如何使用已知的示例应用 PetClinic 将微服务应用程序部署到 Azure Spring Apps。
Pet Clinic 示例演示了微服务体系结构模式。 下图显示了 Azure Spring Apps 标准计划上的 PetClinic 应用程序的体系结构。
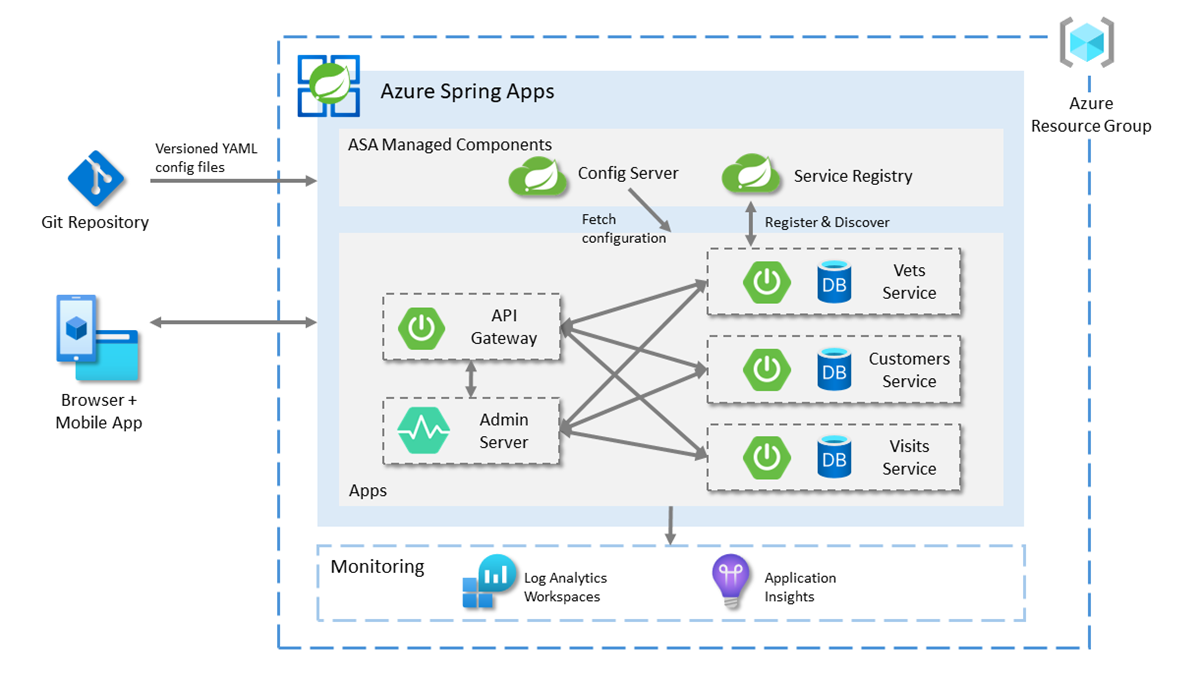
此图显示了 Pet Clinic 示例的以下体系结构流和关系:
- 使用 Azure Spring Apps 管理 Spring Boot 应用。 每个应用都使用 HSQLDB 作为永久性存储。
- 在 Azure Spring Apps 上使用托管组件 Spring Cloud Config Server 和 Eureka Service Registry。 Config Server 会读取 Git 存储库配置。
- 公开 API 网关的 URL 来对服务应用的请求进行负载均衡,并公开管理服务器的 URL 来管理应用程序。
- 使用 Log Analytics 工作区分析日志。
- 使用 Application Insights 来监视性能。
注意
本文使用简化版本的 PetClinic,该版本使用尚不可用于生产环境的内存数据库,以快速部署到 Azure Spring Apps。
部署的应用 admin-server 开放了公共访问,这是一个风险点。 生产环境需要保护 Spring Boot 管理员应用程序。
本文介绍用于部署到 Azure Spring Apps 的以下选项:
- “Azure 门户 + Maven 插件”选项是一种更为传统的方法,可用于分步创建资源和部署应用程序。 此选项适合首次使用 Azure 云服务的 Spring 开发人员。
- “Azure Developer CLI”选项是一种更高效的方法,可通过简单的命令自动创建资源和部署应用程序。 Azure Developer CLI 使用模板来预配所需的 Azure 资源并部署应用程序代码。 此选项适合熟悉 Azure 云服务的 Spring 开发人员。
1.先决条件
2. 准备 Spring 项目
使用以下步骤在本地准备示例:
使用以下命令克隆示例项目:
git clone https://github.com/Azure-Samples/spring-petclinic-microservices.git
导航到项目根目录,然后使用以下命令在本地运行示例项目:
bash ./scripts/run_all_without_infra.sh
成功完成脚本后,在浏览器中转到 http://localhost:8080 来访问 PetClinic 应用程序。
使用以下步骤,使用 Azure Developer CLI 模板初始化 Pet Clinic 应用程序:
在 Bash 窗口中,创建新的空文件夹,然后导航到该文件夹。
使用以下命令来初始化项目:
azd init --template Azure-Samples/spring-petclinic-microservices
以下列表描述了命令交互:
- 输入新的环境名称:提供环境名称,该名称将用作为保存所有 Azure 资源而创建的资源组的后缀。 此名称应在 Azure 订阅中具有唯一性。
控制台输出类似于以下示例的消息:
Initializing a new project (azd init)

Downloading template code to: <your-local-path>
(✓) Done: Initialized git repository
Enter a new environment name: <your-env-name>

SUCCESS: New project initialized!
You can view the template code in your directory: <your-local-path>
Learn more about running 3rd party code on our DevHub: https://aka.ms/azd-third-party-code-notice
3. 准备云环境
本部分介绍如何创建 Azure Spring Apps 服务实例和准备 Azure 云环境。
3.1. 登录到 Azure 门户
转到 Azure 门户,输入凭据以登录到门户。 默认视图是服务仪表板。
3.2. 创建 Azure Spring Apps 实例
请执行以下步骤来创建服务实例:
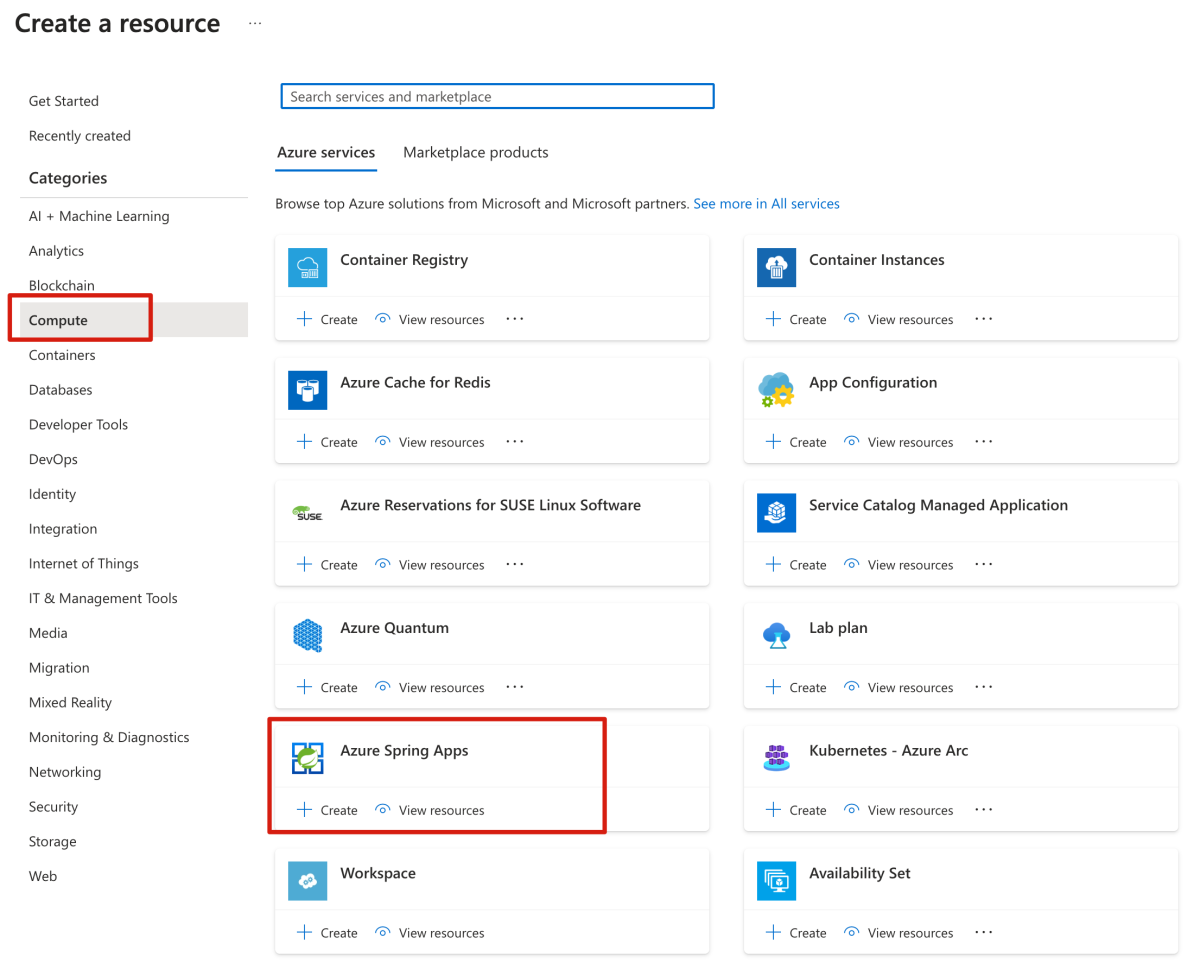
在 Azure 门户一角选择“创建资源”。
在“Azure 服务”选项卡上,选择“配置”>“Azure Spring Apps”。
在“创建 Azure Spring Apps”页上,填写“基本信息”选项卡上的窗体。
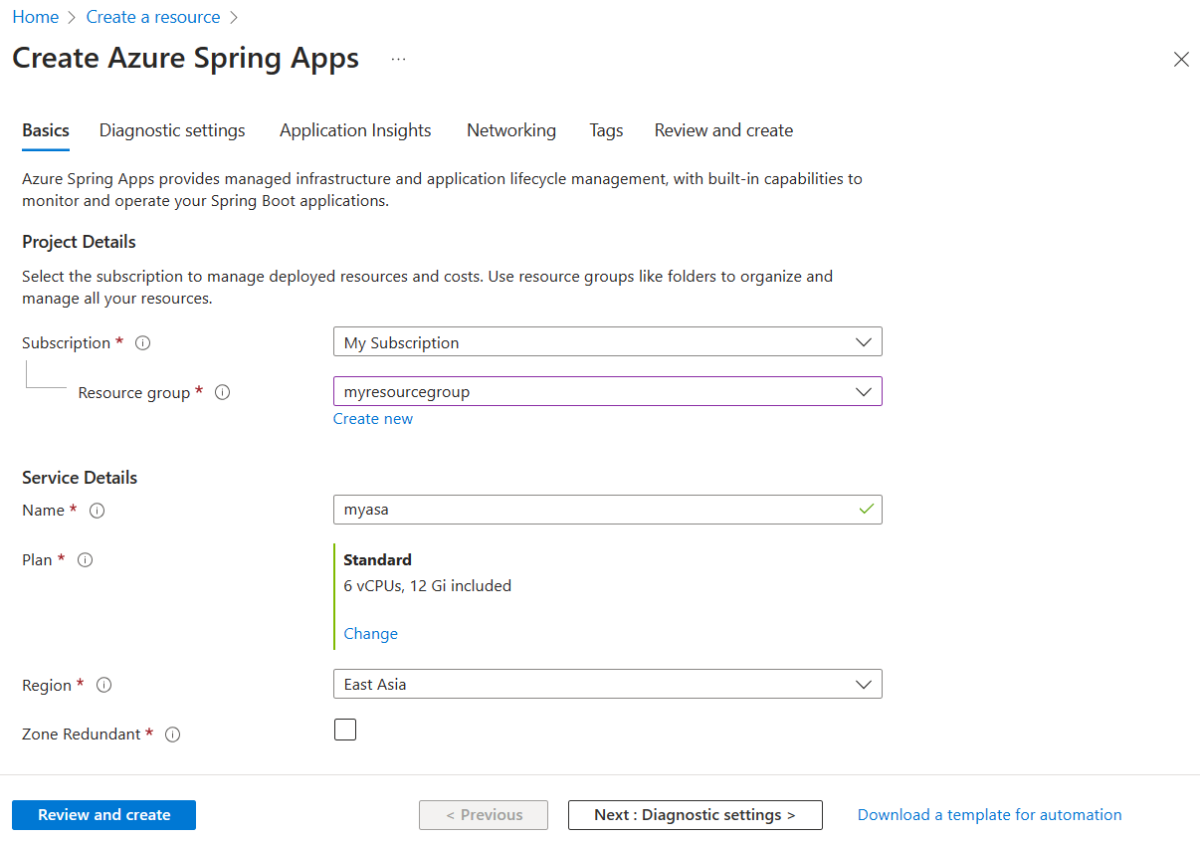
以下表为指南来填写窗体。 建议的计划为是基本。
| 设置 |
建议值 |
描述 |
| 订阅 |
你的订阅名称。 |
要用于服务器的 Azure 订阅。 如果你有多个订阅,请选择要计费的资源所在的订阅。 |
| 资源组 |
myresourcegroup |
新的资源组名称,或订阅中的现有资源组。 |
| 名称 |
myasa |
用于标识 Azure Spring Apps 实例的唯一名称。 该名称必须为 4 到 32 个字符,只能包含小写字母、数字及连字符。 服务名称的第一个字符必须是字母,最后一个字符必须是字母或数字。 |
| 规划 |
标准 |
定价层会确定与实例关联的资源和成本。 |
| 区域 |
离用户最近的区域。 |
最靠近用户的位置。 |
| 区域冗余 |
未选定 |
在 Azure 可用性区域中创建 Azure Spring Apps 服务。 目前并非在所有区域都可用。 |
导航到“创建 Azure Spring Apps”页上的“诊断设置”选项卡,然后选择“新建”,创建新的 Log Analytics 工作区实例。 在“创建新的 Log Analytics 工作区”页上,根据需要更新 Log Analytics 工作区的名称,然后选择“确定”来确认创建。

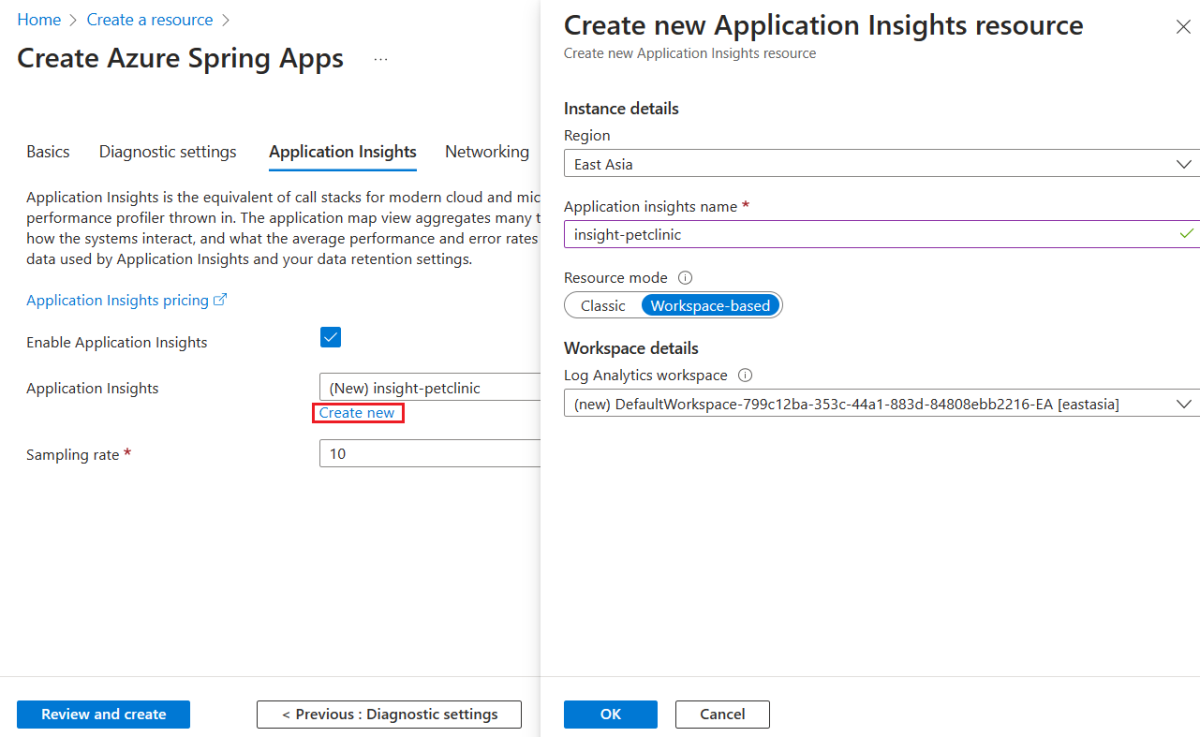
导航到“创建 Azure Spring Apps”页上的“Application Insights”选项卡,然后选择“新建”,创建新的 Application Insights 实例。 在创建新的 Application Insights 资源页上,根据需要更新 Application Insights 名称,选择基于工作区作为资源模式,然后选择确定来确认创建。
选择“查看 + 创建”,查看所选内容。 然后,选择“创建”以预配 Azure Spring Apps 实例。
选择“通知”图标(铃铛)来监视部署过程。 完成部署后,可以选择“固定到仪表板”,以便在 Azure 门户仪表板上创建到此服务“概述”页的快捷方式。
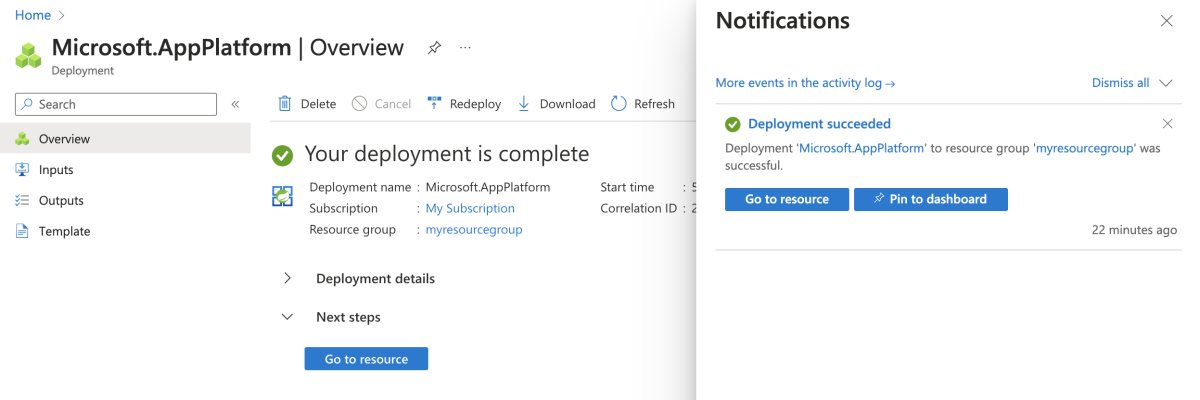
选择“转到资源”,转到“Azure Spring Apps 概述”页面。
在导航窗格中选择“Config Server”。
在“Config Server”页上的“URI”中,输入“https://github.com/Azure-Samples/spring-petclinic-microservices-config.git”,然后选择“验证”。
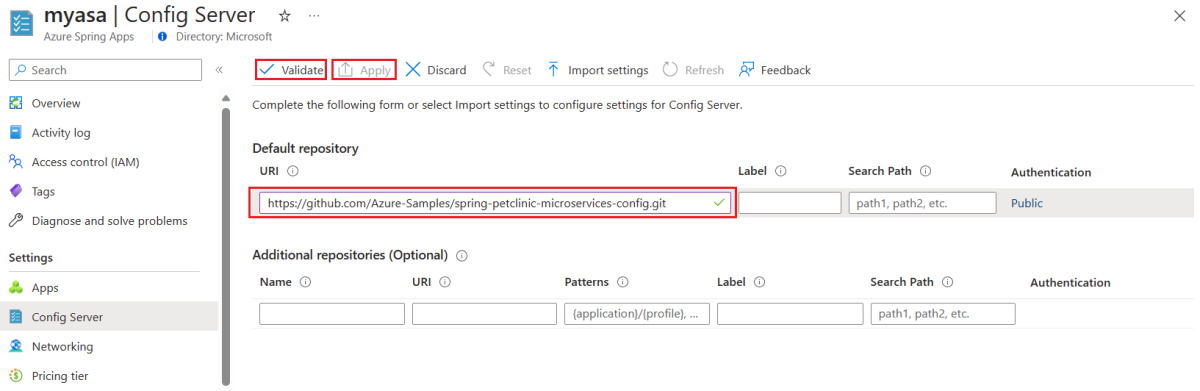
验证后,选择“应用”来完成 Config Server 配置。
使用以下步骤来创建所需的资源:
使用以下命令通过 OAuth2 登录到 Azure CLI。 如果已登录,请忽略此步骤。
azd auth login
控制台输出类似于以下示例的消息:
Logged in to Azure.
使用以下命令打包应用程序的可部署副本,将模板的基础结构预配到 Azure,然后将应用程序代码部署到这些新预配的资源:
azd provision
以下列表描述了命令交互:
- 选择要使用的 Azure 订阅:使用箭头移动,键入以进行筛选,然后按 Enter。
- 选择要使用的 Azure 位置:使用箭头移动,键入以进行筛选,然后按 Enter。
控制台输出类似于以下示例的消息:
SUCCESS: Your application was provisioned in Azure in xx minutes xx seconds.
You can view the resources created under the resource group rg-<your-environment-name> in Azure Portal:
https://portal.azure.cn/#@/resource/subscriptions/<your-subscription-id>/resourceGroups/rg-<your-environment-name>/overview
注意
此命令可能需要一段时间才能完成。 预配 Azure 资源时,系统将会显示进度指示器。
4. 将应用部署到 Azure Spring Apps
现在可以将应用部署到 Azure Spring Apps。
按照以下步骤使用适用于 Azure Spring Apps 的 Maven 插件部署微服务应用程序:
导航到示例项目目录,然后使用以下命令为 Azure Spring Apps 配置应用:
./mvnw -P spring-apps com.microsoft.azure:azure-spring-apps-maven-plugin:1.17.0:config
以下列表描述了命令交互:
- 选择子模块进行配置(以逗号分隔的输入数字,例如 [1-2,4,6],按 Enter 可全选):按 Enter 选择全部。
- OAuth2 登录:根据 OAuth2 协议授权登录到 Azure。
- 选择订阅:选择所创建的 Azure Spring Apps 实例的订阅列表编号,它默认为列表中的第一个订阅。 如果使用默认编号,请直接按 Enter。
- 选择要部署的 Azure Spring Apps:选择所创建的 Azure Spring Apps 实例的列表编号。 如果使用默认编号,请直接按 Enter。
- 选择要公开公共访问权限的应用:(以逗号分隔的输入数字,例如 [1-2,4,6],按 Enter 可全选:输入 1,5 表示
admin-server 和 api-gateway。
- 确认保存上述所有配置 (Y/n):按 y。 如果按 n,则配置不会保存在 POM 文件中。
使用以下命令生成并部署每个应用程序:
./mvnw azure-spring-apps:deploy
对于“OAuth2 登录”提示,请根据 OAuth2 协议授权登录到 Azure。
注意
部署到 Azure Spring Apps 最多可能需要 25 分钟。
运行命令后,日志会显示与下例类似的输出,该输出指示所有部署均成功:
[INFO] Deployment(default) is successfully updated.
[INFO] Deployment Status: Running
[INFO]   InstanceName:admin-server-default-xx-xx-xxx  Status:Running Reason:null       DiscoverStatus:UP
[INFO] Getting public url of app(admin-server)...
[INFO] Application url: https://<your-Azure-Spring-Apps-instance-name>-admin-server.microservices.azure.cn

...

[INFO] Getting public url of app(api-gateway)...
[INFO] Application url: https://<your-Azure-Spring-Apps-instance-name>-api-gateway.microservices.azure.cn
按照以下步骤打包应用,预配 Web 应用程序所需的 Azure 资源,然后部署到 Azure Spring Apps:
使用以下命令打包应用程序的可部署副本:
azd package
控制台输出类似于以下示例的消息:
SUCCESS: Your application was packaged for Azure in xx minutes xx seconds.
使用以下命令将应用程序代码部署到这些新预配的资源:
azd deploy
控制台输出类似于以下示例的消息:
Deploying services (azd deploy)

(✓) Done: Deploying service admin-server
- Endpoint: https://<your-Azure-Spring-Apps-instance-name>-admin-server.microservices.azure.cn

(✓) Done: Deploying service api-gateway
- Endpoint: https://<your-Azure-Spring-Apps-instance-name>-api-gateway.microservices.azure.cn

(✓) Done: Deploying service customers-service
- No endpoints were found

(✓) Done: Deploying service vets-service
- No endpoints were found

(✓) Done: Deploying service visits-service
- No endpoints were found


SUCCESS: Your application was deployed to Azure in xx minutes xx seconds.
You can view the resources created under the resource group rg-<your-environment-name> in Azure Portal:
https://portal.azure.cn/#@/resource/subscriptions/<your-subscription-id>/resourceGroups/rg-<your-environment-name>/overview
5. 验证应用
以下部分介绍如何验证部署。
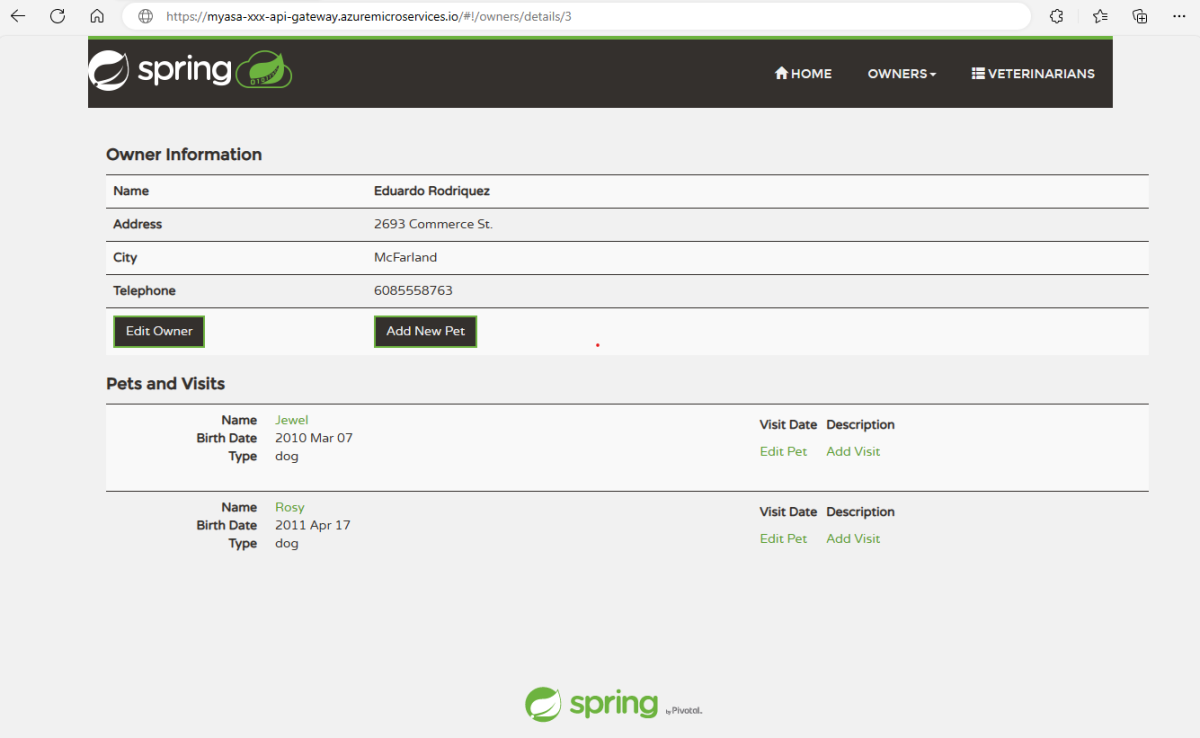
5.1. 访问应用程序
使用部署日志输出中的 URL 信息打开由名为 api-gateway 的应用公开的 URL,例如 https://<your-Azure-Spring-Apps-instance-name>-api-gateway.microservices.azure.cn。 应用程序应该与以下屏幕截图类似:
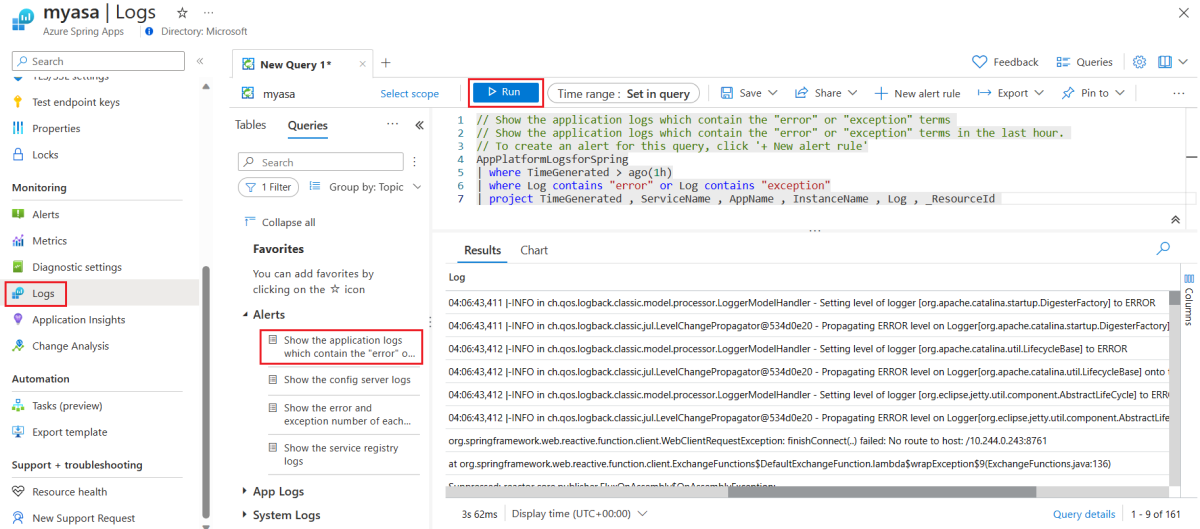
5.2. 查询应用程序日志
浏览完 Pet Clinic 的每个功能后,Log Analytics 工作区会收集每个应用程序的日志。 可使用自定义查询来检查日志,如以下屏幕截图所示:
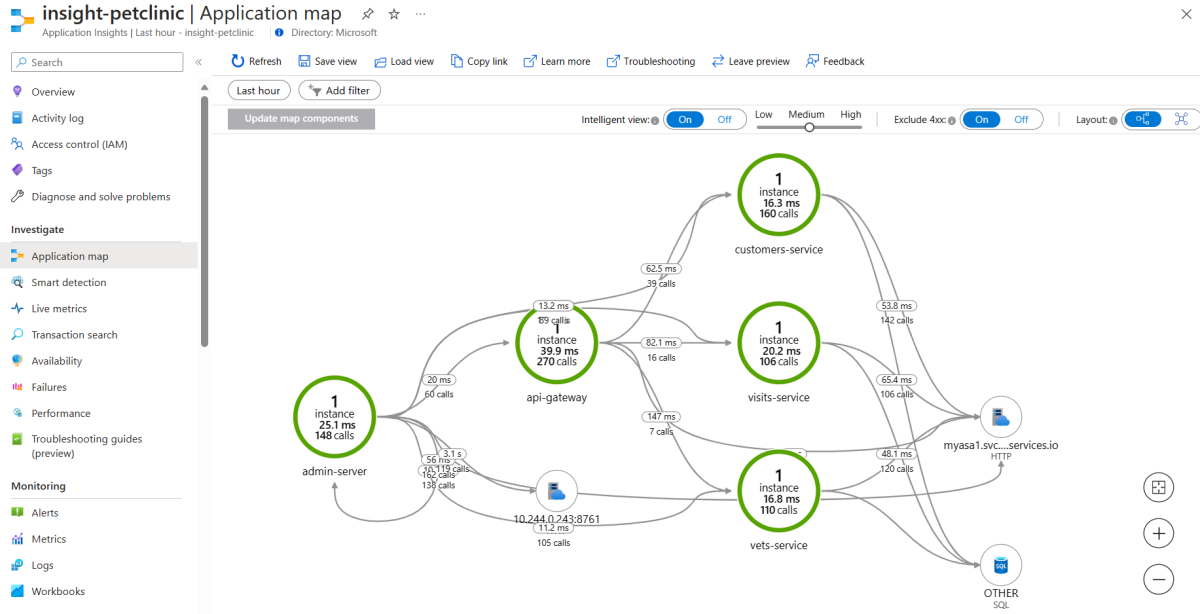
5.3. 监视应用程序
Application Insights 监视应用程序依赖项,如以下应用程序跟踪映射所示:
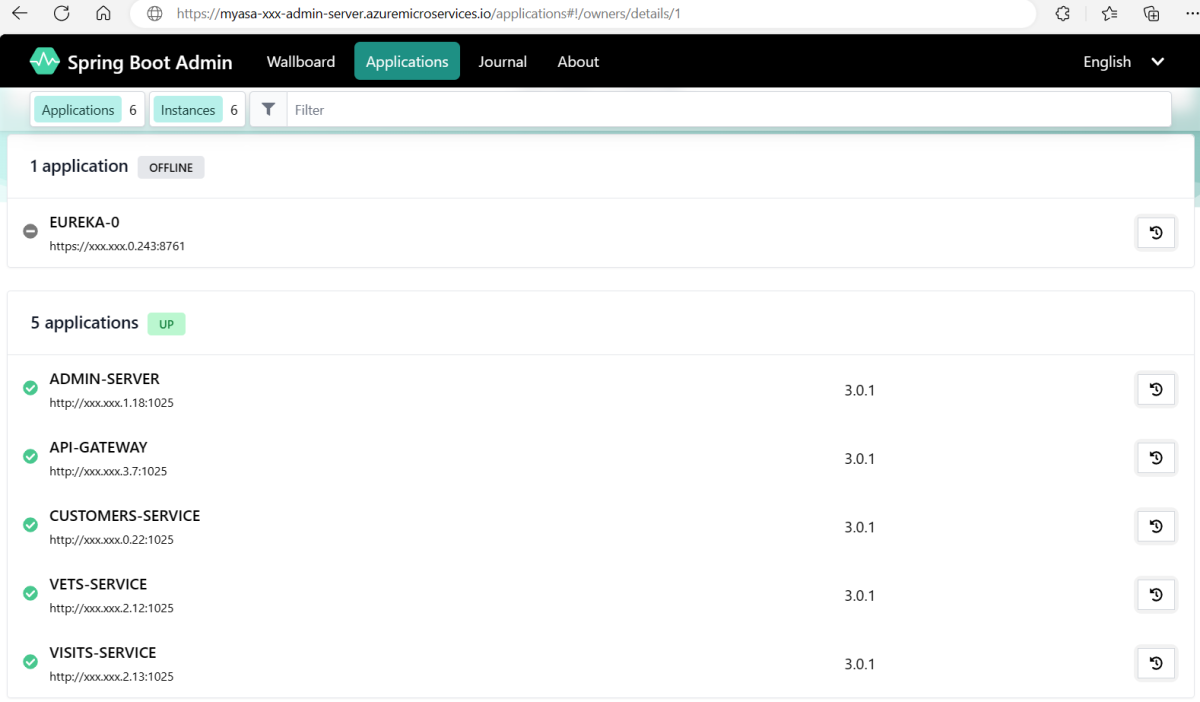
打开应用 admin-server 公开的 URL 来通过 Spring Boot 管理服务器管理应用程序,如以下屏幕截图所示:
6.清理资源
如果打算继续使用后续的快速入门和教程,则可能需要保留这些资源。 不再需要资源时,可以清理不必要的资源以避免 Azure 费用。
按以下步骤删除整个资源组,包括新创建的服务实例:
在 Azure 门户中查找资源组。 在导航菜单上,选择“资源组”,然后选择资源组的名称。
在“资源组”页上,选择“删除”。 在文本框中输入资源组的名称以确认删除,然后选择“删除”。
使用以下命令删除此示例应用程序中使用的所有 Azure 资源:
azd down
以下列表描述了命令交互:
- 要删除的资源总数:<resources-total>,是否确定要继续?:按 y。
控制台输出类似于以下示例的消息:
SUCCESS: Your application was removed from Azure in xx minutes xx seconds.
7. 后续步骤
有关详细信息,请参阅以下文章:


