本教程将介绍如何使用 Microsoft Purview Python SDK。 可以使用 SDK 以编程方式执行所有最常见的 Microsoft Purview 操作,而不是通过 Microsoft Purview 治理门户执行。
本教程将介绍如何使用 SDK 完成以下操作:
- 授予以编程方式使用 Microsoft Purview 所需的权限
- 在 Microsoft Purview 中将 Blob 存储容器注册为数据源
- 定义并运行扫描
- 搜索目录
- 删除数据源
先决条件
在本教程中,需要:
- Python 3.6 或更高版本
- 一个有效的 Azure 订阅。 如果你没有该订阅,可以创建一个试用订阅。
- 与订阅关联的 Microsoft Entra 租户。
- 一个 Azure 存储帐户。 如果还没有帐户,可以按照本快速入门指南中的步骤创建帐户。
- Microsoft Purview 帐户。 如果还没有帐户,可以按照本快速入门指南中的步骤创建帐户。
- 具有客户端密码的服务主体。
重要
对于这些脚本,终结点值会有所不同,具体取决于所使用的 Microsoft Purview 门户。 经典 Microsoft Purview 治理门户purview.azure.cn/,新 Microsoft Purview 门户的终结点:purview.microsoft.com/
因此,如果使用的是新门户,终结点值将类似于:"https://consotopurview.scan.purview.microsoft.com"
授予 Microsoft Purview 对存储帐户的访问权限
需要先授予 Microsoft Purview 合适的角色,然后才能扫描存储帐户的内容。
通过 Azure 门户转到存储帐户。
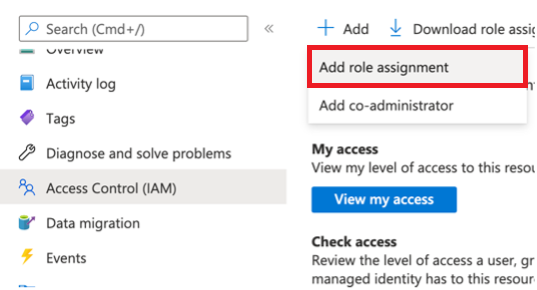
选择“访问控制 (IAM)”。
选择“添加”按钮,然后选择“添加角色分配”。
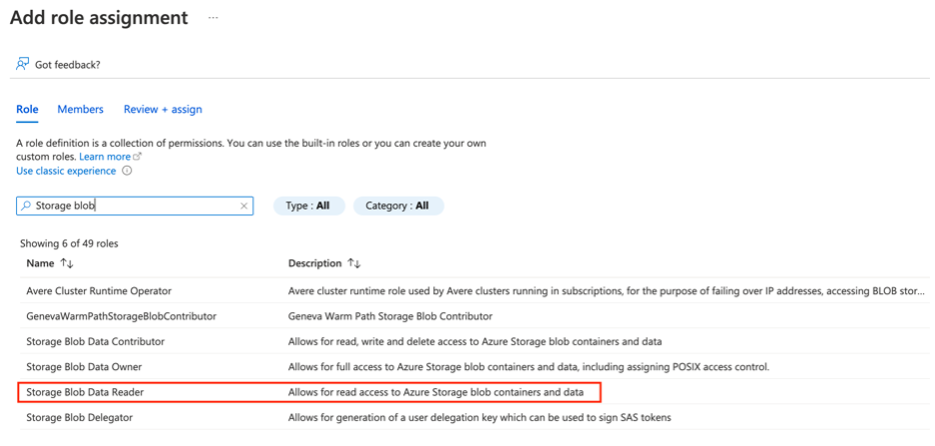
在下一个窗口中,搜索“存储 blob 读者”角色并选择它:
然后转到“成员”选项卡并选择“选择成员”:
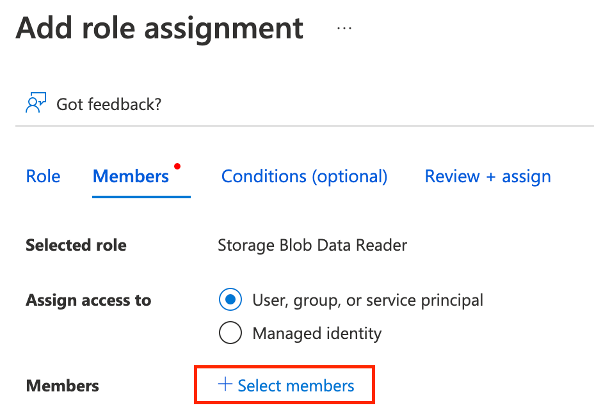
右侧会出现一个新窗格。 搜索并选择现有 Microsoft Purview 实例的名称。
然后可以选择“查看 + 分配”。
Microsoft Purview 现在拥有扫描 Blob 存储所需的读取权限。
授予应用程序对 Microsoft Purview 帐户的访问权限
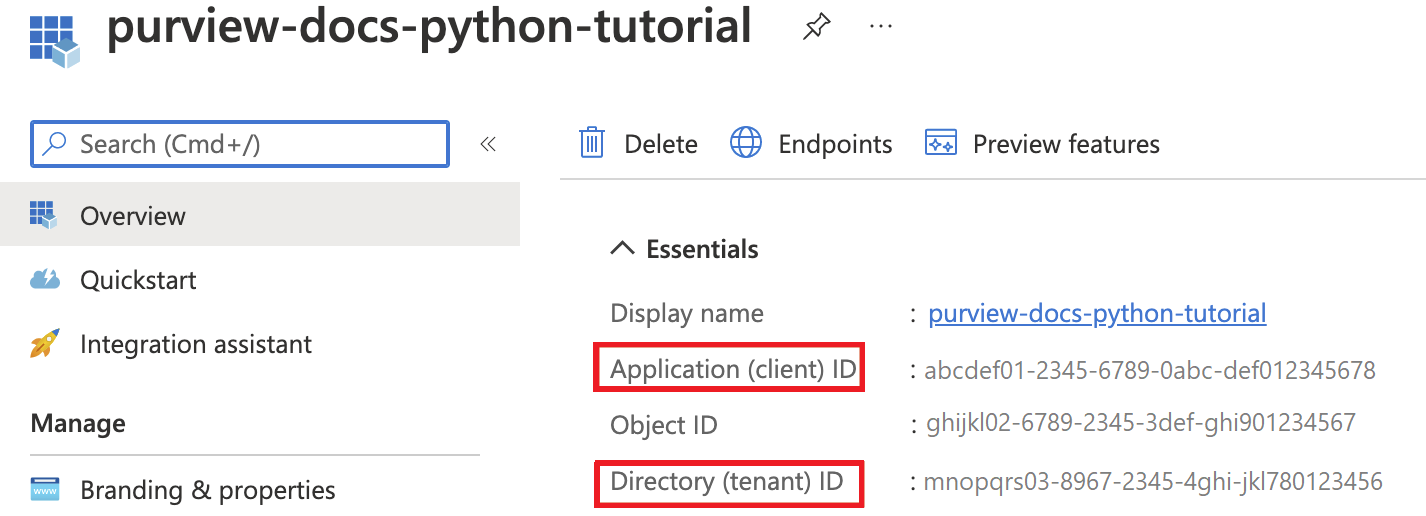
首先,需要来自服务主体的客户端 ID、租户 ID 和客户端密码。 若要查找此信息,请选择 Microsoft Entra ID。
然后,选择“应用注册”。
选择应用程序并找到所需的信息:
名称
客户端 ID(或应用程序 ID)
租户 ID(或目录 ID)
-
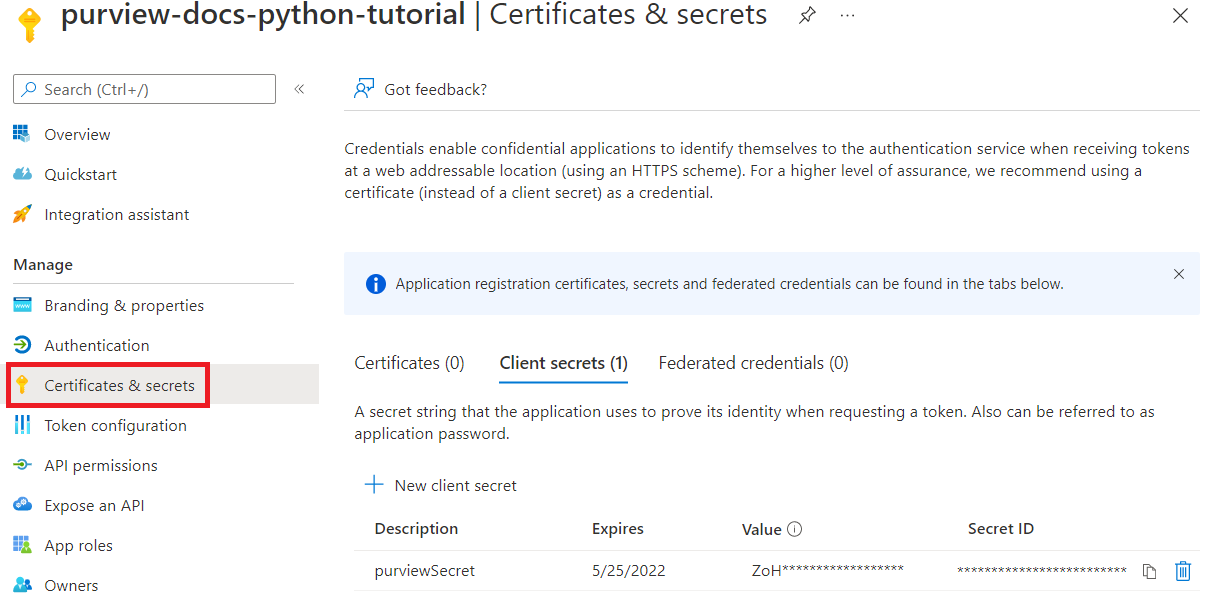
现在,你需要为服务主体提供相关 Microsoft Purview 角色。 为此,请访问 Microsoft Purview 实例。 选择“打开 Microsoft Purview 治理门户”或直接打开 Microsoft Purview 的治理门户,然后选择部署的实例。
在 Microsoft Purview 治理门户中,选择“数据映射”,然后选择“集合”:
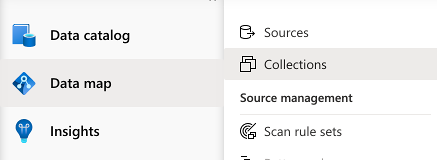
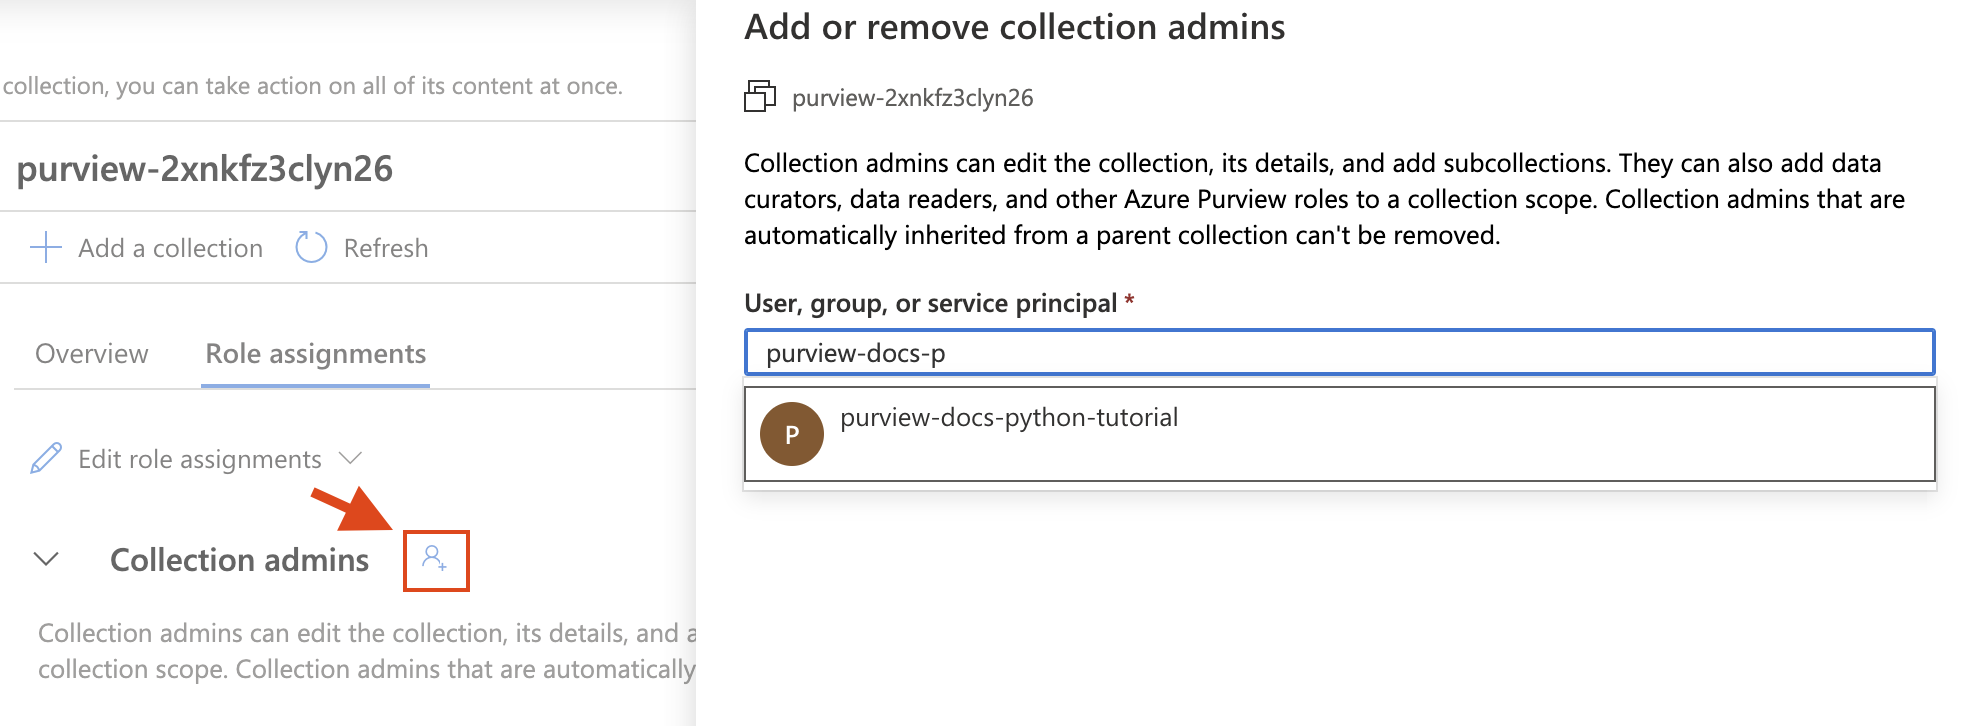
选择要使用的集合,然后转到“角色分配”选项卡。在以下角色中添加服务主体:
- 集合管理员
- 数据源管理员
- 数据策展员
- 数据读取者
对于每个角色,选择“编辑角色分配”按钮,然后选择要向其添加服务主体的角色。 或者,选择每个角色旁边的“添加”按钮,然后通过搜索服务主体名称或客户端 ID 添加服务主体,如下所示:
安装 Python 包
- 打开新的命令提示符或终端
- 安装 Azure 标识包以进行身份验证:
pip install azure-identity - 安装 Microsoft Purview 扫描客户端包:
pip install azure-purview-scanning - 安装 Microsoft Purview 管理客户端包:
pip install azure-purview-administration - 安装 Microsoft Purview 客户端包:
pip install azure-purview-catalog - 安装 Microsoft Purview 帐户包:
pip install azure-purview-account - 安装 Azure 核心包:
pip install azure-core
创建 Python 脚本文件
创建一个纯文本文件,并将其保存为后缀为 .py 的 Python 脚本。 例如:tutorial.py。
实例化扫描、目录和管理客户端
本部分介绍如何实例化:
- 用于注册数据源、创建和管理扫描规则、触发扫描等的扫描客户端。
- 用于通过搜索、浏览发现的资产、确定数据敏感度等与目录交互的目录客户端。
- 用于与 Microsoft Purview 数据映射本身进行交互以完成列出集合等操作的管理客户端。
首先,需要向 Microsoft Entra ID 进行身份验证。 为此,将使用所创建的客户端密码。
从所需的 import 语句开始:我们的三个客户端、凭据语句和 Azure 异常语句。
from azure.purview.scanning import PurviewScanningClient
from azure.purview.catalog import PurviewCatalogClient
from azure.purview.administration.account import PurviewAccountClient
from azure.identity import ClientSecretCredential
from azure.core.exceptions import HttpResponseError
在代码中指定以下信息:
- 客户端 ID(或应用程序 ID)
- 租户 ID(或目录 ID)
- 客户端机密
client_id = "<your client id>"
client_secret = "<your client secret>"
tenant_id = "<your tenant id>"
指定终结点:
重要
终结点值会有所不同,具体取决于所使用的 Microsoft Purview 门户。 经典 Microsoft Purview 治理门户的终结点:
https://{your_purview_account_name}.purview.azure.cn/,新 Microsoft Purview 门户的终结点:https://api.purview-service.microsoft.com经典 Microsoft Purview 治理门户的扫描终结点:
https://{your_purview_account_name}.scan.purview.azure.cn/,新 Microsoft Purview 门户的终结点:https://api.scan.purview-service.microsoft.compurview_endpoint = "<endpoint>" purview_scan_endpoint = "<scan endpoint>"现在,可以实例化三个客户端:
def get_credentials(): credentials = ClientSecretCredential(client_id=client_id, client_secret=client_secret, tenant_id=tenant_id) return credentials def get_purview_client(): credentials = get_credentials() client = PurviewScanningClient(endpoint=purview_scan_endpoint, credential=credentials, logging_enable=True) return client def get_catalog_client(): credentials = get_credentials() client = PurviewCatalogClient(endpoint=purview_endpoint, credential=credentials, logging_enable=True) return client def get_admin_client(): credentials = get_credentials() client = PurviewAccountClient(endpoint=purview_endpoint, credential=credentials, logging_enable=True) return client
我们的许多脚本都将从这些相同的步骤开始,因为我们需要这些客户端来与帐户进行交互。
注册数据源
在本部分中,将注册 Blob 存储。
正如之前部分所讨论,首先将导入访问 Microsoft Purview 帐户所需的客户端。 还要导入 Azure 错误响应包以便排除故障,并导入 ClientSecretCredential 以构造 Azure 凭据。
from azure.purview.administration.account import PurviewAccountClient from azure.purview.scanning import PurviewScanningClient from azure.core.exceptions import HttpResponseError from azure.identity import ClientSecretCredential按照以下指南收集存储帐户的资源 ID:获取存储帐户的资源 ID。
然后,在 Python 文件中定义以下信息,以便能够以编程方式注册 Blob 存储:
storage_name = "<name of your Storage Account>" storage_id = "<id of your Storage Account>" rg_name = "<name of your resource group>" rg_location = "<location of your resource group>" reference_name_purview = "<name of your Microsoft Purview account>"提供要在其中注册 Blob 存储的集合的名称。 (应该是之前在其中应用权限的集合。如果不是,请先将权限应用于此集合。)如果是根集合,请使用与 Microsoft Purview 实例相同的名称。
collection_name = "<name of your collection>"创建一个函数用于构造可访问 Microsoft Purview 帐户的凭据:
client_id = "<your client id>" client_secret = "<your client secret>" tenant_id = "<your tenant id>" def get_credentials(): credentials = ClientSecretCredential(client_id=client_id, client_secret=client_secret, tenant_id=tenant_id) return credentialsMicrosoft Purview 数据映射中的所有集合都有一个易记名称和一个名称。
- 易记名称是在集合中看到的名称。 例如:Sales。
- 所有集合(根集合除外)的名称均为数据映射分配的六字符名称。
Python 需要此六字符名称来引用任何子集合。 若要将易记名称自动转换为脚本所需的六字符集合名称,请添加以下代码块:
重要
终结点值会有所不同,具体取决于所使用的 Microsoft Purview 门户。 经典 Microsoft Purview 治理门户purview.azure.cn/,新 Microsoft Purview 门户的终结点:purview.microsoft.com/
因此,如果使用的是新门户,终结点值将类似于:"https://consotopurview.scan.purview.microsoft.com"
def get_admin_client(): credentials = get_credentials() client = PurviewAccountClient(endpoint=purview_endpoint, credential=credentials, logging_enable=True) return client try: admin_client = get_admin_client() except ValueError as e: print(e) collection_list = client.collections.list_collections() for collection in collection_list: if collection["friendlyName"].lower() == collection_name.lower(): collection_name = collection["name"]对于这两个客户端,根据操作,还需要提供输入正文。 若要注册源,需要为数据源注册提供输入正文:
ds_name = "<friendly name for your data source>" body_input = { "kind": "AzureStorage", "properties": { "endpoint": f"https://{storage_name}.blob.core.chinacloudapi.cn/", "resourceGroup": rg_name, "location": rg_location, "resourceName": storage_name, "resourceId": storage_id, "collection": { "type": "CollectionReference", "referenceName": collection_name }, "dataUseGovernance": "Disabled" } }现在,可以调用 Microsoft Purview 客户端并注册数据源。
重要
终结点值会有所不同,具体取决于所使用的 Microsoft Purview 门户。 经典 Microsoft Purview 治理门户的终结点:
https://{your_purview_account_name}.purview.azure.cn/,新 Microsoft Purview 门户的终结点:https://api.purview-service.microsoft.com如果使用的是经典门户,则终结点值为:
https://{your_purview_account_name}.scan.purview.azure.cn。如果使用的是新门户,则终结点值为:https://scan.api.purview-service.microsoft.comdef get_purview_client(): credentials = get_credentials() client = PurviewScanningClient(endpoint={{ENDPOINT}}, credential=credentials, logging_enable=True) return client try: client = get_purview_client() except ValueError as e: print(e) try: response = client.data_sources.create_or_update(ds_name, body=body_input) print(response) print(f"Data source {ds_name} successfully created or updated") except HttpResponseError as e: print(e)
成功完成注册流程后,可以看到来自客户端的扩充正文响应。
在以下部分中,将扫描注册的数据源并搜索目录。 其中每个脚本的结构都与此注册脚本的结构相似。
完整代码
from azure.purview.scanning import PurviewScanningClient
from azure.identity import ClientSecretCredential
from azure.core.exceptions import HttpResponseError
from azure.purview.administration.account import PurviewAccountClient
client_id = "<your client id>"
client_secret = "<your client secret>"
tenant_id = "<your tenant id>"
purview_endpoint = "<endpoint>"

purview_scan_endpoint = "<scan endpoint>"
storage_name = "<name of your Storage Account>"
storage_id = "<id of your Storage Account>"
rg_name = "<name of your resource group>"
rg_location = "<location of your resource group>"
collection_name = "<name of your collection>"
ds_name = "<friendly data source name>"
def get_credentials():
credentials = ClientSecretCredential(client_id=client_id, client_secret=client_secret, tenant_id=tenant_id)
return credentials
def get_purview_client():
credentials = get_credentials()
client = PurviewScanningClient(endpoint=purview_scan_endpoint, credential=credentials, logging_enable=True)
return client
def get_admin_client():
credentials = get_credentials()
client = PurviewAccountClient(endpoint=purview_endpoint, credential=credentials, logging_enable=True)
return client
try:
admin_client = get_admin_client()
except ValueError as e:
print(e)
collection_list = admin_client.collections.list_collections()
for collection in collection_list:
if collection["friendlyName"].lower() == collection_name.lower():
collection_name = collection["name"]
body_input = {
"kind": "AzureStorage",
"properties": {
"endpoint": f"https://{storage_name}.blob.core.chinacloudapi.cn/",
"resourceGroup": rg_name,
"location": rg_location,
"resourceName": storage_name,
"resourceId": storage_id,
"collection": {
"type": "CollectionReference",
"referenceName": collection_name
},
"dataUseGovernance": "Disabled"
}
}
try:
client = get_purview_client()
except ValueError as e:
print(e)
try:
response = client.data_sources.create_or_update(ds_name, body=body_input)
print(response)
print(f"Data source {ds_name} successfully created or updated")
except HttpResponseError as e:
print(e)
扫描数据源
扫描数据源可以分两步完成:
- 创建扫描定义
- 触发扫描运行
在本教程中,将使用 Blob 存储容器的默认扫描规则。 但是,也可以使用 Microsoft Purview 扫描客户端以编程方式创建自定义扫描规则。
现在,让我们扫描在上文注册的数据源。
添加 import 语句以生成唯一标识符,调用 Microsoft Purview 扫描客户端、Microsoft Purview 管理客户端、能够进行故障排除的 Azure 错误响应包,以及用于收集 Azure 凭据的客户端密码凭据。
import uuid from azure.purview.scanning import PurviewScanningClient from azure.purview.administration.account import PurviewAccountClient from azure.core.exceptions import HttpResponseError from azure.identity import ClientSecretCredential使用凭据创建扫描客户端:
client_id = "<your client id>" client_secret = "<your client secret>" tenant_id = "<your tenant id>" def get_credentials(): credentials = ClientSecretCredential(client_id=client_id, client_secret=client_secret, tenant_id=tenant_id) return credentials def get_purview_client(): credentials = get_credentials() client = PurviewScanningClient(endpoint=f"https://{reference_name_purview}.scan.purview.azure.cn", credential=credentials, logging_enable=True) return client try: client = get_purview_client() except ValueError as e: print(e)添加代码以收集集合的内部名称。 (有关详细信息,请参阅上一部分):
collection_name = "<name of the collection where you will be creating the scan>"

def get_admin_client():
     credentials = get_credentials()
     client = PurviewAccountClient(endpoint=purview_endpoint, credential=credentials, logging_enable=True)
     return client

try:
    admin_client = get_admin_client()
except ValueError as e:
    print(e)

collection_list = client.collections.list_collections()
 for collection in collection_list:
  if collection["friendlyName"].lower() == collection_name.lower():
      collection_name = collection["name"]
然后,创建一个扫描定义:
ds_name = "<name of your registered data source>"
scan_name = "<name of the scan you want to define>"
reference_name_purview = "<name of your Microsoft Purview account>"

body_input = {
        "kind":"AzureStorageMsi",
        "properties": {
            "scanRulesetName": "AzureStorage",
            "scanRulesetType": "System", #We use the default scan rule set
            "collection":
                {
                    "referenceName": collection_name,
                    "type": "CollectionReference"
                }
        }
}

try:
    response = client.scans.create_or_update(data_source_name=ds_name, scan_name=scan_name, body=body_input)
    print(response)
    print(f"Scan {scan_name} successfully created or updated")
except HttpResponseError as e:
    print(e)
现在,扫描已定义,接下来可以使用唯一 ID 触发扫描运行:
run_id = uuid.uuid4() #unique id of the new scan

try:
    response = client.scan_result.run_scan(data_source_name=ds_name, scan_name=scan_name, run_id=run_id)
    print(response)
    print(f"Scan {scan_name} successfully started")
except HttpResponseError as e:
    print(e)
完整代码
import uuid
from azure.purview.scanning import PurviewScanningClient
from azure.purview.administration.account import PurviewAccountClient
from azure.identity import ClientSecretCredential

ds_name = "<name of your registered data source>"
scan_name = "<name of the scan you want to define>"
reference_name_purview = "<name of your Microsoft Purview account>"
client_id = "<your client id>"
client_secret = "<your client secret>"
tenant_id = "<your tenant id>"
collection_name = "<name of the collection where you will be creating the scan>"

def get_credentials():
	credentials = ClientSecretCredential(client_id=client_id, client_secret=client_secret, tenant_id=tenant_id)
	return credentials

def get_purview_client():
	credentials = get_credentials()
	client = PurviewScanningClient(endpoint=purview_scan_endpoint, credential=credentials, logging_enable=True)
	return client

def get_admin_client():
	credentials = get_credentials()
	client = PurviewAccountClient(endpoint=purview_endpoint, credential=credentials, logging_enable=True)
	return client

try:
	admin_client = get_admin_client()
except ValueError as e:
        print(e)

collection_list = admin_client.collections.list_collections()
for collection in collection_list:
	if collection["friendlyName"].lower() == collection_name.lower():
		collection_name = collection["name"]


try:
	client = get_purview_client()
except AzureError as e:
	print(e)

body_input = {
	"kind":"AzureStorageMsi",
	"properties": {
		"scanRulesetName": "AzureStorage",
		"scanRulesetType": "System",
		"collection": {
			"type": "CollectionReference",
			"referenceName": collection_name
		}
	}
}

try:
	response = client.scans.create_or_update(data_source_name=ds_name, scan_name=scan_name, body=body_input)
	print(response)
	print(f"Scan {scan_name} successfully created or updated")
except HttpResponseError as e:
	print(e)

run_id = uuid.uuid4() #unique id of the new scan

try:
	response = client.scan_result.run_scan(data_source_name=ds_name, scan_name=scan_name, run_id=run_id)
	print(response)
	print(f"Scan {scan_name} successfully started")
except HttpResponseError as e:
	print(e)
搜索目录
扫描完成后,资产很可能已被发现,甚至已被分类。 扫描后,此过程可能需要一些时间才能完成,因此在运行下一部分代码前可能需要等待。 等待扫描显示“已完成”,且资产出现在 Microsoft Purview 统一目录中。
资产准备就绪后,可以使用 Microsoft Purview 目录客户端搜索整个目录。
此时,需要导入目录客户端,而不是扫描客户端。 还包括 HTTPResponse 错误和 ClientSecretCredential。
from azure.purview.catalog import PurviewCatalogClient
from azure.identity import ClientSecretCredential
from azure.core.exceptions import HttpResponseError
创建一个函数来获取用于访问 Microsoft Purview 帐户的凭据,并实例化目录客户端。
client_id = "<your client id>"
client_secret = "<your client secret>"
tenant_id = "<your tenant id>"
reference_name_purview = "<name of your Microsoft Purview account>"

def get_credentials():
     credentials = ClientSecretCredential(client_id=client_id, client_secret=client_secret, tenant_id=tenant_id)
     return credentials

def get_catalog_client():
    credentials = get_credentials()
    client = PurviewCatalogClient(endpoint=f"https://{reference_name_purview}.scan.purview.azure.cn", credential=credentials, logging_enable=True)
    return client

try:
    client_catalog = get_catalog_client()
except ValueError as e:
    print(e)
在输入正文中配置搜索条件和关键字:
keywords = "keywords you want to search" body_input={ "keywords": keywords }此处仅指定关键字,但请记住,可以添加许多其他字段来进一步指定查询。
搜索目录:
try:
    response = client_catalog.discovery.query(search_request=body_input)
    print(response)
except HttpResponseError as e:
    print(e)
完整代码
from azure.purview.catalog import PurviewCatalogClient
from azure.identity import ClientSecretCredential
from azure.core.exceptions import HttpResponseError

client_id = "<your client id>"
client_secret = "<your client secret>"
tenant_id = "<your tenant id>"
reference_name_purview = "<name of your Microsoft Purview account>"
keywords = "<keywords you want to search for>"

def get_credentials():
	credentials = ClientSecretCredential(client_id=client_id, client_secret=client_secret, tenant_id=tenant_id)
	return credentials

def get_catalog_client():
	credentials = get_credentials()
	client = PurviewCatalogClient(endpoint=purview_endpoint, credential=credentials, logging_enable=True)
	return client

body_input={
	"keywords": keywords
}

try:
	catalog_client = get_catalog_client()
except ValueError as e:
	print(e)

try:
	response = catalog_client.discovery.query(search_request=body_input)
	print(response)
except HttpResponseError as e:
	print(e)
删除数据源
本部分介绍如何删除之前注册的数据源。 此操作相当简单,可通过扫描客户端完成。
导入扫描客户端。 还包括 HTTPResponse 错误和 ClientSecretCredential。
from azure.purview.scanning import PurviewScanningClient
from azure.identity import ClientSecretCredential
from azure.core.exceptions import HttpResponseError
创建一个函数来获取用于访问 Microsoft Purview 帐户的凭据,并实例化扫描客户端。
client_id = "<your client id>"
client_secret = "<your client secret>"
tenant_id = "<your tenant id>"
reference_name_purview = "<name of your Microsoft Purview account>"

def get_credentials():
     credentials = ClientSecretCredential(client_id=client_id, client_secret=client_secret, tenant_id=tenant_id)
     return credentials

def get_scanning_client():
    credentials = get_credentials()
    PurviewScanningClient(endpoint=f"https://{reference_name_purview}.scan.purview.azure.cn", credential=credentials, logging_enable=True)
    return client

try:
    client_scanning = get_scanning_client()
except ValueError as e:
    print(e)
删除数据源:
    ds_name = "<name of the registered data source you want to delete>"
    try:
        response = client_scanning.data_sources.delete(ds_name)
        print(response)
        print(f"Data source {ds_name} successfully deleted")
    except HttpResponseError as e:
        print(e)
完整代码
from azure.purview.scanning import PurviewScanningClient
from azure.identity import ClientSecretCredential
from azure.core.exceptions import HttpResponseError


client_id = "<your client id>"
client_secret = "<your client secret>"
tenant_id = "<your tenant id>"
reference_name_purview = "<name of your Microsoft Purview account>"
ds_name = "<name of the registered data source you want to delete>"

def get_credentials():
	credentials = ClientSecretCredential(client_id=client_id, client_secret=client_secret, tenant_id=tenant_id)
	return credentials

def get_scanning_client():
	credentials = get_credentials()
	client = PurviewScanningClient(endpoint=f"https://{reference_name_purview}.scan.purview.azure.cn", credential=credentials, logging_enable=True)
	return client

try:
	client_scanning = get_scanning_client()
except ValueError as e:
	print(e)

try:
	response = client_scanning.data_sources.delete(ds_name)
	print(response)
	print(f"Data source {ds_name} successfully deleted")
except HttpResponseError as e:
	print(e)