使用 Python 可解释性包来解释 ML 模型和预测(预览版)
本操作指南介绍如何使用 Azure 机器学习 Python SDK 的可解释性包来执行以下任务:
在本地的个人计算机上解释整个模型行为或单个预测。
为工程特征启用可解释性技术。
在 Azure 中解释整个模型的行为和单个预测。
将解释上传到 Azure 机器学习运行历史记录。
在 Jupyter 笔记本和 Azure 机器学习工作室中使用可视化仪表板与模型解释进行交互。
将评分解释器与模型一起部署,以便在推理过程中观察解释。
若要详细了解受支持的可解释性技术和机器学习模型,请参阅 Azure 机器学习中的模型可解释性和笔记本示例。
有关如何为使用自动机器学习进行训练的模型启用可解释性的指导,请参阅可解释性:自动机器学习模型的模型说明(预览)。
在个人计算机上生成特征重要性值
以下示例演示如何在不使用 Azure 服务的情况下在个人计算机上使用可解释性包。
安装
azureml-interpret包。pip install azureml-interpret在本地 Jupyter Notebook 中训练示例模型。
# load breast cancer dataset, a well-known small dataset that comes with scikit-learn
from sklearn.datasets import load_breast_cancer
from sklearn import svm
from sklearn.model_selection import train_test_split
breast_cancer_data = load_breast_cancer()
classes = breast_cancer_data.target_names.tolist()

# split data into train and test
from sklearn.model_selection import train_test_split
x_train, x_test, y_train, y_test = train_test_split(breast_cancer_data.data,
                                                    breast_cancer_data.target,
                                                    test_size=0.2,
                                                    random_state=0)
clf = svm.SVC(gamma=0.001, C=100., probability=True)
model = clf.fit(x_train, y_train)
在本地调用解释器。
- 若要初始化解释器对象,请将模型和一些训练数据传递给该解释器的构造函数。
- 若要使解释和可视化效果更具参考性,可以选择传入特征名称和输出类名称(如果执行分类)。
以下代码块演示如何在本地使用
TabularExplainer、MimicExplainer和PFIExplainer实例化解释器对象。TabularExplainer调用下面的三个 SHAP 解释器之一(TreeExplainer、DeepExplainer或KernelExplainer)。TabularExplainer为用例自动选择最适合的解释器,但你可以直接调用三个基础解释器中的每一个。
from interpret.ext.blackbox import TabularExplainer

# "features" and "classes" fields are optional
explainer = TabularExplainer(model,
                             x_train,
                             features=breast_cancer_data.feature_names,
                             classes=classes)
或
from interpret.ext.blackbox import MimicExplainer

# you can use one of the following four interpretable models as a global surrogate to the black box model

from interpret.ext.glassbox import LGBMExplainableModel
from interpret.ext.glassbox import LinearExplainableModel
from interpret.ext.glassbox import SGDExplainableModel
from interpret.ext.glassbox import DecisionTreeExplainableModel

# "features" and "classes" fields are optional
# augment_data is optional and if true, oversamples the initialization examples to improve surrogate model accuracy to fit original model.  Useful for high-dimensional data where the number of rows is less than the number of columns.
# max_num_of_augmentations is optional and defines max number of times we can increase the input data size.
# LGBMExplainableModel can be replaced with LinearExplainableModel, SGDExplainableModel, or DecisionTreeExplainableModel
explainer = MimicExplainer(model,
                           x_train,
                           LGBMExplainableModel,
                           augment_data=True,
                           max_num_of_augmentations=10,
                           features=breast_cancer_data.feature_names,
                           classes=classes)
或
from interpret.ext.blackbox import PFIExplainer

# "features" and "classes" fields are optional
explainer = PFIExplainer(model,
                         features=breast_cancer_data.feature_names,
                         classes=classes)
解释整个模型行为(全局解释)
请参阅以下示例来帮助获取聚合(全局)特征重要性值。
# you can use the training data or the test data here, but test data would allow you to use Explanation Exploration
global_explanation = explainer.explain_global(x_test)

# if you used the PFIExplainer in the previous step, use the next line of code instead
# global_explanation = explainer.explain_global(x_train, true_labels=y_train)

# sorted feature importance values and feature names
sorted_global_importance_values = global_explanation.get_ranked_global_values()
sorted_global_importance_names = global_explanation.get_ranked_global_names()
dict(zip(sorted_global_importance_names, sorted_global_importance_values))

# alternatively, you can print out a dictionary that holds the top K feature names and values
global_explanation.get_feature_importance_dict()
解释单个预测(本地解释)
通过为单个实例或一组实例调用解释来获取不同数据点的单个特征重要性值。
注意
PFIExplainer 不支持本地解释。
# get explanation for the first data point in the test set
local_explanation = explainer.explain_local(x_test[0:5])

# sorted feature importance values and feature names
sorted_local_importance_names = local_explanation.get_ranked_local_names()
sorted_local_importance_values = local_explanation.get_ranked_local_values()
原始特征转换
可以选择获取原始的未经转换的特征中的解释,而不是工程特征中的解释。 对于此选项,请将特征转换管道传递到 train_explain.py 中的解释器。 否则,解释器会根据工程特征提供解释。
支持的转换格式与 sklearn-pandas 中所述的格式相同。 一般情况下,只要转换针对单个列运行,并且很明确地可以判断它们执行一对多的转换,则就会支持这些转换。
使用 sklearn.compose.ColumnTransformer 或拟合的转换器元组列表获取原始特征的解释。 下面的示例使用 sklearn.compose.ColumnTransformer。
from sklearn.compose import ColumnTransformer

numeric_transformer = Pipeline(steps=[
    ('imputer', SimpleImputer(strategy='median')),
    ('scaler', StandardScaler())])

categorical_transformer = Pipeline(steps=[
    ('imputer', SimpleImputer(strategy='constant', fill_value='missing')),
    ('onehot', OneHotEncoder(handle_unknown='ignore'))])

preprocessor = ColumnTransformer(
    transformers=[
        ('num', numeric_transformer, numeric_features),
        ('cat', categorical_transformer, categorical_features)])

# append classifier to preprocessing pipeline.
# now we have a full prediction pipeline.
clf = Pipeline(steps=[('preprocessor', preprocessor),
                      ('classifier', LogisticRegression(solver='lbfgs'))])

# clf.steps[-1][1] returns the trained classification model
# pass transformation as an input to create the explanation object
# "features" and "classes" fields are optional
tabular_explainer = TabularExplainer(clf.steps[-1][1],
                                     initialization_examples=x_train,
                                     features=dataset_feature_names,
                                     classes=dataset_classes,
                                     transformations=preprocessor)
如果你想要使用拟合的转换器元组列表运行示例,请使用以下代码:
from sklearn.pipeline import Pipeline
from sklearn.impute import SimpleImputer
from sklearn.preprocessing import StandardScaler, OneHotEncoder
from sklearn.linear_model import LogisticRegression
from sklearn_pandas import DataFrameMapper

# assume that we have created two arrays, numerical and categorical, which holds the numerical and categorical feature names

numeric_transformations = [([f], Pipeline(steps=[('imputer', SimpleImputer(
    strategy='median')), ('scaler', StandardScaler())])) for f in numerical]

categorical_transformations = [([f], OneHotEncoder(
    handle_unknown='ignore', sparse=False)) for f in categorical]

transformations = numeric_transformations + categorical_transformations

# append model to preprocessing pipeline.
# now we have a full prediction pipeline.
clf = Pipeline(steps=[('preprocessor', DataFrameMapper(transformations)),
                      ('classifier', LogisticRegression(solver='lbfgs'))])

# clf.steps[-1][1] returns the trained classification model
# pass transformation as an input to create the explanation object
# "features" and "classes" fields are optional
tabular_explainer = TabularExplainer(clf.steps[-1][1],
                                     initialization_examples=x_train,
                                     features=dataset_feature_names,
                                     classes=dataset_classes,
                                     transformations=transformations)
通过远程运行生成特征重要性值
以下示例演示如何使用 ExplanationClient 类为远程运行启用模型可解释性。 它在概念上类似于本地过程,不过需要:
- 在远程运行中使用
ExplanationClient来上传可解释性上下文。 - 稍后在本地环境中下载该上下文。
安装
azureml-interpret包。pip install azureml-interpret在本地 Jupyter Notebook 中创建训练脚本。 例如,
train_explain.py。from azureml.interpret import ExplanationClient from azureml.core.run import Run from interpret.ext.blackbox import TabularExplainer run = Run.get_context() client = ExplanationClient.from_run(run) # write code to get and split your data into train and test sets here # write code to train your model here # explain predictions on your local machine # "features" and "classes" fields are optional explainer = TabularExplainer(model, x_train, features=feature_names, classes=classes) # explain overall model predictions (global explanation) global_explanation = explainer.explain_global(x_test) # uploading global model explanation data for storage or visualization in webUX # the explanation can then be downloaded on any compute # multiple explanations can be uploaded client.upload_model_explanation(global_explanation, comment='global explanation: all features') # or you can only upload the explanation object with the top k feature info #client.upload_model_explanation(global_explanation, top_k=2, comment='global explanation: Only top 2 features')将 Azure 机器学习计算设置为计算目标,并提交训练运行。 有关说明,请参阅创建和管理 Azure 机器学习计算群集。 示例笔记本也可能很有帮助。
下载本地 Jupyter Notebook 中的解释。
from azureml.interpret import ExplanationClient

client = ExplanationClient.from_run(run)

# get model explanation data
explanation = client.download_model_explanation()
# or only get the top k (e.g., 4) most important features with their importance values
explanation = client.download_model_explanation(top_k=4)

global_importance_values = explanation.get_ranked_global_values()
global_importance_names = explanation.get_ranked_global_names()
print('global importance values: {}'.format(global_importance_values))
print('global importance names: {}'.format(global_importance_names))
可视化效果
将说明下载到本地 Jupyter Notebook 后,可以使用说明仪表板中的可视化效果来了解和解释模型。 若要在 Jupyter Notebook 中加载说明仪表板小组件,请使用以下代码:
from raiwidgets import ExplanationDashboard

ExplanationDashboard(global_explanation, model, datasetX=x_test)
可视化效果同时支持有关工程化特征和原始特征的说明。 原始解释基于原始数据集的特征,工程化解释基于应用了特征工程的数据集的特征。
尝试解释与原始数据集相关的模型时,建议使用原始解释,因为每个特征重要性将对应于原始数据集中的一个列。 工程化解释可能有用的一个场景是,从分类特征观察各个类别的影响。 如果对某个分类特征应用了独热编码,则生成的工程化解释会为每个类别包含一个不同的重要性值,为每个独热工程化特征包含一个重要性值。 此编码在缩小范围以确定数据集的哪一部分提供的信息对模型最有用时很有用。
注意
工程化解释和原始解释按顺序计算。 首先会基于模型和特征化管道创建一个工程化解释。 然后,通过聚合来自同一原始特征的工程化特征的重要性,基于该工程化解释创建原始解释。
创建、编辑和查看数据集队列
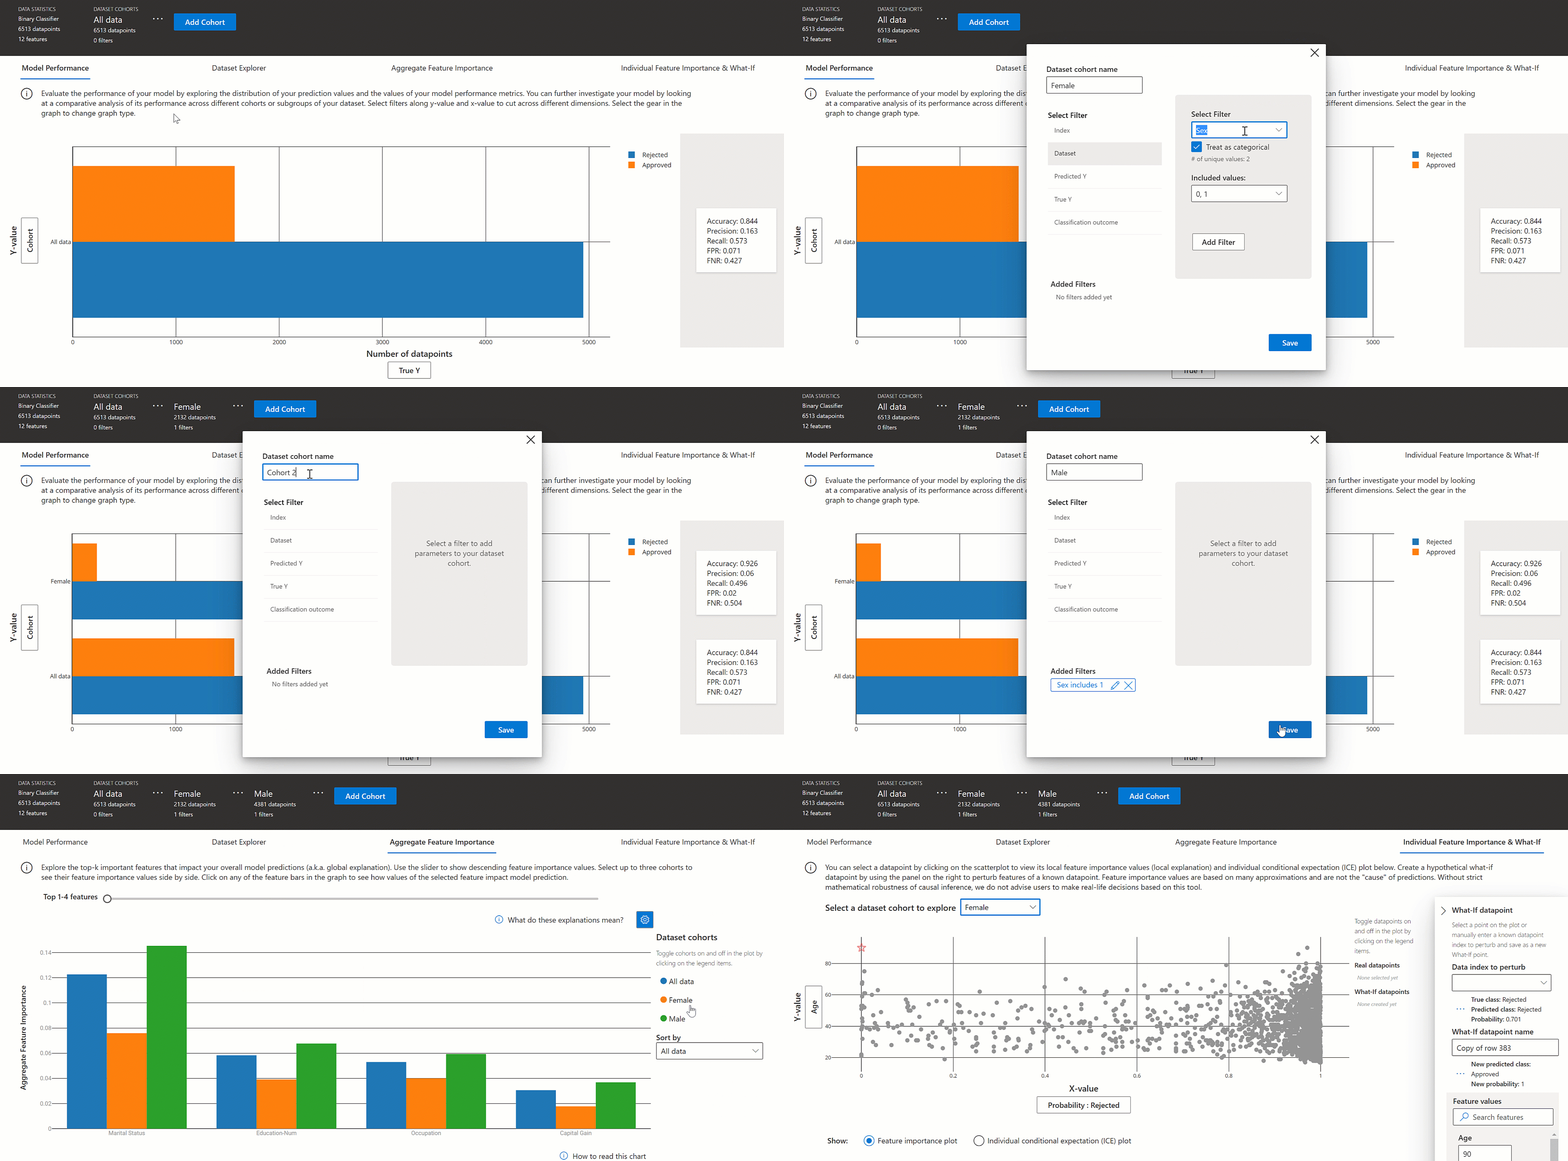
顶部的功能区显示了模型和数据的总体统计信息。 你可以将数据切分为数据集队列或子组,以研究或比较你的模型在这些已定义子组中的性能和解释。 通过在这些子组之间比较数据集统计信息和说明,你可以了解为何其中一组可能出现错误,而另一组却不出现错误。
理解整个模型行为(全局解释)
解释仪表板的前三个选项卡提供了已训练模型的总体分析及其预测和解释。
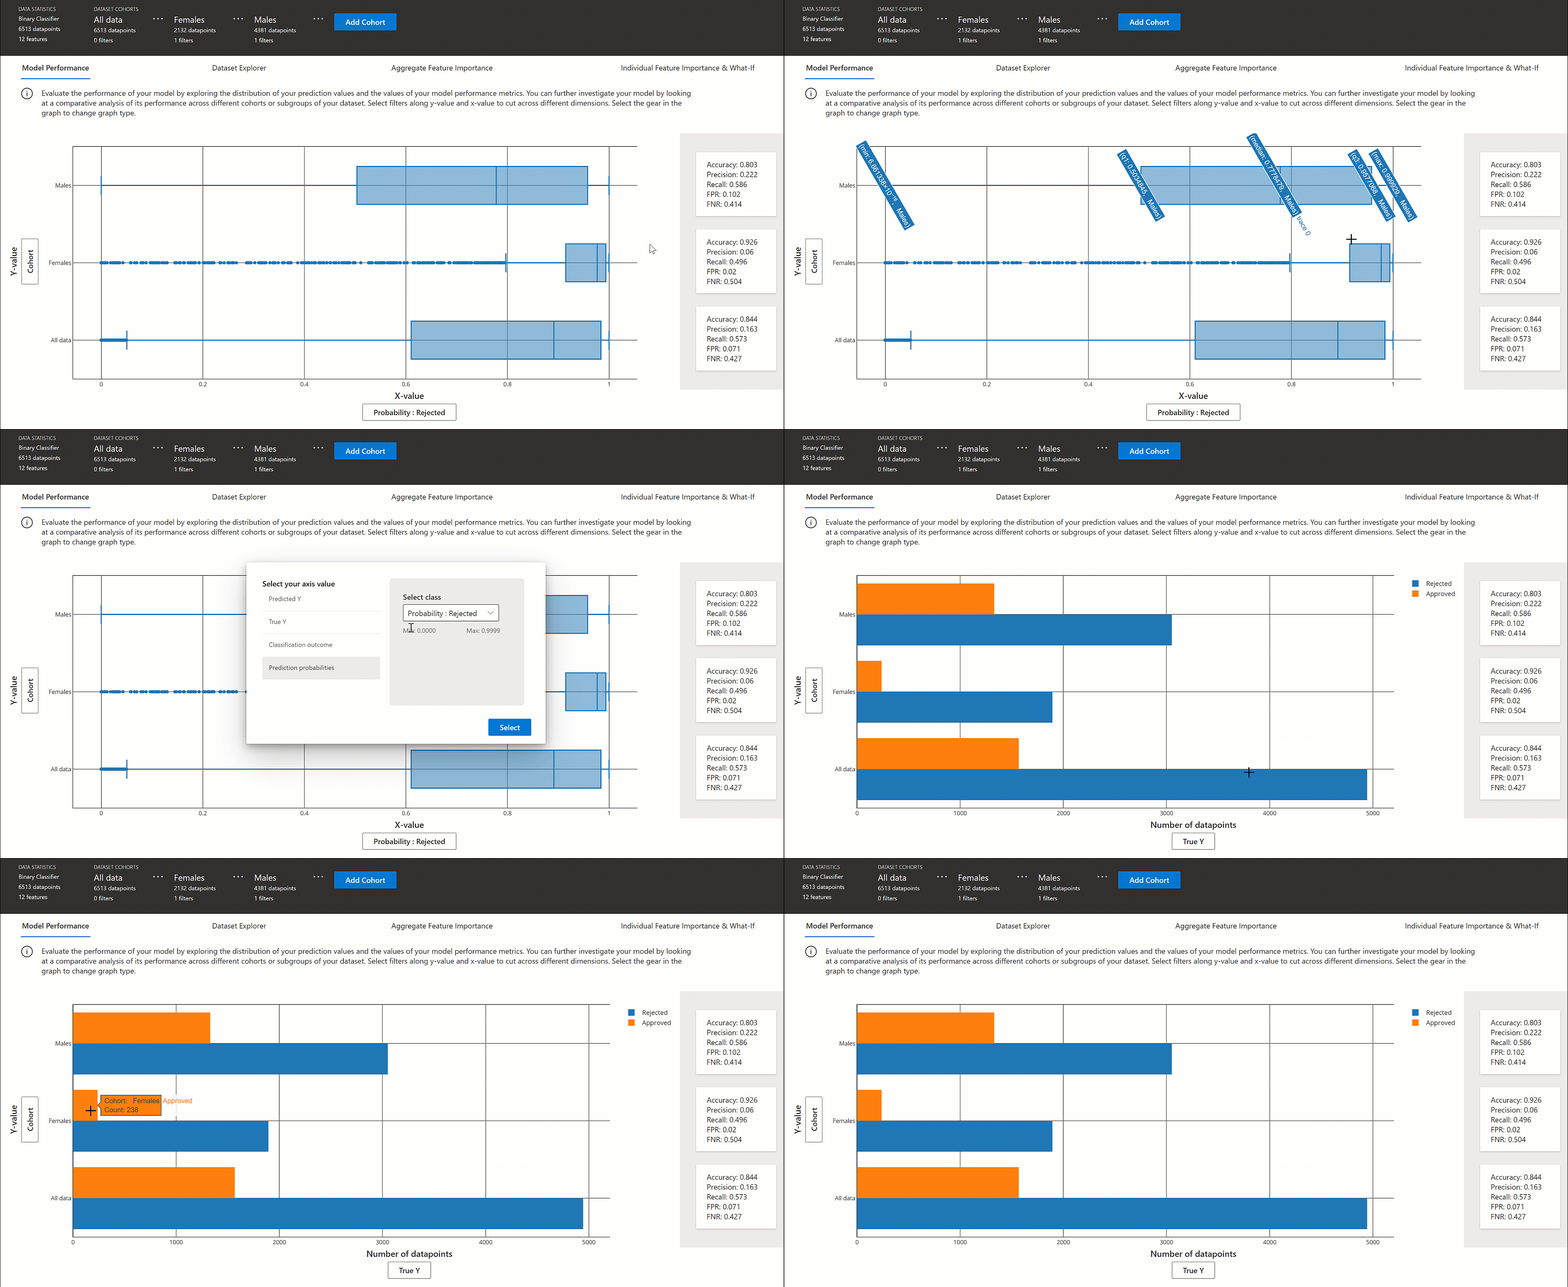
模型性能
通过探究预测值的分布和模型性能指标的值来评估模型的性能。 你可以通过查看模型在数据集的不同队列或子组之间的性能比较分析来进一步研究模型。 通过 x 值和 y 值选择筛选器,以便了解不同的维度。 查看指标,例如准确度、精度、召回率、误报率 (FPR) 和漏报率 (FNR)。
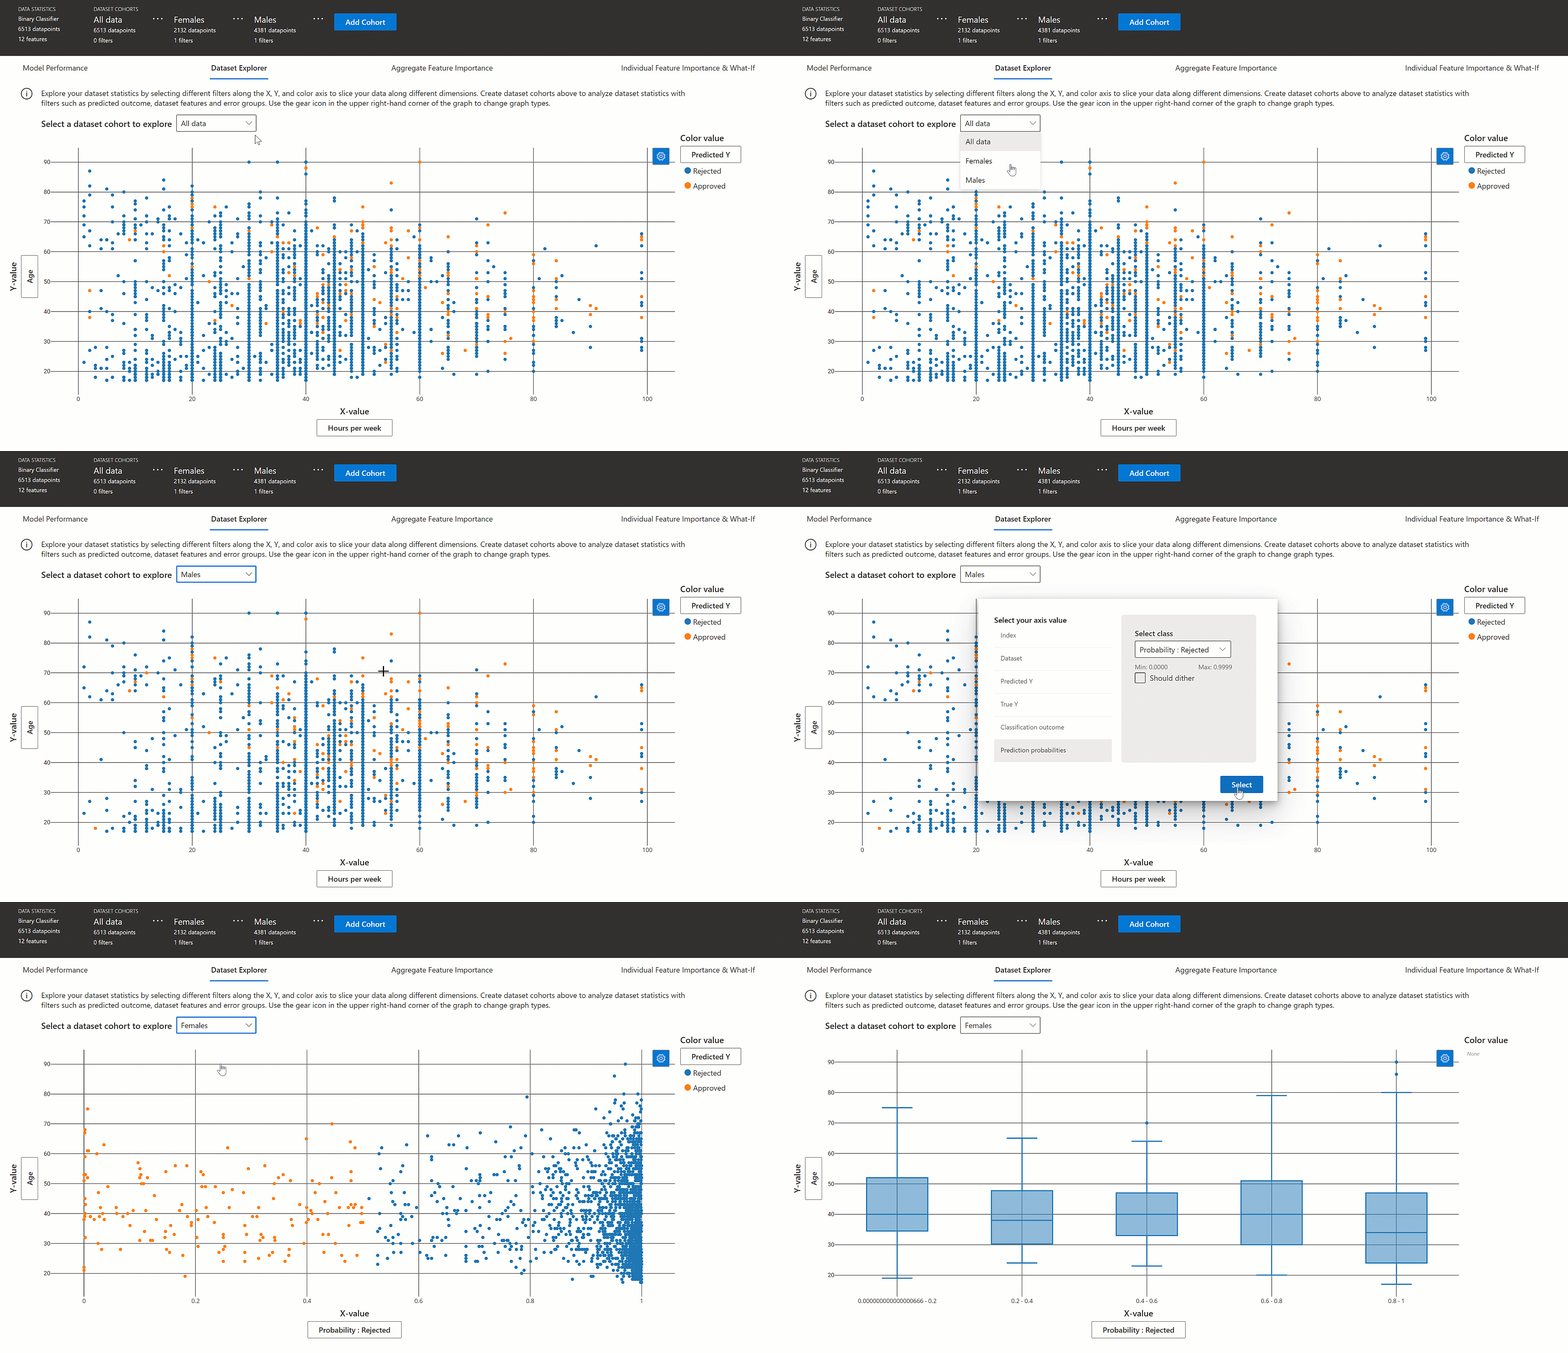
数据集资源管理器
了解数据集统计信息,方法是:沿 X 轴、Y 轴和颜色轴选择不同的筛选器,以便沿不同维度对数据进行切片。 创建以上数据集队列,以使用筛选器(例如预测结果、数据集特征和错误组)分析数据集统计信息。 可以使用此图右上角的齿轮图标更改图形类型。
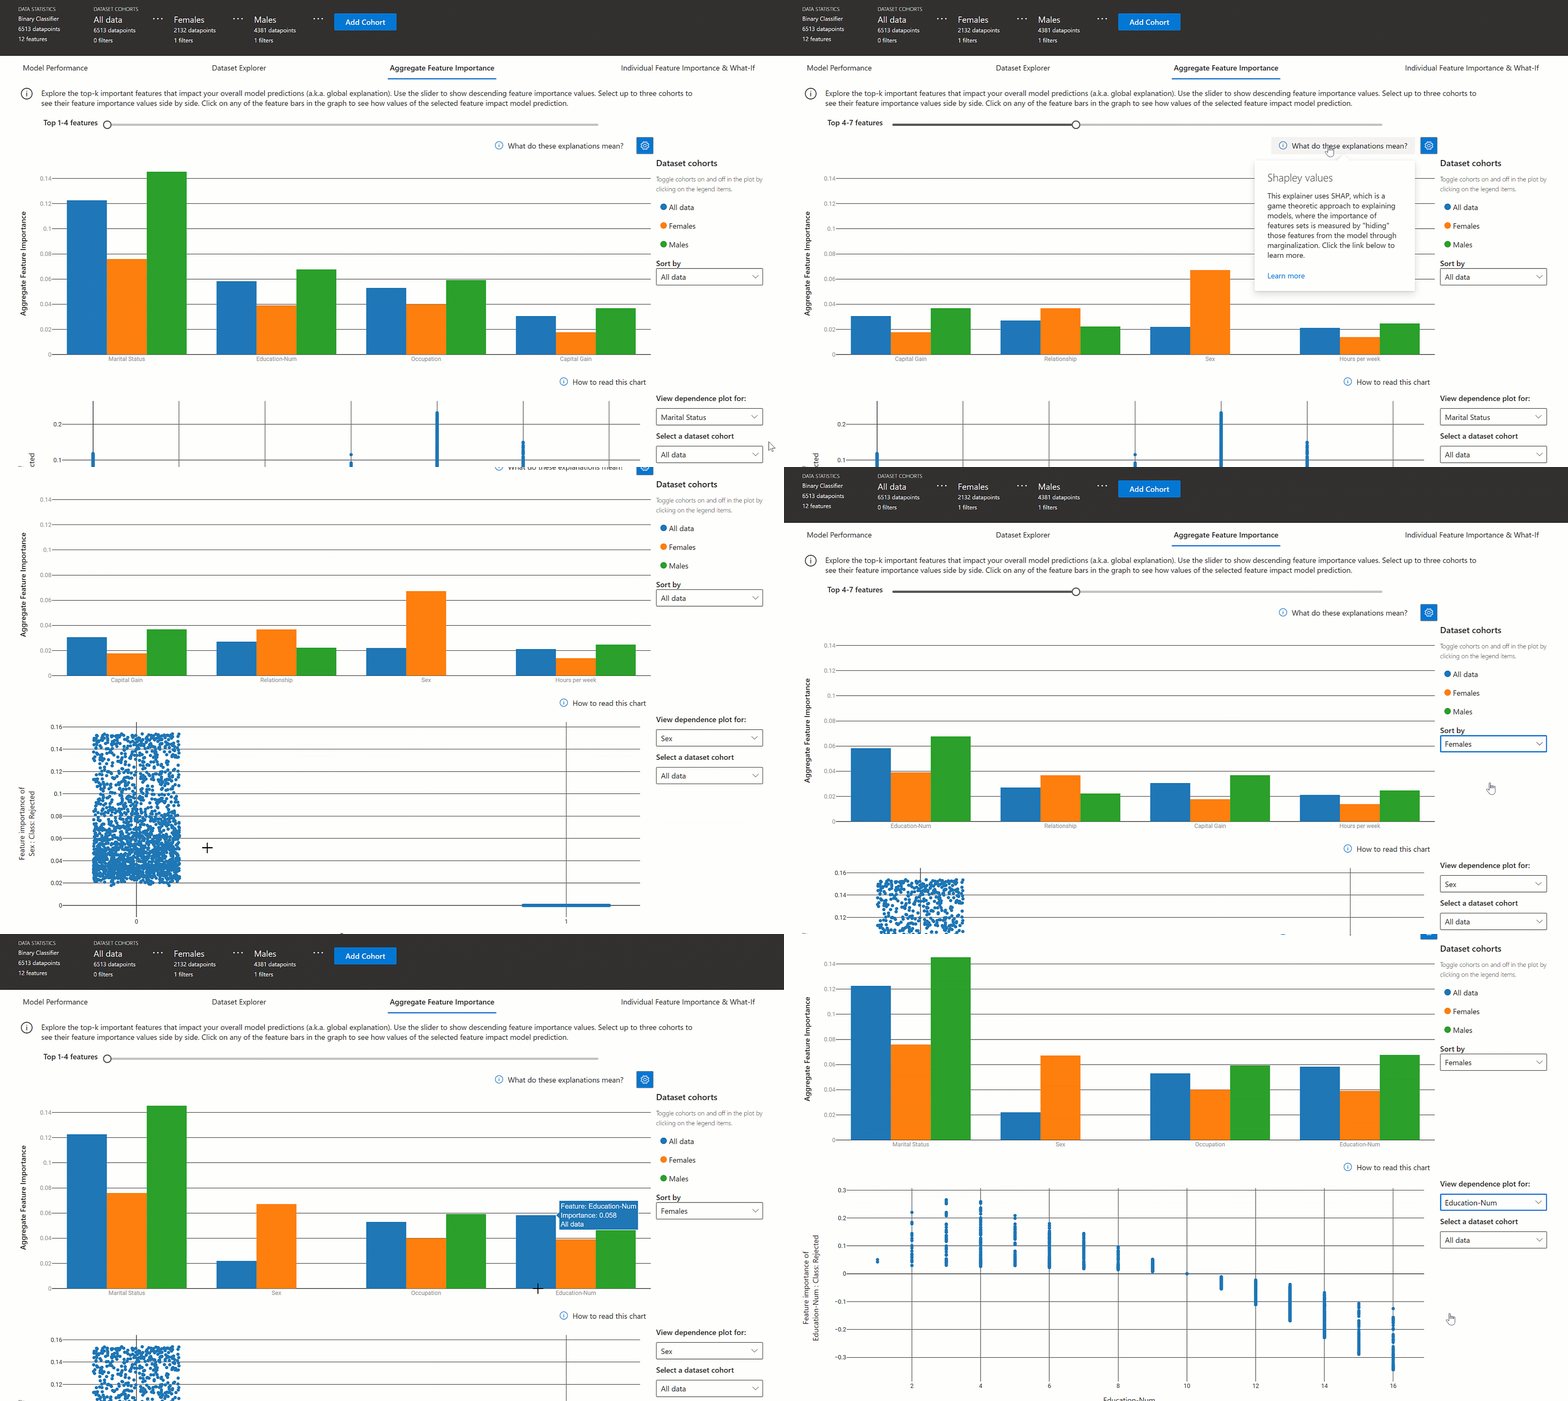
聚合特征重要性
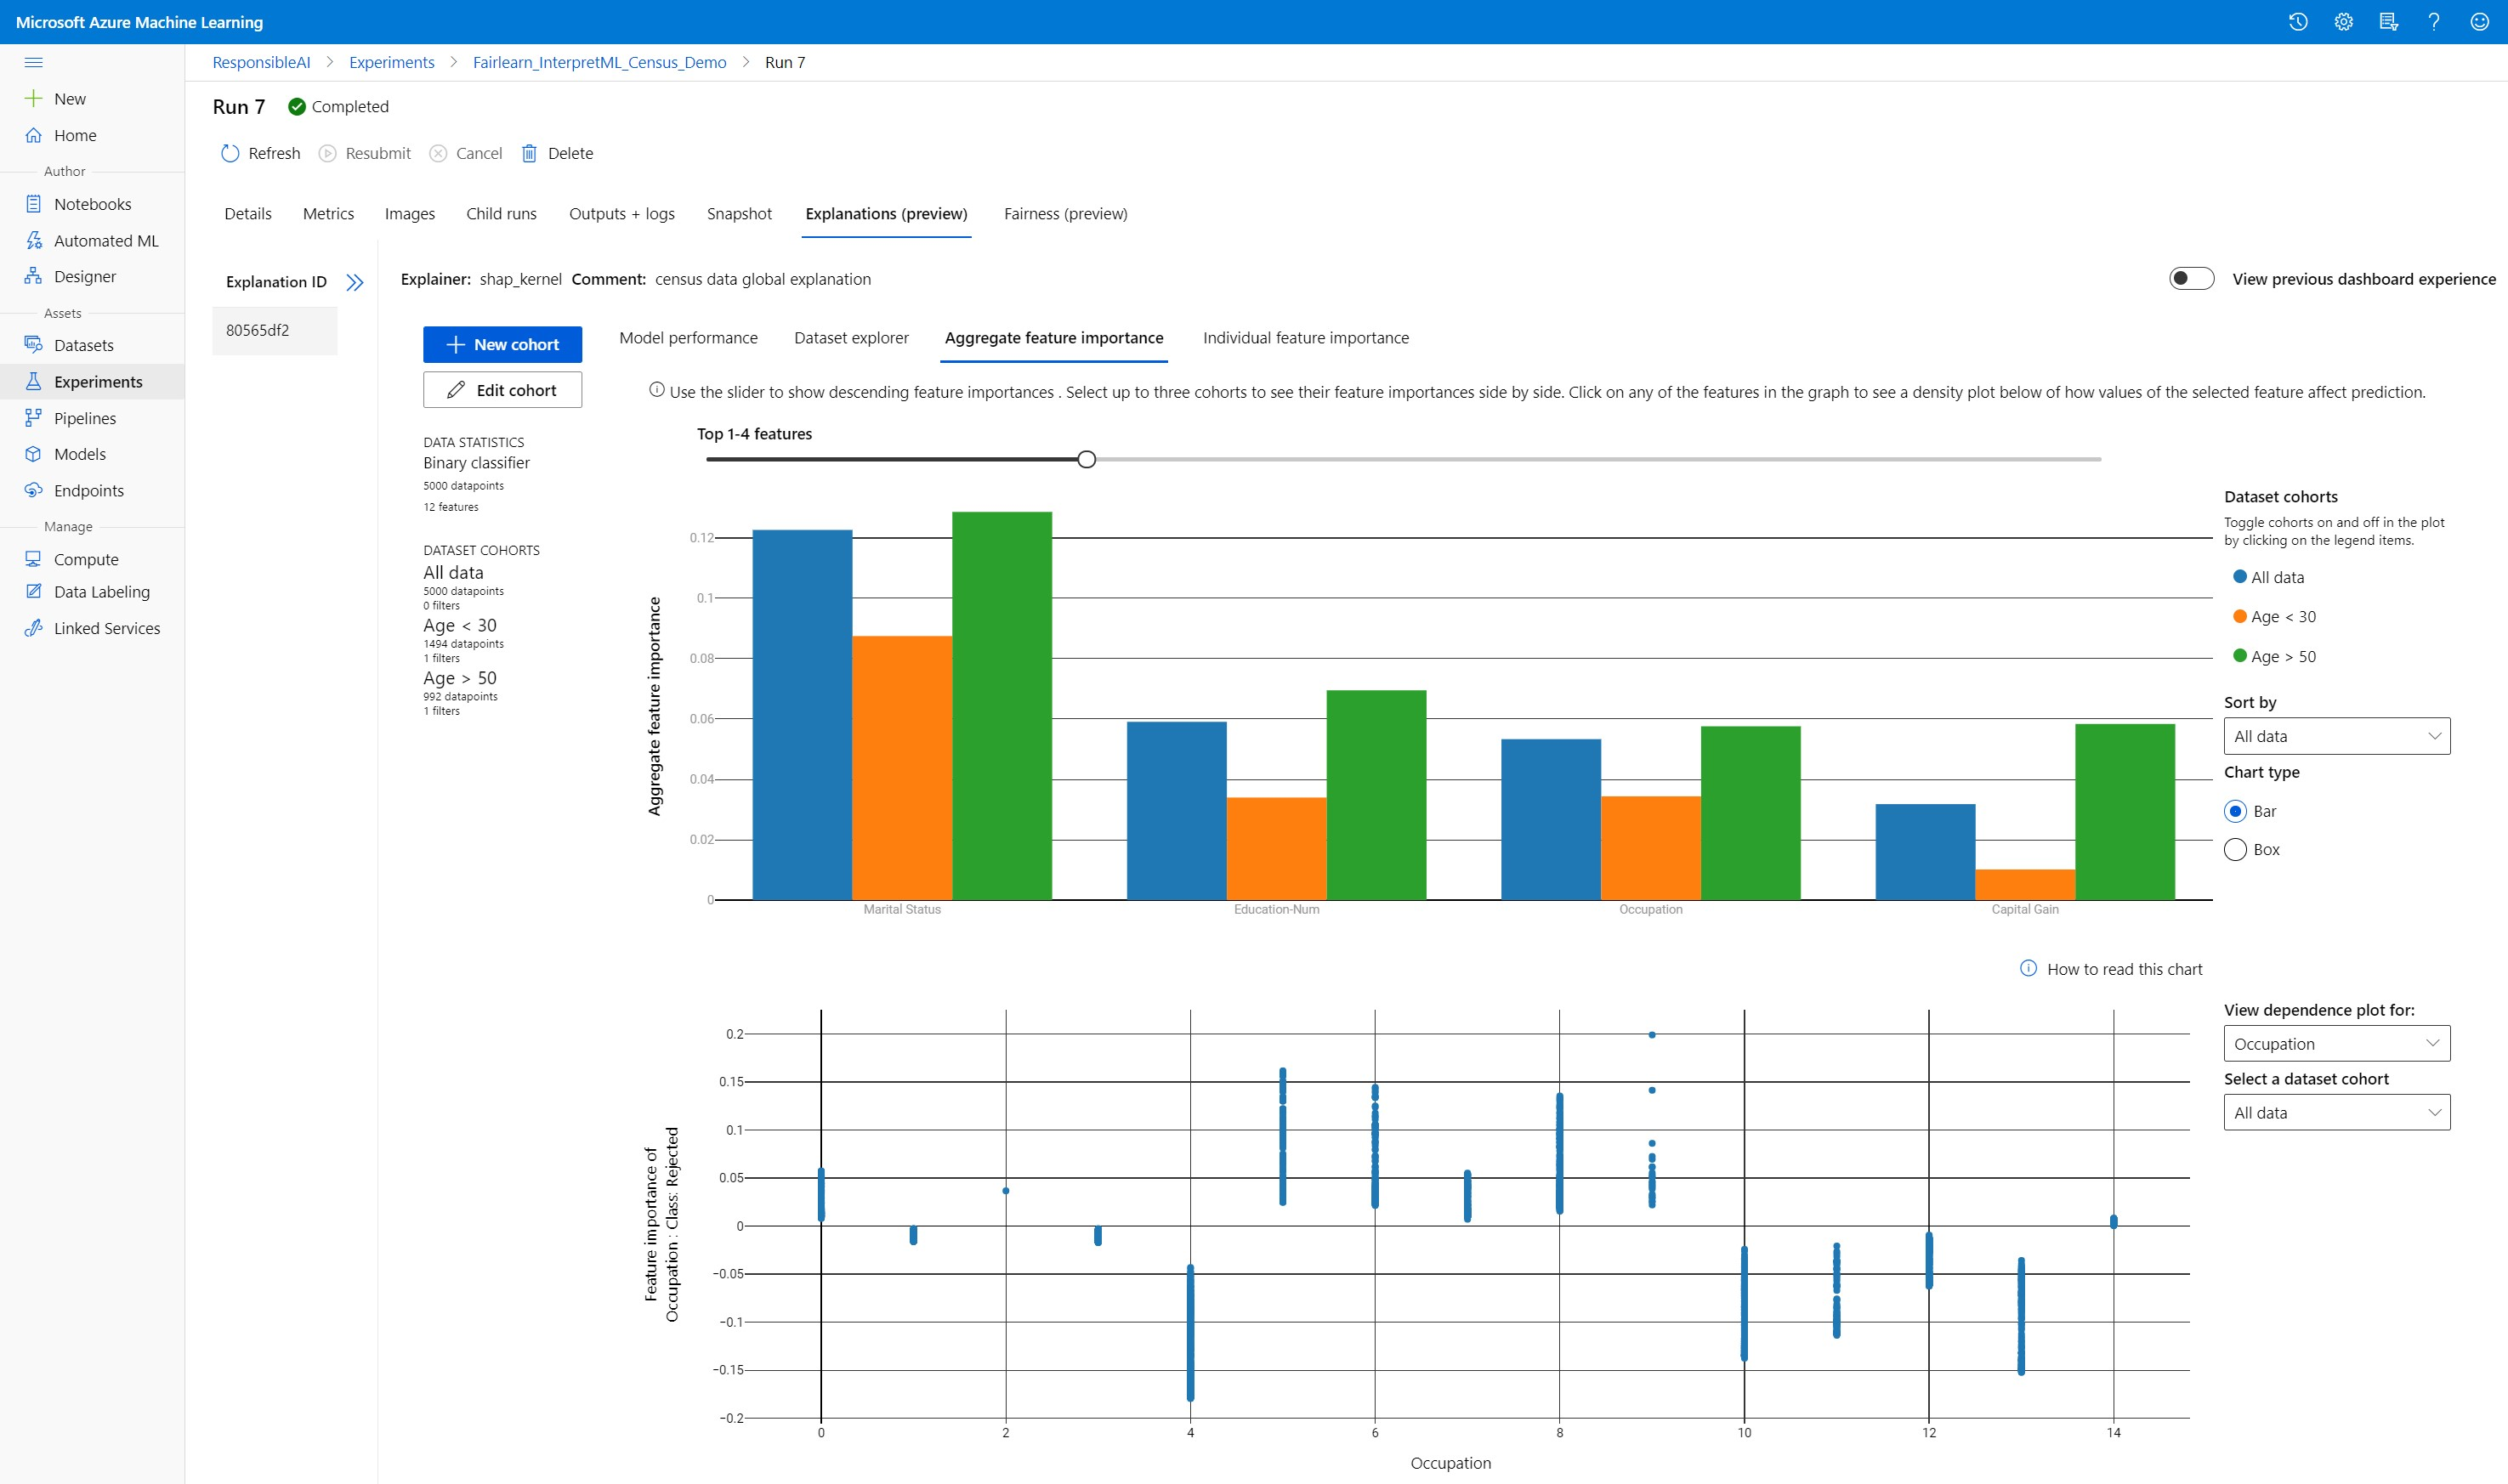
探究影响整体模型预测(也称为全局解释)的排名前 k 的重要特征。 使用滑块来显示按降序排列的特征重要性值。 最多可以选择三个队列来并排查看其特征重要性值。 选择图形中的任何特征条可以查看所选特征的值如何影响下方的依赖关系图中的模型预测。
理解单个预测(本地解释)
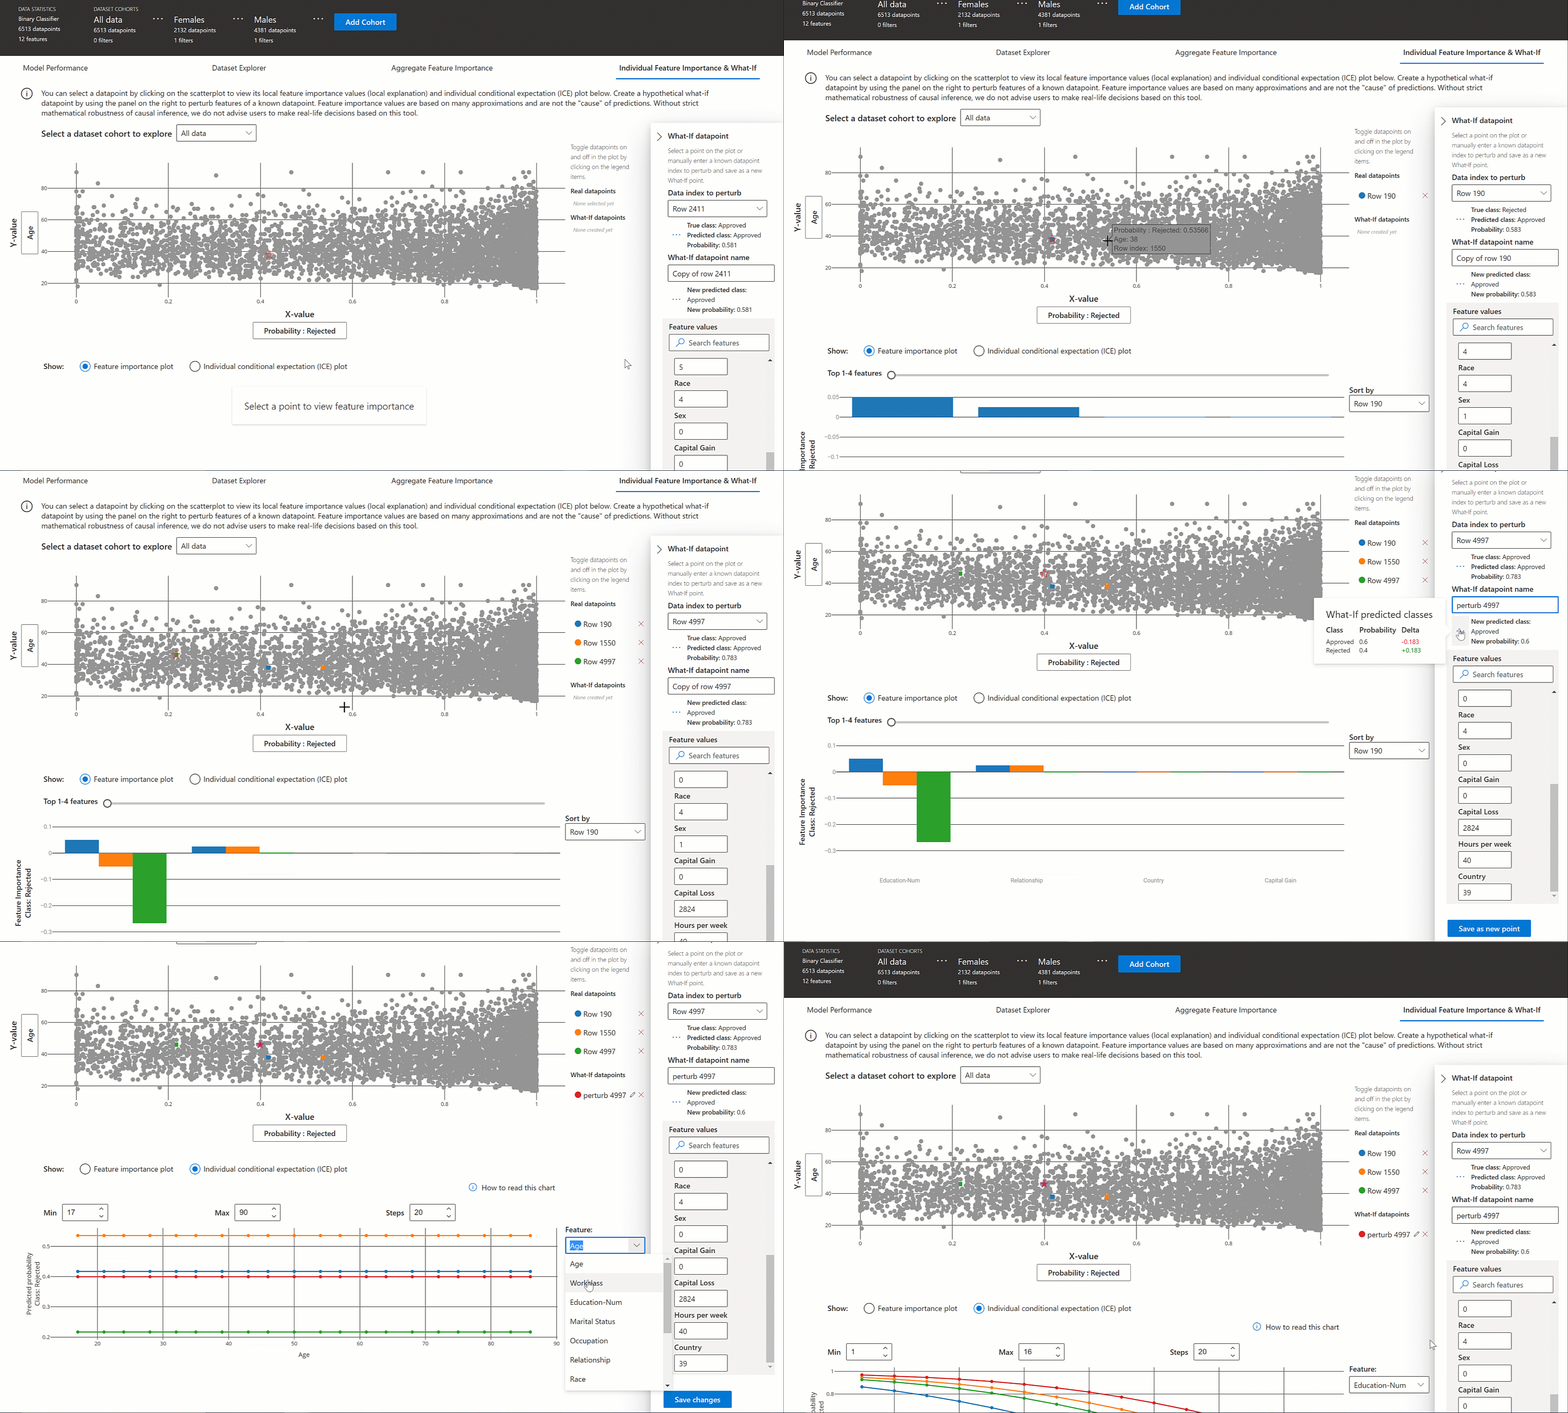
可以使用解释选项卡的第四个选项卡深入了解单个数据点及其单个特征重要性。 你可以通过单击主散点图中的任意单个数据点或在右侧面板向导中选择特定的数据点,加载任意数据点的单个特征重要性绘图。
| 绘图 | 说明 |
|---|---|
| 单个特征重要性 | 为单个预测显示排名前 k 的重要特征。 帮助演示基础模型对特定数据点的本地行为。 |
| What-if 分析 | 允许更改所选真实数据点的特征值,并通过生成具有新特征值的假设数据点来观察所导致的针对预测值的更改。 |
| 个体条件预期 (ICE) | 允许特征值从最小值更改为最大值。 帮助演示在特征发生更改时数据点的预测如何更改。 |
注意
这些是基于许多近似值的解释,而不是那样预测的“原因”。 如果因果推理没有严格的数学稳健性,我们不建议用户根据 What-if 工具的特征扰动做出现实生活中的决策。 此工具主要用于了解你的模型和进行调试。
Azure 机器学习工作室中的可视化效果
如果完成了远程可解释性步骤(将生成的说明上传到 Azure 机器学习运行历史记录),则可在 Azure 机器学习工作室中查看说明仪表板上的可视化效果。 此仪表板是在 Jupyter 笔记本中生成的仪表板小组件的简洁版本。 What-If 数据点生成和 ICE 绘图已禁用,因为 Azure 机器学习工作室中没有可以执行实时计算的活动计算。
如果数据集、全局和本地解释可用,则数据会填充所有选项卡。 但是,如果只有全局解释可用,则会禁用“单个特征重要性”选项卡。
按照以下路径之一来访问 Azure 机器学习工作室中的“说明”仪表板:
“试验”窗格(预览)
- 在左侧窗格中选择“试验”,以查看在 Azure 机器学习中运行的试验列表。
- 选择特定的试验可查看该试验中的所有运行。
- 选择一个运行,然后选择“解释”选项卡来查看解释可视化仪表板。
“模型”窗格
- 如果已遵循使用 Azure 机器学习部署模型中的步骤注册了原始模型,则可以在左侧窗格中选择“模型”来查看它。
- 选择一个模型,然后选择“说明”选项卡来查看说明仪表板。
推理时的可解释性
可将解释器与原始模型一起部署,并在推理时使用该解释器为任何新的数据点提供单个特征重要性值(本地解释)。 我们还提供了更轻型的评分解释器来改善推理时的可解释性性能,当前只有 Azure 机器学习 SDK 支持它。 部署轻量评分解释器的过程类似于部署模型,包括以下步骤:
创建解释对象。 例如,可以使用
TabularExplainer:from interpret.ext.blackbox import TabularExplainer explainer = TabularExplainer(model, initialization_examples=x_train, features=dataset_feature_names, classes=dataset_classes, transformations=transformations)使用解释对象创建评分解释器。
from azureml.interpret.scoring.scoring_explainer import KernelScoringExplainer, save

# create a lightweight explainer at scoring time
scoring_explainer = KernelScoringExplainer(explainer)

# pickle scoring explainer
# pickle scoring explainer locally
OUTPUT_DIR = 'my_directory'
save(scoring_explainer, directory=OUTPUT_DIR, exist_ok=True)
配置并注册使用评分解释器模型的映像。
# register explainer model using the path from ScoringExplainer.save - could be done on remote compute
# scoring_explainer.pkl is the filename on disk, while my_scoring_explainer.pkl will be the filename in cloud storage
run.upload_file('my_scoring_explainer.pkl', os.path.join(OUTPUT_DIR, 'scoring_explainer.pkl'))

scoring_explainer_model = run.register_model(model_name='my_scoring_explainer',
                                             model_path='my_scoring_explainer.pkl')
print(scoring_explainer_model.name, scoring_explainer_model.id, scoring_explainer_model.version, sep = '\t')
(可选步骤)可以从云检索评分解释器,并测试解释。
from azureml.interpret.scoring.scoring_explainer import load

# retrieve the scoring explainer model from cloud"
scoring_explainer_model = Model(ws, 'my_scoring_explainer')
scoring_explainer_model_path = scoring_explainer_model.download(target_dir=os.getcwd(), exist_ok=True)

# load scoring explainer from disk
scoring_explainer = load(scoring_explainer_model_path)

# test scoring explainer locally
preds = scoring_explainer.explain(x_test)
print(preds)
遵循以下步骤将映像部署到计算目标:
如果需要,请遵循使用 Azure 机器学习部署模型中的步骤注册原始预测模型。
创建评分文件。
%%writefile score.py
import json
import numpy as np
import pandas as pd
import os
import pickle
from sklearn.externals import joblib
from sklearn.linear_model import LogisticRegression
from azureml.core.model import Model

def init():

   global original_model
   global scoring_model

   # retrieve the path to the model file using the model name
   # assume original model is named original_prediction_model
   original_model_path = Model.get_model_path('original_prediction_model')
   scoring_explainer_path = Model.get_model_path('my_scoring_explainer')

   original_model = joblib.load(original_model_path)
   scoring_explainer = joblib.load(scoring_explainer_path)

def run(raw_data):
   # get predictions and explanations for each data point
   data = pd.read_json(raw_data)
   # make prediction
   predictions = original_model.predict(data)
   # retrieve model explanations
   local_importance_values = scoring_explainer.explain(data)
   # you can return any data type as long as it is JSON-serializable
   return {'predictions': predictions.tolist(), 'local_importance_values': local_importance_values}
定义部署配置。
此配置取决于模型的要求。 以下示例定义一种使用 1 个 CPU 核心和 1 GB 内存的配置。
from azureml.core.webservice import AciWebservice

 aciconfig = AciWebservice.deploy_configuration(cpu_cores=1,
                                           memory_gb=1,
                                           tags={"data": "NAME_OF_THE_DATASET",
                                                 "method" : "local_explanation"},
                                           description='Get local explanations for NAME_OF_THE_PROBLEM')
创建包含环境依赖项的文件。
from azureml.core.conda_dependencies import CondaDependencies

# WARNING: to install this, g++ needs to be available on the Docker image and is not by default (look at the next cell)

azureml_pip_packages = ['azureml-defaults', 'azureml-core', 'azureml-telemetry', 'azureml-interpret']

# specify CondaDependencies obj
myenv = CondaDependencies.create(conda_packages=['scikit-learn', 'pandas'],
                                 pip_packages=['sklearn-pandas'] + azureml_pip_packages,
                                 pin_sdk_version=False)

with open("myenv.yml","w") as f:
   f.write(myenv.serialize_to_string())

with open("myenv.yml","r") as f:
   print(f.read())
创建装有 g++ 的自定义 Dockerfile。
%%writefile dockerfile
RUN apt-get update && apt-get install -y g++
部署创建的映像。
此过程大约需要 5 分钟。
from azureml.core.webservice import Webservice
from azureml.core.image import ContainerImage

# use the custom scoring, docker, and conda files we created above
image_config = ContainerImage.image_configuration(execution_script="score.py",
                                                docker_file="dockerfile",
                                                runtime="python",
                                                conda_file="myenv.yml")

# use configs and models generated above
service = Webservice.deploy_from_model(workspace=ws,
                                    name='model-scoring-service',
                                    deployment_config=aciconfig,
                                    models=[scoring_explainer_model, original_model],
                                    image_config=image_config)

service.wait_for_deployment(show_output=True)
测试部署。
import requests

# create data to test service with
examples = x_list[:4]
input_data = examples.to_json()

headers = {'Content-Type':'application/json'}

# send request to service
resp = requests.post(service.scoring_uri, input_data, headers=headers)

print("POST to url", service.scoring_uri)
# can covert back to Python objects from json string if desired
print("prediction:", resp.text)
清理。
若要删除已部署的 Web 服务,请使用
service.delete()。
疑难解答
不支持稀疏数据:当存在大量特征时,模型解释仪表板会出现故障,或者速度明显减慢,因此我们目前不支持稀疏数据格式。 此外,当使用大型数据集和大量特征时,会产生常规的内存问题。
支持的解释特征矩阵
| 支持的解释选项卡 | 原始特征(密集) | 原始特征(稀疏) | 工程特征(密集) | 工程特征(稀疏) |
|---|---|---|---|---|
| 模型性能 | 支持(不预测) | 支持(不预测) | 支持 | 支持 |
| 数据集资源管理器 | 支持(不预测) | 不支持。 因为未上传稀疏数据,并且 UI 在呈现稀疏数据时出现问题。 | 支持 | 不支持。 因为未上传稀疏数据,并且 UI 在呈现稀疏数据时出现问题。 |
| 聚合特征重要性 | 支持 | 受支持 | 受支持 | 支持 |
| 单个特征重要性 | 支持(不预测) | 不支持。 因为未上传稀疏数据,并且 UI 在呈现稀疏数据时出现问题。 | 支持 | 不支持。 因为未上传稀疏数据,并且 UI 在呈现稀疏数据时出现问题。 |
模型解释不支持的预测模型:可解释性,最佳模型解释,不适用于推荐以下算法作为最佳模型的 AutoML 预测实验:TCNForecaster、AutoArima、Prophet、ExponentialSmoothing、Average、Naive, Seasonal Average 和 Seasonal Naive。 AutoML 预测回归模型支持解释。 但是,在解释仪表板中,不支持将“单个特征重要性”选项卡用于预测,因为其数据管道太复杂。
数据索引的本地解释:如果原始验证数据集有 5000 个以上的数据点,则解释仪表板不支持将本地重要性值关联到该数据集中的行标识符,因为仪表板会随机对数据进行下采样。 但是,仪表板会在“单个特征重要性”选项卡下显示传递到仪表板中的每个数据点的原始数据集特征值。用户可以通过对原始数据集特征值进行匹配将本地重要性映射回原始数据集。 如果验证数据集的大小小于 5000 个样本,则 Azure 机器学习工作室中的
index特征将对应于验证数据集中的索引。工作室中不支持 What-if/ICE 绘图:Azure 机器学习工作室中的“解释”选项卡下不支持 What-If 和个体条件预期 (ICE) 绘图,因为上传的解释需要一个活动计算来重新计算预测和扰动特征的概率。 在使用 SDK 将它作为小组件运行时,当前支持在 Jupyter 笔记本中使用它。

