将 MLflow 模型部署为 Azure Web 服务
MLflow 是用于管理机器学习试验生命周期的开源库。 MLflow 与 Azure 机器学习的集成使你可以将管理功能从模型训练扩展到生产模型的部署阶段。 在本文中,你将 MLflow 模型部署为 Azure Web 服务,并将 Azure 机器学习模型管理和数据偏移检测功能应用到生产模型。
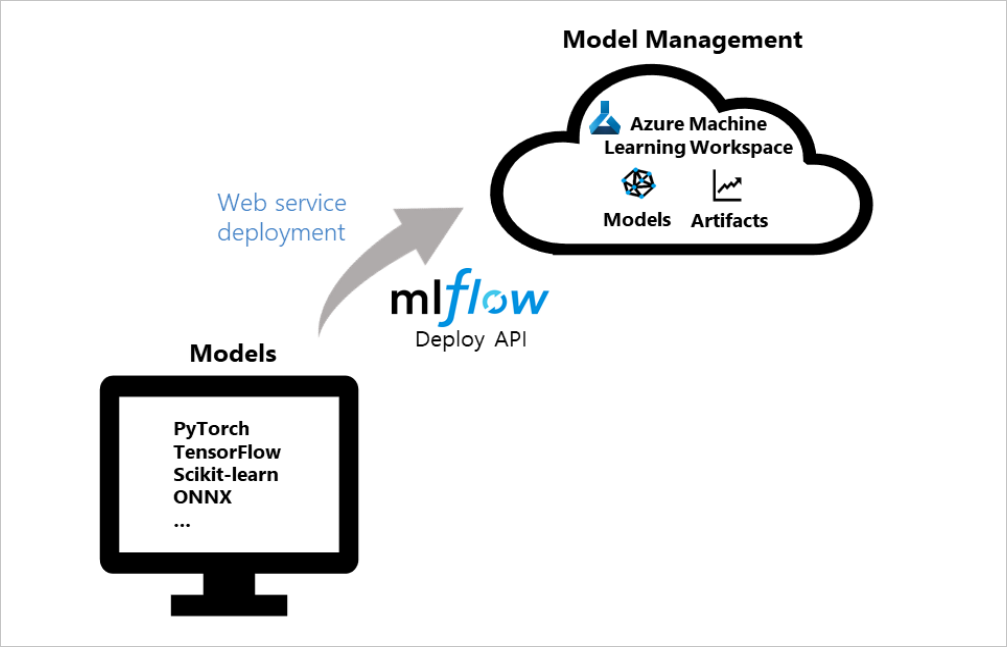
下图演示了 MLflow 部署 API 如何与 Azure 机器学习集成以部署模型。 可以使用常用的框架(如 PyTorch、Tensorflow 或 scikit-learn)创建模型作为 Azure Web 服务,并在工作区中管理服务:
提示
本文支持想要将 MLflow 模型部署到 Azure 机器学习 Web 服务终结点的数据科学家和开发人员。 如果你是想要监视 Azure 机器学习的资源使用情况和事件的管理员,例如配额、已完成的训练运行或已完成的模型部署,请参阅监视 Azure 机器学习。
先决条件
训练机器学习模型。 如果没有训练好的模型,请在 GitHub 上的 Azure 机器学习笔记本存储库中下载最适合你的计算方案的笔记本。 按照笔记本中的说明操作,并运行单元格来准备模型。
安装 azureml-mlflow 包。 此包会自动加载 Azure 机器学习 Python SDK 中的 azureml-core 定义,它为 MLflow 访问你的工作区提供了连接。
确认你具有在工作区中执行 MLflow 操作必需的访问权限。
部署选项
Azure 机器学习提供以下部署配置选项:
- Azure 容器实例:适合快速的开发测试部署。
- Azure Kubernetes 服务 (AKS):建议用于可缩放的生产部署。
注意
Azure 机器学习终结点 (v2) 提供了经过改进的简化部署体验。 终结点同时支持实时和批量推理场景。 终结点提供了一个统一的接口,以用于跨计算类型调用和管理模型部署。 请参阅什么是 Azure 机器学习终结点?。
有关更多 MLflow 和 Azure 机器学习功能集成,请参阅使用 v2 SDK 的 MLflow 和 Azure 机器学习 (v2)。
部署到 Azure 容器实例
若要将 MLflow 模型部署到 Azure 机器学习 Web 服务,必须使用 MLflow 跟踪 URI 设置模型以连接 Azure 机器学习。
对于向 Azure 容器实例的部署,你无需定义任何部署配置。 如果未提供配置,该服务默认进行 Azure 容器实例部署。 你可以为 Azure 机器学习使用 MLflow 的 deploy 方法一步注册和部署模型。
from mlflow.deployments import get_deploy_client

# Set the tracking URI as the deployment client
client = get_deploy_client(mlflow.get_tracking_uri())

# Set the model path
model_path = "model"

# Define the model path and the name as the service name
# The model is registered automatically and a name is autogenerated by using the "name" parameter
client.create_deployment(name="mlflow-test-aci", model_uri='runs:/{}/{}'.format(run.id, model_path))
自定义部署配置 json 文件
如果不希望使用默认值,则可使用部署配置 json 文件设置部署,该文件使用 deploy_configuration() 方法中的参数作为参考。
定义部署配置参数
在部署配置 json 文件中,以字典的形式定义每个部署配置参数。 以下代码片段提供了一个示例。 有关部署配置 json 文件可以包含什么的详细信息,请参阅 Azure 机器学习 Azure CLI 参考中的 Azure 容器实例部署配置架构。
{"computeType": "aci",
 "containerResourceRequirements": {"cpu": 1, "memoryInGB": 1},
 "location": "chinanorth2"
}
然后,可以使用配置 json 文件创建部署:
# Set the deployment config json file
deploy_path = "deployment_config.json"
test_config = {'deploy-config-file': deploy_path}

client.create_deployment(model_uri='runs:/{}/{}'.format(run.id, model_path), config=test_config, name="mlflow-test-aci")
部署到 Azure Kubernetes 服务 (AKS)
若要将 MLflow 模型部署到 Azure 机器学习 Web 服务,必须使用 MLflow 跟踪 URI 设置模型以连接 Azure 机器学习。
若要部署到 AKS,首先使用 ComputeTarget.create() 方法创建 AKS 群集。 此过程可能需要 20-25 分钟来创建新群集。
from azureml.core.compute import AksCompute, ComputeTarget

# Use the default configuration (can also provide parameters to customize)
prov_config = AksCompute.provisioning_configuration()

aks_name = 'aks-mlflow'

# Create the cluster
aks_target = ComputeTarget.create(workspace=ws, name=aks_name, provisioning_configuration=prov_config)

aks_target.wait_for_completion(show_output = True)

print(aks_target.provisioning_state)
print(aks_target.provisioning_errors)
使用 deploy_configuration() 方法值作为参考来创建部署配置 JSON。 将每个部署配置参数定义为字典,如以下示例所示:
{"computeType": "aks", "computeTargetName": "aks-mlflow"}
然后,使用 MLflow 部署客户端在一个步骤中注册并部署模型:
from mlflow.deployments import get_deploy_client

# Set the tracking URI as the deployment client
client = get_deploy_client(mlflow.get_tracking_uri())

# Set the model path
model_path = "model"

# Set the deployment config json file
deploy_path = "deployment_config.json"
test_config = {'deploy-config-file': deploy_path}

# Define the model path and the name as the service name
# The model is registered automatically and a name is autogenerated by using the "name" parameter
client.create_deployment(model_uri='runs:/{}/{}'.format(run.id, model_path), config=test_config, name="mlflow-test-aci")
服务部署可能需要几分钟的时间。
清理资源
如果你不打算使用已部署的 Web 服务,请使用 service.delete() 方法从笔记本中删除服务。 有关详细信息,请参阅 Python SDK 文档中的 WebService 类的 delete() 方法。
浏览示例笔记本
将 MLflow 与 Azure 机器学习笔记本配合使用演示了本文中所述的概念,并在这些概念的基础上有所延伸。
注意
如需使用 MLflow 的社区驱动示例存储库,请参阅 GitHub 上的 Azure 机器学习示例存储库。

