适用范围: Azure CLI ml 扩展 v2(最新版)
 Python SDK azure-ai-ml v2(最新版)
本文介绍如何连接到 Azure 外部的数据源,使该数据可供 Azure 机器学习服务使用。 Azure 连接充当密钥保管库代理,而与连接的交互是与 Azure 密钥保管库的直接交互。 Azure 机器学习连接将用户名和密码数据资源作为机密安全地存储在密钥保管库中。 密钥保管库 RBAC 控制对这些数据资源的访问。 为了可以使用此数据,Azure 支持连接到以下外部源:
- Snowflake DB
- Amazon S3
- Azure SQL DB
重要
此功能目前处于公开预览状态。 此预览版在提供时没有附带服务级别协议,我们不建议将其用于生产工作负荷。 某些功能可能不受支持或者受限。
有关详细信息,请参阅适用于 Azure 预览版的补充使用条款。
先决条件
重要
Azure 机器学习连接将在连接创建期间传递的凭据安全地存储在工作区 Azure Key Vault 中。 连接从密钥保管库存储位置引用凭据以供后续使用。 将凭据存储到密钥保管库后,你就无需直接处理它们。 可以选择将凭据存储在 YAML 文件中。 CLI 命令或 SDK 可能会替代它们。 建议避免将凭据存储在 YAML 文件中,因为安全漏洞可能会导致凭据泄露。
注意
要成功导入数据,请验证是否已安装适用于 SDK 的最新 azure-ai-ml 包(版本 1.5.0 或更高版本)以及 ml 扩展(版本 2.15.1 或更高版本)。
如果有较旧的 SDK 包或 CLI 扩展,请删除旧包,并使用选项卡部分中显示的代码安装新包。 按照如下所示的 SDK 和 CLI 说明进行操作:
代码版本
az extension remove -n ml
az extension add -n ml --yes
az extension show -n ml #(the version value needs to be 2.15.1 or later)
pip uninstall azure-ai-ml
pip install azure-ai-ml
pip show azure-ai-ml #(the version value needs to be 1.5.0 or later)
创建 Snowflake DB 连接
此 YAML 文件创建 Snowflake DB 连接。 请务必更新适当的值:
# my_snowflakedb_connection.yaml
$schema: http://azureml/sdk-2-0/Connection.json
type: snowflake
name: my-sf-db-connection # add your datastore name here

target: jdbc:snowflake://<myaccount>.snowflakecomputing.com/?db=<mydb>&warehouse=<mywarehouse>&role=<myrole>
# add the Snowflake account, database, warehouse name and role name here. If no role name provided it will default to PUBLIC
credentials:
    type: username_password
    username: <username> # add the Snowflake database user name here or leave this blank and type in CLI command line
    password: <password> # add the Snowflake database password here or leave this blank and type in CLI command line
在 CLI 中创建 Azure 机器学习连接:
选项 1:使用 YAML 文件中的用户名和密码
az ml connection create --file my_snowflakedb_connection.yaml
选项 2:在命令行中替代用户名和密码
az ml connection create --file my_snowflakedb_connection.yaml --set credentials.
username="<username>" credentials.
password="<password>"
选项 1:从 YAML 文件加载连接
from azure.ai.ml import MLClient, load_workspace_connection

ml_client = MLClient.from_config()

wps_connection = load_workspace_connection(source="./my_snowflakedb_connection.yaml")
wps_connection.credentials.username="<username>"
wps_connection.credentials.password="<password>"
ml_client.connections.create_or_update(workspace_connection=wps_connection)
选项 2:在 Python 脚本中使用 WorkspaceConnection()
from azure.ai.ml import MLClient
from azure.ai.ml.entities import WorkspaceConnection
from azure.ai.ml.entities import UsernamePasswordConfiguration

target= "jdbc:snowflake://<myaccount>.snowflakecomputing.com/?db=<mydb>&warehouse=<mywarehouse>&role=<myrole>"
# add the Snowflake account, database, warehouse name and role name here. If no role name provided it will default to PUBLIC
name= <my_snowflake_connection> # name of the connection
wps_connection = WorkspaceConnection(name= name,
type="snowflake",
target= target,
credentials= UsernamePasswordConfiguration(username="<username>", password="<password>")
)

ml_client.connections.create_or_update(workspace_connection=wps_connection)
导航到 Azure 机器学习工作室。
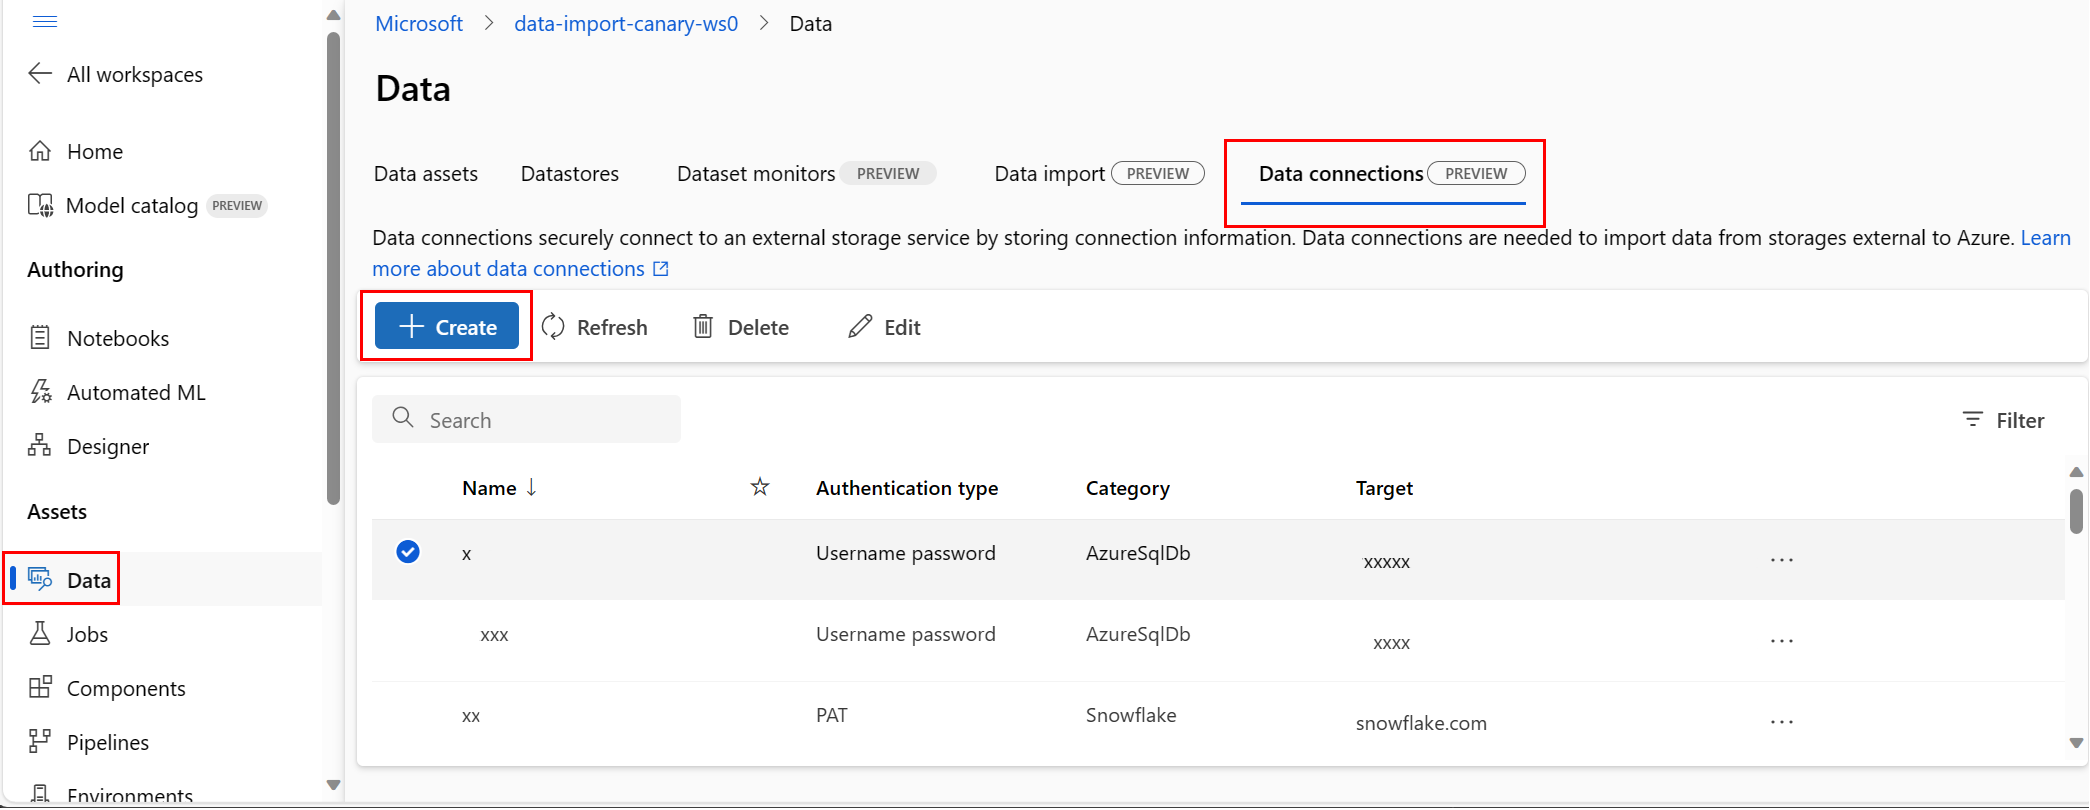
在左侧导航栏的“资产”下,选择“数据”。 接下来,选择“数据连接”选项卡。然后选择“创建”,如下方的屏幕截图所示:
在“创建连接”窗格中,填写值,如屏幕截图所示。 为类别选择“Snowflake”,为“身份验证类型”选择“用户名密码”。 请确保以此格式指定“目标”文本框值,并在 <> 字符之间填写指定值:
jdbc:snowflake://<myaccount>.snowflakecomputing.com/?db=<mydb>&warehouse=<mywarehouse>&role=<myrole>
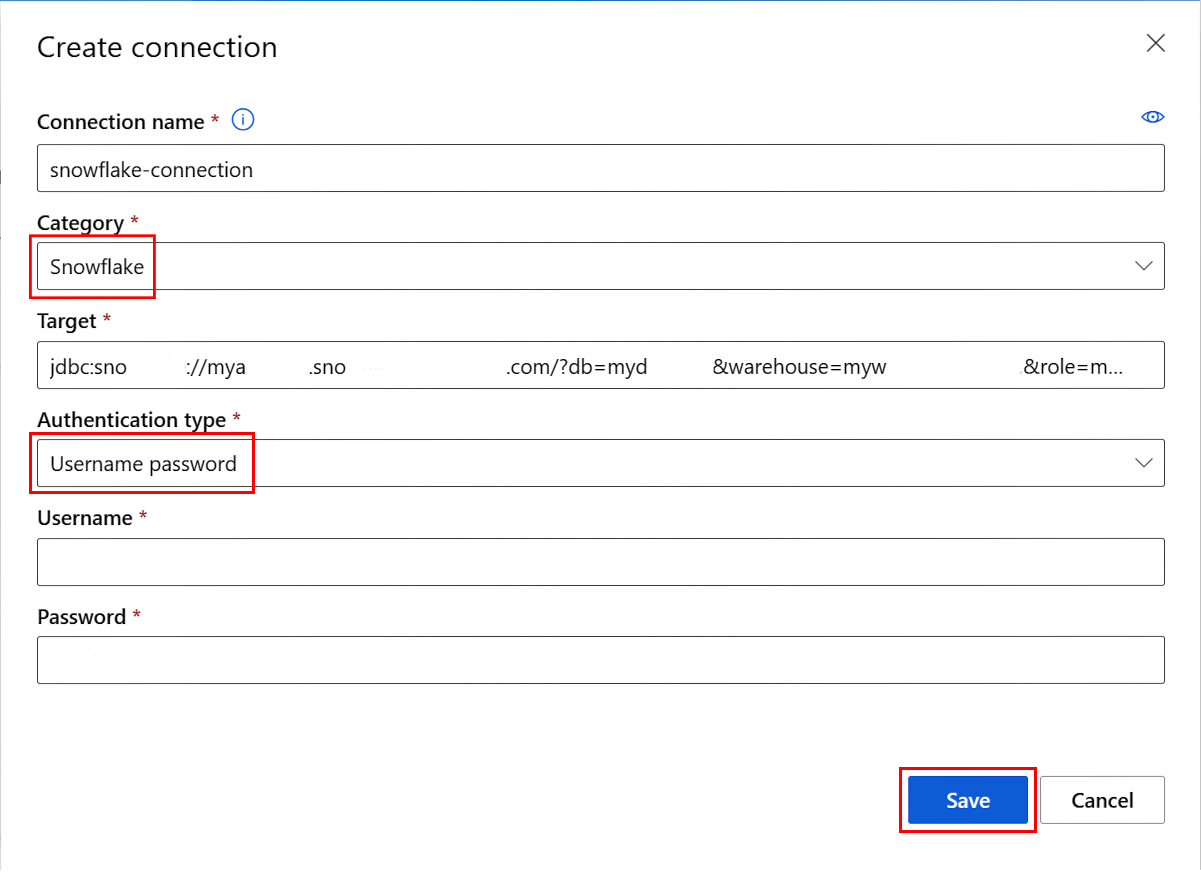
选择“保存”,将凭据安全地存储在与相关工作区关联的密钥保管库中。 运行数据导入作业时将使用此连接。
创建使用 OAuth 的 Snowflake DB 连接
本部分中的信息介绍了如何创建使用 OAuth 进行身份验证的 Snowflake DB 连接。
重要
在按照本部分中的步骤操作之前,必须先配置 Azure 以代表客户端颁发 OAuth 令牌。 此配置创建一个服务主体,这是 OAuth 连接所必需的。 若要创建连接,你需要以下信息:
- 客户端 ID:服务主体的 ID
- 客户端密码:服务主体的机密
- 租户 ID:Microsoft Entra ID 租户的 ID
此 YAML 文件创建使用 OAuth 的 Snowflake DB 连接。 请务必更新适当的值:
# my_snowflakedb_connection.yaml
name: snowflake_service_principal_connection
type: snowflake
# Add the Snowflake account, database, warehouse name, and role name here. If no role name is provided, it will default to PUBLIC.
target: jdbc:snowflake://<myaccount>.snowflakecomputing.com/?db=<mydb>&warehouse=<mywarehouse>&scope=<scopeForServicePrincipal>
credentials:
  type: service_principal
  client_id: <client-id>          # The service principal's client id
  client_secret: <client-secret>  # The service principal's client secret
  tenant_id: <tenant-id>          # The Microsoft Entra ID tenant id
在 CLI 中创建 Azure 机器学习连接:
az ml connection create --file my_snowflakedb_connection.yaml
还可以在命令行中替代 YAML 文件中的信息:
az ml connection create --file my_snowflakedb_connection.yaml --set credentials.client_id="my-client-id" credentials.client_secret="my-client-secret" credentials.tenant_id="my-tenant-id"
使用 Python SDK,可以通过加载 YAML 文件中存储的连接信息来创建连接。 你还可以替代值:
from azure.ai.ml import MLClient, load_workspace_connection

ml_client = MLClient.from_config()

wps_connection = load_workspace_connection(source="./my_snowflakedb_connection.yaml")
wps_connection.credentials_client_id="my-client-id"
wps_connection.credentials.client_secret="my-client-secret"
wps_connection.credentials.tenant_id="my-tenant-id"
ml_client.connections.create_or_update(workspace_connection=wps_connection)
还可以直接在 Python 脚本中指定连接信息,而无需依赖 YAML 文件:
from azure.ai.ml import MLClient
from azure.ai.ml.entities import WorkspaceConnection
from azure.ai.ml.entities import ServicePrincipalConfiguration

target= "jdbc:snowflake://<myaccount>.snowflakecomputing.com/?db=<mydb>&warehouse=<mywarehouse>&role=<myrole>"
# add the Snowflake account, database, warehouse name and role name here. If no role name provided it will default to PUBLIC
name= <my_snowflake_connection> # name of the connection
auth = ServicePrincipalConfiguration(client_id="<my-client-id>", client_secret="<my-client-secret>", tenant_id="<my-tenant-id>")
wps_connection = WorkspaceConnection(name= name,
                                     type="snowflake",
                                     target=target,
                                     credentials=auth
)

ml_client.connections.create_or_update(workspace_connection=wps_connection)
注意
使用服务主体(适用于 OAuth)创建 Snowflake DB 连接只能通过 Azure CLI 或 Python SDK 进行。
创建 Azure SQL DB 连接
此 YAML 脚本创建 Azure SQL DB 连接。 请务必更新适当的值:
# my_sqldb_connection.yaml
$schema: http://azureml/sdk-2-0/Connection.json

type: azure_sql_db
name: my-sqldb-connection

target: Server=tcp:<myservername>,<port>;Database=<mydatabase>;Trusted_Connection=False;Encrypt=True;Connection Timeout=30
# add the sql servername, port addresss and database
credentials:
    type: sql_auth
    username: <username> # add the sql database user name here or leave this blank and type in CLI command line
    password: <password> # add the sql database password here or leave this blank and type in CLI command line
在 CLI 中创建 Azure 机器学习连接:
选项 1:使用 YAML 文件中的用户名/密码
az ml connection create --file my_sqldb_connection.yaml
选项 2:替代 YAML 文件中的用户名和密码
az ml connection create --file my_sqldb_connection.yaml --set credentials.
username="<username>" credentials.
password="<password>"
选项 1:从 YAML 文件加载连接
from azure.ai.ml import MLClient, load_workspace_connection

ml_client = MLClient.from_config()

wps_connection = load_workspace_connection(source="./my_sqldb_connection.yaml")
wps_connection.credentials.username="<username>"
wps_connection.credentials.password="<password>"
ml_client.connections.create_or_update(workspace_connection=wps_connection)
选项 2:使用 WorkspaceConnection()
from azure.ai.ml import MLClient
from azure.ai.ml.entities import WorkspaceConnection
from azure.ai.ml.entities import UsernamePasswordConfiguration

target= "Server=tcp:<myservername>,<port>;Database=<mydatabase>;Trusted_Connection=False;Encrypt=True;Connection Timeout=30"
# add the sql servername, port address and database

name= <my_sql_connection> # name of the connection
wps_connection = WorkspaceConnection(name= name,
type="azure_sql_db",
target= target,
credentials= UsernamePasswordConfiguration(username="<username>", password="<password>")
)

ml_client.connections.create_or_update(workspace_connection=wps_connection)
导航到 Azure 机器学习工作室。
在左侧导航栏的“资产”下,选择“数据”。 接下来,选择“数据连接”选项卡。然后选择“创建”,如下方的屏幕截图所示:

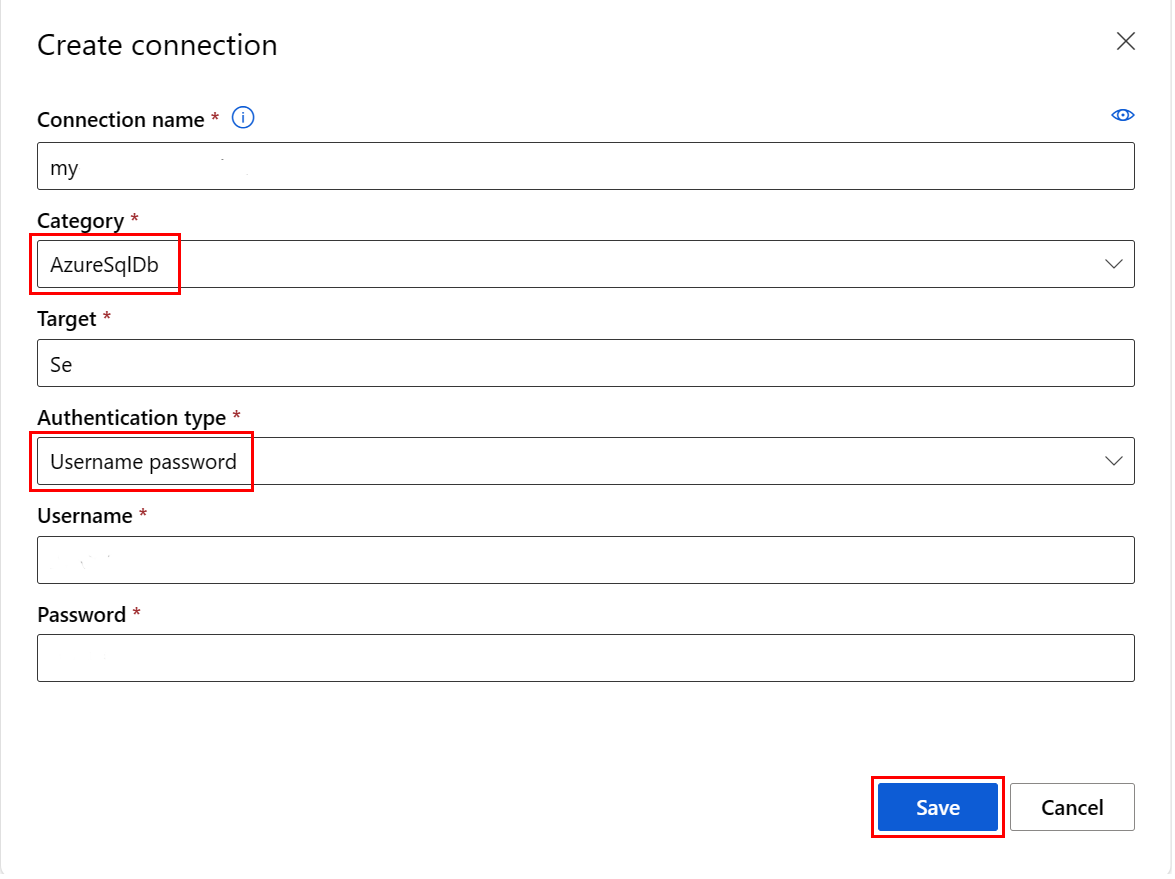
在“创建连接”窗格中,填写值,如屏幕截图所示。 为类别选择“AzureSqlDb”,为“身份验证类型”选择“用户名密码”。 请确保以此格式指定“目标”文本框值,并在 <> 字符之间填写指定值:
Server=tcp:<myservername>,<port>;Database=<mydatabase>;Trusted_Connection=False;Encrypt=True;Connection Timeout=30
创建 Amazon S3 连接
使用以下 YAML 文件创建 Amazon S3 连接。 请务必更新适当的值:
# my_s3_connection.yaml
$schema: http://azureml/sdk-2-0/Connection.json

type: s3
name: my_s3_connection

target: <mybucket> # add the s3 bucket details
credentials:
    type: access_key
    access_key_id: bbbbbbbb-1c1c-2d2d-3e3e-444444444444 # add access key id
    secret_access_key: H4iJ5kL6mN7oP8qR9sT0uV1wX2yZ3a # add access key secret
在 CLI 中创建 Azure 机器学习连接:
az ml connection create --file my_s3_connection.yaml
选项 1:从 YAML 文件加载连接
from azure.ai.ml import MLClient, load_workspace_connection

ml_client = MLClient.from_config()

wps_connection = load_workspace_connection(source="./my_s3_connection.yaml")
ml_client.connections.create_or_update(workspace_connection=wps_connection)
选项 2:在 Python 脚本中使用 WorkspaceConnection()
from azure.ai.ml import MLClient
from azure.ai.ml.entities import WorkspaceConnection
from azure.ai.ml.entities import AccessKeyConfiguration

target=<mybucket> # add the s3 bucket details
name=<my_s3_connection> # name of the connection
wps_connection=WorkspaceConnection(name=name,
type="s3",
target= target,
credentials= AccessKeyConfiguration(access_key_id="XXXJ5kL6mN7oP8qR9sT0uV1wX2yZ3aB4cXXX",acsecret_access_key="C2dE3fH4iJ5kL6mN7oP8qR9sT0uV1w")
)

ml_client.connections.create_or_update(workspace_connection=wps_connection)
导航到 Azure 机器学习工作室。
在左侧导航栏的“资产”下,选择“数据”。 接下来,选择“数据连接”选项卡。然后选择“创建”,如下方的屏幕截图所示:

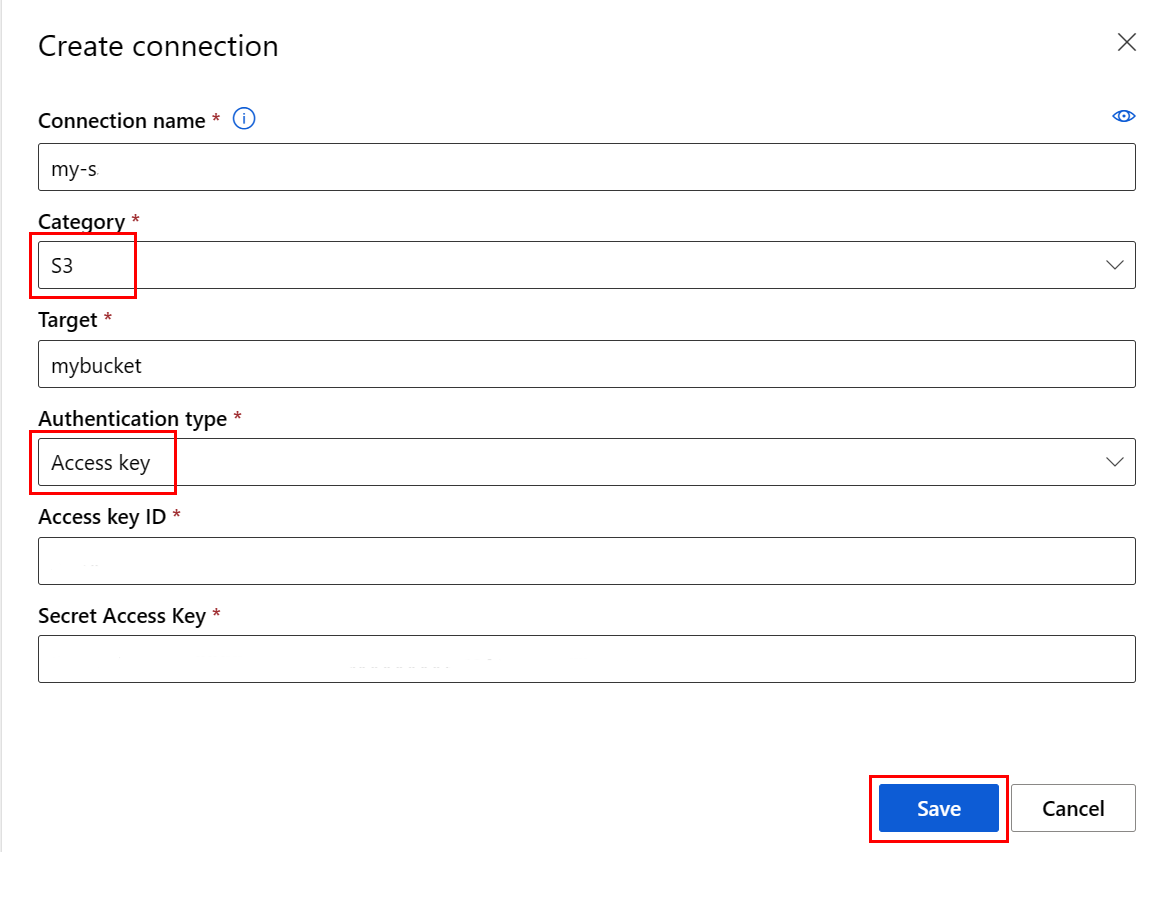
在“创建连接”窗格中,填写值,如屏幕截图所示。 为类别选择“S3”,为“身份验证类型”选择“用户名密码”。 请确保以此格式指定“目标”文本框值,并在 <> 字符之间填写指定值:
<目标>
非数据连接
你可以使用这些连接类型连接到 Git:
- Python 源
- Azure 容器注册表
- 使用 API 密钥的连接
这些连接不是数据连接,而是用于连接到外部服务,以便在代码中使用。
Git
使用以下 YAML 文件之一创建 Git 连接。 请务必更新适当的值:
使用个人访问令牌进行连接 (PAT):
#Connection.yml
name: test_ws_conn_git_pat
type: git
target: https://github.com/contoso/contosorepo
credentials:
    type: pat
    pat: dummy_pat
连接到公共存储库(无凭据):
#Connection.yml

name: git_no_cred_conn
type: git
target: https://https://github.com/contoso/contosorepo
在 CLI 中创建 Azure 机器学习连接:
az ml connection create --file connection.yaml
以下示例将会创建与 GitHub 存储库的 Git 连接。 此连接使用个人访问令牌 (PAT) 进行身份验证:
from azure.ai.ml.entities import WorkspaceConnection
from azure.ai.ml.entities import UsernamePasswordConfiguration, PatTokenConfiguration


name = "my_git_conn"

target = "https://github.com/myaccount/myrepo"

wps_connection = WorkspaceConnection(
    name=name,
    type="git",
    target=target,
    credentials=PatTokenConfiguration(pat="E3fH4iJ5kL6mN7oP8qR9sT0uV1wX2y"),
)
ml_client.connections.create_or_update(workspace_connection=wps_connection)
Python 源
使用以下其中一个 YAML 文件创建与 Python 源的连接。 请务必更新适当的值:
使用个人访问令牌进行连接 (PAT):
#Connection.yml
name: test_ws_conn_python_pat
type: python_feed
target: https://test-feed.com
credentials:
    type: pat
    pat: dummy_pat
使用用户名和密码进行连接:
name: test_ws_conn_python_user_pass
type: python_feed
target: https://test-feed.com
credentials:
    type: username_password
    username: <username>
    password: <password>
连接到公共源(无凭据):
name: test_ws_conn_python_no_cred
type: python_feed
target: https://test-feed.com3
在 CLI 中创建 Azure 机器学习连接:
az ml connection create --file connection.yaml
以下示例将会创建 Python 源连接。 此连接使用个人访问令牌 (PAT) 或用户名和密码进行身份验证:
from azure.ai.ml.entities import WorkspaceConnection
from azure.ai.ml.entities import UsernamePasswordConfiguration, PatTokenConfiguration


name = "my_pfeed_conn"

target = "https://iJ5kL6mN7.core.chinacloudapi.cn/mycontainer"

wps_connection = WorkspaceConnection(
    name=name,
    type="python_feed",
    target=target,
    #credentials=UsernamePasswordConfiguration(username="<username>", password="<password>"),
    credentials=PatTokenConfiguration(pat="<PatTokenConfiguration>"),

    #credentials=None
)
ml_client.connections.create_or_update(workspace_connection=wps_connection)
容器注册表
使用以下其中一个 YAML 文件创建与 Azure 容器注册表的连接。 请务必更新适当的值:
在 CLI 中创建 Azure 机器学习连接:
az ml connection create --file connection.yaml
以下示例将会创建 Azure 容器注册表连接。 此连接使用托管标识进行身份验证:
from azure.ai.ml.entities import WorkspaceConnection
from azure.ai.ml.entities import UsernamePasswordConfiguration


name = "my_acr_conn"

target = "https://iJ5kL6mN7.core.chinacloudapi.cn/mycontainer"

wps_connection = WorkspaceConnection(
    name=name,
    type="container_registry",
    target=target,
    credentials=UsernamePasswordConfiguration(username="<username>", password="<password>"),
)
ml_client.connections.create_or_update(workspace_connection=wps_connection)
API 密钥
以下示例将会创建 API 密钥连接:
from azure.ai.ml.entities import WorkspaceConnection
from azure.ai.ml.entities import UsernamePasswordConfiguration, ApiKeyConfiguration


name = "my_api_key"

target = "https://L6mN7oP8q.core.chinacloudapi.cn/mycontainer"

wps_connection = WorkspaceConnection(
    name=name,
    type="apikey",
    target=target,
    credentials=ApiKeyConfiguration(key="9sT0uV1wX"),
)
ml_client.connections.create_or_update(workspace_connection=wps_connection)
通用容器注册表
使用 GenericContainerRegistry 工作区连接,可以为映像生成指定外部注册表,例如 Nexus 或 Artifactory。 环境映像从指定的注册表推送,先前的缓存会被忽略。
使用以下 YAML 文件创建连接。 请务必更新适当的值:
#myenv.yml
$schema: https://azuremlschemas.azureedge.net/latest/environment.schema.json
name: docker-image-plus-conda-example
image: mcr.microsoft.com/azureml/openmpi4.1.0-ubuntu20.04
type: python_feed
conda_file: conda_dep.yml
description: Environment created from a Docker image plus Conda environment
#conda_dep.yml
name: project_environment
dependencies:
  - python=3.10
  - pip:
    - azureml-defaults
channels:
  - anaconda
  - conda-forge
#connection.yml
name: ws_conn_generic_container_registry
type: container_registry
target: https://test-registry.com
credentials:
  type: username_password
  username: <username>
  password: <password>
#hello_world_job.yml
$schema: https://azuremlschemas.azureedge.net/latest/commandJob.schema.json
command: echo "hello world"
environment: azureml:<env name>@latest
使用凭据从 YAML 文件创建连接:
az ml connection create --file connection.yaml --credentials username=<username> password=<password> --resource-group my-resource-group --workspace-name my-workspace
创建环境
az ml environment create --name my-env --version 1 --file my_env.yml --conda-file conda_dep.yml --image mcr.microsoft.com/azureml/openmpi4.1.0-ubuntu20.04 --resource-group my-resource-group --workspace-name my-workspace
可以验证是否已成功创建环境
az ml environment show --name my-env --version 1 --resource-group my-resource-group --workspace-name my-workspace
以下示例将会创建 Azure 容器注册表连接。 此连接使用托管标识进行身份验证:
import os
from azure.ai.ml import MLClient
from azure.identity import DefaultAzureCredential
from azure.ai.ml.entities import Environment
from azure.ai.ml.entities import WorkspaceConnection
from azure.ai.ml.entities import UsernamePasswordConfiguration
from azureml.core.conda_dependencies import CondaDependencies
from azure.ai.ml import command

# Enter details of AML workspace
subscription_id = "<SUBSCRIPTION_ID>"
resource_group = "<RESOURCE_GROUP>"
workspace = "<AML_WORKSPACE_NAME>"

ml_client = MLClient( DefaultAzureCredential(), subscription_id, resource_group, workspace)
# Fetching secrets from env var to secure access, these secrets can be set outside or source code
registry_username = os.environ["REGISTRY_USERNAME"]
registry_password = os.environ["REGISTRY_PASSWORD"]
credentials = UsernamePasswordConfiguration(username= registry_username, password= registry_password)

# Create GenericContainerRegistry workspace connection for a generic registry
ws_connection = WorkspaceConnection(name="<name>", target="<target>", type="GenericContainerRegistry", credentials=credentials)
ml_client.connections.create_or_update(ws_connection)

# Create an environment
env_docker_conda = Environment(image="<base image>", conda_file="<yml file>", name="docker-image-plus-conda-example", description="Environment created from a Docker image plus Conda environment.")
ml_client.environments.create_or_updat(env_docker_conda)

job = command(command="echo 'hello world'", environment=env_docker_conda,display_name="v2-job-example")
returned_job = ml_client.create_or_update(job)
导航到 Azure 机器学习工作室。
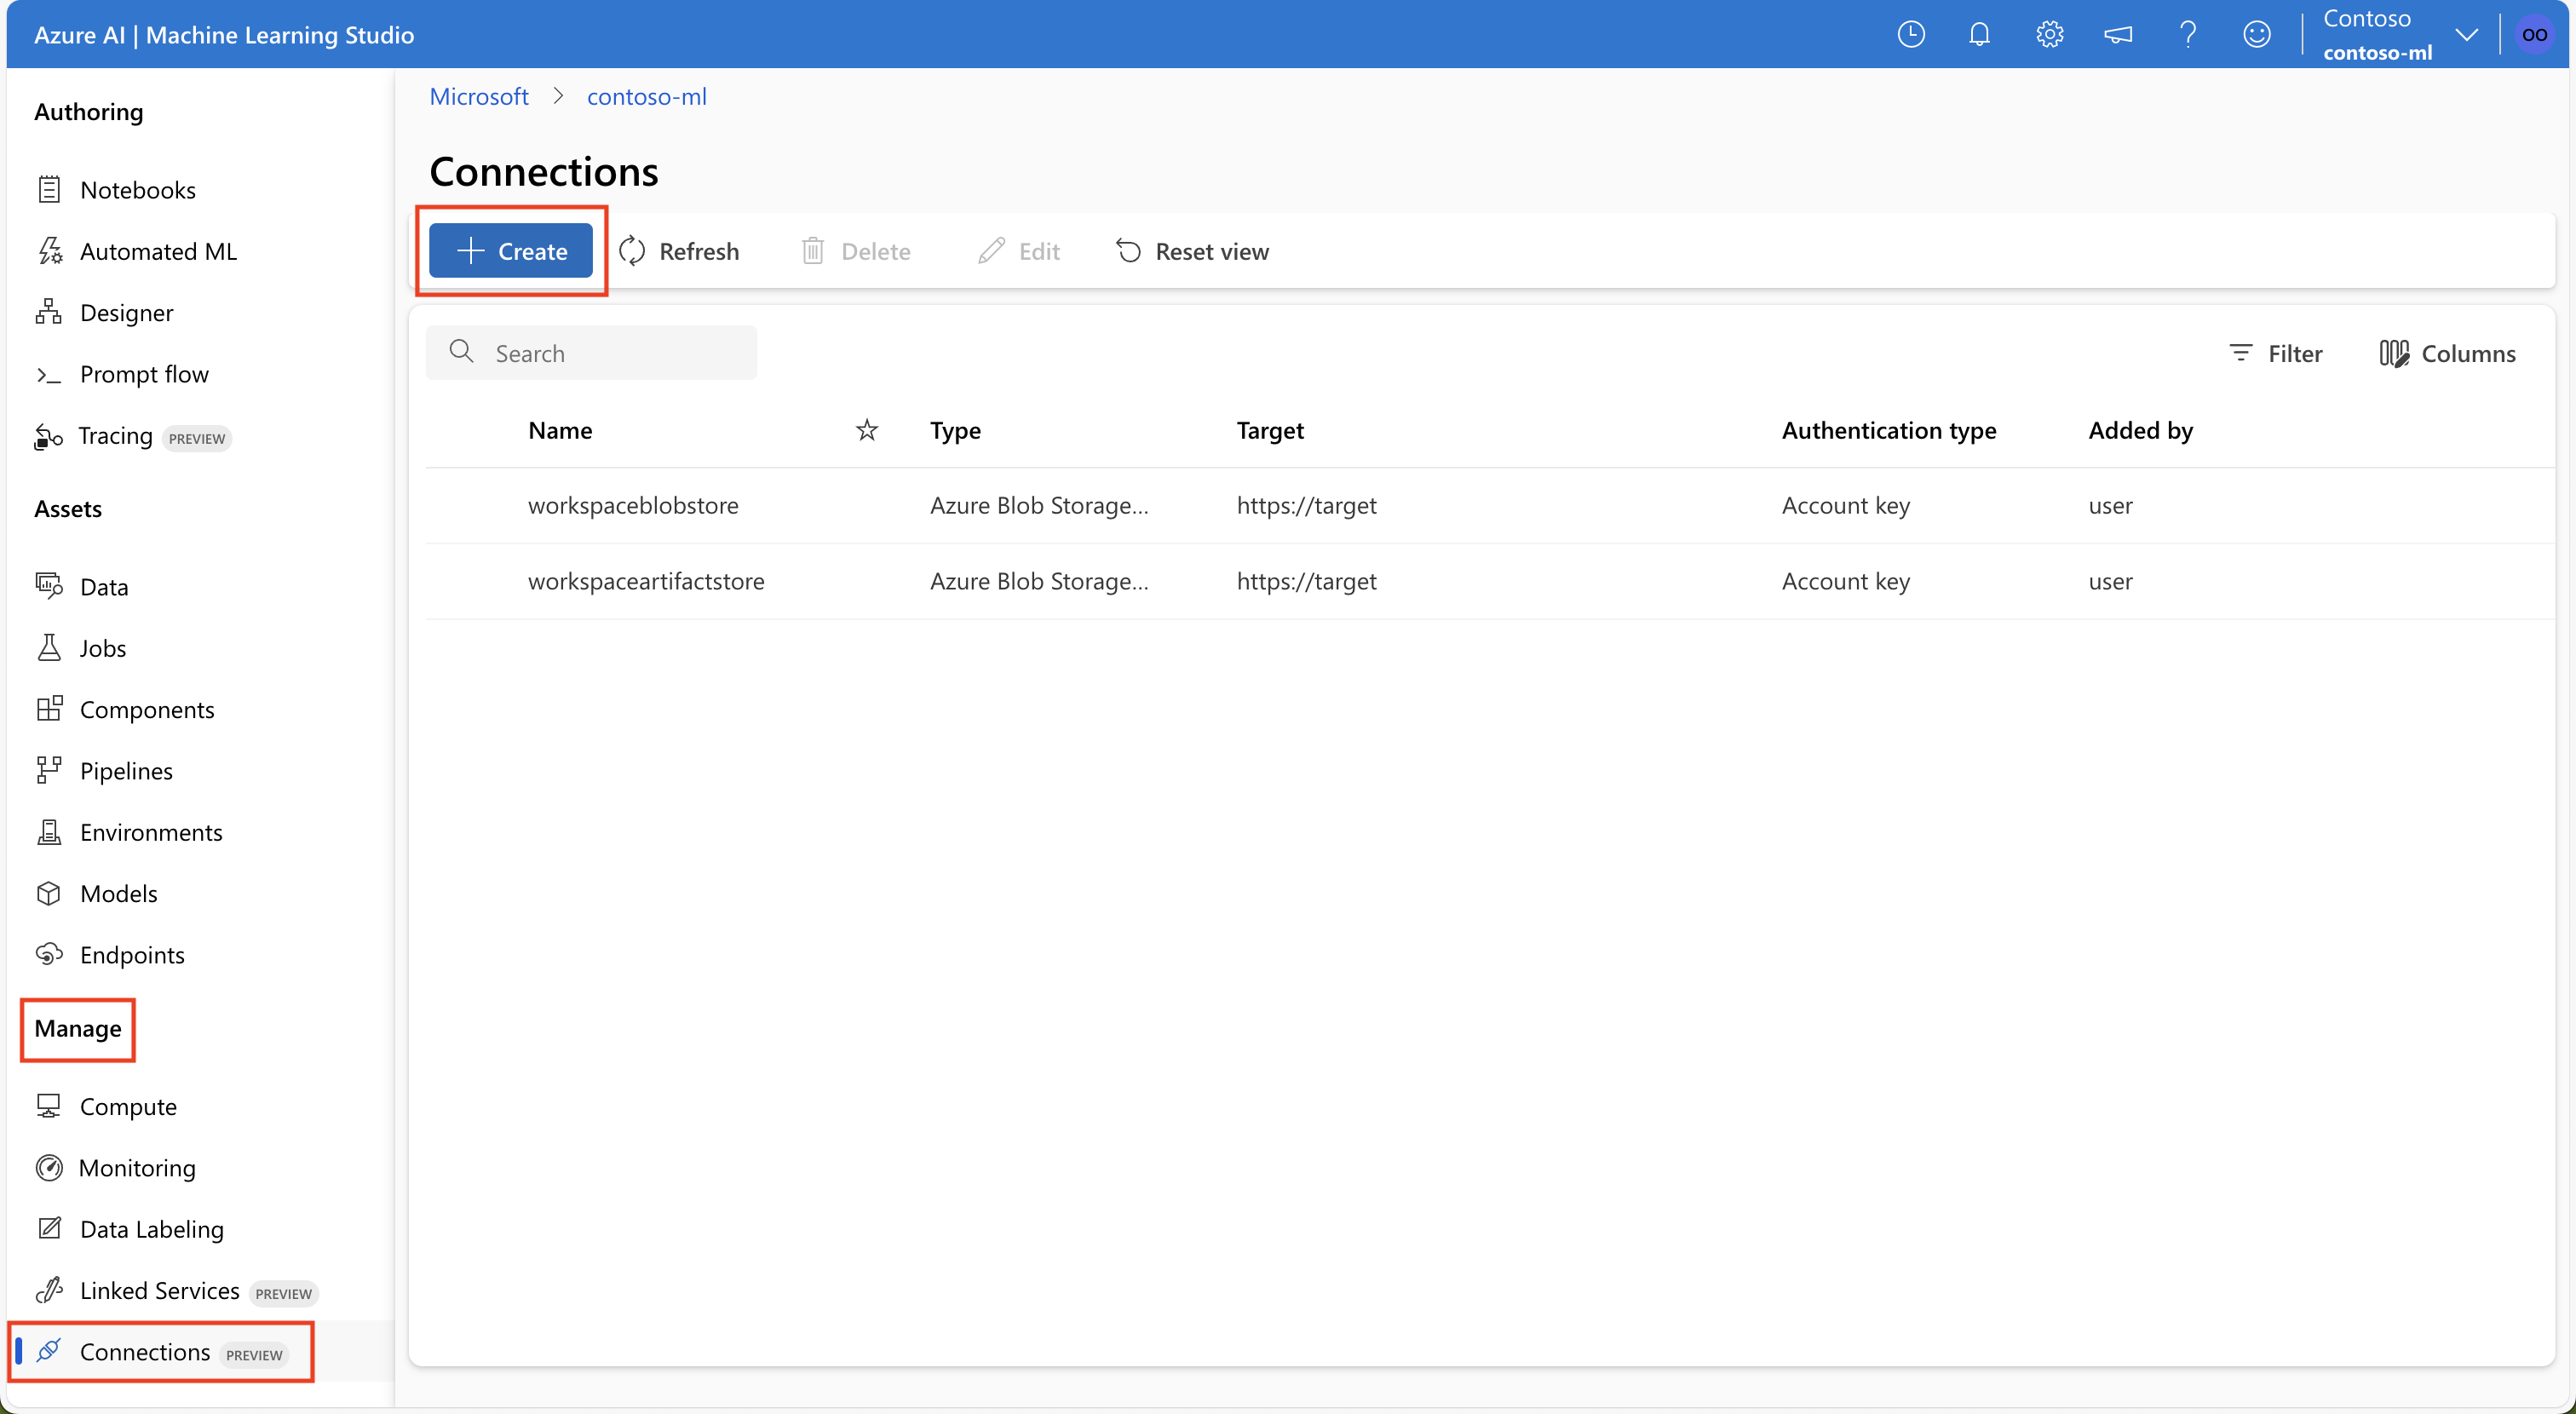
在左侧导航栏中,选择“管理”下的“连接”,然后选择“创建”。
在“其他资源类型”下,选择*“通用容器注册表”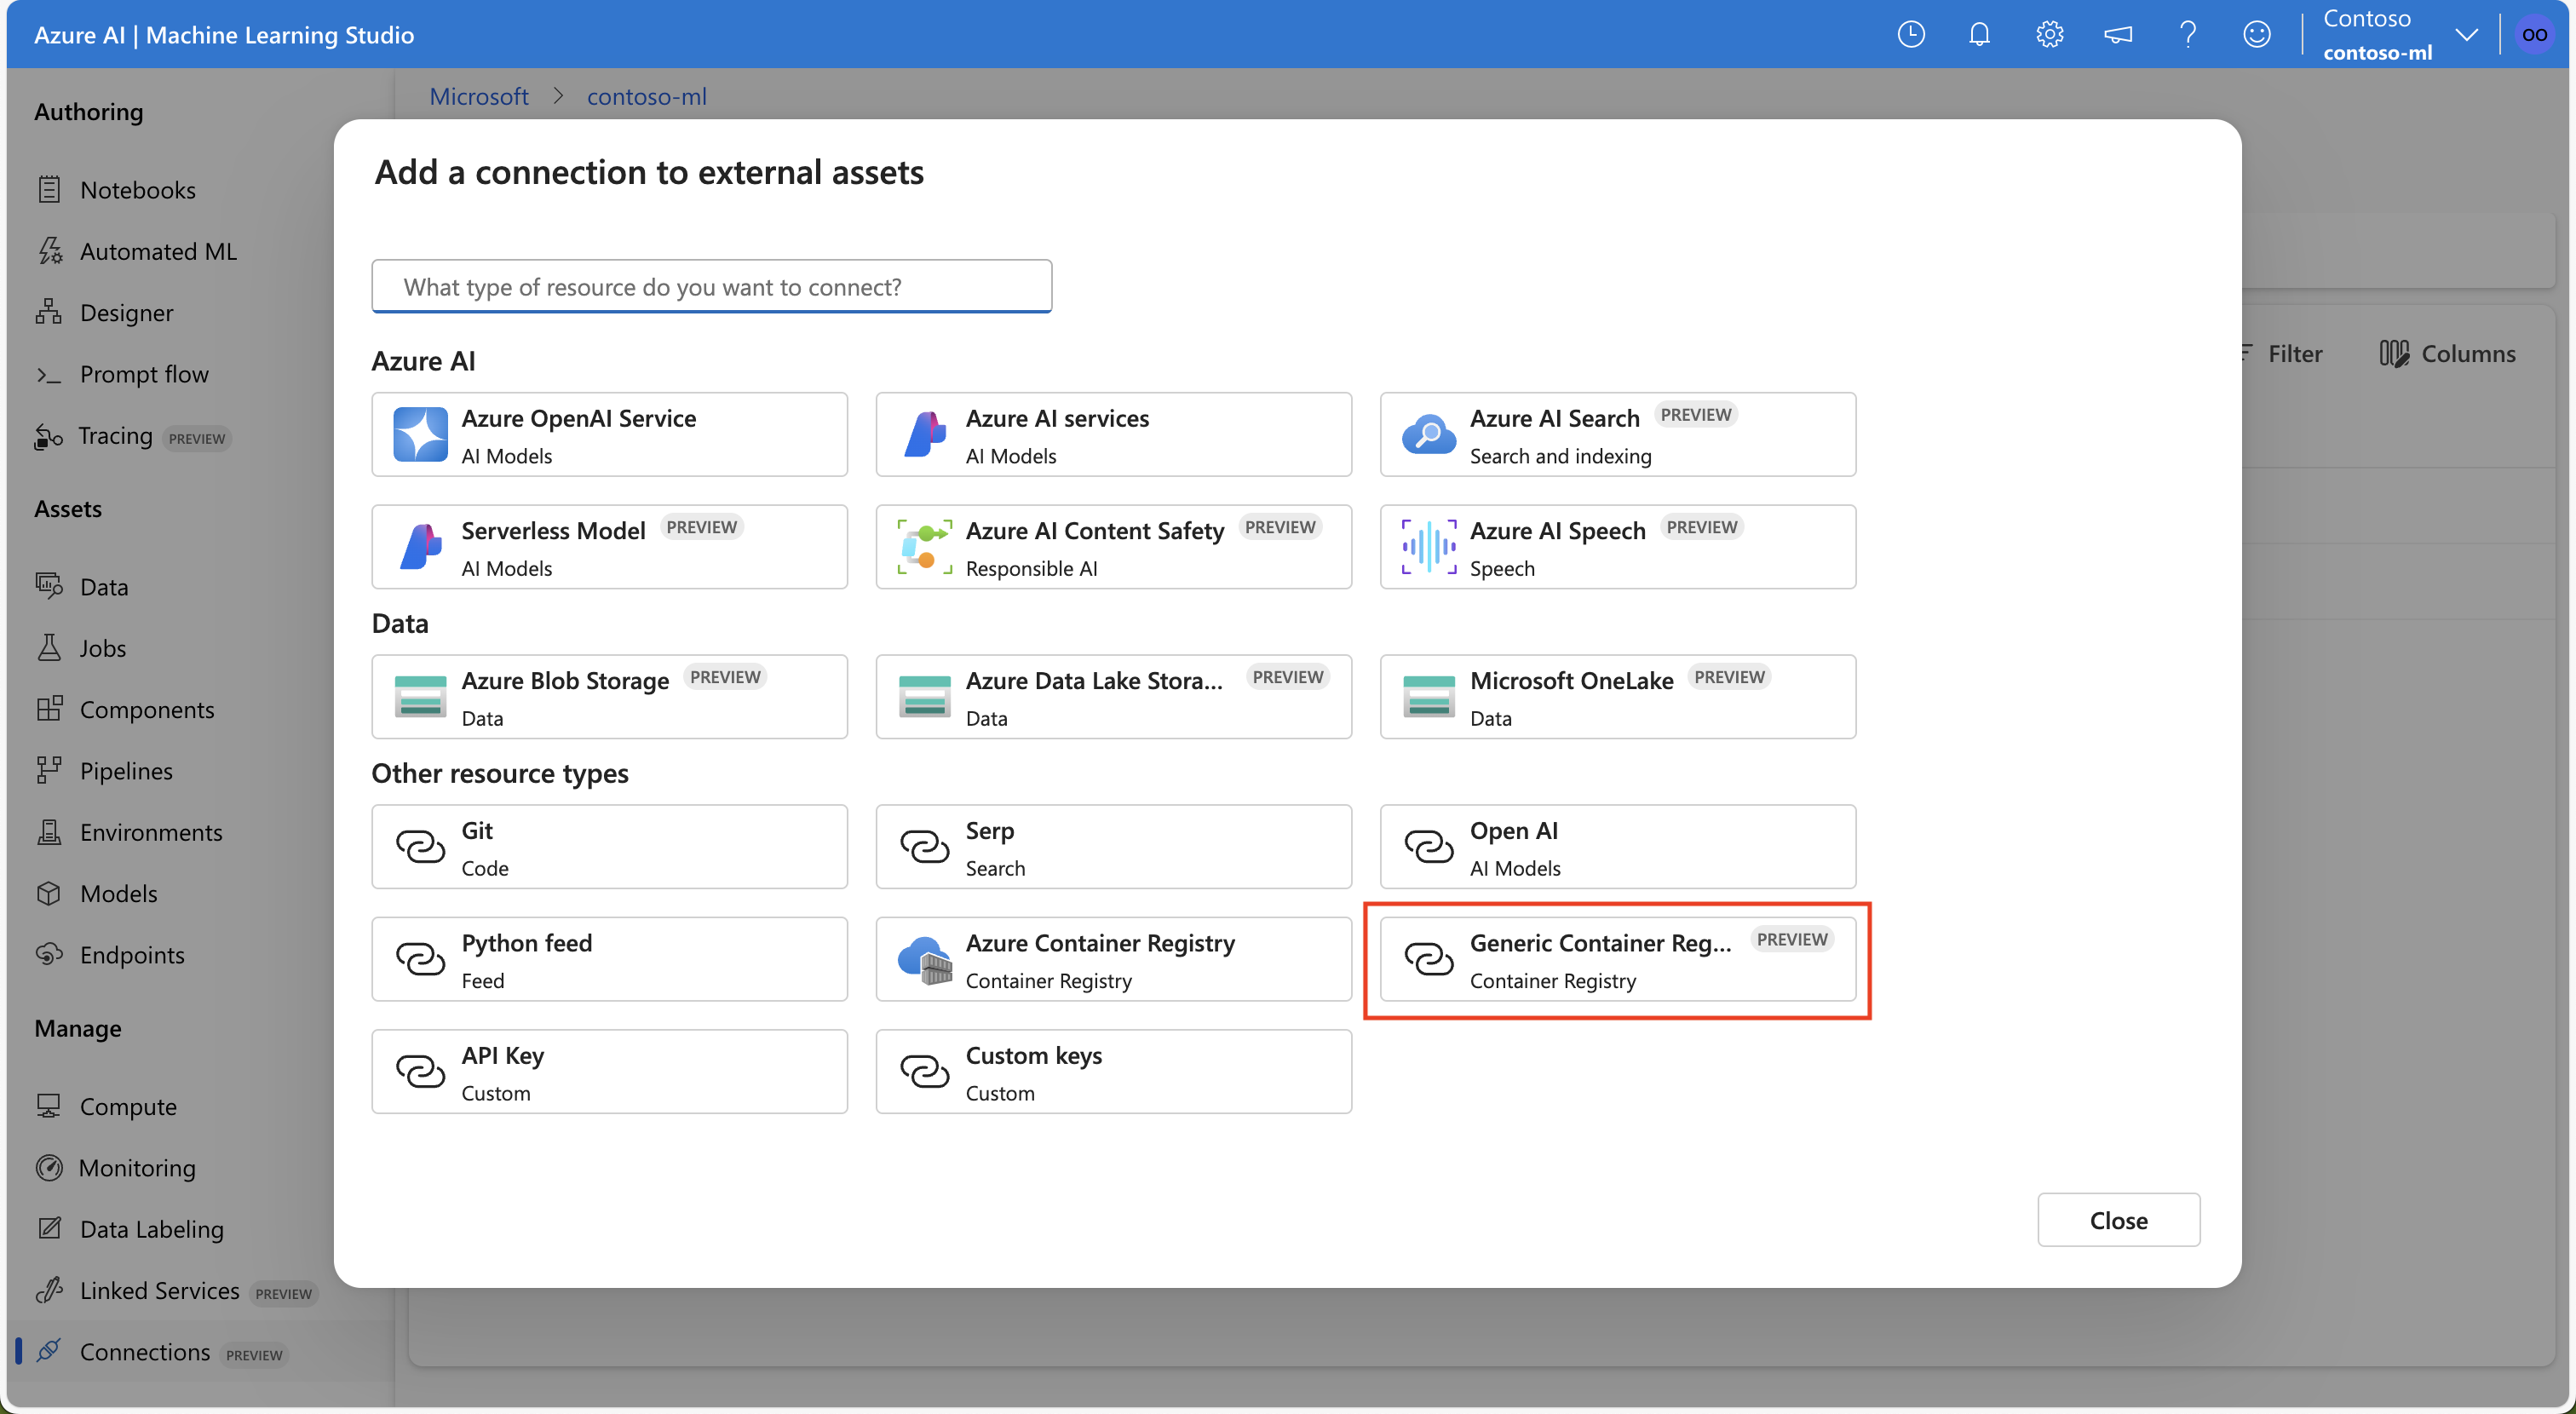
输入所需信息,然后选择“添加连接”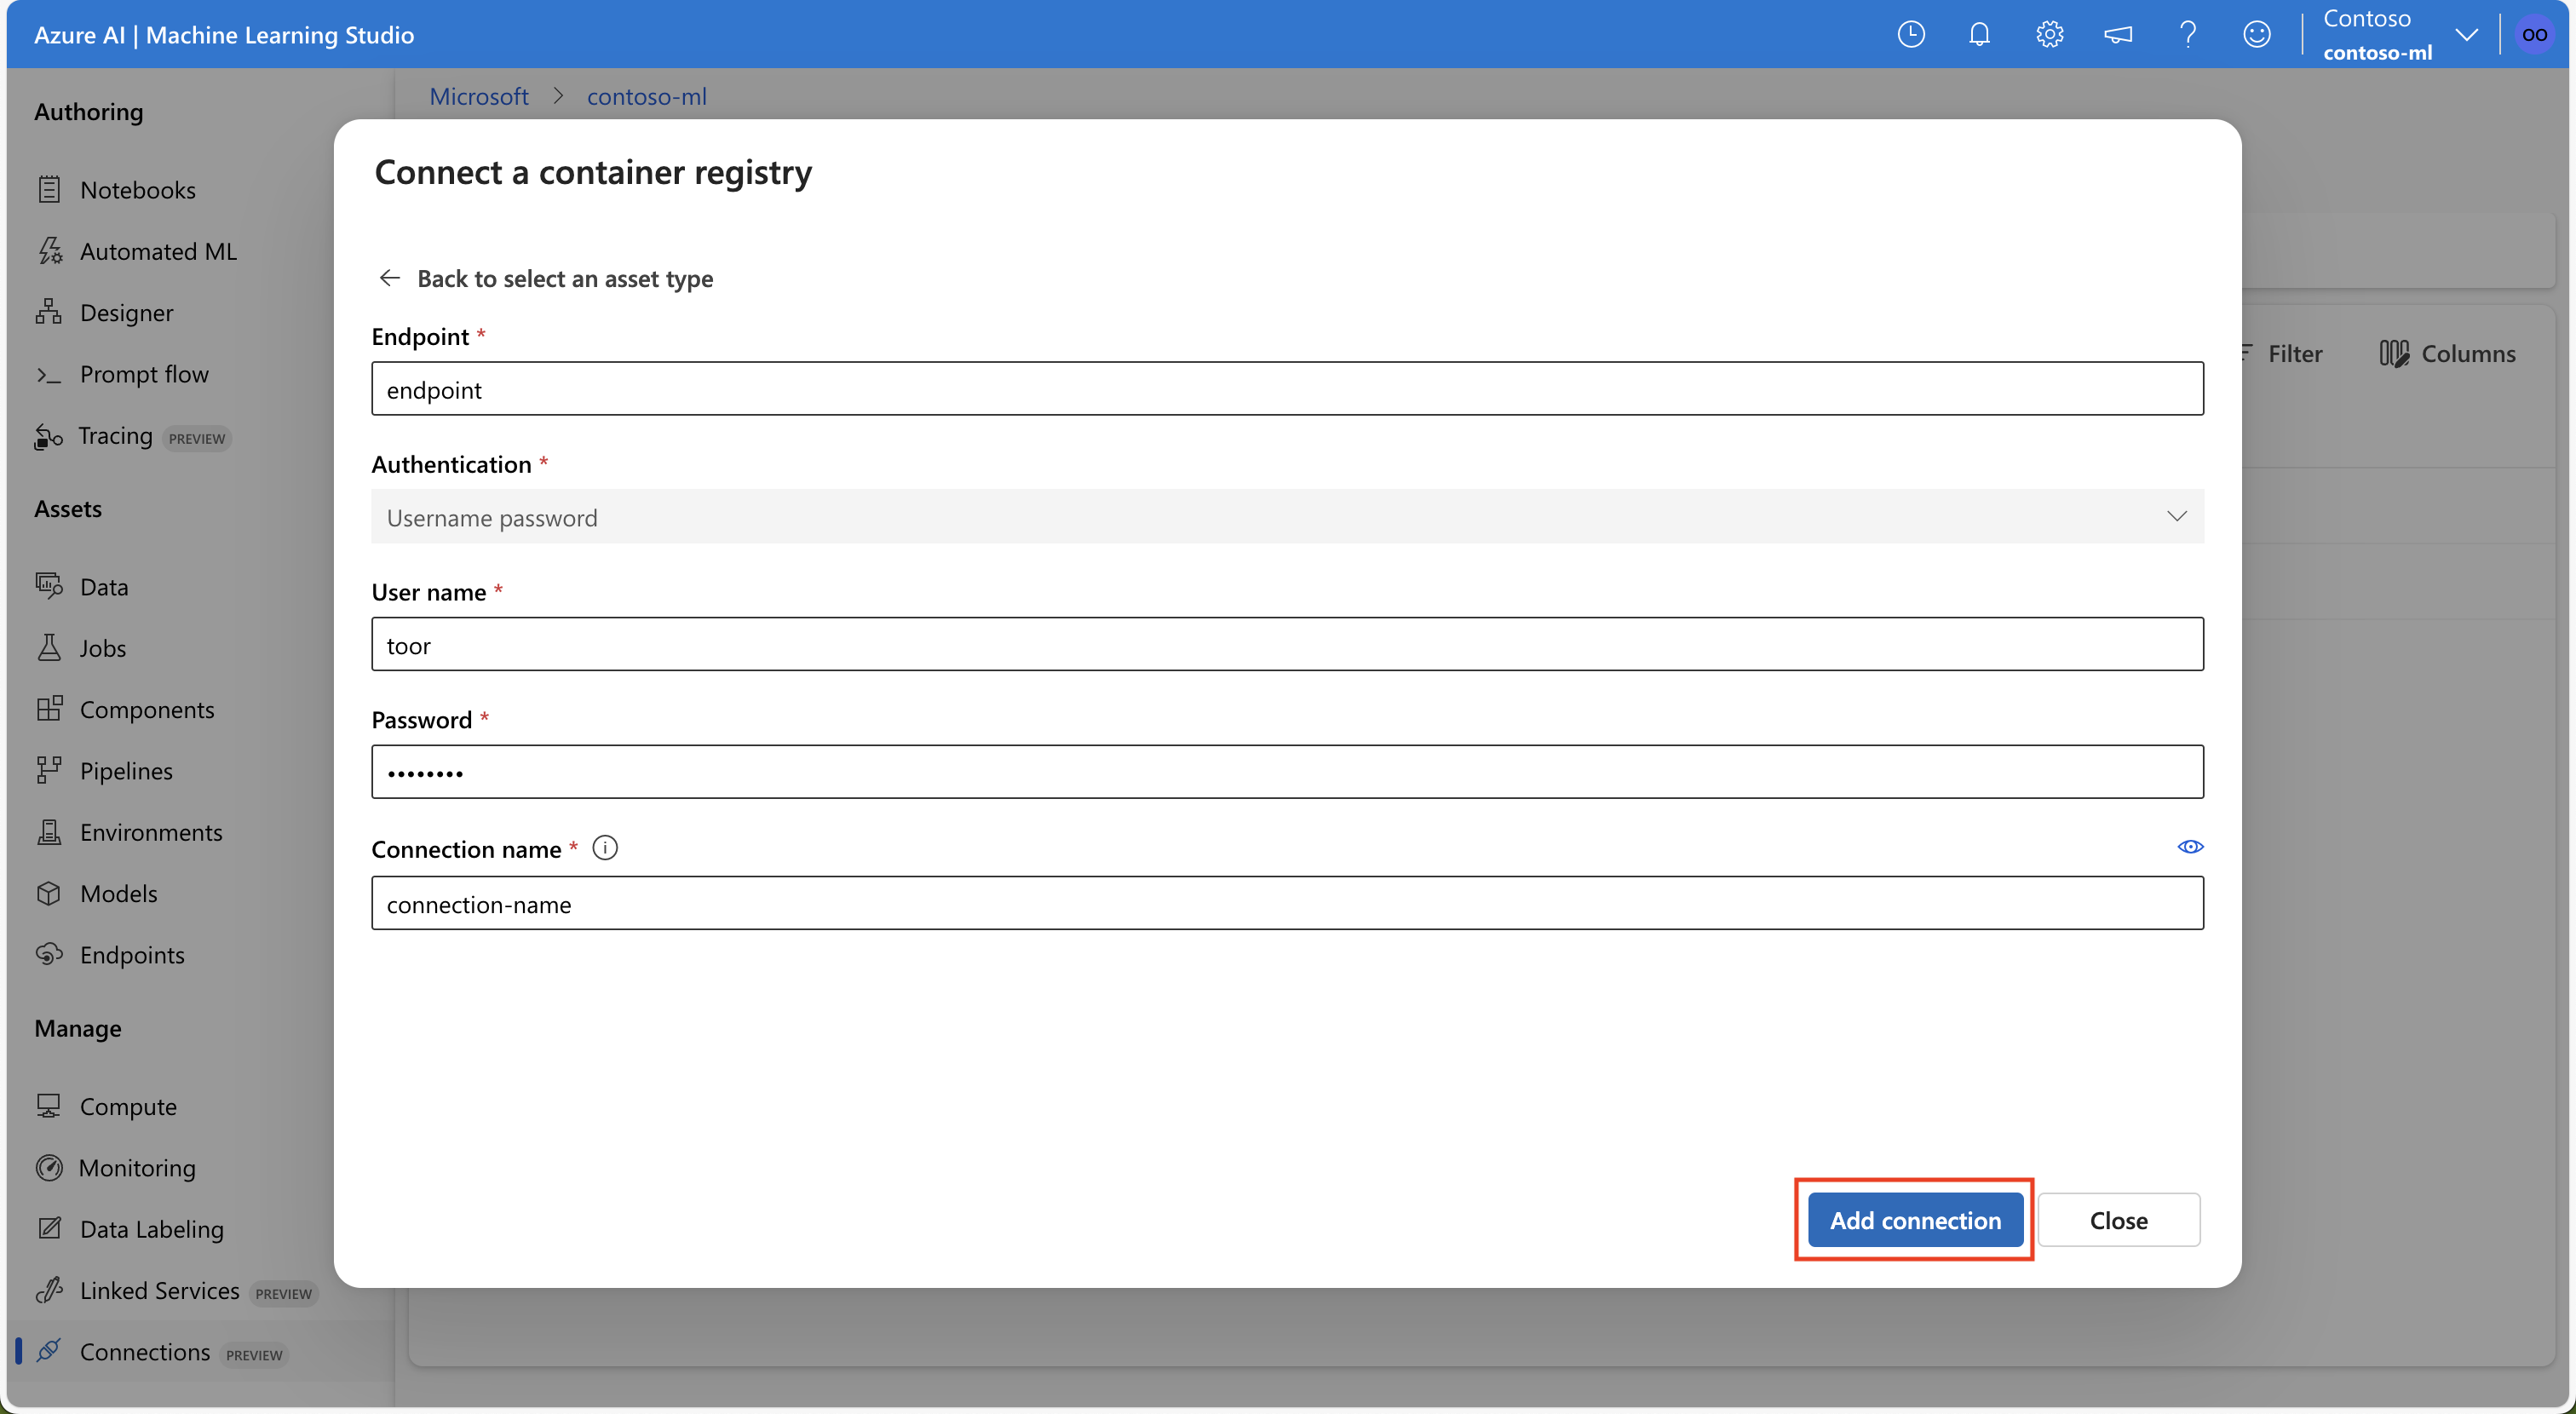
相关内容
如果使用数据连接(Snowflake DB、Amazon S3 或 Azure SQL DB),请参阅以下文章,了解详细信息:
 Azure CLI ml 扩展 v2(最新版)
 Python SDK azure-ai-ml v2(最新版)


