从部署的用于实时推理的模型中收集生产数据
适用范围: Azure CLI ml 扩展 v2(最新版)
 Python SDK azure-ai-ml v2(最新版)
在本文中,你将了解如何使用 Azure 机器学习数据收集器从部署到 Azure 机器学习托管联机终结点或 Kubernetes 联机终结点的模型中收集生产推理数据。
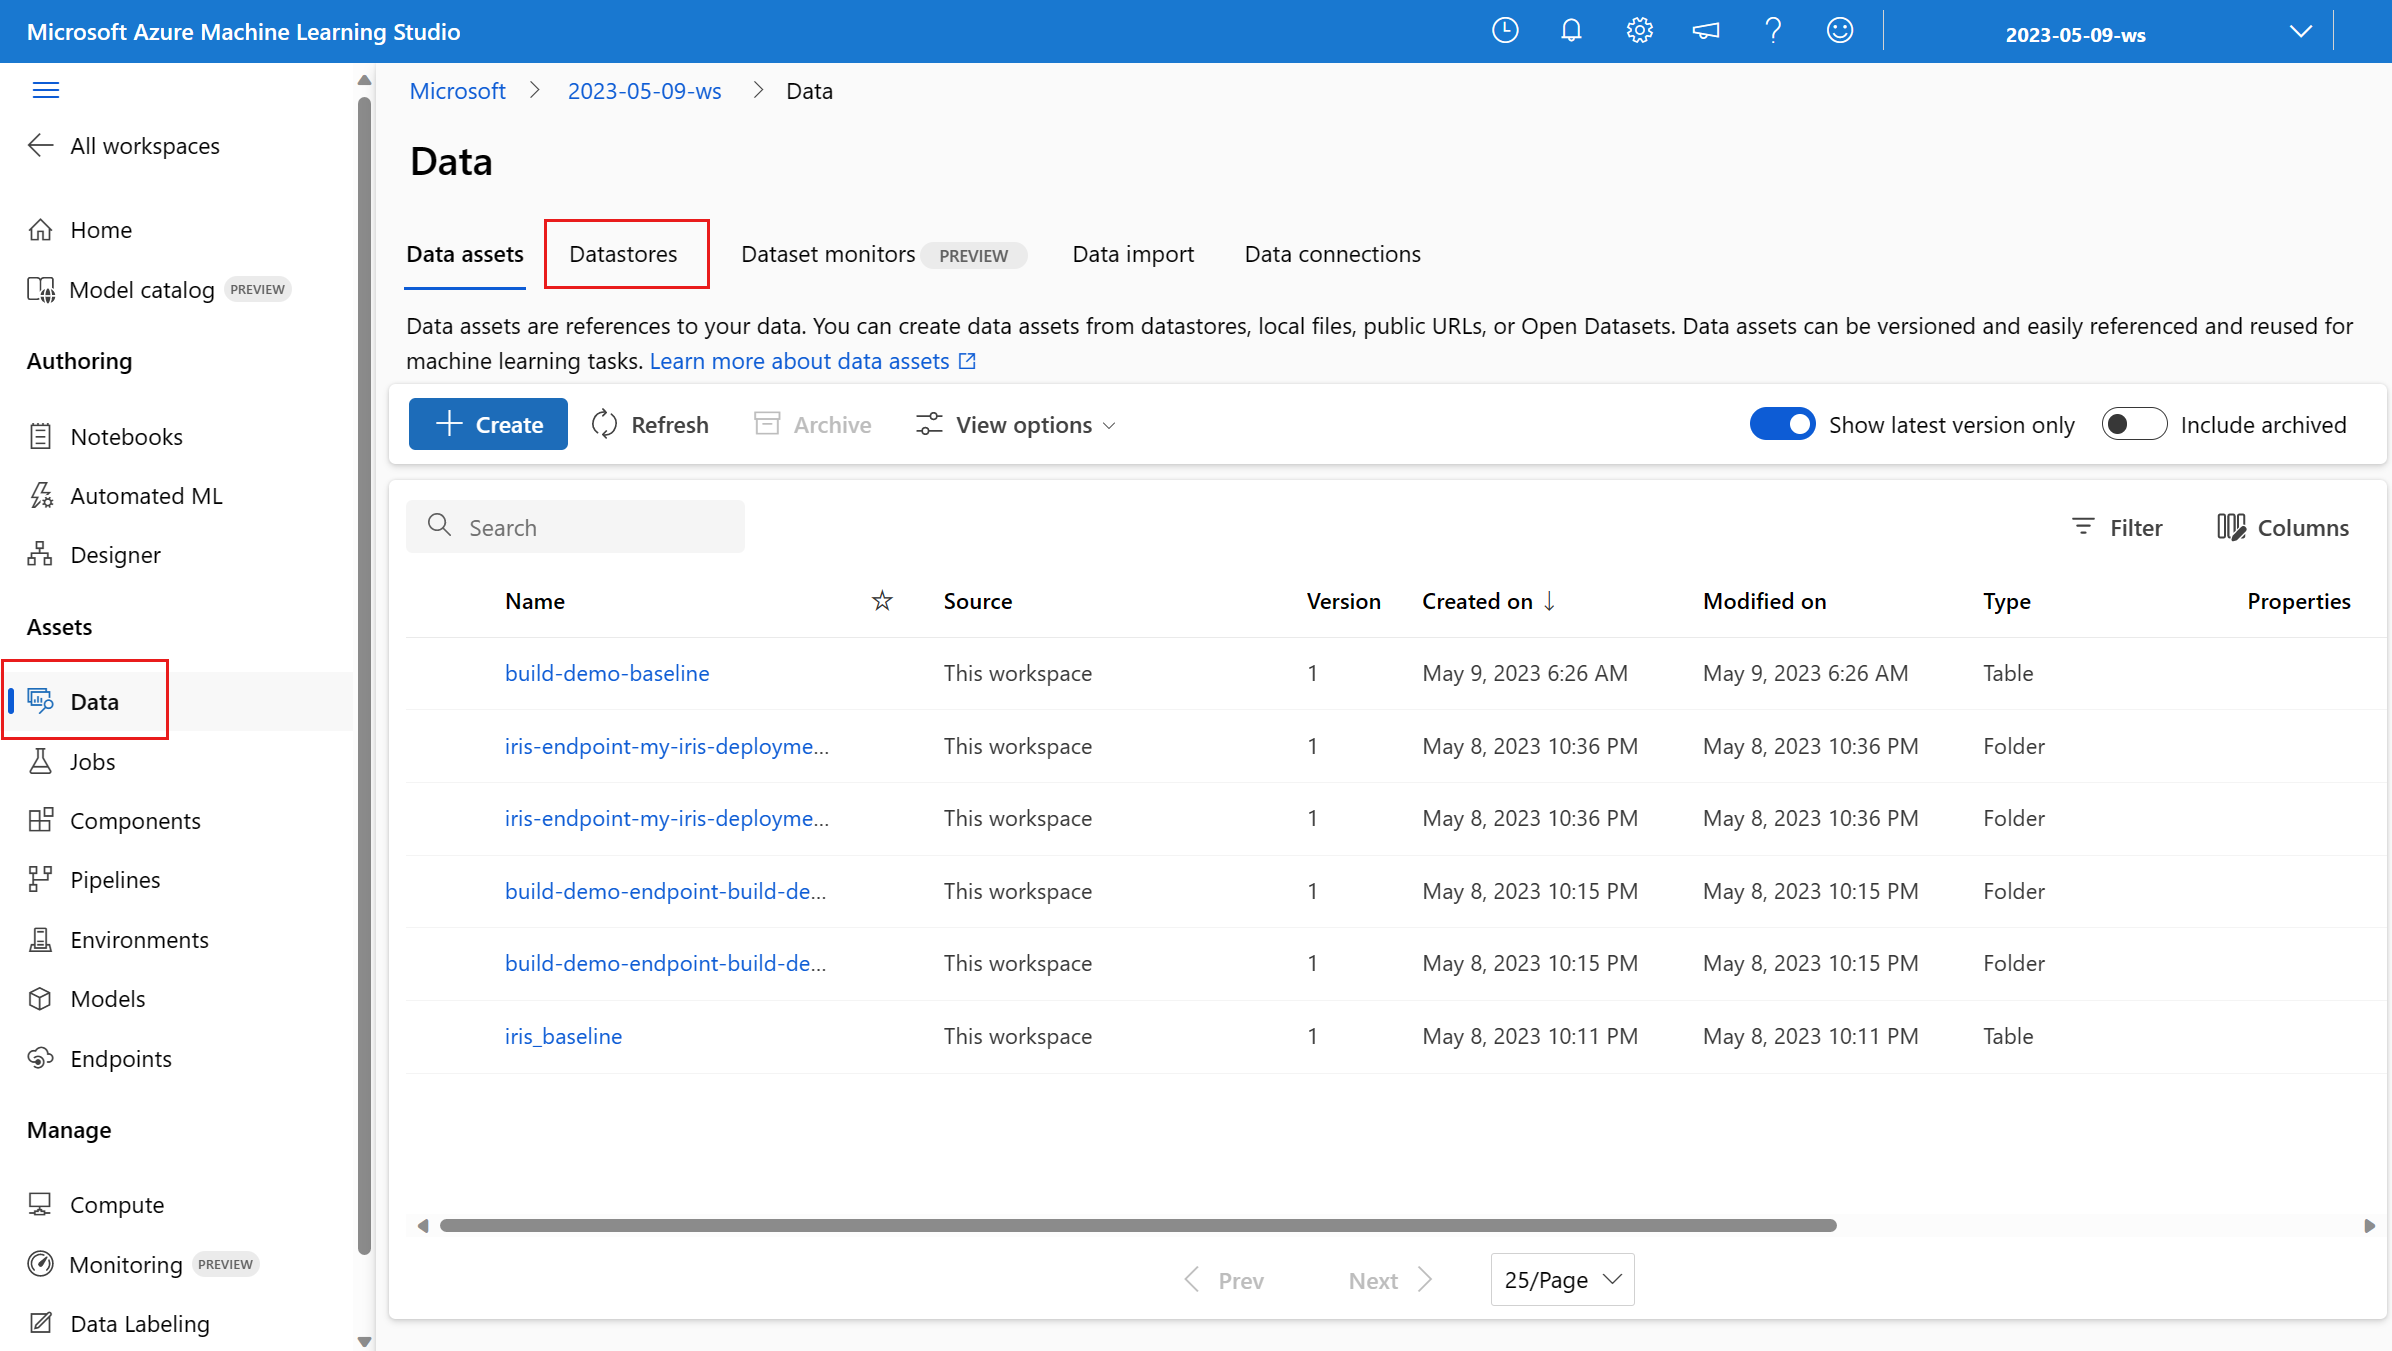
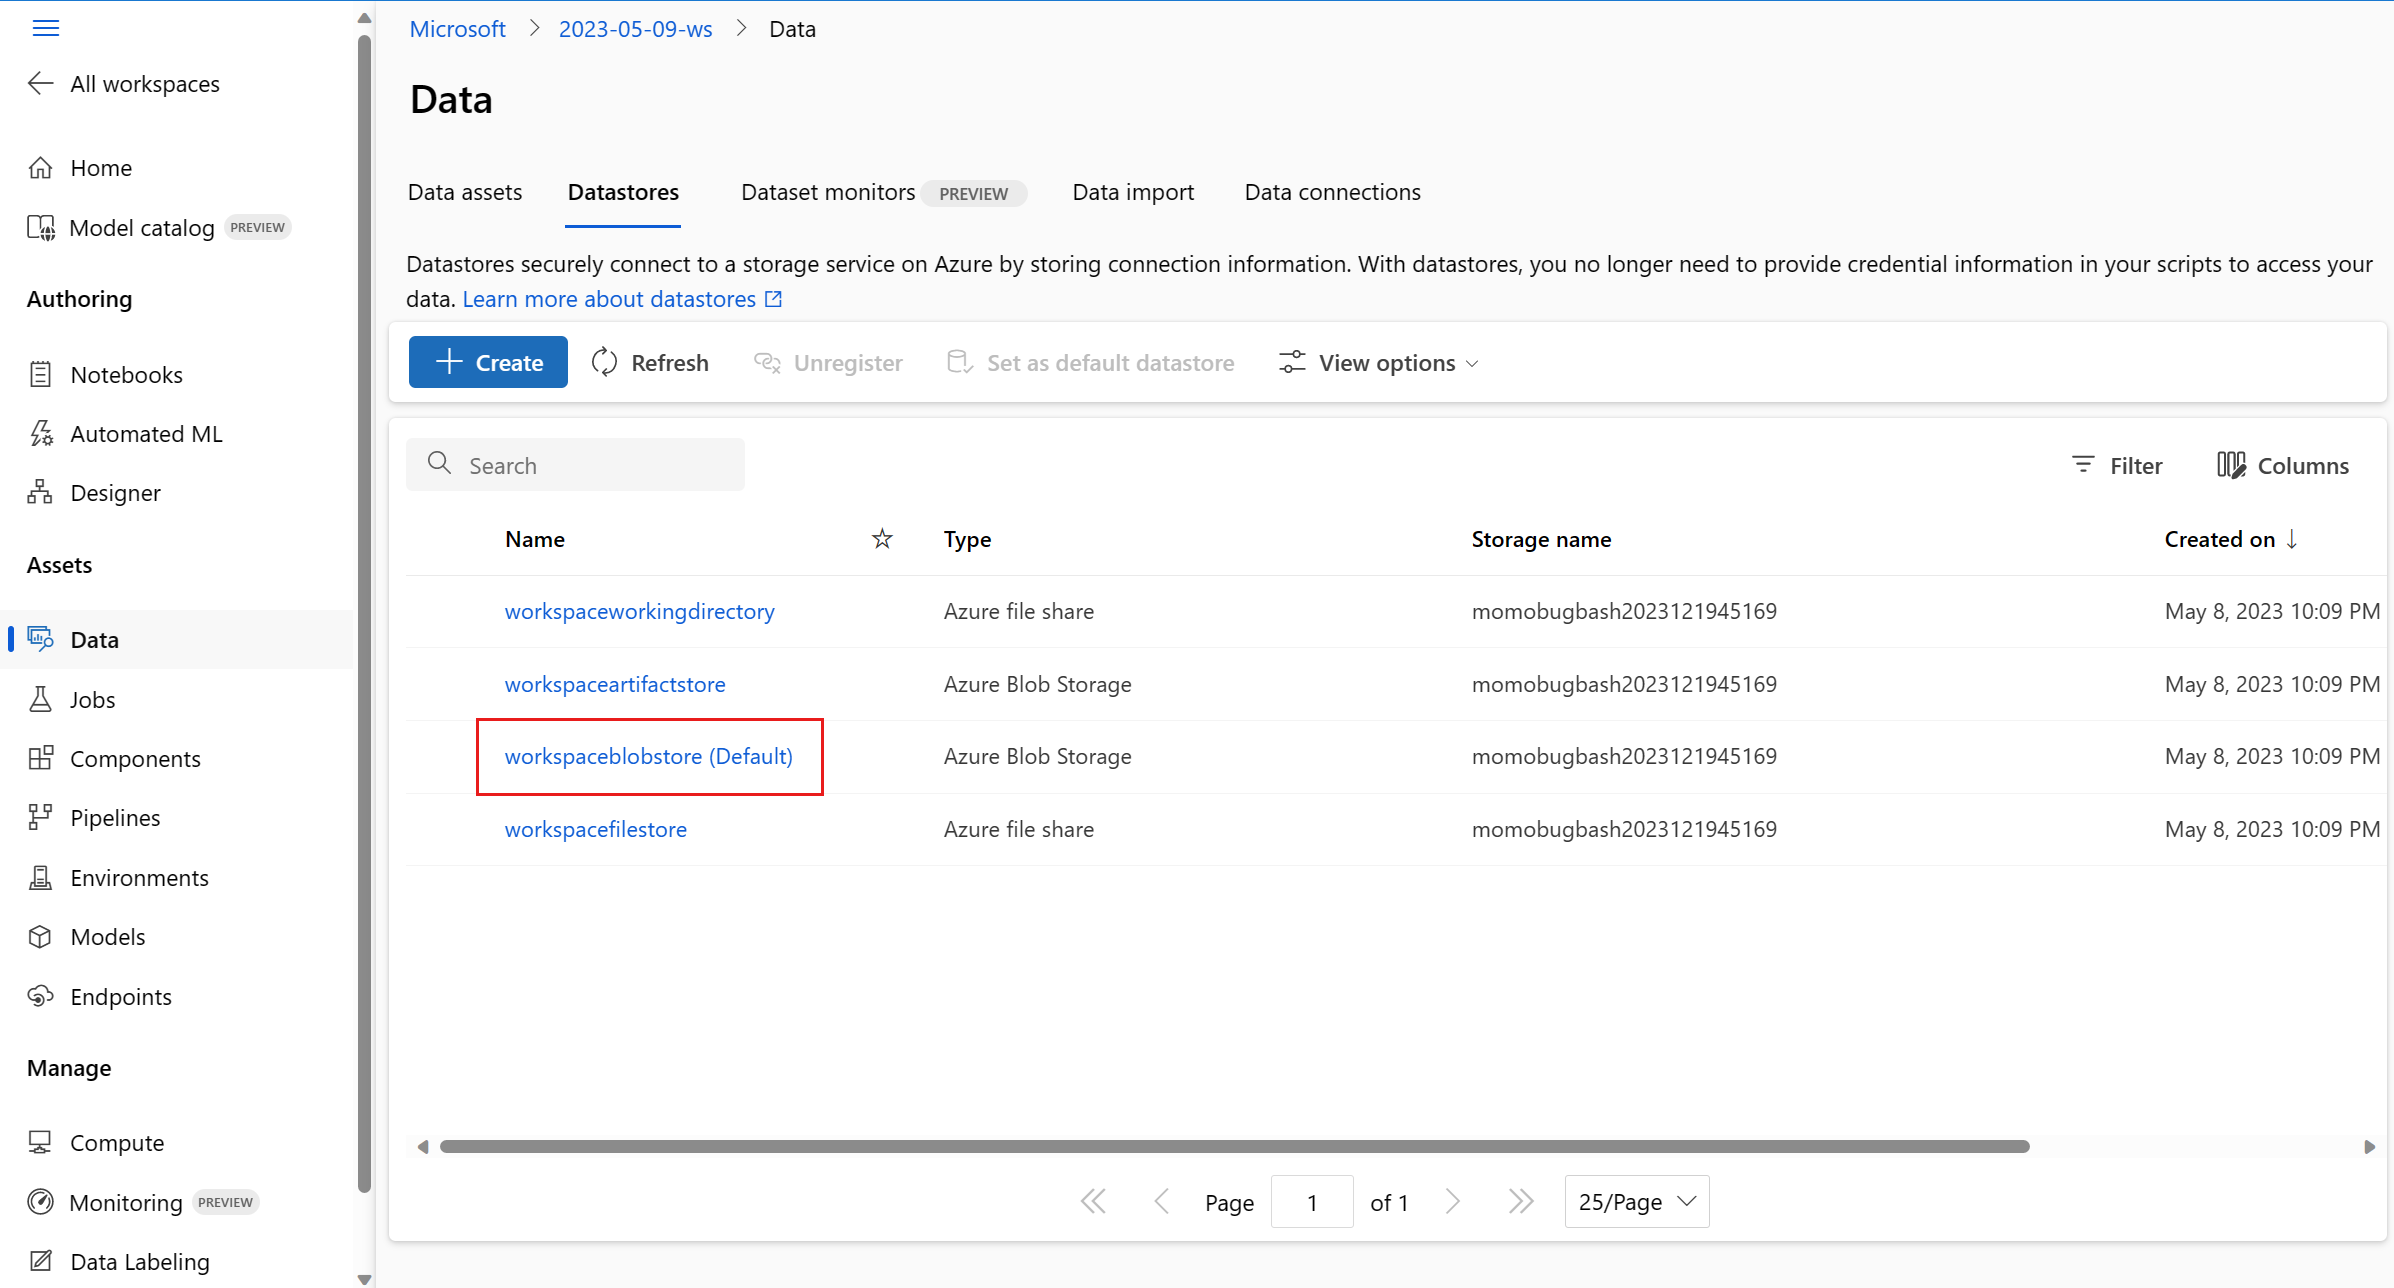
可以为新的或现有的联机终结点部署启用数据收集。 Azure 机器学习数据收集器在 Azure Blob 存储中记录推理数据。 使用 Python SDK 收集的数据将自动注册为 Azure 机器学习工作区中的数据资产。 此数据资产可用于监控模型。
如果有兴趣为部署到实时终结点的 MLflow 模型收集生产推理数据,请参阅 MLflow 模型的数据收集。
先决条件
在按照本文中的步骤操作之前,请确保满足以下先决条件:
Azure CLI 和 Azure CLI 的
ml扩展。 有关详细信息,请参阅安装、设置和使用 CLI (v2)。重要
本文中的 CLI 示例假定你使用的是 Bash(或兼容的)shell。 例如,从 Linux 系统或者适用于 Linux 的 Windows 子系统。
Azure 机器学习工作区。 如果没有,请使用安装、设置和使用 CLI (v2) 中的步骤创建一个。
- Azure 基于角色的访问控制 (Azure RBAC) 用于授予对 Azure 机器学习中的操作的访问权限。 若要执行本文中的步骤,必须为用户帐户分配 Azure 机器学习工作区的所有者或参与者角色,或者分配一个允许
Microsoft.MachineLearningServices/workspaces/onlineEndpoints/*的自定义角色。 有关详细信息,请参阅管理对 Azure 机器学习工作区的访问。
拥有可用于部署的已注册模型。 如果你没有已注册的模型,请参阅将你的模型注册为机器学习中的资产。
创建 Azure 机器学习联机终结点。 如果你没有现有的联机终结点,请参阅使用联机终结点部署机器学习模型并对其进行评分。
执行模型监视的自定义日志记录
使用自定义日志记录的数据收集允许你在任何数据转换之前、期间和之后直接从记分脚本记录 Pandas DataFrame。 使用自定义日志记录时,表格数据将实时记录到工作区 Blob 存储或自定义 Blob 存储容器。 模型监视器可以使用存储中的数据。
使用自定义日志记录代码更新评分脚本
首先,将自定义日志记录代码添加到评分脚本 (score.py)。 对于自定义日志记录,你需要 azureml-ai-monitoring 包。 有关此包的更多信息,请参阅 数据收集 SDK 的 PyPI 页面。
通过将以下行添加到评分脚本的顶部来导入
azureml-ai-monitoring包:from azureml.ai.monitoring import Collector在
init()函数中声明数据收集变量(最多五个):注意
如果你对
Collector对象使用名称model_inputs和model_outputs,模型监控系统将自动识别自动注册的数据资产以提供更加无缝的模型监视体验。global inputs_collector, outputs_collector inputs_collector = Collector(name='model_inputs') outputs_collector = Collector(name='model_outputs')默认情况下,如果在数据收集过程中失败,Azure 机器学习会引发异常。 (可选)可以使用
on_error参数指定在发生日志记录失败时要运行的函数。 例如,在以下代码中使用on_error参数,Azure 机器学习将记录错误,而不是抛出异常:inputs_collector = Collector(name='model_inputs', on_error=lambda e: logging.info("ex:{}".format(e)))在
run()函数中,使用collect()函数记录评分前后的数据帧。 第一次调用collect()返回context,其中包含稍后关联模型输入和模型输出的信息。context = inputs_collector.collect(data) result = model.predict(data) outputs_collector.collect(result, context)注意
目前,
collect()API 仅记录 pandas DataFrame。 如果数据在传递到collect()时不在 DataFrame 中,则不会被记录到存储中,系统将报告错误。
以下代码是使用自定义日志记录 Python SDK 的完整评分脚本 (score.py) 的示例。
import pandas as pd
import json
from azureml.ai.monitoring import Collector

def init():
  global inputs_collector, outputs_collector, inputs_outputs_collector

  # instantiate collectors with appropriate names, make sure align with deployment spec
  inputs_collector = Collector(name='model_inputs')
  outputs_collector = Collector(name='model_outputs')

def run(data):
  # json data: { "data" : {  "col1": [1,2,3], "col2": [2,3,4] } }
  pdf_data = preprocess(json.loads(data))

  # tabular data: {  "col1": [1,2,3], "col2": [2,3,4] }
  input_df = pd.DataFrame(pdf_data)

  # collect inputs data, store correlation_context
  context = inputs_collector.collect(input_df)

  # perform scoring with pandas Dataframe, return value is also pandas Dataframe
  output_df = predict(input_df)

  # collect outputs data, pass in correlation_context so inputs and outputs data can be correlated later
  outputs_collector.collect(output_df, context)

  return output_df.to_dict()

def preprocess(json_data):
  # preprocess the payload to ensure it can be converted to pandas DataFrame
  return json_data["data"]

def predict(input_df):
  # process input and return with outputs
  ...

  return output_df
更新评分脚本以记录自定义唯一 ID
除了直接在评分脚本中记录 pandas 数据帧,还可以使用所选的唯一 ID 记录数据。 这些 ID 可以来自应用程序、外部系统,也可以生成它们。 如果未提供自定义 ID(如本部分所述),数据收集器将自动生成唯一的 correlationid,以帮助稍后关联模型的输入和输出。 如果提供自定义 ID,则所记录数据的 correlationid 字段将包含提供的自定义 ID 的值。
首先完成上一部分中的步骤,然后将以下行添加到评分脚本,导入
azureml.ai.monitoring.context包:from azureml.ai.monitoring.context import BasicCorrelationContext在评分脚本中,实例化
BasicCorrelationContext对象,并传入要为该行记录的id。 建议此id是系统中的唯一 ID,以便唯一标识 Blob 存储中的每个记录行。 将此对象作为参数传递到collect()API 调用:# create a context with a custom unique id artificial_context = BasicCorrelationContext(id='test') # collect inputs data, store correlation_context context = inputs_collector.collect(input_df, artificial_context)确保将上下文传入
outputs_collector,以便对模型输入和输出记录相同的唯一 ID,并且稍后可以轻松关联它们:# collect outputs data, pass in context so inputs and outputs data can be correlated later outputs_collector.collect(output_df, context)
以下代码是记录自定义唯一 ID 的完整评分脚本 (score.py) 的示例。
import pandas as pd
import json
from azureml.ai.monitoring import Collector
from azureml.ai.monitoring.context import BasicCorrelationContext
def init():
global inputs_collector, outputs_collector, inputs_outputs_collector
# instantiate collectors with appropriate names, make sure align with deployment spec
inputs_collector = Collector(name='model_inputs')
outputs_collector = Collector(name='model_outputs')
def run(data):
# json data: { "data" : { "col1": [1,2,3], "col2": [2,3,4] } }
pdf_data = preprocess(json.loads(data))
# tabular data: { "col1": [1,2,3], "col2": [2,3,4] }
input_df = pd.DataFrame(pdf_data)
  # create a context with a custom unique id
  artificial_context = BasicCorrelationContext(id='test')

  # collect inputs data, store correlation_context
  context = inputs_collector.collect(input_df, artificial_context)
# perform scoring with pandas Dataframe, return value is also pandas Dataframe
output_df = predict(input_df)
  # collect outputs data, pass in context so inputs and outputs data can be correlated later
  outputs_collector.collect(output_df, context)
return output_df.to_dict()
def preprocess(json_data):
# preprocess the payload to ensure it can be converted to pandas DataFrame
return json_data["data"]
def predict(input_df):
# process input and return with outputs
...
return output_df
收集数据以监视模型性能
如果要使用收集的数据进行模型性能监视,请务必在此类数据可用时,每个记录的行都有唯一的 correlationid,可用于将数据与地面真实数据相关联。 数据收集器将为每个记录的行自动生成唯一的 correlationid,并将此自动生成的 ID 包含在 JSON 对象的 correlationid 字段中。 有关 JSON 架构的详细信息,请参阅存储 blob 存储中收集的数据。
如果要将自己的唯一 ID 用于记录生产数据,建议将此 ID 记录为 Pandas 数据帧中的单独列,因为数据收集器会批处理彼此靠近的请求。 通过将 correlationid 记录为单独的列,它可以在下游随时用于与地面真实数据集成。
更新依赖项
需要先使用基础映像 mcr.microsoft.com/azureml/openmpi4.1.0-ubuntu20.04 和适当的 Conda 依赖项创建环境,才能使用更新的评分脚本创建部署。 因此,可以使用以下 YAML 中的规范构建环境。
channels:
  - conda-forge
dependencies:
  - python=3.8
  - pip=22.3.1
  - pip:
      - azureml-defaults==1.38.0
      - azureml-ai-monitoring~=0.1.0b1
name: model-env
更新部署 YAML
接下来,你需要创建部署 YAML。 若要创建部署 YAML,需要包括 data_collector 属性,并为之前通过自定义日志记录 Python SDK 实例化的 Collector 对象 model_inputs 和 model_outputs 启用数据收集:
data_collector:
  collections:
    model_inputs:
      enabled: 'True'
    model_outputs:
      enabled: 'True'
以下代码是用于托管联机终结点部署的综合部署 YAML 的示例。 你应该根据自己的方案来更新部署 YAML。 有关如何为推理数据日志记录设置部署 YAML 格式的更多示例,请参阅 Azure 模型数据收集器示例。
$schema: https://azuremlschemas.azureedge.net/latest/managedOnlineDeployment.schema.json
name: blue
endpoint_name: my_endpoint
model: azureml:iris_mlflow_model@latest
environment:
  image: mcr.microsoft.com/azureml/openmpi4.1.0-ubuntu20.04
  conda_file: model/conda.yaml
code_configuration:
  code: scripts
  scoring_script: score.py
instance_type: Standard_F2s_v2
instance_count: 1
data_collector:
  collections:
    model_inputs:
      enabled: 'True'
    model_outputs:
      enabled: 'True'
(可选)可以为 data_collector 调整以下附加参数:
data_collector.rolling_rate:对存储中的数据进行分区的速率。 从以下值中进行选择:Minute、Hour、Day、Month或Year。data_collector.sampling_rate:要收集的数据的百分比,以十进制比率表示。 例如,值1.0表示收集 100% 的数据。data_collector.collections.<collection_name>.data.name:要与收集的数据一起注册的数据资产的名称。data_collector.collections.<collection_name>.data.path:完整的 Azure 机器学习数据存储路径,其中收集的数据应注册为数据资产。data_collector.collections.<collection_name>.data.version:要与 Blob 存储中收集的数据一起注册的数据资产的版本。
将数据收集到自定义 Blob 存储容器
可以按照以下步骤使用数据收集器将生产推理数据收集到自定义 Blob 存储容器:
将存储容器连接到 Azure 机器学习数据存储。 有关将存储容器连接到 Azure 机器学习数据存储的详细信息,请参阅创建数据存储。
检查 Azure 机器学习终结点是否具有写入数据存储目标所需的权限。
数据收集器支持系统分配的托管标识 (SAMI) 和用户分配的托管标识 (UAMI)。 将标识添加到终结点。 使用 Blob 存储容器(用作数据目标)将角色
Storage Blob Data Contributor分配给此标识。 若要了解如何在 Azure 中使用托管标识,请参阅将 Azure 角色分配给托管标识。更新部署 YAML 以在每个集合中包含
data属性。- 必需的
data.name参数,指定要向收集的数据注册的数据资产的名称。 - 必需的
data.path参数,指定连接到你的 Azure Blob 存储容器的完整的 Azure 机器学习数据存储路径。 - 可选的
data.version参数,指定数据资产的版本(默认为 1)。
以下 YAML 配置显示了如何在每个集合中包含
data属性的示例。data_collector: collections: model_inputs: enabled: 'True' data: name: my_model_inputs_data_asset path: azureml://datastores/workspaceblobstore/paths/modelDataCollector/my_endpoint/blue/model_inputs version: 1 model_outputs: enabled: 'True' data: name: my_model_outputs_data_asset path: azureml://datastores/workspaceblobstore/paths/modelDataCollector/my_endpoint/blue/model_outputs version: 1注意
还可以使用
data.path参数来指向不同 Azure 订阅中的数据存储,方法是提供遵循以下格式的路径:azureml://subscriptions/<sub_id>/resourcegroups/<rg_name>/workspaces/<ws_name>/datastores/<datastore_name>/paths/<path>- 必需的
使用数据收集创建部署
在启用自定义日志记录的情况下部署模型:
$ az ml online-deployment create -f deployment.YAML
有关如何格式化部署 YAML 以使用托管联机终结点进行数据收集的详细信息,请参阅 CLI (v2) 托管联机部署 YAML 架构。
执行有效负载日志记录
除了使用提供的 PythonSDK 自定义日志记录外,你还可以直接收集请求和响应 HTTP 有效负载数据,而无需扩展评分脚本 (score.py)。
要启用有效负载日志记录,请在部署 YAML 中使用名称
request和response:$schema: http://azureml/sdk-2-0/OnlineDeployment.json endpoint_name: my_endpoint name: blue model: azureml:my-model-m1:1 environment: azureml:env-m1:1 data_collector: collections: request: enabled: 'True' response: enabled: 'True'在启用有效负载日志记录的情况下部署模型:
$ az ml online-deployment create -f deployment.YAML
使用有效负载日志记录时,不能保证收集的数据为表格格式。 因此,如果你希望在模型监控中使用收集的有效负载数据,则需要提供一个预处理组件来使数据表格化。 如果想要体验无缝模型监控,我们建议你使用自定义日志 Python SDK。
使用部署时,收集的数据会流向工作区 Blob 存储。 以下 JSON 代码是收集的 HTTP 请求的示例:
{"specversion":"1.0",
"id":"19790b87-a63c-4295-9a67-febb2d8fbce0",
"source":"/subscriptions/aaaa0a0a-bb1b-cc2c-dd3d-eeeeee4e4e4e/resourceGroups/mire2etesting/providers/Microsoft.MachineLearningServices/workspaces/mirmasterenvws/onlineEndpoints/localdev-endpoint/deployments/localdev",
"type":"azureml.inference.request",
"datacontenttype":"application/json",
"time":"2022-05-25T08:59:48Z",
"data":{"data": [  [1,2,3,4,5,6,7,8,9,10], [10,9,8,7,6,5,4,3,2,1]]},
"path":"/score",
"method":"POST",
"contentrange":"bytes 0-59/*",
"correlationid":"aaaa0000-bb11-2222-33cc-444444dddddd","xrequestid":"aaaa0000-bb11-2222-33cc-444444dddddd"}
以下 JSON 代码是另一个收集的 HTTP 响应的示例:
{"specversion":"1.0",
"id":"bbd80e51-8855-455f-a719-970023f41e7d",
"source":"/subscriptions/aaaa0a0a-bb1b-cc2c-dd3d-eeeeee4e4e4e/resourceGroups/mire2etesting/providers/Microsoft.MachineLearningServices/workspaces/mirmasterenvws/onlineEndpoints/localdev-endpoint/deployments/localdev",
"type":"azureml.inference.response",
"datacontenttype":"application/json",
"time":"2022-05-25T08:59:48Z",
"data":[11055.977245525679, 4503.079536107787],
"contentrange":"bytes 0-38/39",
"correlationid":"aaaa0000-bb11-2222-33cc-444444dddddd","xrequestid":"aaaa0000-bb11-2222-33cc-444444dddddd"}
在 blob 存储中存储收集的数据
数据收集允许将生产推理数据记录到所选的 Blob 存储目标。 数据目标设置可在 collection_name 级别进行配置。
Blob 存储输出/格式:
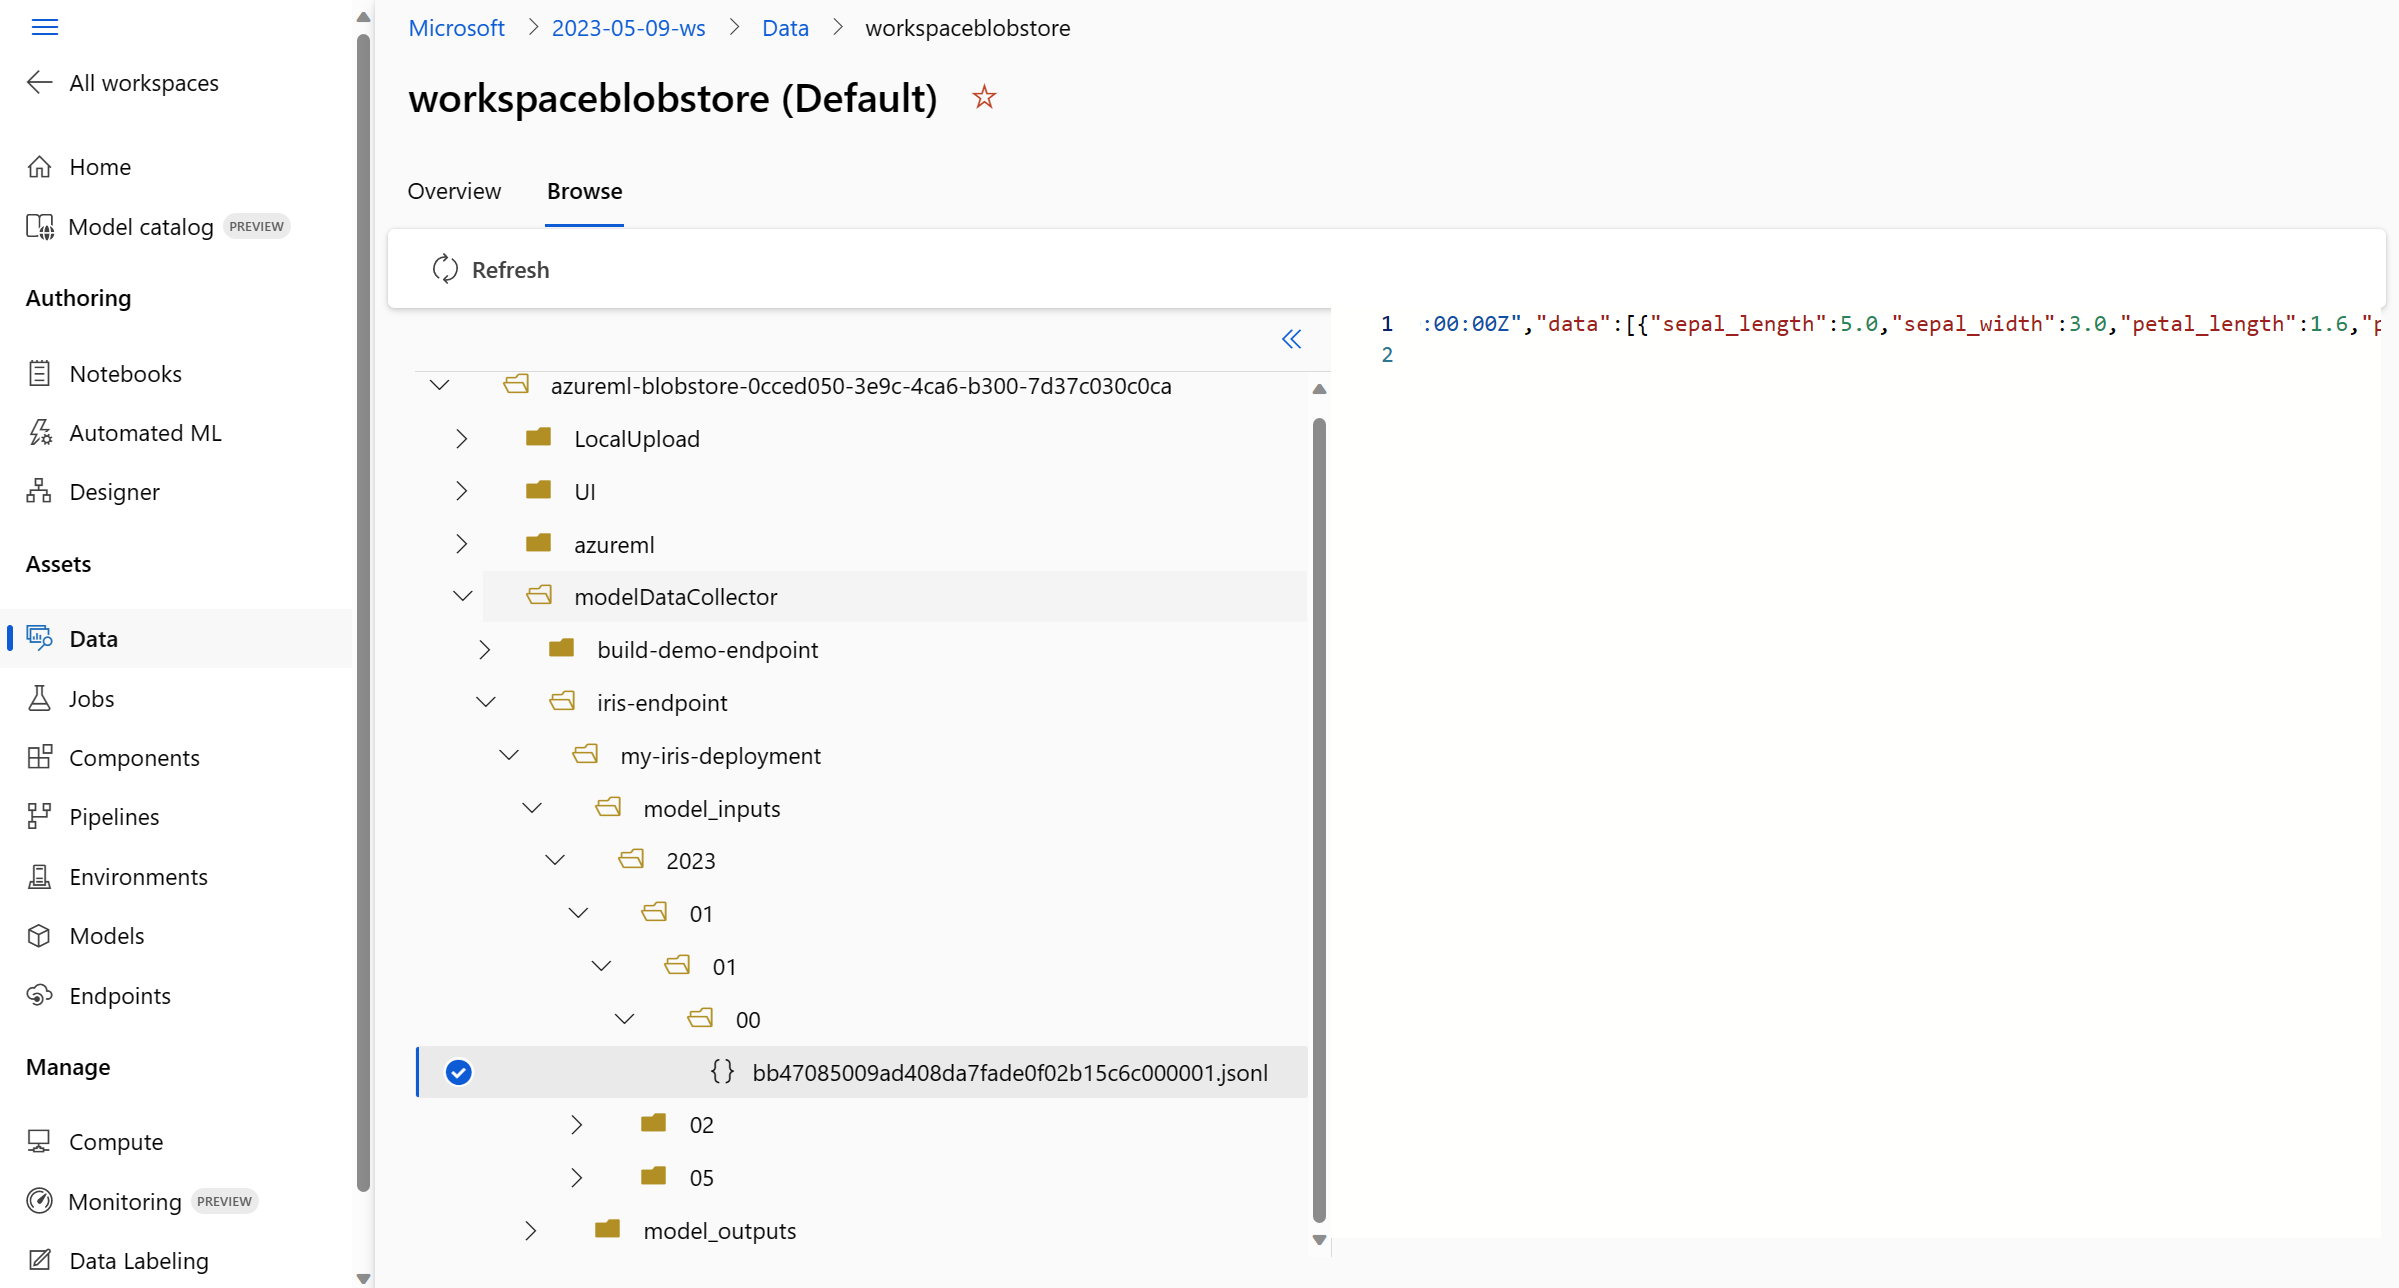
默认情况下,收集的数据存储在工作区 Blob 存储的以下路径中:
azureml://datastores/workspaceblobstore/paths/modelDataCollector。Blob 中的最终路径将附加
{endpoint_name}/{deployment_name}/{collection_name}/{yyyy}/{MM}/{dd}/{HH}/{instance_id}.jsonl。文件中的每一行都是一个 JSON 对象,表示已记录的单个推理请求/响应。
注意
collection_name 引用数据集合名称(例如 model_inputs 或 model_outputs)。
instance_id 是标识记录的数据分组的唯一 ID。
收集的数据遵循以下 JSON 架构。 可从 data关键值中获得收集的数据,并且系统提供附加元数据。
{"specversion":"1.0",
"id":"725aa8af-0834-415c-aaf5-c76d0c08f694",
"source":"/subscriptions/bbbb1b1b-cc2c-dd3d-ee4e-ffffff5f5f5f/resourceGroups/mire2etesting/providers/Microsoft.MachineLearningServices/workspaces/mirmasterws/onlineEndpoints/localdev-endpoint/deployments/localdev",
"type":"azureml.inference.inputs",
"datacontenttype":"application/json",
"time":"2022-12-01T08:51:30Z",
"data":[{"label":"DRUG","pattern":"aspirin"},{"label":"DRUG","pattern":"trazodone"},{"label":"DRUG","pattern":"citalopram"}],
"correlationid":"bbbb1111-cc22-3333-44dd-555555eeeeee","xrequestid":"bbbb1111-cc22-3333-44dd-555555eeeeee",
"modelversion":"default",
"collectdatatype":"pandas.core.frame.DataFrame",
"agent":"monitoring-sdk/0.1.2",
"contentrange":"bytes 0-116/117"}
提示
显示换行符只是为了便于阅读。 在收集的.jsonl 文件中,不会有任何换行符。
存储大型有效负载
如果数据的有效负载大于 4 MB,则 {endpoint_name}/{deployment_name}/request/.../{instance_id}.jsonl 路径中包含的 {instance_id}.jsonl 文件中将有一个事件指向原始文件路径,该文件的路径应该如下:blob_url/{blob_container}/{blob_path}/{endpoint_name}/{deployment_name}/{rolled_time}/{instance_id}.jsonl。 收集的数据将存在于此路径中。
存储二进制数据
对于收集的二进制数据,我们直接显示原始文件,并将 instance_id 作为文件名。 根据 rolling_rate,二进制数据放置在与请求源组路径相同的文件夹中。 以下示例反映数据字段中的路径。 格式为 JSON,显示换行符只是为了便于阅读:
{
"specversion":"1.0",
"id":"ba993308-f630-4fe2-833f-481b2e4d169a",
"source":"/subscriptions//resourceGroups//providers/Microsoft.MachineLearningServices/workspaces/ws/onlineEndpoints/ep/deployments/dp",
"type":"azureml.inference.request",
"datacontenttype":"text/plain",
"time":"2022-02-28T08:41:07Z",
"data":"https://masterws0373607518.blob.core.chinacloudapi.cn/modeldata/mdc/%5Byear%5D%5Bmonth%5D%5Bday%5D-%5Bhour%5D_%5Bminute%5D/ba993308-f630-4fe2-833f-481b2e4d169a",
"path":"/score?size=1",
"method":"POST",
"contentrange":"bytes 0-80770/80771",
"datainblob":"true"
}
数据收集器批处理
如果在彼此的短时间间隔内发送请求,数据收集器会将它们一起批处理到同一 JSON 对象中。 例如,如果运行脚本将示例数据发送到终结点,并且部署已启用数据收集,则某些请求可以一起批处理,具体取决于它们之间的时间间隔。 如果使用数据收集与 Azure 机器学习模型监视,模型监视服务将单独处理每个请求。 但是,如果希望每个记录的数据行都有自己的唯一 correlationid,则可以将 correlationid 作为列包含在使用数据收集器记录的 pandas 数据帧中。 有关如何在 pandas 数据帧中将唯一 correlationid 作为列包含在内的详细信息,请参阅收集数据以监视模型性能。
下面是两个已记录的请求的示例,这些请求一起批处理:
{"specversion":"1.0",
"id":"720b8867-54a2-4876-80eb-1fd6a8975770",
"source":"/subscriptions/cccc2c2c-dd3d-ee4e-ff5f-aaaaaa6a6a6a/resourceGroups/rg-bozhlinmomoignite/providers/Microsoft.MachineLearningServices/workspaces/momo-demo-ws/onlineEndpoints/credit-default-mdc-testing-4/deployments/main2",
"type":"azureml.inference.model_inputs",
"datacontenttype":"application/json",
"time":"2024-03-05T18:16:25Z",
"data":[{"LIMIT_BAL":502970,"AGE":54,"BILL_AMT1":308068,"BILL_AMT2":381402,"BILL_AMT3":442625,"BILL_AMT4":320399,"BILL_AMT5":322616,"BILL_AMT6":397534,"PAY_AMT1":17987,"PAY_AMT2":78764,"PAY_AMT3":26067,"PAY_AMT4":24102,"PAY_AMT5":-1155,"PAY_AMT6":2154,"SEX":2,"EDUCATION":2,"MARRIAGE":2,"PAY_0":0,"PAY_2":0,"PAY_3":0,"PAY_4":0,"PAY_5":0,"PAY_6":0},{"LIMIT_BAL":293458,"AGE":35,"BILL_AMT1":74131,"BILL_AMT2":-71014,"BILL_AMT3":59284,"BILL_AMT4":98926,"BILL_AMT5":110,"BILL_AMT6":1033,"PAY_AMT1":-3926,"PAY_AMT2":-12729,"PAY_AMT3":17405,"PAY_AMT4":25110,"PAY_AMT5":7051,"PAY_AMT6":1623,"SEX":1,"EDUCATION":3,"MARRIAGE":2,"PAY_0":-2,"PAY_2":-2,"PAY_3":-2,"PAY_4":-2,"PAY_5":-1,"PAY_6":-1}],
"contentrange":"bytes 0-6794/6795",
"correlationid":"test",
"xrequestid":"test",
"modelversion":"default",
"collectdatatype":"pandas.core.frame.DataFrame",
"agent":"azureml-ai-monitoring/0.1.0b4"}
在工作室 UI 中查看数据
要从工作室 UI 查看 Blob 存储中收集的数据,请执行以下操作:
收集 MLflow 模型的数据
如果你将 MLflow 模型部署到 Azure 机器学习联机终结点,则可以通过在工作室 UI 中进行一次切换来启用生产推理数据收集。 如果数据收集已打开,Azure 机器学习使用自定义日志记录代码自动检测你的评分脚本,以确保将生产数据记录到你的工作区 Blob 存储中。 然后,模型监视器可以使用数据来监视生产环境中的 MLflow 模型的性能。
在配置模型的部署时,可以启用生产数据收集。 在“部署”选项卡下,为“数据收集”选择“已启用”。
启用数据收集后,生产推理数据将记录到你的 Azure 机器学习工作区 Blob 存储中,并将创建两个数据资产,名称分别为 <endpoint_name>-<deployment_name>-model_inputs 和 <endpoint_name>-<deployment_name>-model_outputs。 在生产环境中使用部署时,这些数据资产会实时更新。 然后,模型监视器可以使用数据资产来监视生产环境中的模型的性能。


