如何将托管标识与 Azure 服务配合使用以连接到 Azure Cosmos DB for NoSQL
适用范围: NoSQL
部署指南序列图,包括以下位置,顺序为:概述、概念、准备、基于角色的访问控制、网络和参考。 目前突出显示了“准备”位置。
本文回顾了创建托管标识以用于连接到 Azure Cosmos DB for NoSQL 的已部署应用程序所需的步骤。
托管标识是 Microsoft Entra ID 中的很多标识资源类型之一,供应用程序在连接到支持 Microsoft Entra 身份验证的服务时使用。 托管标识可用于替代资源拥有的传统凭证,例如密钥。 在 Azure 中,托管标识为应用程序提供了一种获取 Microsoft Entra 令牌以向 Azure 服务进行身份验证的方法,而无需编写大量的身份验证代码。
可以使用 Microsoft Entra 向 Azure 服务进行身份验证,包括但不限于:
- Azure SQL
- Azure AI
- Azure Cosmos DB
- Azure 存储
- Azure 事件中心
- Azure 容器注册表
可以使用托管标识来表示从其他 Azure 服务向 Azure 服务进行身份验证的主体,包括但不限于:
- Azure Kubernetes 服务
- Azure Container Apps
- Azure 虚拟机
- Azure Functions
- Azure 应用服务
- Azure Spring Apps
- Azure Service Fabric
托管标识可实现多个安全场景,在这些场景中,各种 Azure 服务可以相互连接。 示例包括:
- 为 Azure Spring Apps 中的应用程序创建系统分配的托管标识,以连接到 Azure SQL 帐户并查询 Azure SQL 帐户
- 使用具有 Azure Kubernetes 服务和 Azure Functions 的单个用户分配的托管标识向 Azure AI 帐户发出请求
- 使用 Azure Cosmos DB 帐户的托管标识将密钥存储在 Azure Key Vault 中
有关详细信息,请参阅 Azure 资源的托管标识。
先决条件
- 具有活动订阅的 Azure 帐户。 创建帐户。
可以使用本地 Azure CLI。
如果需要,请安装 Azure CLI 来运行 CLI 参考命令。
本地 Azure CLI,请了解如何安装 Azure CLI。 如果在 Windows 或 macOS 上运行,请考虑在 Docker 容器中运行 Azure CLI。 有关详细信息,请参阅如何在 Docker 容器中运行 Azure CLI。
通过使用 az login 命令登录到 Azure CLI。 若要完成身份验证过程,请遵循终端中显示的步骤。 有关其他登录选项,请参阅使用 Azure CLI 登录。
出现提示时,请在首次使用时安装 Azure CLI 扩展。 有关扩展详细信息,请参阅使用 Azure CLI 的扩展。
运行 az version 以查找安装的版本和依赖库。 若要升级到最新版本,请运行 az upgrade。
- 如果选择在本地使用 Azure PowerShell:
- 安装最新版本的 Az PowerShell 模块。
- 使用 Connect-AzAccount -Environment AzureChinaCloud cmdlet 连接到 Azure 帐户。
使用系统分配的托管标识创建 Azure 服务
使用系统分配的托管标识创建新的 Azure 服务。 本部分将创建 Azure 容器实例资源。
使用
az container create创建新的容器实例。 使用assign-identity参数将帐户配置为使用系统分配的托管标识。az container create \ --resource-group "<name-of-existing-resource-group>" \ --name "<name-of-new-container>" \ --image mcr.microsoft.com/dotnet/samples:aspnetapp-chiseled \ --cpu 1 \ --memory 2 \ --assign-identity使用
az container show和 JMESPath 查询获取系统分配的托管标识的详细信息。az container show \ --resource-group "<name-of-existing-resource-group>" \ --name "<name-of-existing-container>" \ --query "identity"查看此命令的输出。 它应包括标识和租户的唯一标识符。
{
  "principalId": "aaaaaaaa-bbbb-cccc-1111-222222222222",
  "tenantId": "aaaabbbb-0000-cccc-1111-dddd2222eeee",
  "type": "SystemAssigned",
  "userAssignedIdentities": null
}
创建新的 Bicep 文件以定义新的容器实例。 将文件命名为 container-instance.bicep。 设置容器实例的以下属性:
值 name使用名为 instanceName的参数location设置为资源组的位置 identity.typeSystemAssignedproperties.osTypeLinuxproperties.containers[0].nameaspnet-sampleproperties.containers[0].properties.imagemcr.microsoft.com/dotnet/samples:aspnetapp-chiseledproperties.containers[0].properties.resources.requests.cpu1properties.containers[0].properties.resources.requests.memoryInGB2metadata description = 'Create Azure Container Instance resource with system-assigned managed identity.' @description('Name of the Azure Container Instances resource.') param instanceName string resource instance 'Microsoft.ContainerInstance/containerGroups@2023-05-01' = { name: instanceName location: resourceGroup().location identity: { type: 'SystemAssigned' } properties: { osType: 'Linux' containers: [ { name: 'aspnet-sample' properties: { image: 'mcr.microsoft.com/dotnet/samples:aspnetapp-chiseled' resources: { requests: { cpu: 1 memoryInGB: 2 } } } } ] } } output systemAssignedIdentity object = instance.identity创建名为 container-instance.
bicepparam的新 Bicep 参数文件。 在此参数文件中,使用instanceName参数为容器实例创建唯一名称。using './container-instance.bicep' param instanceName = '<name-of-new-container-instance>'使用
az deployment group create部署 Bicep 模板。 指定 Bicep 模板、参数文件和 Azure 资源组的名称。az deployment group create \ --resource-group "<name-of-existing-resource-group>" \ --parameters "container-instance.bicepparam" \ --template-file "container-instance.bicep"查看部署的输出。 输出包含
properties.outputs.systemAssignedIdentity.value属性中容器实例中的标识对象。{ "principalId": "aaaaaaaa-bbbb-cccc-1111-222222222222", "tenantId": "aaaabbbb-0000-cccc-1111-dddd2222eeee", "type": "SystemAssigned" }
登录到 Azure 门户 (https://portal.azure.cn)。
在全局搜索栏中输入 Azure 容器实例。
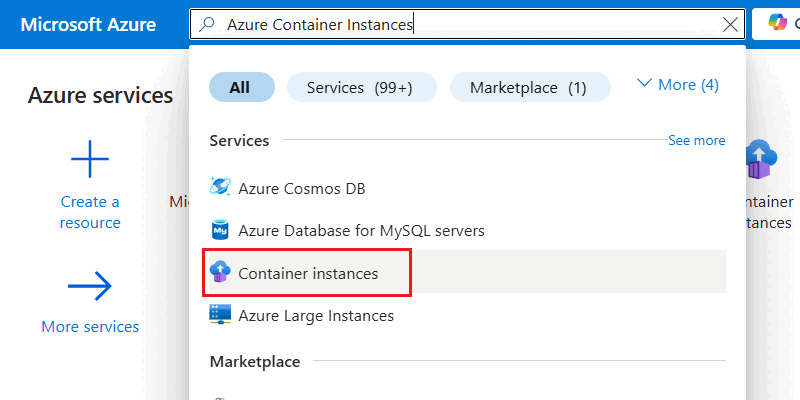
在“服务”中,选择“容器实例”。
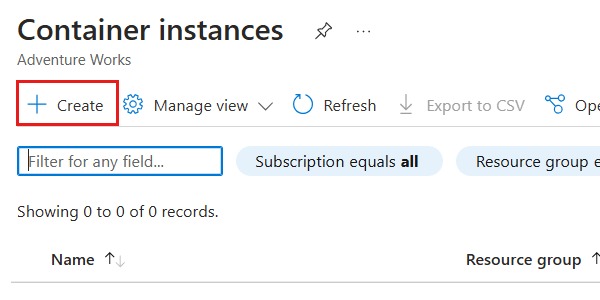
在“容器实例”窗格中,选择“创建”。
在“基本信息”窗格中,配置以下选项,然后选择“查看 + 创建” :
值 订阅 选择 Azure 订阅 资源组 创建新的资源组,或选择现有资源组 容器名称 提供全局唯一名称 区域 为订阅选择支持的 Azure 区域 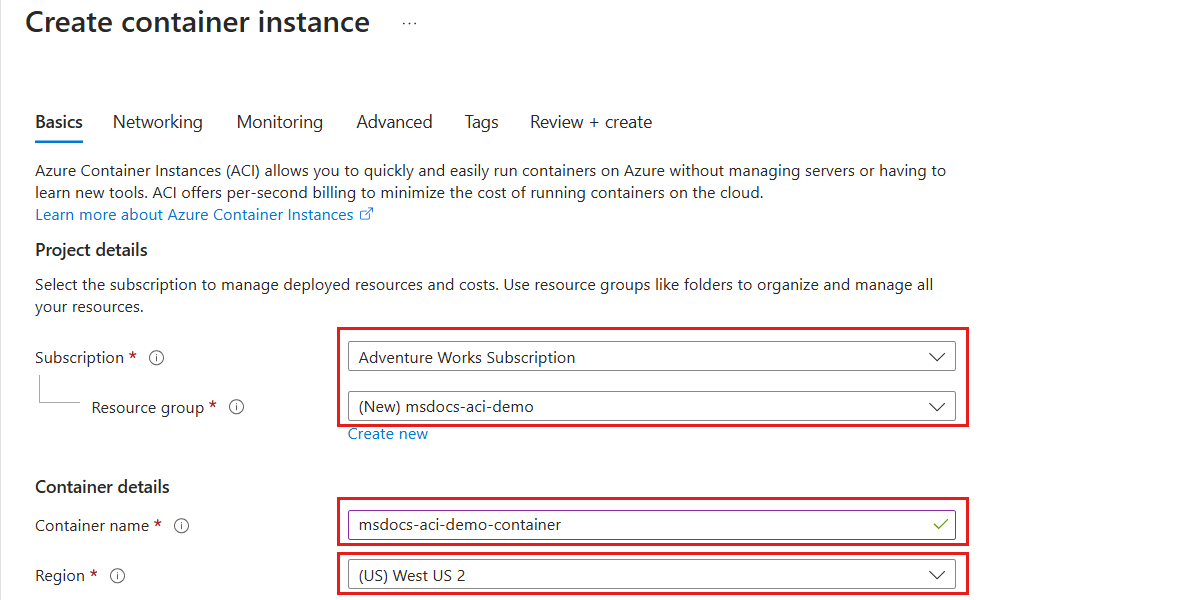
提示
可以将任何未指定的选项保留为其默认值。
在“查看 + 创建”窗格中,等待帐户验证成功完成,然后选择“创建”。
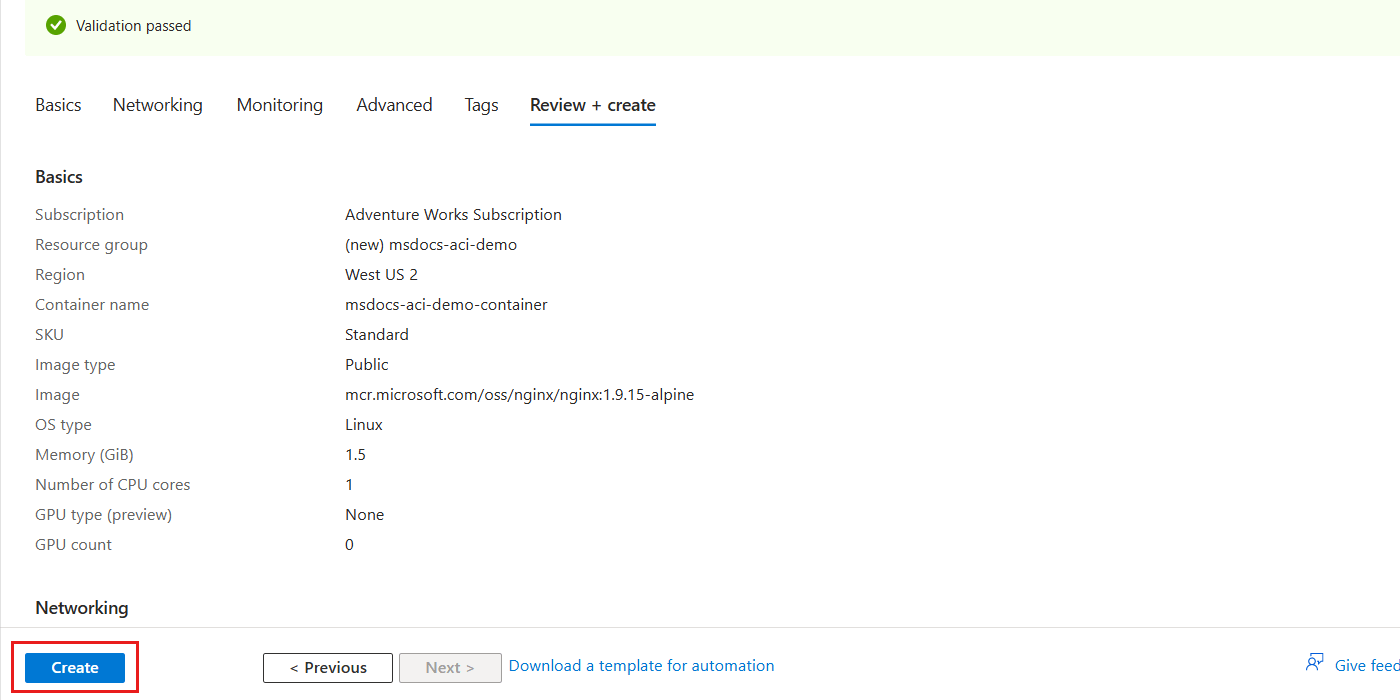
门户会自动导航到“部署”窗格。 等待部署完成。
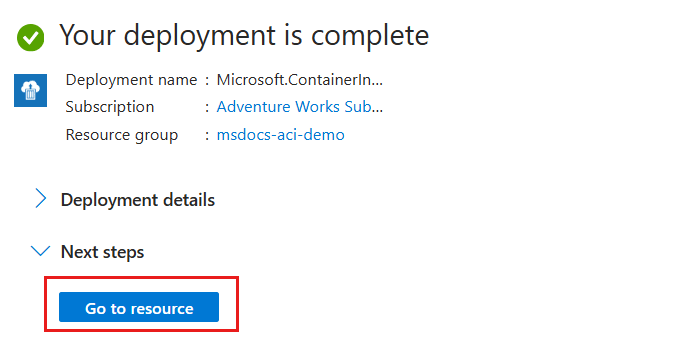
部署完成后,即可选择“转到资源”以导航到新的 Azure 容器实例资源。
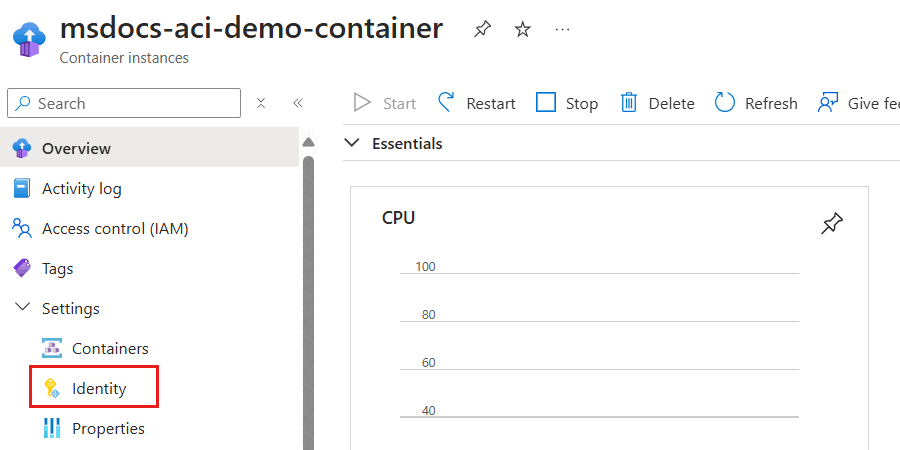
在新容器实例的窗格中,在服务菜单的“设置”部分中选择“标识”。
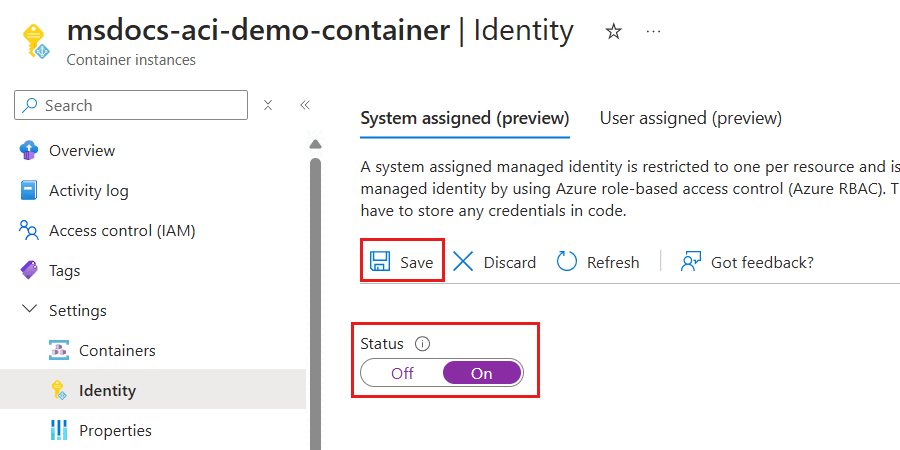
在“标识”窗格中,通过将“状态”选项设置为“启用”来启用系统分配的托管标识。 然后,选择“保存”并解决提交更改的任何提示。
系统分配的托管标识准备就绪后,请查看对象(主体)ID 属性的值。 该属性的值是标识的唯一标识符。
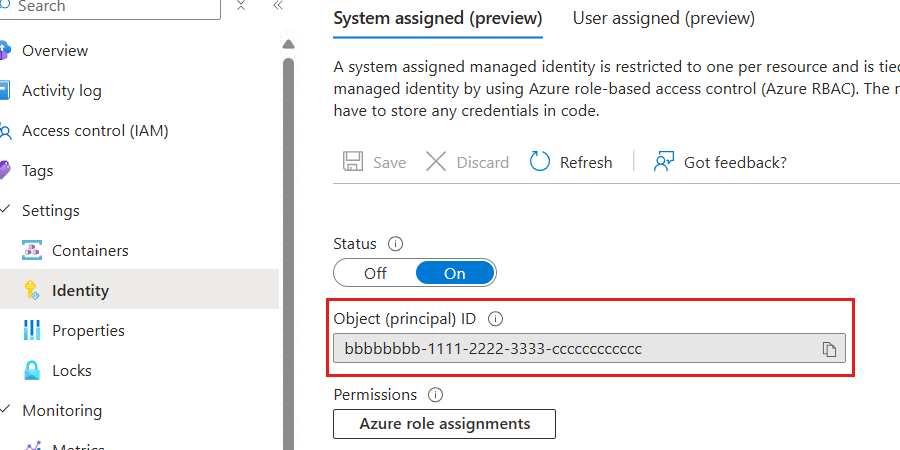
提示
在此示例屏幕截图中,系统分配的托管标识的唯一标识符为
bbbbbbbb-1111-2222-3333-cccccccccccc。
创建一个表示使用
New-AzContainerInstanceObject容器的对象,并将其存储在名为$container的变量中。 然后,使用该容器对象通过New-AzContainerGroup创建一个新的容器实例。 通过将IdentityType参数设置为SystemAssigned将帐户配置为使用系统分配的托管标识。$parameters = @{ Name = "aspnet-sample" Image = "mcr.microsoft.com/dotnet/samples:aspnetapp-chiseled" RequestCpu = 1 RequestMemoryInGb = 2 } $container = New-AzContainerInstanceObject @parameters $parameters = @{ ResourceGroupName = "<name-of-existing-resource-group>" Name = "<name-of-new-container>" Container = $container OsType = "Linux" Location = "<azure-region>" IdentityType = "SystemAssigned" } New-AzContainerGroup @parameters使用
Get-AzContainerGroup和Format-List仅选择Identity属性以获取系统分配托管标识的详细信息。$parameters = @{ ResourceGroupName = "<name-of-existing-resource-group>" Name = "<name-of-existing-container>" } Get-AzContainerGroup @parameters | Format-List Identity查看此命令的输出。 它应包括标识和租户的唯一标识符。
Identity : {
             "principalId": "aaaaaaaa-bbbb-cccc-1111-222222222222",
             "tenantId": "aaaabbbb-0000-cccc-1111-dddd2222eeee",
             "type": "SystemAssigned"
           }
创建用户分配的托管标识
创建一个用户分配的托管标识,该标识可以可移植方式用于一个或多个 Azure 服务。
使用
az identity create在 Azure 资源组中创建新的用户分配的托管标识。az identity create \ --resource-group "<name-of-existing-resource-group>" \ --name "<name-of-new-managed-identity>"使用
az identity list获取资源组中用户分配的托管标识列表az identity list \ --resource-group "<name-of-existing-resource-group>"查看此命令的输出。 记录
id字段的值,因为此完全限定的资源标识符用于将用户分配的托管标识分配给 Azure 资源。{ "clientId": "11112222-bbbb-3333-cccc-4444dddd5555", "id": "/subscriptions/aaaa0a0a-bb1b-cc2c-dd3d-eeeeee4e4e4e/resourcegroups/msdocs-identity-example/providers/Microsoft.ManagedIdentity/userAssignedIdentities/msdocs-identity-example-user-assigned", "location": "<azure-location>", "name": "msdocs-identity-example-user-assigned", "principalId": "cccccccc-dddd-eeee-3333-444444444444", "resourceGroup": "msdocs-identity-example", "systemData": null, "tags": {}, "tenantId": "aaaabbbb-0000-cccc-1111-dddd2222eeee", "type": "Microsoft.ManagedIdentity/userAssignedIdentities" }注意
在此示例中,
id值将为/subscriptions/aaaa0a0a-bb1b-cc2c-dd3d-eeeeee4e4e4e/resourcegroups/msdocs-identity-example/providers/Microsoft.ManagedIdentity/userAssignedIdentities/msdocs-identity-example-user-assigned。 此示例使用虚构数据,而你的标识符与此示例不同。
创建 Bicep 文件以定义用户分配的托管标识,并将文件命名为 user-assigned-managed-identity.bicep。 设置以下最小属性:
值 name使用名为 identityName的可选参数并生成唯一的默认值location设置为资源组的位置 metadata description = 'Create a user-assigned managed identity.' param identityName string = uniqueString(subscription().id, resourceGroup().id) resource identity 'Microsoft.ManagedIdentity/userAssignedIdentities@2023-01-31' = { name: identityName location: resourceGroup().location } output id string = identity.id output name string = identity.name使用
az deployment group create部署 Bicep 模板。 指定 Bicep 模板和 Azure 资源组的名称。az deployment group create \ --resource-group "<name-of-existing-resource-group>" \ --template-file "user-assigned-managed-identity.bicep"查看部署的输出。 输出包含
properties.outputs.name.value属性中托管标识的唯一标识符。 记下此值,因为稍后在本指南中创建新的 Azure 资源时需要使用此值。{ "type": "String", "value": "msdocs-identity-example-user-assigned" }注意
在此示例中,
name.value将为msdocs-identity-example-user-assigned。 此示例使用虚构数据,而你的标识符与此示例不同。
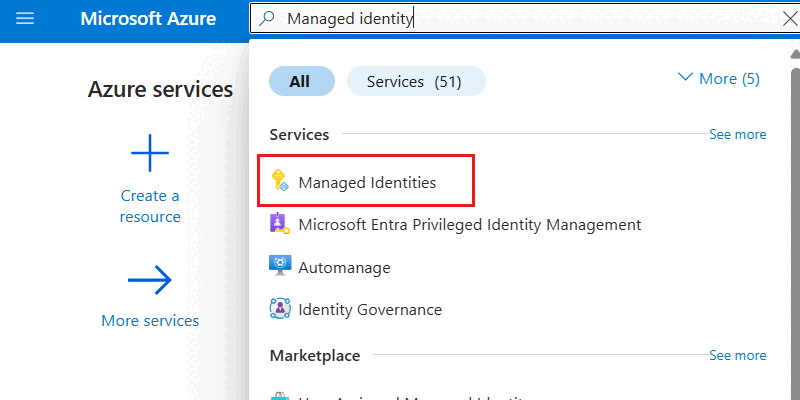
在全局搜索栏中输入托管标识。
在“服务”下选择“托管标识”。
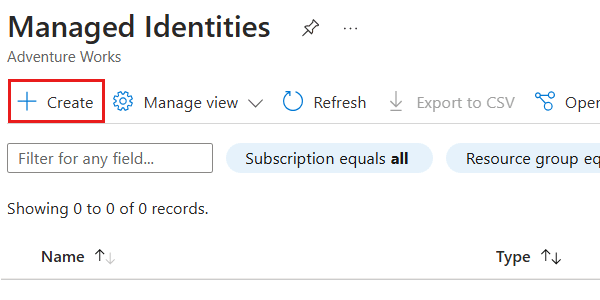
在“容器实例”窗格中,选择“创建”。
在“基本信息”窗格中,配置以下选项,然后选择“查看 + 创建” :
值 订阅 选择 Azure 订阅 资源组 创建新的资源组,或选择现有资源组 区域 为订阅选择支持的 Azure 区域 Name 提供全局唯一名称 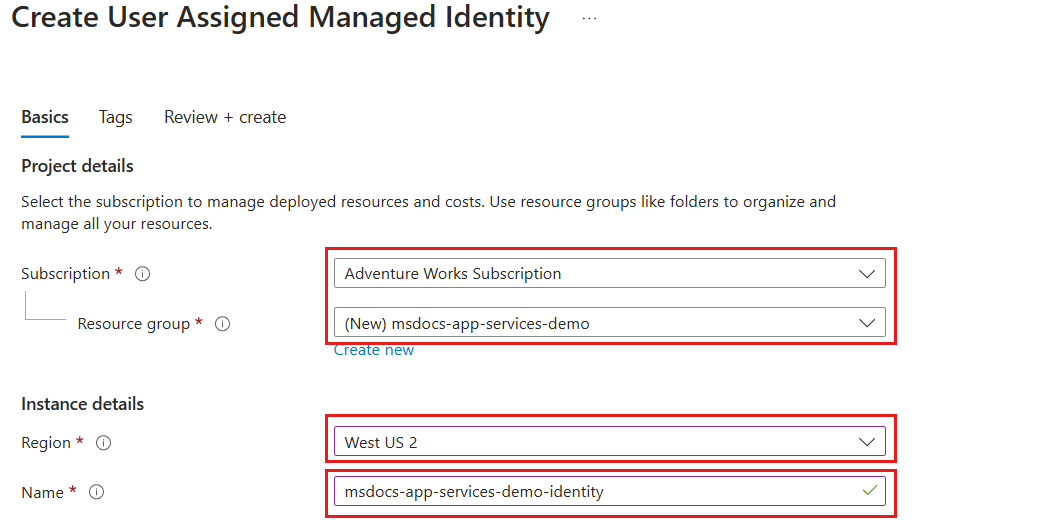
在“查看 + 创建”窗格中,等待帐户验证成功完成,然后选择“创建”。
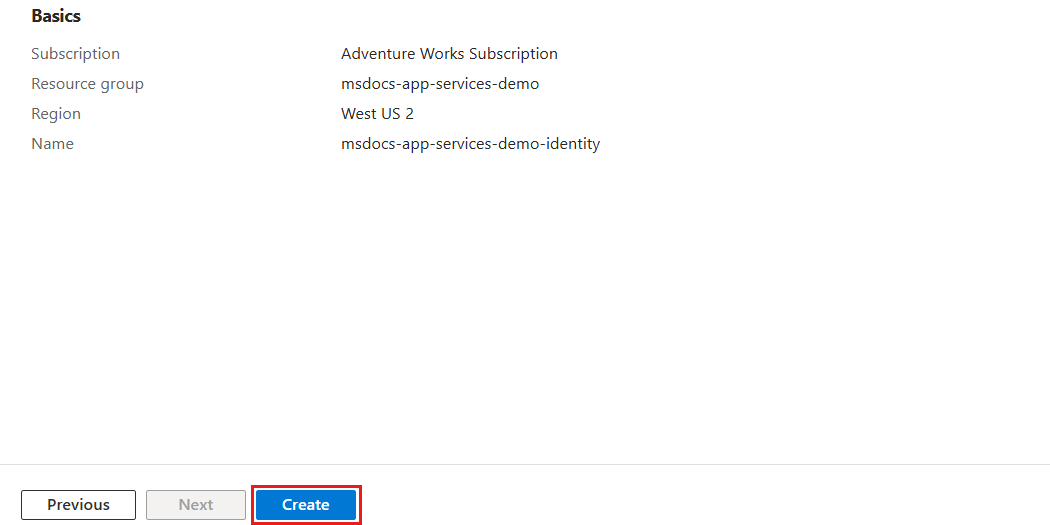
门户会自动导航到“部署”窗格。 等待部署完成。
等待托管标识的部署完成。
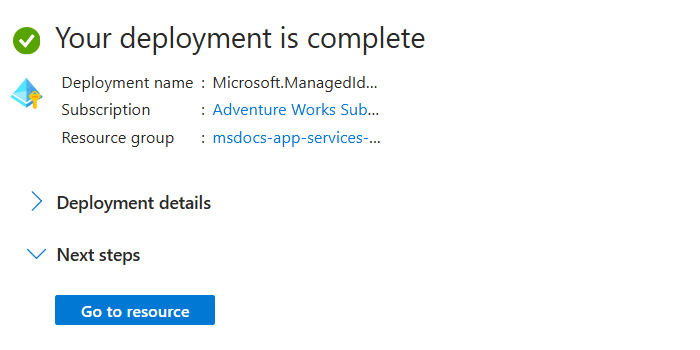
在 Azure 资源组中使用
New-AzUserAssignedIdentity创建新的用户分配托管标识。$parameters = @{ ResourceGroupName = "<name-of-existing-resource-group>" Name = "<name-of-new-managed-identity>" Location = "<azure-region>" } New-AzUserAssignedIdentity @parameters使用
Get-AzUserAssignedIdentity获取资源组中用户分配的托管标识列表。$parameters = @{ ResourceGroupName = "<name-of-existing-resource-group>" } Get-AzUserAssignedIdentity @parameters | Format-List Name, Id查看此命令的输出。 记录
Id字段的值,因为此完全限定的资源标识符用于将用户分配的托管标识分配给 Azure 资源。Name : msdocs-identity-example-user-assigned Id : /subscriptions/aaaa0a0a-bb1b-cc2c-dd3d-eeeeee4e4e4e/resourcegroups/msdocs-identity-example/providers/Microsoft.ManagedIdentity/userAssignedIdentities/msdocs-identity-example-user-assigned注意
在此示例中,
Id值将为/subscriptions/aaaa0a0a-bb1b-cc2c-dd3d-eeeeee4e4e4e/resourcegroups/msdocs-identity-example/providers/Microsoft.ManagedIdentity/userAssignedIdentities/msdocs-identity-example-user-assigned。 此示例使用虚构数据,而你的标识符与此示例不同。
使用用户分配的托管标识创建 Azure 服务
分配以前创建的用户分配托管标识到新的 Azure 托管服务。 本部分创建 Azure 应用服务 Web 应用资源。
使用
az appservice plan create创建新的应用服务计划。az appservice plan create \ --resource-group "<name-of-existing-resource-group>" \ --name "<name-of-new-plan>"使用
az webapp create将用户分配的托管标识分配给新的 Web 应用。 使用本指南前面记录的id字段作为ssign-identity参数的值。az webapp create \ --resource-group "<name-of-existing-resource-group>" \ --name "<name-of-existing-web-app>" \ --plan "<name-of-existing-plan>" \ --assign-identity "<resource-id-recorded-earlier>"使用
az webapp show和 JMESPath 查询获取分配给此帐户的所有标识的详细信息。az webapp show \ --resource-group "<name-of-existing-resource-group>" \ --name "<name-of-existing-account>" \ --query "identity"查看此命令的输出。 它应包括用户分配的托管标识。
{
  "principalId": null,
  "tenantId": null,
  "type": "UserAssigned",
  "userAssignedIdentities": {
    "/subscriptions/aaaa0a0a-bb1b-cc2c-dd3d-eeeeee4e4e4e/resourcegroups/msdocs-identity-example/providers/Microsoft.ManagedIdentity/userAssignedIdentities/msdocs-identity-example-user-assigned": {
      "clientId": "11112222-bbbb-3333-cccc-4444dddd5555",
      "principalId": "cccccccc-dddd-eeee-3333-444444444444"
    }
  }
}
创建另一个名为 app-service-web-app.bicep 的 Bicep 文件,并定义 Azure 应用服务计划和 Web 应用。 为这些资源设置以下属性:
资源 值 name现有托管标识 使用名为 identityName的参数name应用服务计划 使用名为 planName的参数location应用服务计划 设置为资源组的位置 nameWeb 应用 使用名为 webAppName的参数locationWeb 应用 设置为资源组的位置 identity.typeUserAssignedidentity.userAssignedIdentities.{identity.id}{}properties.serverFarmIdplan.idmetadata description = 'Creates an Azure App Service plan and web app with a user-assigned managed identity.' @description('The name of the app service plan.') param planName string @description('The name of the web app.') param webAppName string @description('The name of the user-assigned managed identity.') param identityName string resource identity 'Microsoft.ManagedIdentity/userAssignedIdentities@2023-01-31' existing = { name: identityName } resource plan 'Microsoft.Web/serverfarms@2023-12-01' = { name: planName location: resourceGroup().location } resource webApp 'Microsoft.Web/sites@2023-12-01' = { name: webAppName location: resourceGroup().location identity: { type: 'UserAssigned' userAssignedIdentities: { '${identity.id}': {} } } properties: { serverFarmId: plan.id } } output userAssignedIdentity object = webApp.identity创建名为 app-service-web-app.
bicepparam的 Bicep 参数文件。 在此参数文件中,分别使用planName和webAppName参数为 Web 应用和计划创建唯一名称。 然后,提供用户分配的托管标识的名称作为identityName参数的值。using './app-service-web-app.bicep' param planName = '<name-of-new-app-service-plan>' param webAppName = '<name-of-new-web-app>' param identityName = '<name-of-existing-managed-identity>'使用
az deployment group create部署 Bicep 模板。 指定 Bicep 模板、参数文件和 Azure 资源组的名称。az deployment group create \ --resource-group "<name-of-existing-resource-group>" \ --parameters "app-service-web-app.bicepparam" \ --template-file "app-service-web-app.bicep"查看部署的输出。 输出包含
properties.outputs.userAssignedIdentity.value属性中容器实例中的标识对象。{ "type": "UserAssigned", "userAssignedIdentities": { "/subscriptions/aaaa0a0a-bb1b-cc2c-dd3d-eeeeee4e4e4e/resourcegroups/msdocs-identity-example/providers/Microsoft.ManagedIdentity/userAssignedIdentities/msdocs-identity-example-user-assigned": { "clientId": "11112222-bbbb-3333-cccc-4444dddd5555", "principalId": "cccccccc-dddd-eeee-3333-444444444444" } } }
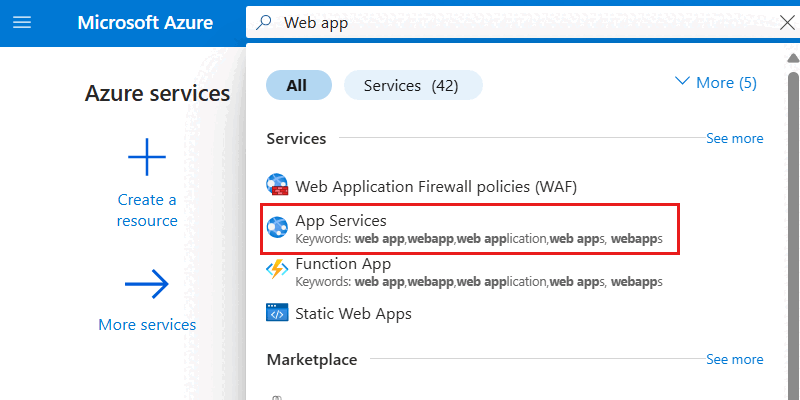
在全局搜索栏中输入 Web 应用。
在“服务”中,选择“应用服务”。
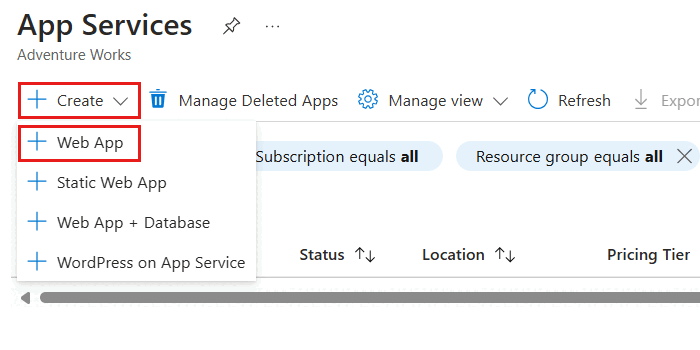
在“应用服务”窗格中,选择“创建”,然后选择“Web 应用”。
在“基本信息”窗格中,配置以下选项,然后选择“查看 + 创建” :
值 订阅 选择 Azure 订阅 资源组 创建新的资源组,或选择现有资源组 Name 提供全局唯一名称 计划 创建新计划或选择一个现有计划 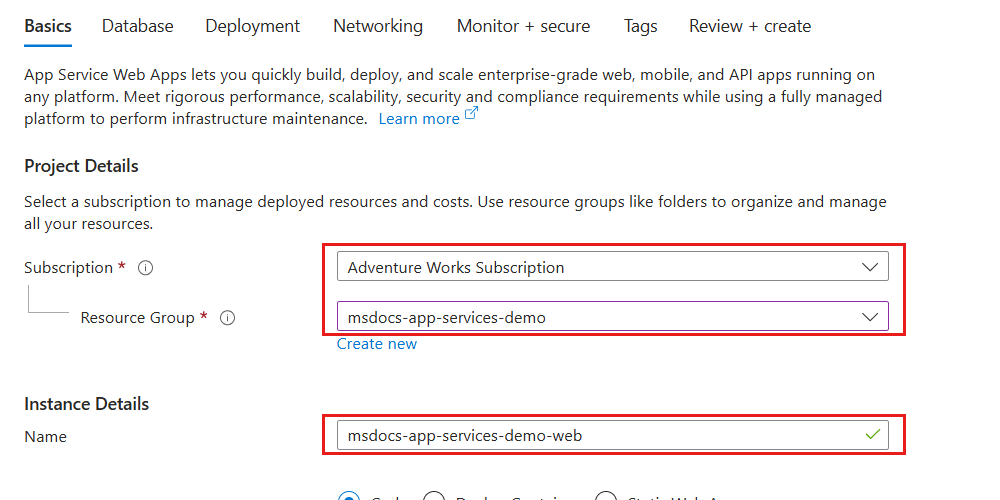
在“查看 + 创建”窗格中,等待帐户验证成功完成,然后选择“创建”。
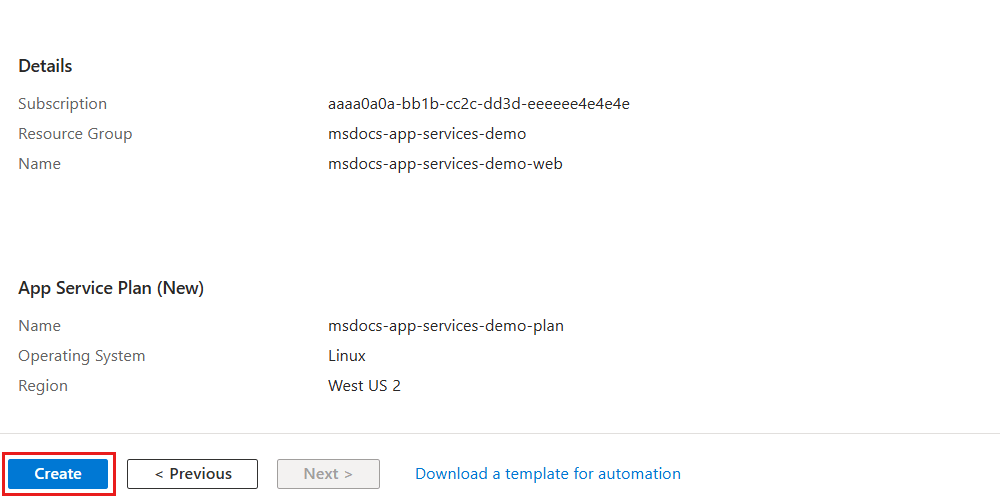
门户会自动导航到“部署”窗格。 等待部署完成。
部署完成后,即可选择“转到资源”以导航到新的 Azure 容器实例资源。
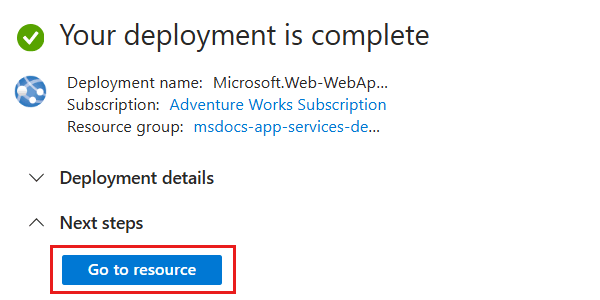
在新容器实例的窗格中,在服务菜单的“设置”部分中选择“标识”。
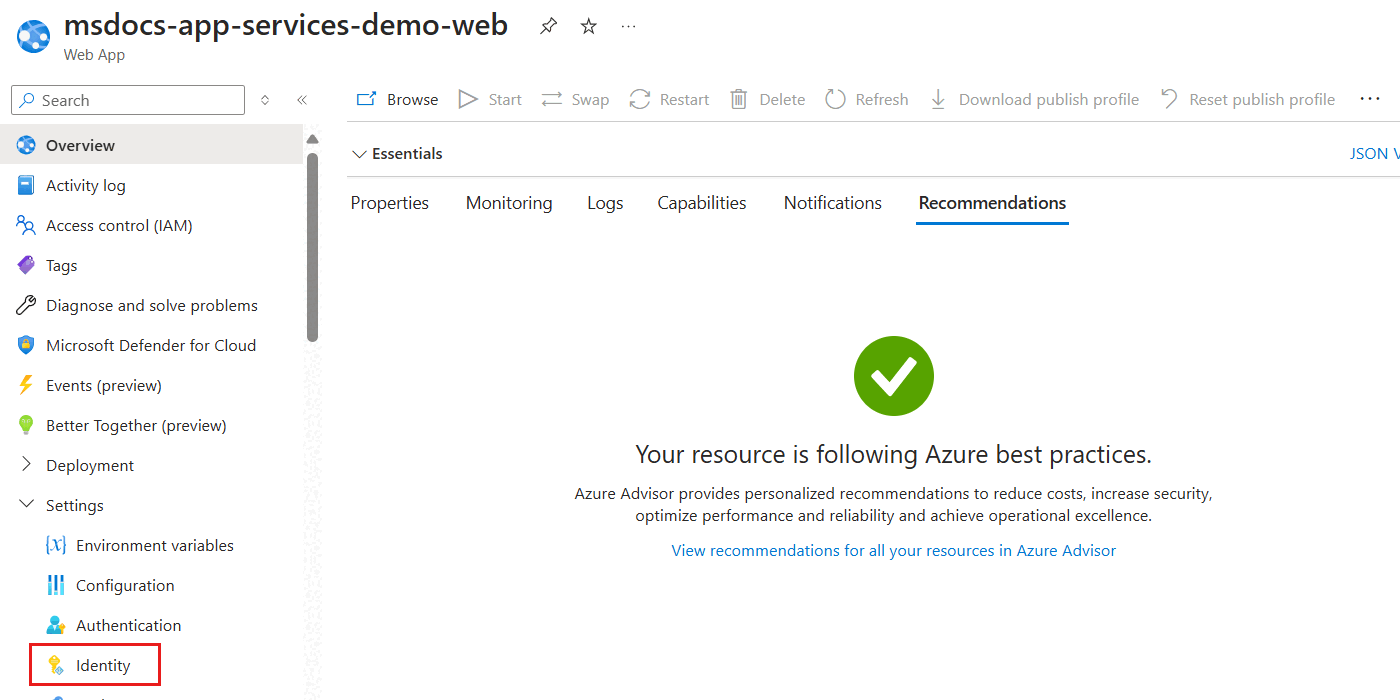
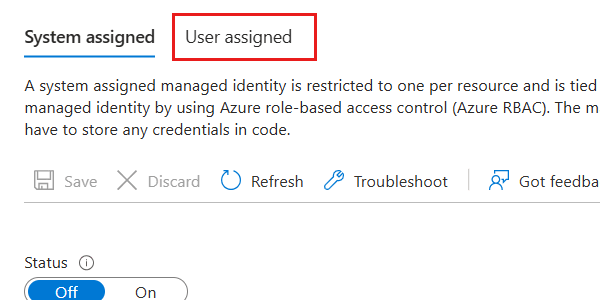
在“标识”窗格中,选择“用户分配”选项。
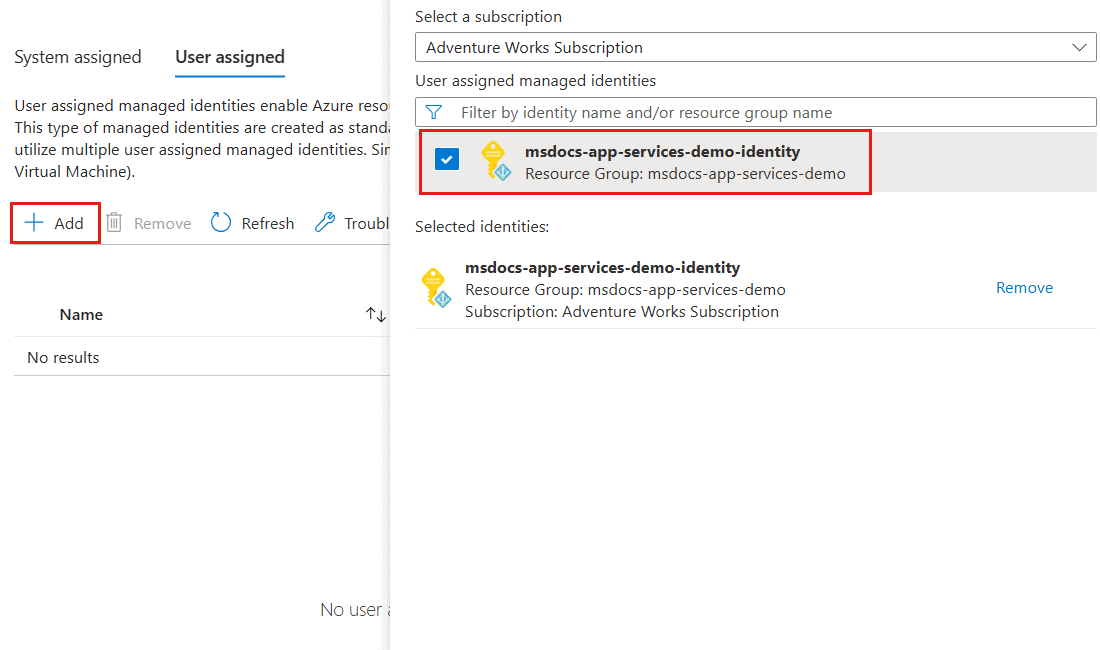
选择“添加”打开对话框,以分配现有用户分配的托管标识。 在对话框中,选择现有的用户分配的托管标识,然后选择“添加”。
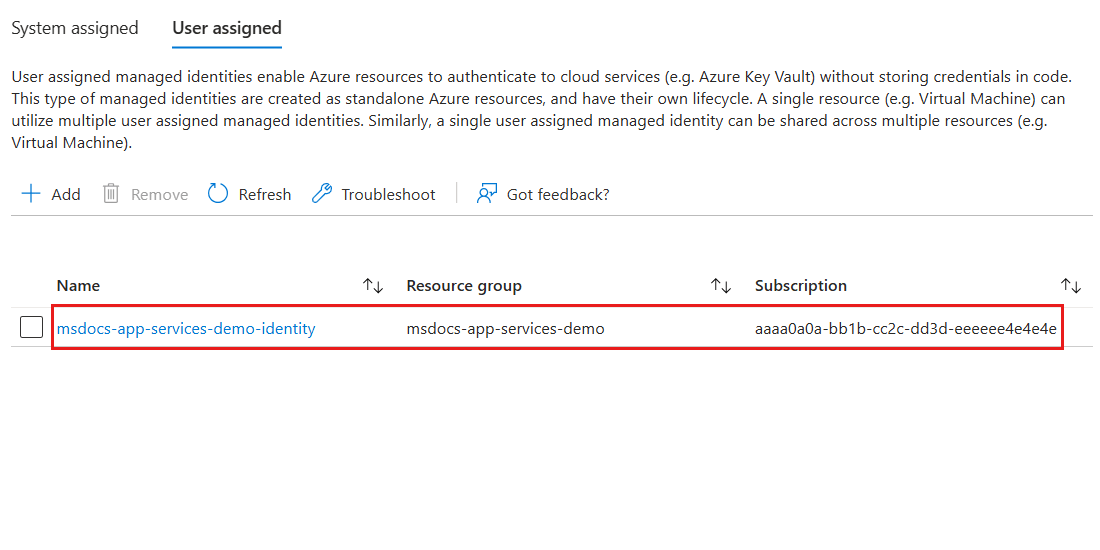
最后,查看与你的 Web 应用关联的用户分配的托管标识列表。 它应包括标识的名称、资源组名称和订阅标识符。
使用
New-AzWebApp创建新的 Azure 应用服务 Web 应用。$parameters = @{ ResourceGroupName = "<name-of-existing-resource-group>" Name = "<name-of-new-web-app>" Location = "<azure-region>" } New-AzWebApp @parameters修补新创建的 Web 应用,将
identity.type属性设置为UserAssigned,并将现有的用户分配托管标识添加到identity.userAssignedIdentities属性。 若要完成此任务,请先提供本指南前面记录的id字段作为identityIdshell 变量的值。 然后,构造有效负载对象并将其转换为 JSON 格式。 最后,将Invoke-AzRestMethod与PATCHHTTP 谓词结合使用以更新现有的 Web 应用。$identityId = "<resource-id-recorded-earlier>" $payload = @{ identity = @{ type = "UserAssigned" userAssignedIdentities = @{ "$identityId" = @{} } } } | ConvertTo-Json -Depth 3 $parameters = @{ ResourceGroupName = "<name-of-existing-resource-group>" Name = "<name-of-existing-web-app>" ResourceProviderName = 'Microsoft.Web' ResourceType = 'sites' ApiVersion = '2023-12-01' Method = 'PATCH' Payload = $payload } Invoke-AzRestMethod @parameters使用
Get-AzWebApp、Select-Object和ConvertTo-Json仅选择Identity属性以获取分配给 Web 应用的所有标识的详细信息。$parameters = @{ ResourceGroupName = "<name-of-existing-resource-group>" Name = "<name-of-existing-web-app>" } Get-AzWebApp @parameters | Select-Object Identity | ConvertTo-Json -Depth 3查看此命令的输出。 它应包括标识和租户的唯一标识符。
{
  "Identity": {
    "Type": "UserAssigned",
    "TenantId": null,
    "PrincipalId": null,
    "UserAssignedIdentities": {
      "/subscriptions/aaaa0a0a-bb1b-cc2c-dd3d-eeeeee4e4e4e/resourcegroups/msdocs-identity-example/providers/Microsoft.ManagedIdentity/userAssignedIdentities/msdocs-identity-example-user-assigned": {
        "PrincipalId": "cccccccc-dddd-eeee-3333-444444444444",
        "ClientId": "11112222-bbbb-3333-cccc-4444dddd5555"
      }
    }
  }
}
