加密部署数据
在云中运行 Azure 容器实例 (ACI) 资源时,ACI 服务将收集并保存与容器相关的数据。 将此数据保存在云中时,ACI 会自动对其进行加密。 这种加密可以保护数据,并帮助组织履行在安全性与合规性方面做出的承诺。 ACI 还提供相应的选项让你使用自己的密钥来加密数据,使你可以更好地控制与 ACI 部署相关的数据。
ACI 数据加密
ACI 中的数据是使用 256 位 AES 加密法加密和解密的。 此加密法已为所有 ACI 部署启用,无需修改部署或容器即可利用它。 涵盖的数据包括有关部署的元数据、环境变量、要传入容器的密钥,以及在停止容器后保存的日志(以便仍可以查看这些日志)。 加密不会影响容器组的性能,且不会产生更多的成本。
可以依赖于使用 Azure 托管的密钥来加密容器数据,或者,可以使用自己的密钥来管理加密。 下表对这些选项做了比较:
| Azure 托管的密钥 | 客户管理的密钥 | |
|---|---|---|
| 加密/解密操作 | Azure | Azure |
| 密钥存储 | Azure 密钥存储 | Azure Key Vault |
| 密钥轮换职责 | Azure | 客户 |
| 密钥访问权限 | 仅限 Azure | Microsoft、客户 |
本文回顾了使用客户管理的密钥加密数据的两个流程:
- 使用存储在标准 Azure Key Vault 中的客户管理的密钥加密数据
- 使用已启用受信任服务的受网络保护的 Azure Key Vault 中存储的客户管理的密钥加密数据。
使用存储在标准 Azure Key Vault 中的客户管理的密钥加密数据
先决条件
如需在本地运行 CLI 参考命令,请安装 Azure CLI。 如果在 Windows 或 macOS 上运行,请考虑在 Docker 容器中运行 Azure CLI。 有关详细信息,请参阅如何在 Docker 容器中运行 Azure CLI。
如果使用的是本地安装,请使用 az login 命令登录到 Azure CLI。 若要完成身份验证过程,请遵循终端中显示的步骤。 有关其他登录选项,请参阅使用 Azure CLI 登录。
出现提示时,请在首次使用时安装 Azure CLI 扩展。 有关扩展详细信息,请参阅使用 Azure CLI 的扩展。
运行 az version 以查找安装的版本和依赖库。 若要升级到最新版本,请运行 az upgrade。
注意
在可以在由世纪互联运营的 Microsoft Azure 中使用 Azure CLI 之前,请先运行 az cloud set -n AzureChinaCloud 来更改云环境。 若要切换回 Azure 公有云,请再次运行 az cloud set -n AzureCloud。
为 ACI 创建服务主体
第一步是确保为 Azure 租户分配一个服务主体,用于向 Azure 容器实例服务授予权限。
重要
若要成功地运行以下命令并创建服务主体,请确认你有权在租户中创建服务主体。
以下 CLI 命令将在 Azure 环境中设置 ACI SP:
az ad sp create --id 6bb8e274-af5d-4df2-98a3-4fd78b4cafd9
运行此命令后的输出应显示一个设置了“displayName”的服务主体:“Azure 容器实例服务”。
如果无法成功创建服务主体,请执行以下操作:
- 确认你在租户中有权执行此操作
- 进行检查,看租户中是否存在服务主体,以便部署到 ACI。 为此,可以运行
az ad sp show --id 6bb8e274-af5d-4df2-98a3-4fd78b4cafd9并改用该服务主体
创建 Key Vault 资源
使用 Azure 门户、Azure CLI 或 Azure PowerShell 创建 Azure Key Vault。
对于 Key Vault 的属性,请使用以下指导原则:
- 姓名:必须提供唯一的名称。
- 订阅:选择订阅。
- 在“资源组”下,选择现有的资源组,或创建新的资源组并输入资源组名称。
- 在“位置”下拉菜单中选择一个位置。
- 可将其他选项保留默认值,或者根据其他要求进行选择。
重要
使用客户管理的密钥加密 ACI 部署模板时,建议对 Key Vault 设置以下两个属性:“软删除”和“不清除”。 默认不会启用这些属性,但可以使用 PowerShell 或 Azure CLI 对新的或现有的 Key Vault 启用。
生成新密钥
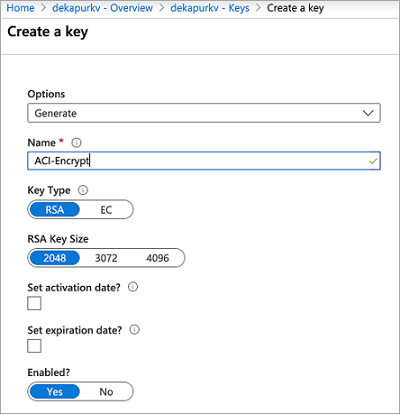
创建 Key Vault 后,在 Azure 门户中导航到该资源。 在资源边栏选项卡的左侧导航菜单中的“设置”下,选择“密钥”。 在“密钥”视图中,选择“生成/导入”以生成新密钥。 对此密钥使用任何唯一名称,并根据要求设置任何其他首选项。

设置访问策略
创建新的访问策略,以允许 ACI 服务访问你的密钥。
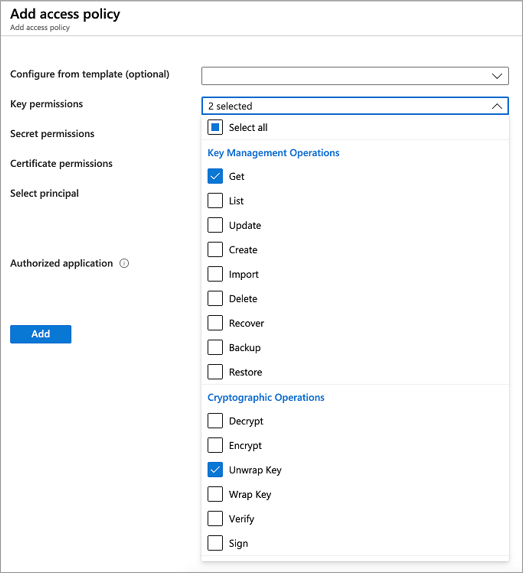
- 生成密钥后,回到密钥保管库资源边栏选项卡,在“设置”下选择“访问策略”。
- 在密钥保管库的“访问策略”页上,选择“添加访问策略”。
- 设置“密钥权限”以包括“获取”和“解包密钥”

- 对于“选择主体”,请选择“Azure 容器实例服务”
- 选择底部的“添加”
现在,该访问策略应会显示在 Key Vault 的访问策略中。

修改 JSON 部署模板
重要
当前正在推出的最新 API 版本 (2019-12-01) 中提供了使用客户管理的密钥加密部署数据的功能。请在部署模板中指定此 API 版本。 如果在执行此操作时遇到任何问题,请联系 Azure 支持部门。
设置 Key Vault 密钥和访问策略后,将以下属性添加到 ACI 部署模板。 若要详细了解如何使用模板来部署 ACI 资源,请参阅教程:使用资源管理器模板部署多容器组。
- 在
resources下,将apiVersion设置为2019-12-01。 - 在部署模板的容器组 properties 节下,添加包含以下值的
encryptionProperties:vaultBaseUrl:密钥保管库的 DNS 名称,可在门户中密钥保管库资源的概览边栏选项卡上找到keyName:前面生成的密钥的名称keyVersion:密钥的当前版本。 查看密钥本身可以找到此字段(在密钥保管库资源的“设置”部分的“密钥”下)
- 在容器组 properties 节下,添加值为
Standard的sku属性。 在 API 版本 2019-12-01 中,sku属性是必需的。
以下模板代码段显示了用于加密部署数据的其他属性:
[...]
"resources": [
    {
        "name": "[parameters('containerGroupName')]",
        "type": "Microsoft.ContainerInstance/containerGroups",
        "apiVersion": "2019-12-01",
        "location": "[resourceGroup().location]",
        "properties": {
            "encryptionProperties": {
                "vaultBaseUrl": "https://example.vault.azure.cn",
                "keyName": "acikey",
                "keyVersion": "xxxxxxxxxxxxxxxx"
            },
            "sku": "Standard",
            "containers": {
                [...]
            }
        }
    }
]
下面是一个完整的模板,改编自教程:使用资源管理器模板部署多容器组。
{
  "$schema": "https://schema.management.azure.com/schemas/2015-01-01/deploymentTemplate.json#",
  "contentVersion": "1.0.0.0",
  "parameters": {
    "containerGroupName": {
      "type": "string",
      "defaultValue": "myContainerGroup",
      "metadata": {
        "description": "Container Group name."
      }
    }
  },
  "variables": {
    "container1name": "aci-tutorial-app",
    "container1image": "mcr.microsoft.com/azuredocs/aci-helloworld:latest",
    "container2name": "aci-tutorial-sidecar",
    "container2image": "mcr.microsoft.com/azuredocs/aci-tutorial-sidecar"
  },
  "resources": [
    {
      "name": "[parameters('containerGroupName')]",
      "type": "Microsoft.ContainerInstance/containerGroups",
      "apiVersion": "2019-12-01",
      "location": "[resourceGroup().location]",
      "properties": {
        "encryptionProperties": {
            "vaultBaseUrl": "https://example.vault.azure.cn",
            "keyName": "acikey",
            "keyVersion": "xxxxxxxxxxxxxxxx"
        },
        "sku": "Standard",
        "containers": [
          {
            "name": "[variables('container1name')]",
            "properties": {
              "image": "[variables('container1image')]",
              "resources": {
                "requests": {
                  "cpu": 1,
                  "memoryInGb": 1.5
                }
              },
              "ports": [
                {
                  "port": 80
                },
                {
                  "port": 8080
                }
              ]
            }
          },
          {
            "name": "[variables('container2name')]",
            "properties": {
              "image": "[variables('container2image')]",
              "resources": {
                "requests": {
                  "cpu": 1,
                  "memoryInGb": 1.5
                }
              }
            }
          }
        ],
        "osType": "Linux",
        "ipAddress": {
          "type": "Public",
          "ports": [
            {
              "protocol": "tcp",
              "port": "80"
            },
            {
                "protocol": "tcp",
                "port": "8080"
            }
          ]
        }
      }
    }
  ],
  "outputs": {
    "containerIPv4Address": {
      "type": "string",
      "value": "[reference(resourceId('Microsoft.ContainerInstance/containerGroups/', parameters('containerGroupName'))).ipAddress.ip]"
    }
  }
}
部署资源
使用“az group create”命令创建资源组。
az group create --name myResourceGroup --location chinaeast2
使用 az deployment group create 命令部署模板。
az deployment group create --resource-group myResourceGroup --template-file deployment-template.json
将在几秒钟内收到来自 Azure 的初始响应。 部署完成后,所有与之相关且由 ACI 服务保存的数据将使用提供的密钥进行加密。
使用已启用受信任服务的受网络保护的 Azure Key Vault 中的客户管理的密钥加密数据
创建 Key Vault 资源
使用 Azure 门户、Azure CLI 或 Azure PowerShell 创建 Azure Key Vault。 首先,不要应用任何网络限制,以便将必要的密钥添加到保管库。 在后续步骤中,我们将添加网络限制并启用受信任的服务。
对于 Key Vault 的属性,请使用以下指导原则:
- 姓名:必须提供唯一的名称。
- 订阅:选择订阅。
- 在“资源组”下,选择现有的资源组,或创建新的资源组并输入资源组名称。
- 在“位置”下拉菜单中选择一个位置。
- 可将其他选项保留默认值,或者根据其他要求进行选择。
重要
使用客户管理的密钥加密 ACI 部署模板时,建议对 Key Vault 设置以下两个属性:“软删除”和“不清除”。 默认不会启用这些属性,但可以使用 PowerShell 或 Azure CLI 对新的或现有的 Key Vault 启用。
生成新密钥
创建 Key Vault 后,在 Azure 门户中导航到该资源。 在资源边栏选项卡的左侧导航菜单中的“设置”下,选择“密钥”。 在“密钥”视图中,选择“生成/导入”以生成新密钥。 对此密钥使用任何唯一名称,并根据要求设置任何其他首选项。 确保捕获密钥名称和版本,以便执行后续步骤。

为容器组创建用户分配的托管标识
使用 az identity create 命令在订阅中创建标识。 可以使用用于创建 Key Vault 的相同资源组,也可以使用不同的资源组。
az identity create \
  --resource-group myResourceGroup \
  --name myACIId
若要在以下步骤中使用标识,请使用 az identity show 命令在变量中存储标识的服务主体 ID 和资源 ID。
# Get service principal ID of the user-assigned identity
spID=$(az identity show \
  --resource-group myResourceGroup \
  --name myACIId \
  --query principalId --output tsv)
设置访问策略
创建新的访问策略,以允许用户分配的标识访问和解包密钥以进行加密。
az keyvault set-policy \
    --name mykeyvault \
    --resource-group myResourceGroup \
    --object-id $spID \
    --key-permissions get unwrapKey
修改 Azure Key Vault 的网络权限
以下命令为 Azure Key Vault 设置 Azure 防火墙,并允许 Azure 受信任的服务(如 ACI 访问)。
az keyvault update \
    --name mykeyvault \
    --resource-group myResourceGroup \
    --default-action Deny
az keyvault update \
    --name mykeyvault \
    --resource-group myResourceGroup \
    --bypass AzureServices
修改 JSON 部署模板
重要
使用客户管理的密钥加密部署数据的功能在 2022-09-01 API 版本或更高版本中可用。 2022-09-01 API 版本只能通过 ARM 或 REST 使用。 如果在执行此操作时遇到任何问题,请联系 Azure 支持部门。 设置 Key Vault 密钥和访问策略后,将以下属性添加到 ACI 部署模板。 若要详细了解如何使用模板来部署 ACI 资源,请参阅教程:使用资源管理器模板部署多容器组。
- 在
resources下,将apiVersion设置为2022-09-01。 - 在部署模板的容器组 properties 节下,添加包含以下值的
encryptionProperties:vaultBaseUrl:密钥保管库的 DNS 名称。 可在门户中的密钥保管库资源的概览边栏选项卡上找到此属性keyName:前面生成的密钥的名称keyVersion:密钥的当前版本。 单击密钥本身可找到此属性(在密钥保管库资源的“设置”部分的“密钥”下)identity:此属性是之前创建的托管标识实例的资源 URI
- 在容器组 properties 节下,添加值为
Standard的sku属性。 在 API 版本 2022-09-01 中,sku属性是必需的。 - 在资源下,添加将托管标识用于 ACI 所需的
identity对象,其中包含以下值:type:正在使用的标识的类型(用户分配或系统分配)。 在本例中,它设置为“UserAssigned”userAssignedIdentities:encryptionProperties对象中使用的同一用户分配标识的 resourceURI。
以下模板代码段显示了用于加密部署数据的其他属性:
[...]
"resources": [
    {
        "name": "[parameters('containerGroupName')]",
        "type": "Microsoft.ContainerInstance/containerGroups",
        "apiVersion": "2019-12-01",
        "location": "[resourceGroup().location]",
        "identity": {
         "type": "UserAssigned",
         "userAssignedIdentities": {
           "/subscriptions/XXXXXXXXXXXXXXXXXXXXXX/resourcegroups/XXXXXXXXXXXXXXXXXXXXXX/providers/Microsoft.ManagedIdentity/userAssignedIdentities/myACIId": {}
         }
        },
        "properties": {
            "encryptionProperties": {
                "vaultBaseUrl": "https://example.vault.azure.cn",
                "keyName": "acikey",
                "keyVersion": "xxxxxxxxxxxxxxxx",
                "identity": "/subscriptions/XXXXXXXXXXXXXXXXXXXXXX/resourcegroups/XXXXXXXXXXXXXXXXXXXXXX/providers/Microsoft.ManagedIdentity/userAssignedIdentities/myACIId"
            },
            "sku": "Standard",
            "containers": {
                [...]
            }
        }
    }
]
下面是一个完整的模板,改编自教程:使用资源管理器模板部署多容器组。
{
  "$schema": "https://schema.management.azure.com/schemas/2015-01-01/deploymentTemplate.json#",
  "contentVersion": "1.0.0.0",
  "parameters": {
    "containerGroupName": {
      "type": "string",
      "defaultValue": "myContainerGroup",
      "metadata": {
        "description": "Container Group name."
      }
    }
  },
  "variables": {
    "container1name": "aci-tutorial-app",
    "container1image": "mcr.microsoft.com/azuredocs/aci-helloworld:latest",
    "container2name": "aci-tutorial-sidecar",
    "container2image": "mcr.microsoft.com/azuredocs/aci-tutorial-sidecar"
  },
  "resources": [
    {
      "name": "[parameters('containerGroupName')]",
      "type": "Microsoft.ContainerInstance/containerGroups",
      "apiVersion": "2022-09-01",
      "location": "[resourceGroup().location]",
      "identity": {
        "type": "UserAssigned",
        "userAssignedIdentities": {
          "/subscriptions/XXXXXXXXXXXXXXXXXXXXXX/resourcegroups/XXXXXXXXXXXXXXXXXXXXXX/providers/Microsoft.ManagedIdentity/userAssignedIdentities/myACIId": {}
        }
      },
      "properties": {
        "encryptionProperties": {
          "vaultBaseUrl": "https://example.vault.azure.cn",
          "keyName": "acikey",
          "keyVersion": "xxxxxxxxxxxxxxxx",
          "identity": "/subscriptions/XXXXXXXXXXXXXXXXXXXXXX/resourcegroups/XXXXXXXXXXXXXXXXXXXXXX/providers/Microsoft.ManagedIdentity/userAssignedIdentities/myACIId"
        },
        "sku": "Standard",
        "containers": [
          {
            "name": "[variables('container1name')]",
            "properties": {
              "image": "[variables('container1image')]",
              "resources": {
                "requests": {
                  "cpu": 1,
                  "memoryInGb": 1.5
                }
              },
              "ports": [
                {
                  "port": 80
                },
                {
                  "port": 8080
                }
              ]
            }
          },
          {
            "name": "[variables('container2name')]",
            "properties": {
              "image": "[variables('container2image')]",
              "resources": {
                "requests": {
                  "cpu": 1,
                  "memoryInGb": 1.5
                }
              }
            }
          }
        ],
        "osType": "Linux",
        "ipAddress": {
          "type": "Public",
          "ports": [
            {
              "protocol": "tcp",
              "port": "80"
            },
            {
              "protocol": "tcp",
              "port": "8080"
            }
          ]
        }
      }
    }
  ],
  "outputs": {
    "containerIPv4Address": {
      "type": "string",
      "value": "[reference(resourceId('Microsoft.ContainerInstance/containerGroups/', parameters('containerGroupName'))).ipAddress.ip]"
    }
  }
}
部署资源
使用“az group create”命令创建资源组。
az group create --name myResourceGroup --location chinaeast2
使用 az deployment group create 命令部署模板。
az deployment group create --resource-group myResourceGroup --template-file deployment-template.json
将在几秒钟内收到来自 Azure 的初始响应。 部署完成后,所有与之相关且由 ACI 服务保存的数据将使用提供的密钥进行加密。