快速入门:将 Bicep 模块发布到专用模块注册表
了解如何将 Bicep 模块发布到专用模块注册表,以及如何从 Bicep 文件调用模块。 专用模块注册表使你可以在组织中共享 Bicep 模块。 有关详细信息,请参阅为 Bicep 模块创建专用注册表。
先决条件
如果没有 Azure 订阅,可在开始前创建一个试用帐户。
要使用模块注册表,必须具有 Bicep CLI 版本 0.4.1008 或更高版本。 若要与 Azure CLI 一同使用,还必须安装 Azure CLI 2.31.0 或更高版本;若要与 Azure PowerShell 一同使用,还必须安装 Azure PowerShell 7.0.0 或更高版本 。
Bicep 注册表托管在 Azure 容器注册表 (ACR) 上。 若要创建一个注册表,请参阅快速入门:使用 Bicep 文件创建容器注册表。
若要设置环境以进行 Bicep 开发,请参阅安装 Bicep 工具。 完成这些步骤后,你将具有 Visual Studio Code 和 Bicep 扩展,或 Visual Studio 和 Bicep 扩展。
创建 Bicep 模块
模块是一个从另一个 Bicep 文件部署的 Bicep 文件。 任何 Bicep 文件都可以用作模块。 可以在本快速入门中使用以下 Bicep 文件。 它创建存储帐户:
@minLength(3)
@maxLength(11)
param storagePrefix string

@allowed([
  'Standard_LRS'
  'Standard_GRS'
  'Standard_RAGRS'
  'Premium_LRS'

])
param storageSKU string = 'Standard_LRS'
param location string

var uniqueStorageName = '${storagePrefix}${uniqueString(resourceGroup().id)}'

resource stg 'Microsoft.Storage/storageAccounts@2023-04-01' = {
  name: uniqueStorageName
  location: location
  sku: {
    name: storageSKU
  }
  kind: 'StorageV2'
  properties: {
    supportsHttpsTrafficOnly: true
  }
}

output storageEndpoint object = stg.properties.primaryEndpoints
将 Bicep 文件另存为 storage.bicep。
发布模块
如果没有 Azure 容器注册表 (ACR),请参阅先决条件创建一个。 需要 ACR 的登录服务器名称。 登录服务器名称的格式为:<registry-name>.azurecr.cn。 获取登录服务器名称:
az acr show --resource-group <resource-group-name> --name <registry-name> --query loginServer
使用以下语法将 Bicep 文件作为模块发布到专用模块注册表。
az bicep publish --file storage.bicep --target br:exampleregistry.azurecr.cn/bicep/modules/storage:v1 --documentationUri https://www.contoso.com/exampleregistry.html
在前面的示例中,./storage.bicep 是要发布的 Bicep 文件。 如果需要,请更新文件路径。 模块路径具有以下语法:
br:<registry-name>.azurecr.cn/<file-path>:<tag>
- br 是 Bicep 注册表的架构名称。
- file-path 在 Azure 容器注册表中称作
repository。 file-path 可以包含由/字符分隔的段。 如果注册表中不存在此文件路径,则创建此文件路径。 - tag 用于指定模块的版本。
若要验证已发布的模块,可以列出 ACR 存储库:
az acr repository list --name <registry-name> --output table
调用模块
若要调用模块,请在 Visual Studio Code 中创建新的 Bicep 文件。 在新的 Bicep 文件中,输入以下行。
module stgModule 'br:<registry-name>.azurecr.cn/bicep/modules/storage:v1'
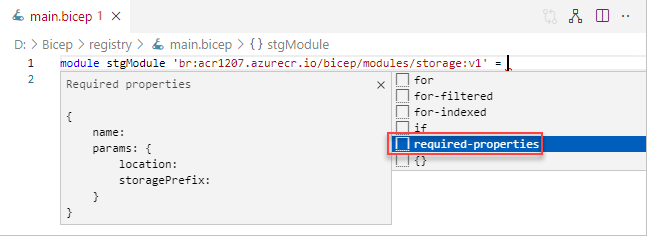
将 <registry-name> 替换为 ACR 注册表名称。 将模块还原到本地缓存需要一小段时间。 模块还原后,模块路径下的红色卷线将消失。 在行的末尾添加 = 和一个空格,然后选择“required-properties”,如以下屏幕截图所示。 模块结构将自动填充。

以下示例是已完成的 Bicep 文件。
@minLength(3)
@maxLength(11)
param namePrefix string
param location string = resourceGroup().location

module stgModule 'br:ace1207.azurecr.cn/bicep/modules/storage:v1' = {
  name: 'stgStorage'
  params: {
    location: location
    storagePrefix: namePrefix
  }
}
在本地保存 Bicep 文件,然后使用 Azure CLI 或 Azure PowerShell 部署 Bicep 文件:
resourceGroupName = "{provide-a-resource-group-name}"
templateFile="{provide-the-path-to-the-bicep-file}"

az group create --name $resourceGroupName --location chinaeast

az deployment group create --resource-group $resourceGroupName --template-file $templateFile
在 Azure 门户中,验证存储帐户已成功创建。
清理资源
如果不再需要本文中创建的 Azure 资源,请使用 Azure CLI 或 Azure PowerShell 模块删除快速入门资源组。
resourceGroupName = "{provide-the-resource-group-name}"

az group delete --name $resourceGroupName