从版本 1.21 开始,Azure Kubernetes 服务 (AKS) 引入了容器存储接口 (CSI) 驱动程序的实现。 采用 CSI 并将其作为标准时,应迁移或升级使用树内永久性卷 (PV) 的现有有状态工作负载,以使用 CSI 驱动程序。
为了使此过程尽可能简单,并确保不会丢失数据,本文提供了不同的迁移选项。 这些选项包括有助于确保从树内磁盘顺利迁移到 Azure 磁盘和 Azure 文件 CSI 驱动程序的脚本。
开始之前
- Azure CLI 版本 2.37.0 或更高版本。 可通过运行
az --version查找版本,运行az upgrade升级版本。 如果需要进行安装或升级,请参阅安装 Azure CLI。 - Kubectl 和群集管理员有权创建、获取、列出、删除对 PVC 或 PV、卷快照或卷快照内容的访问权限。 对于已启用 Microsoft Entra RBAC 的群集,你是 Azure Kubernetes 服务 RBAC 群集管理员角色的成员。
迁移磁盘卷
注意
标签 failure-domain.beta.kubernetes.io/zone 和 failure-domain.beta.kubernetes.io/region 在 AKS 1.24 中已被弃用,在 1.28 中已被删除。 如果现有永久性卷仍在使用与这两个标签匹配的 nodeAffinity,则需要将其更改为新的永久性卷设置中的 topology.kubernetes.io/zone 和 topology.kubernetes.io/region 标签。
使用两个迁移选项支持从树内迁移到 CSI:
- 创建静态卷
- 创建动态卷
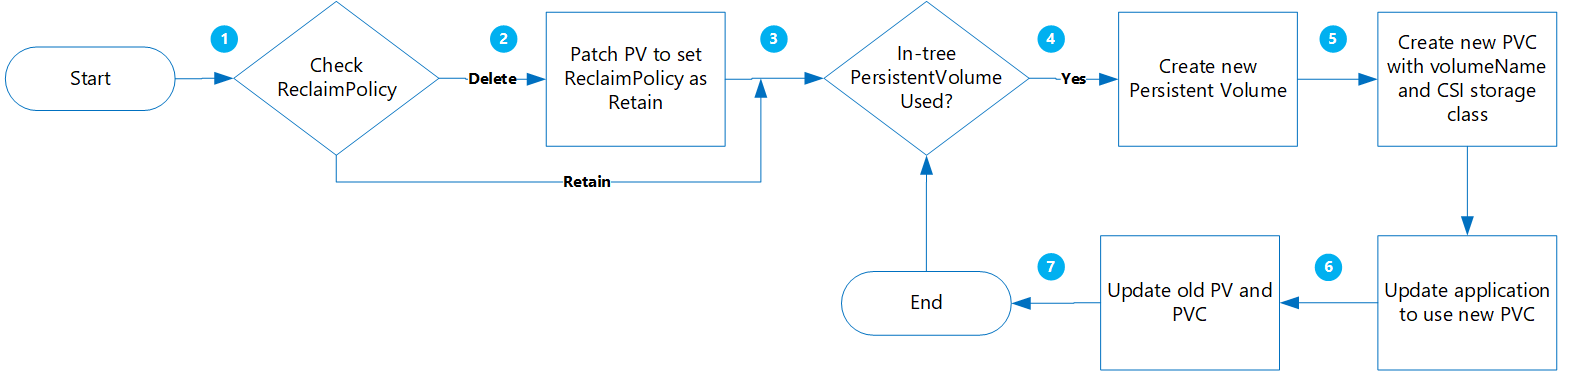
创建静态卷
使用此选项,可以通过将 claimRef 静态分配给稍后要创建的新 PVC 来创建 PV,并为 PersistentVolumeClaim 指定 volumeName。
此方法的优点包括:
- 此工作流很简单,而且可以自动化。
- 无需使用树内存储类清理原始配置。
- 风险低,因为仅执行 Kubernetes PV/PVC 的逻辑删除,不会删除实际的物理数据。
- 无额外费用,因为不需要创建额外的 Azure 对象,如磁盘、快照等。
以下是要评估的重要注意事项:
- 从原始动态样式卷转换到静态卷时需要为所有选项手动构造和管理 PV 对象。
- 根据新的 PVC 对象重新部署新应用程序时潜在的应用程序停机时间。
迁移
运行以下命令,将现有 PV
ReclaimPolicy从“删除”更新为“保留”:kubectl patch pv pvName -p '{"spec":{"persistentVolumeReclaimPolicy":"Retain"}}'将“pvName”替换为所选 PersistentVolume 的名称。 或者,如果要更新多个 PV 的 reclaimPolicy,请创建一个名为 patchReclaimPVs.sh 的文件,并复制到以下代码中。
#!/bin/bash
# Patch the Persistent Volume in case ReclaimPolicy is Delete
NAMESPACE=$1
i=1
for PVC in $(kubectl get pvc -n $NAMESPACE | awk '{ print $1}'); do
  # Ignore first record as it contains header
  if [ $i -eq 1 ]; then
    i=$((i + 1))
  else
    PV="$(kubectl get pvc $PVC -n $NAMESPACE -o jsonpath='{.spec.volumeName}')"
    RECLAIMPOLICY="$(kubectl get pv $PV -n $NAMESPACE -o jsonpath='{.spec.persistentVolumeReclaimPolicy}')"
    echo "Reclaim Policy for Persistent Volume $PV is $RECLAIMPOLICY"
    if [[ $RECLAIMPOLICY == "Delete" ]]; then
      echo "Updating ReclaimPolicy for $pv to Retain"
      kubectl patch pv $PV -p '{"spec":{"persistentVolumeReclaimPolicy":"Retain"}}'
    fi
  fi
done
使用
namespace参数执行脚本以指定群集命名空间./PatchReclaimPolicy.sh <namespace>。运行以下命令,获取命名空间中按 creationTimestamp 排序的所有 PVC 的列表。 使用
--namespace参数和实际群集命名空间设置命名空间。kubectl get pvc -n <namespace> --sort-by=.metadata.creationTimestamp -o custom-columns=NAME:.metadata.name,CreationTime:.metadata.creationTimestamp,StorageClass:.spec.storageClassName,Size:.spec.resources.requests.storage如果你有大量需要迁移的 PV,并且想要一次迁移几个 PV,则此步骤非常有用。 运行此命令可以确定在给定时间范围内创建了哪些 PVC。 运行 CreatePV.sh 脚本时,其中两个参数是开始时间和结束时间,使你能够仅在该时间段内迁移 PVC。
创建一个名为 CreatePV.sh 的文件并将以下 YAML 复制到其中。 此脚本执行以下任务:
- 为存储类
storageClassName的命名空间中的所有 PersistentVolume 创建名为existing-pv-csi的新 PersistentVolume。 - 将新 PVC 名称配置为
existing-pvc-csi。 - 使用指定的 PV 名称创建新的 PVC。
#!/bin/bash #kubectl get pvc -n <namespace> --sort-by=.metadata.creationTimestamp -o custom-columns=NAME:.metadata.name,CreationTime:.metadata.creationTimestamp,StorageClass:.spec.storageClassName,Size:.spec.resources.requests.storage # TimeFormat 2022-04-20T13:19:56Z NAMESPACE=$1 FILENAME=$(date +%Y%m%d%H%M)-$NAMESPACE EXISTING_STORAGE_CLASS=$2 STORAGE_CLASS_NEW=$3 STARTTIMESTAMP=$4 ENDTIMESTAMP=$5 i=1 for PVC in $(kubectl get pvc -n $NAMESPACE | awk '{ print $1}'); do # Ignore first record as it contains header if [ $i -eq 1 ]; then i=$((i + 1)) else PVC_CREATION_TIME=$(kubectl get pvc $PVC -n $NAMESPACE -o jsonpath='{.metadata.creationTimestamp}') if [[ $PVC_CREATION_TIME >= $STARTTIMESTAMP ]]; then if [[ $ENDTIMESTAMP > $PVC_CREATION_TIME ]]; then PV="$(kubectl get pvc $PVC -n $NAMESPACE -o jsonpath='{.spec.volumeName}')" RECLAIM_POLICY="$(kubectl get pv $PV -n $NAMESPACE -o jsonpath='{.spec.persistentVolumeReclaimPolicy}')" STORAGECLASS="$(kubectl get pv $PV -n $NAMESPACE -o jsonpath='{.spec.storageClassName}')" echo $PVC RECLAIM_POLICY="$(kubectl get pv $PV -n $NAMESPACE -o jsonpath='{.spec.persistentVolumeReclaimPolicy}')" if [[ $RECLAIM_POLICY == "Retain" ]]; then if [[ $STORAGECLASS == $EXISTING_STORAGE_CLASS ]]; then STORAGE_SIZE="$(kubectl get pv $PV -n $NAMESPACE -o jsonpath='{.spec.capacity.storage}')" SKU_NAME="$(kubectl get storageClass $STORAGE_CLASS_NEW -o jsonpath='{.parameters.skuname}')" DISK_URI="$(kubectl get pv $PV -n $NAMESPACE -o jsonpath='{.spec.azureDisk.diskURI}')" PERSISTENT_VOLUME_RECLAIM_POLICY="$(kubectl get pv $PV -n $NAMESPACE -o jsonpath='{.spec.persistentVolumeReclaimPolicy}')" cat >$PVC-csi.yaml <<EOF apiVersion: v1 kind: PersistentVolume metadata: annotations: pv.kubernetes.io/provisioned-by: disk.csi.azure.com name: $PV-csi spec: accessModes: - ReadWriteOnce capacity: storage: $STORAGE_SIZE claimRef: apiVersion: v1 kind: PersistentVolumeClaim name: $PVC-csi namespace: $NAMESPACE csi: driver: disk.csi.azure.com volumeAttributes: csi.storage.k8s.io/pv/name: $PV-csi csi.storage.k8s.io/pvc/name: $PVC-csi csi.storage.k8s.io/pvc/namespace: $NAMESPACE requestedsizegib: "$STORAGE_SIZE" skuname: $SKU_NAME volumeHandle: $DISK_URI persistentVolumeReclaimPolicy: $PERSISTENT_VOLUME_RECLAIM_POLICY storageClassName: $STORAGE_CLASS_NEW --- apiVersion: v1 kind: PersistentVolumeClaim metadata: name: $PVC-csi namespace: $NAMESPACE spec: accessModes: - ReadWriteOnce storageClassName: $STORAGE_CLASS_NEW resources: requests: storage: $STORAGE_SIZE volumeName: $PV-csi EOF kubectl apply -f $PVC-csi.yaml LINE="PVC:$PVC,PV:$PV,StorageClassTarget:$STORAGE_CLASS_NEW" printf '%s\n' "$LINE" >>$FILENAME fi fi fi fi fi done- 为存储类
若要为命名空间中的所有 PersistentVolumes 创建新的 PersistentVolume,请使用以下参数执行脚本 CreatePV.sh:
namespace- 群集命名空间sourceStorageClass- 基于树内存储驱动程序的 StorageClasstargetCSIStorageClass- 基于 CSI 存储驱动程序的 StorageClass,可以是将预配器设置为 disk.csi.azure.com 或 file.csi.azure.com 的默认存储类之一。 或者,可以创建自定义存储类,只要它设置为这两个预配器之一。startTimeStamp- 以 yyyy-mm-ddthh:mm:ssz 格式提供 PVC 创建时间之前的开始时间endTimeStamp- 提供格式为 yyyy-mm-ddthh:mm:ssz 的结束时间。
./CreatePV.sh <namespace> <sourceIntreeStorageClass> <targetCSIStorageClass> <startTimestamp> <endTimestamp>更新应用程序以使用新 PVC。
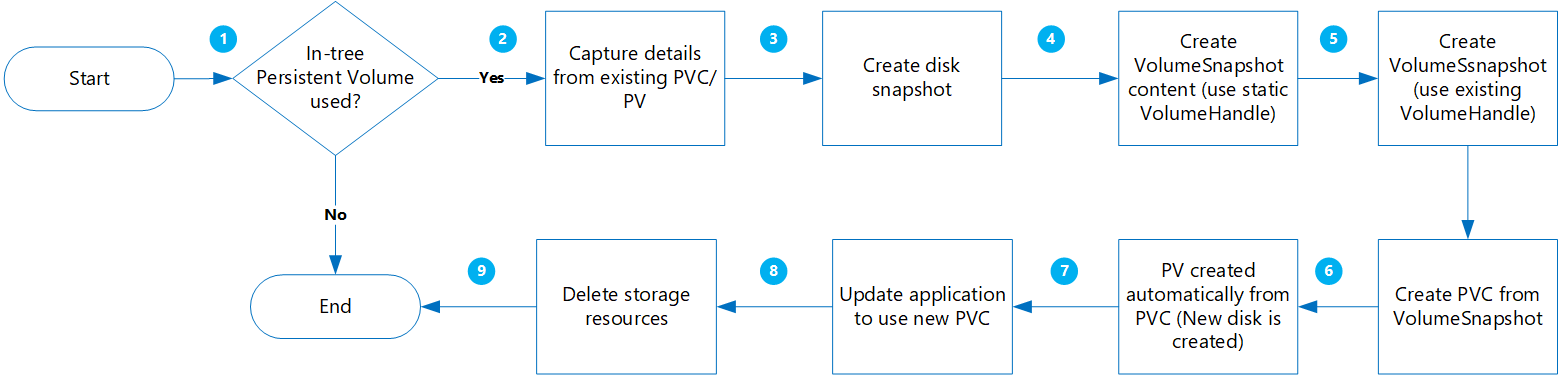
创建动态卷
使用此选项,可以根据永久性卷声明动态创建永久性卷。
此方法的优点包括:
风险较低,因为所有新对象都是在保留包含快照的其他副本的同时创建的。
无需单独构造 PV 并在 PVC 清单中添加卷名称。
以下是要评估的重要注意事项:
虽然这种方法的风险较低,但它确实会创建多个对象,这会增加存储成本。
在创建新卷期间,应用程序不可用。
应谨慎执行删除步骤。 临时资源锁可以应用于资源组,直到迁移完成并成功验证应用程序。
根据快照创建新磁盘时执行数据验证。
迁移
在继续之前,请验证以下事项:
对于数据在写入磁盘之前先写入内存的特定工作负载,应停止应用程序并允许将内存中的数据刷新到磁盘。
VolumeSnapshot类应存在,如以下示例 YAML 所示:apiVersion: snapshot.storage.k8s.io/v1 kind: VolumeSnapshotClass metadata: name: custom-disk-snapshot-sc driver: disk.csi.azure.com deletionPolicy: Delete parameters: incremental: "false"
运行以下命令,获取特定命名空间中按 creationTimestamp 排序的所有 PVC 的列表。 使用
--namespace参数和实际群集命名空间设置命名空间。kubectl get pvc --namespace <namespace> --sort-by=.metadata.creationTimestamp -o custom-columns=NAME:.metadata.name,CreationTime:.metadata.creationTimestamp,StorageClass:.spec.storageClassName,Size:.spec.resources.requests.storage如果你有大量需要迁移的 PV,并且想要一次迁移几个 PV,则此步骤非常有用。 运行此命令可以确定在给定时间范围内创建了哪些 PVC。 运行 MigrateCSI.sh 脚本时,其中两个参数是开始时间和结束时间,使你能够仅在该时间段内迁移 PVC。
创建一个名为 MigrateCSI.sh 的文件并将以下 YAML 复制到其中。 此脚本执行以下任务:
- 使用 Azure CLI 创建完整磁盘快照
- 创建
VolumesnapshotContent - 创建
VolumeSnapshot - 从
VolumeSnapshot创建一个新的 PVC - 创建一个文件名为
<namespace>-timestamp的新文件,其中包含需要清理的所有旧资源的列表。
#!/bin/bash
#kubectl get pvc -n <namespace> --sort-by=.metadata.creationTimestamp -o custom-columns=NAME:.metadata.name,CreationTime:.metadata.creationTimestamp,StorageClass:.spec.storageClassName,Size:.spec.resources.requests.storage
# TimeFormat 2022-04-20T13:19:56Z
NAMESPACE=$1
FILENAME=$NAMESPACE-$(date +%Y%m%d%H%M)
EXISTING_STORAGE_CLASS=$2
STORAGE_CLASS_NEW=$3
VOLUME_STORAGE_CLASS=$4
START_TIME_STAMP=$5
END_TIME_STAMP=$6
i=1
for PVC in $(kubectl get pvc -n $NAMESPACE | awk '{ print $1}'); do
  # Ignore first record as it contains header
  if [ $i -eq 1 ]; then
    i=$((i + 1))
  else
    PVC_CREATION_TIME=$(kubectl get pvc $PVC -n $NAMESPACE -o jsonpath='{.metadata.creationTimestamp}')
    if [[ $PVC_CREATION_TIME > $START_TIME_STAMP ]]; then
      if [[ $END_TIME_STAMP > $PVC_CREATION_TIME ]]; then
        PV="$(kubectl get pvc $PVC -n $NAMESPACE -o jsonpath='{.spec.volumeName}')"
        RECLAIM_POLICY="$(kubectl get pv $PV -n $NAMESPACE -o jsonpath='{.spec.persistentVolumeReclaimPolicy}')"
        STORAGE_CLASS="$(kubectl get pv $PV -n $NAMESPACE -o jsonpath='{.spec.storageClassName}')"
        echo $PVC
        RECLAIM_POLICY="$(kubectl get pv $PV -n $NAMESPACE -o jsonpath='{.spec.persistentVolumeReclaimPolicy}')"
        if [[ $STORAGE_CLASS == $EXISTING_STORAGE_CLASS ]]; then
          STORAGE_SIZE="$(kubectl get pv $PV -n $NAMESPACE -o jsonpath='{.spec.capacity.storage}')"
          SKU_NAME="$(kubectl get storageClass $STORAGE_CLASS_NEW -o jsonpath='{.parameters.skuname}')"
          DISK_URI="$(kubectl get pv $PV -n $NAMESPACE -o jsonpath='{.spec.azureDisk.diskURI}')"
          TARGET_RESOURCE_GROUP="$(cut -d'/' -f5 <<<"$DISK_URI")"
          echo $DISK_URI
          SUBSCRIPTION_ID="$(echo $DISK_URI | grep -o 'subscriptions/[^/]*' | sed 's#subscriptions/##g')"
          echo $TARGET_RESOURCE_GROUP
          PERSISTENT_VOLUME_RECLAIM_POLICY="$(kubectl get pv $PV -n $NAMESPACE -o jsonpath='{.spec.persistentVolumeReclaimPolicy}')"
          az snapshot create --resource-group $TARGET_RESOURCE_GROUP --name $PVC-$FILENAME --source "$DISK_URI" --subscription ${SUBSCRIPTION_ID}
          SNAPSHOT_PATH=$(az snapshot list --resource-group $TARGET_RESOURCE_GROUP --query "[?name == '$PVC-$FILENAME'].id | [0]" --subscription ${SUBSCRIPTION_ID})
          SNAPSHOT_HANDLE=$(echo "$SNAPSHOT_PATH" | tr -d '"')
          echo $SNAPSHOT_HANDLE
          sleep 10
          # Create Restore File
          cat <<EOF >$PVC-csi.yml
    apiVersion: snapshot.storage.k8s.io/v1
    kind: VolumeSnapshotContent
    metadata:
      name: $PVC-$FILENAME
    spec:
      deletionPolicy: 'Delete'
      driver: 'disk.csi.azure.com'
      volumeSnapshotClassName: $VOLUME_STORAGE_CLASS
      source:
        snapshotHandle: $SNAPSHOT_HANDLE
      volumeSnapshotRef:
        apiVersion: snapshot.storage.k8s.io/v1
        kind: VolumeSnapshot
        name: $PVC-$FILENAME
        namespace: $1
---
    apiVersion: snapshot.storage.k8s.io/v1
    kind: VolumeSnapshot
    metadata:
      name: $PVC-$FILENAME
      namespace: $1
    spec:
      volumeSnapshotClassName: $VOLUME_STORAGE_CLASS
      source:
        volumeSnapshotContentName: $PVC-$FILENAME
---
    apiVersion: v1
    kind: PersistentVolumeClaim
    metadata:
      name: csi-$PVC
      namespace: $1
    spec:
      accessModes:
      - ReadWriteOnce
      storageClassName: $STORAGE_CLASS_NEW
      resources:
        requests:
          storage: $STORAGE_SIZE
      dataSource:
        name: $PVC-$FILENAME
        kind: VolumeSnapshot
        apiGroup: snapshot.storage.k8s.io

EOF
          kubectl create -f $PVC-csi.yml
          LINE="OLDPVC:$PVC,OLDPV:$PV,VolumeSnapshotContent:volumeSnapshotContent-$FILENAME,VolumeSnapshot:volumesnapshot$FILENAME,OLDdisk:$DISK_URI"
          printf '%s\n' "$LINE" >>$FILENAME
        fi
      fi
    fi
  fi
done
若要迁移磁盘卷,请使用以下参数执行脚本 MigrateToCSI.sh:
namespace- 群集命名空间sourceStorageClass- 基于树内存储驱动程序的 StorageClasstargetCSIStorageClass- 基于 CSI 存储驱动程序的 StorageClassvolumeSnapshotClass- 卷快照类的名称。 例如custom-disk-snapshot-sc。startTimeStamp- 提供格式为 yyyy-mm-ddthh:mm:ssz 的开始时间。endTimeStamp- 提供格式为 yyyy-mm-ddthh:mm:ssz 的结束时间。
./MigrateToCSI.sh <namespace> <sourceStorageClass> <TargetCSIstorageClass> <VolumeSnapshotClass> <startTimestamp> <endTimestamp>更新应用程序以使用新 PVC。
手动删除较旧的资源,包括树内 PVC/PV、VolumeSnapshot 和 VolumeSnapshotContent。 否则,维护树内 PVC/PC 和快照对象会产生更多成本。
迁移文件共享卷
通过创建静态卷,可以从树内迁移到 CSI:
- 无需使用树内存储类清理原始配置。
- 风险低,因为仅执行 Kubernetes PV/PVC 的逻辑删除,不会删除实际的物理数据。
- 无额外费用,因为不需要创建额外的 Azure 对象,如文件共享等。
迁移
运行以下命令,将现有 PV
ReclaimPolicy从“删除”更新为“保留”:kubectl patch pv pvName -p '{"spec":{"persistentVolumeReclaimPolicy":"Retain"}}'将“pvName”替换为所选 PersistentVolume 的名称。 或者,如果要更新多个 PV 的 reclaimPolicy,请创建一个名为 patchReclaimPVs.sh 的文件,并复制到以下代码中。
#!/bin/bash
# Patch the Persistent Volume in case ReclaimPolicy is Delete
namespace=$1
i=1
for pvc in $(kubectl get pvc -n $namespace | awk '{ print $1}'); do
  # Ignore first record as it contains header
  if [ $i -eq 1 ]; then
    i=$((i + 1))
  else
    pv="$(kubectl get pvc $pvc -n $namespace -o jsonpath='{.spec.volumeName}')"
    reclaimPolicy="$(kubectl get pv $pv -n $namespace -o jsonpath='{.spec.persistentVolumeReclaimPolicy}')"
    echo "Reclaim Policy for Persistent Volume $pv is $reclaimPolicy"
    if [[ $reclaimPolicy == "Delete" ]]; then
      echo "Updating ReclaimPolicy for $pv to Retain"
      kubectl patch pv $pv -p '{"spec":{"persistentVolumeReclaimPolicy":"Retain"}}'
    fi
  fi
done
使用
namespace参数执行脚本以指定群集命名空间./PatchReclaimPolicy.sh <namespace>。创建一个新的存储类并将预配器设置为
file.csi.azure.com,或者将其中一个默认 StorageClasses 与 CSI 文件预配器配合使用。通过运行以下命令,从现有 PersistentVolumes 中获取
secretName和shareName:kubectl describe pv pvName使用新的 StorageClass、
shareName和secretName从树内 PV 创建新的 PV。 创建一个名为 azurefile-mount-pv.yaml 的文件并将以下代码复制到其中。 在csi下,更新resourceGroup、volumeHandle和shareName。 对于装载选项,fileMode 和 dirMode 的默认值为 0777。fileMode和dirMode的默认值为 0777。apiVersion: v1 kind: PersistentVolume metadata: name: azurefile spec: capacity: storage: 5Gi accessModes: - ReadWriteMany persistentVolumeReclaimPolicy: Retain storageClassName: azurefile-csi csi: driver: file.csi.azure.com readOnly: false volumeHandle: unique-volumeid # make sure volumeid is unique for every identical share in the cluster volumeAttributes: resourceGroup: EXISTING_RESOURCE_GROUP_NAME # optional, only set this when storage account is not in the same resource group as the cluster nodes shareName: aksshare nodeStageSecretRef: name: azure-secret namespace: default mountOptions: - dir_mode=0777 - file_mode=0777 - uid=0 - gid=0 - mfsymlinks - cache=strict - nosharesock - nobrl # disable sending byte range lock requests to the server and for applications which have challenges with posix locks使用以下代码创建一个名为 azurefile-mount-pvc.yaml 的文件,其中包含使用 PersistentVolumeClaim 的 PersistentVolume。
apiVersion: v1
kind: PersistentVolumeClaim
metadata:
  name: azurefile
spec:
  accessModes:
    - ReadWriteMany
  storageClassName: azurefile-csi
  volumeName: azurefile
  resources:
    requests:
      storage: 5Gi
使用
kubectl命令创建 PersistentVolume。kubectl apply -f azurefile-mount-pv.yaml使用
kubectl命令创建 PersistentVolumeClaim。kubectl apply -f azurefile-mount-pvc.yaml通过运行以下命令,验证 PersistentVolumeClaim 是否已创建并绑定到 PersistentVolume。
kubectl get pvc azurefile输出如下所示:
NAME        STATUS   VOLUME      CAPACITY   ACCESS MODES   STORAGECLASS   AGE
azurefile   Bound    azurefile   5Gi        RWX            azurefile      5s
更新容器规范以引用 PersistentVolumeClaim并更新 Pod。 例如,复制以下代码并创建名为 azure-files-pod.yaml 的文件。
...
  volumes:
  - name: azure
    persistentVolumeClaim:
      claimName: azurefile
无法及时更新 Pod 规范。 使用以下
kubectl命令删除 Pod,然后再重新创建 Pod。kubectl delete pod mypodkubectl apply -f azure-files-pod.yaml
后续步骤
- 有关存储最佳做法的详细信息,请参阅有关 Azure Kubernetes 服务中存储和备份的最佳做法。