Note
Access to this page requires authorization. You can try signing in or changing directories.
Access to this page requires authorization. You can try changing directories.
This article shows you how to use Virtual WAN and Azure Firewall rules and filters to manage secure access for connections to your resources in Azure over point-to site IKEv2 or OpenVPN connections. This configuration is helpful if you have remote users for whom you want to restrict access to Azure resources, or to secure your resources in Azure.
The steps in this article help you create the architecture in the following diagram to allow User VPN clients to access a specific resource (VM1) in a spoke VNet connected to the virtual hub, but not other resources (VM2). Use this architecture example as a basic guideline.
Prerequisites
You have an Azure subscription. If you don't have an Azure subscription, create a trial subscription.
You have a virtual network to which you want to connect.
- Verify that none of the subnets of your on-premises networks overlap with the virtual networks that you want to connect to.
- To create a virtual network in the Azure portal, see the Quickstart article.
Your virtual network must not have any existing virtual network gateways.
- If your virtual network already has gateways (VPN or ExpressRoute), you must remove all of the gateways before proceeding.
- This configuration requires that virtual networks connect to the Virtual WAN hub gateway only.
Decide the IP address range that you want to use for your virtual hub private address space. This information is used when configuring your virtual hub. A virtual hub is a virtual network that is created and used by Virtual WAN. It's the core of your Virtual WAN network in a region. The address space range must conform the certain rules:
- The address range that you specify for the hub can't overlap with any of the existing virtual networks that you connect to.
- The address range can't overlap with the on-premises address ranges that you connect to.
- If you're unfamiliar with the IP address ranges located in your on-premises network configuration, coordinate with someone who can provide those details for you.
- You have the values available for the authentication configuration that you want to use. For example, a RADIUS server, Microsoft Entra authentication, or Generate and export certificates.
Create a virtual WAN
In the portal, in the Search resources bar, type Virtual WAN in the search box and select Enter.
Select Virtual WANs from the results. On the Virtual WANs page, select + Create to open the Create WAN page.
On the Create WAN page, on the Basics tab, fill in the fields. Modify the example values to apply to your environment.
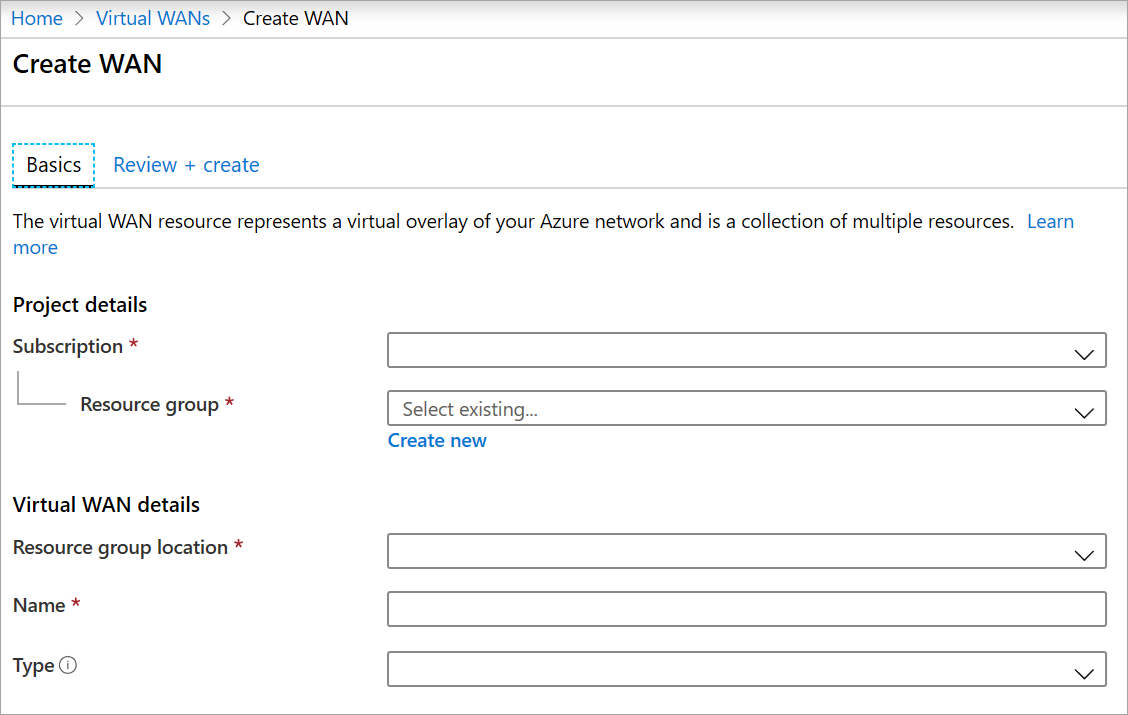
- Subscription: Select the subscription that you want to use.
- Resource group: Create new or use existing.
- Resource group location: Choose a resource location from the dropdown. A WAN is a global resource and doesn't live in a particular region. However, you must select a region in order to manage and locate the WAN resource that you create.
- Name: Type the Name that you want to call your virtual WAN.
- Type: Basic or Standard. Select Standard. If you select Basic, understand that Basic virtual WANs can only contain Basic hubs. Basic hubs can only be used for site-to-site connections.
After you finish filling out the fields, at the bottom of the page, select Review +Create.
Once validation passes, click Create to create the virtual WAN.
Define P2S configuration parameters
The point-to-site (P2S) configuration defines the parameters for connecting remote clients. This section helps you define P2S configuration parameters, and then create the configuration that will be used for the VPN client profile. The instructions you follow depend on the authentication method you want to use.
Authentication methods
When selecting the authentication method, you have three choices. Each method has specific requirements. Select one of the following methods, and then complete the steps.
Microsoft Entra authentication: Obtain the following:
- The Application ID of the Azure VPN Enterprise Application registered in your Microsoft Entra tenant.
- The Issuer. Example:
https://sts.chinacloudapi.cn/your-Directory-ID. - The Microsoft Entra tenant.
Radius-based authentication: Obtain the Radius server IP, Radius server secret, and certificate information.
Azure certificates: For this configuration, certificates are required. You need to either generate or obtain certificates. A client certificate is required for each client. Additionally, the root certificate information (public key) needs to be uploaded. For more information about the required certificates, see Generate and export certificates.
Navigate to the virtual WAN that you created.
Select User VPN configurations from the menu on the left.
On the User VPN configurations page, select +Create user VPN config.
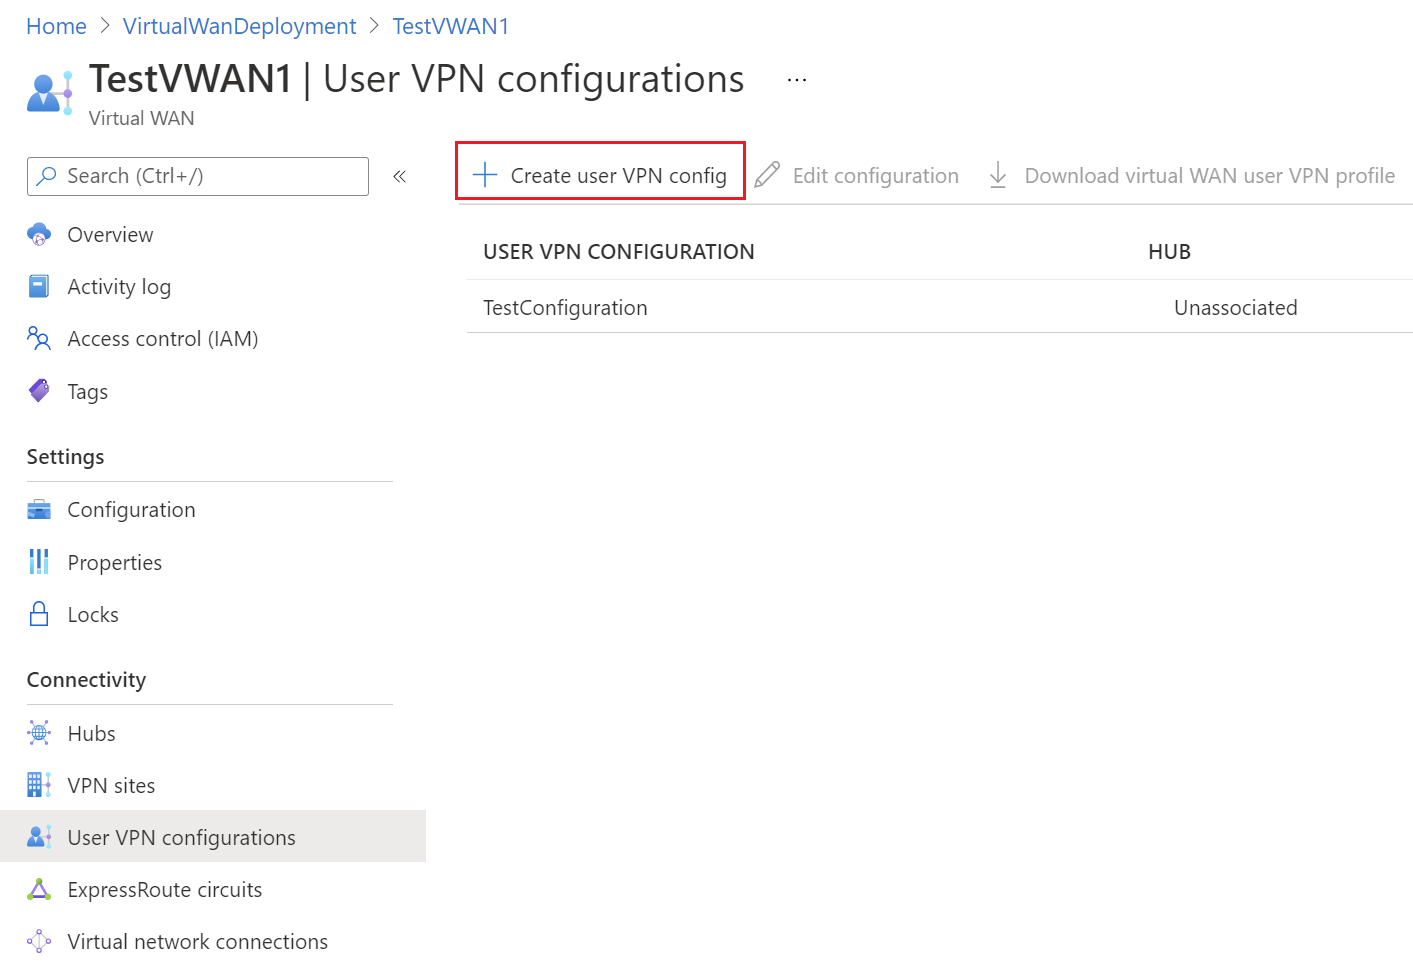
On the Create new User VPN configuration page Basics tab, under Instance details, enter the Name you want to assign to your VPN configuration.

For Tunnel type, select the tunnel type that you want from the dropdown. The tunnel type options are: IKEv2 VPN, OpenVPN, and OpenVpn and IKEv2. Each tunnel type has specific required settings. The tunnel type you choose corresponds to the authentication choices available.
Requirements and parameters:
IKEv2 VPN
Requirements: When you select the IKEv2 tunnel type, you see a message directing you to select an authentication method. For IKEv2, you may specify only one authentication method. You can choose Azure Certificate, or RADIUS-based authentication.
IPSec custom parameters: To customize the parameters for IKE Phase 1 and IKE Phase 2, toggle the IPsec switch to Custom and select the parameter values.
OpenVPN
- Requirements: When you select the OpenVPN tunnel type, you see a message directing you to select an authentication mechanism. If OpenVPN is selected as the tunnel type, you may specify multiple authentication methods. You can choose any subset of Azure Certificate, Azure Active Directory, or RADIUS-based authentication. For RADIUS-based authentication, you can provide a secondary RADIUS server IP address and server secret.
Configure the Authentication methods you want to use. Each authentication method is in a separate tab: Azure certificate, RADIUS authentication, and Azure Active Directory. Some authentication methods are only available on certain tunnel types.
On the tab for the authentication method you want to configure, select Yes to reveal the available configuration settings.
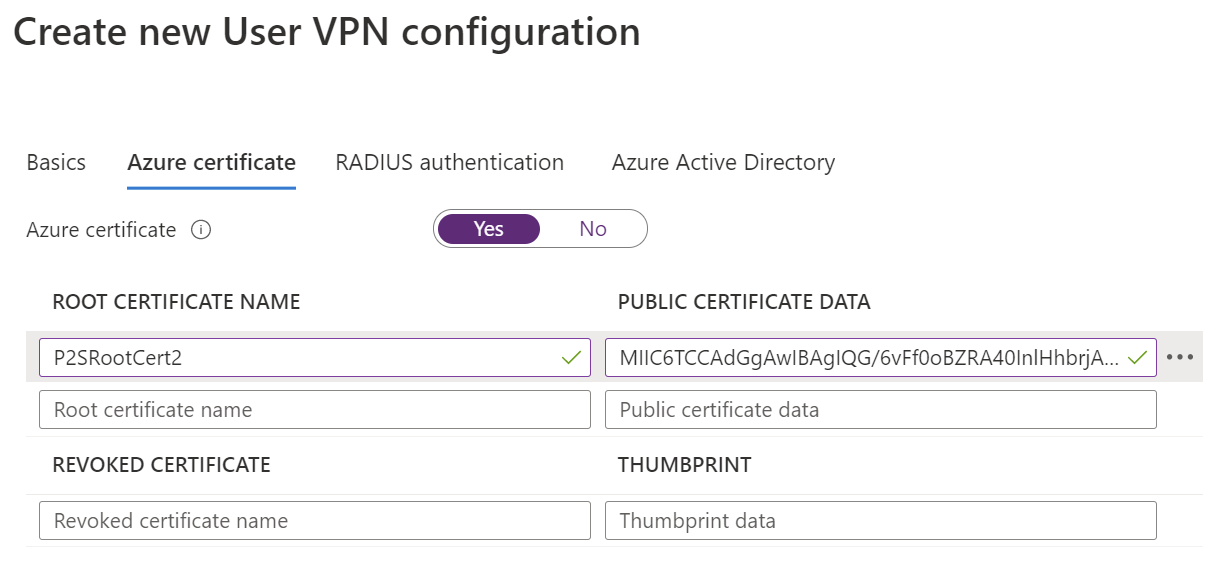
Example - Certificate authentication
To configure this setting, the tunnel type the Basics page can be IKEv2, OpenVPN, or OpenVPN and IKEv2.
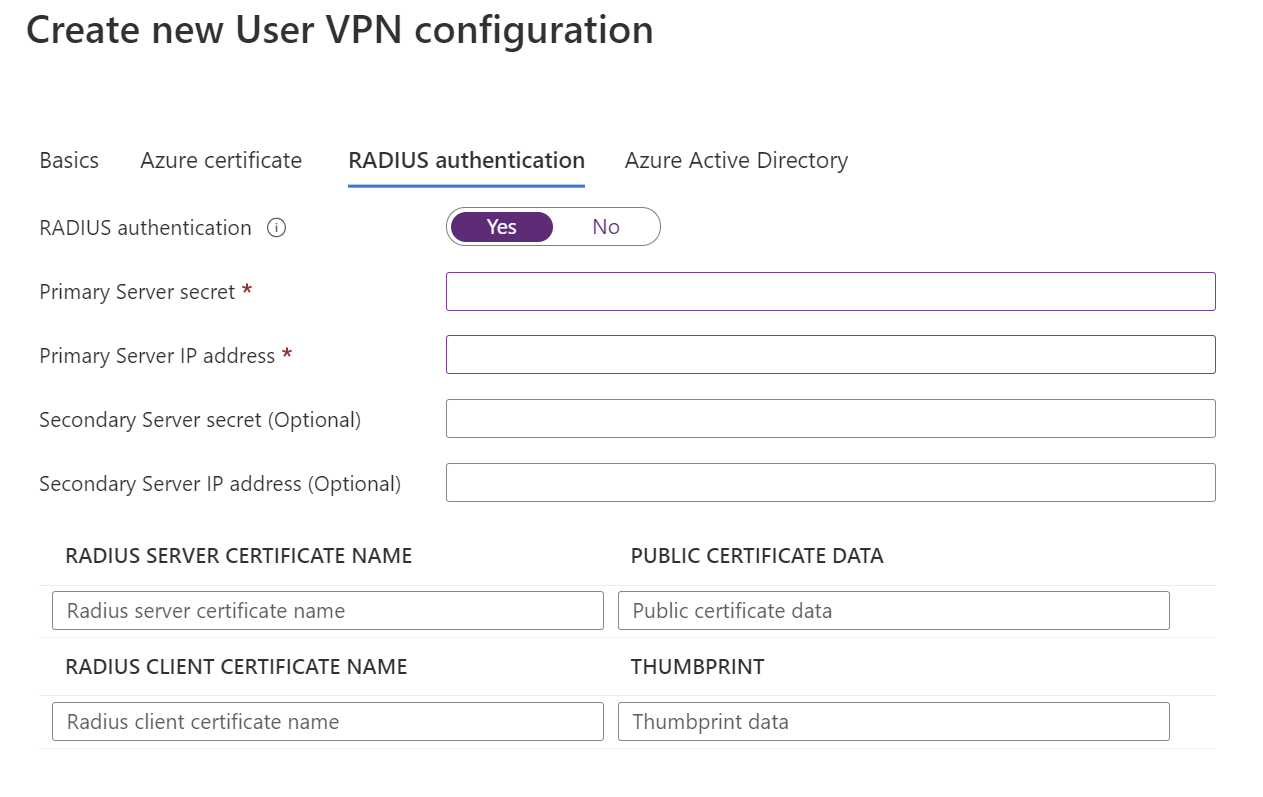
Example - RADIUS authentication
To configure this setting, the tunnel type on the Basics page can be Ikev2, OpenVPN, or OpenVPN and IKEv2.
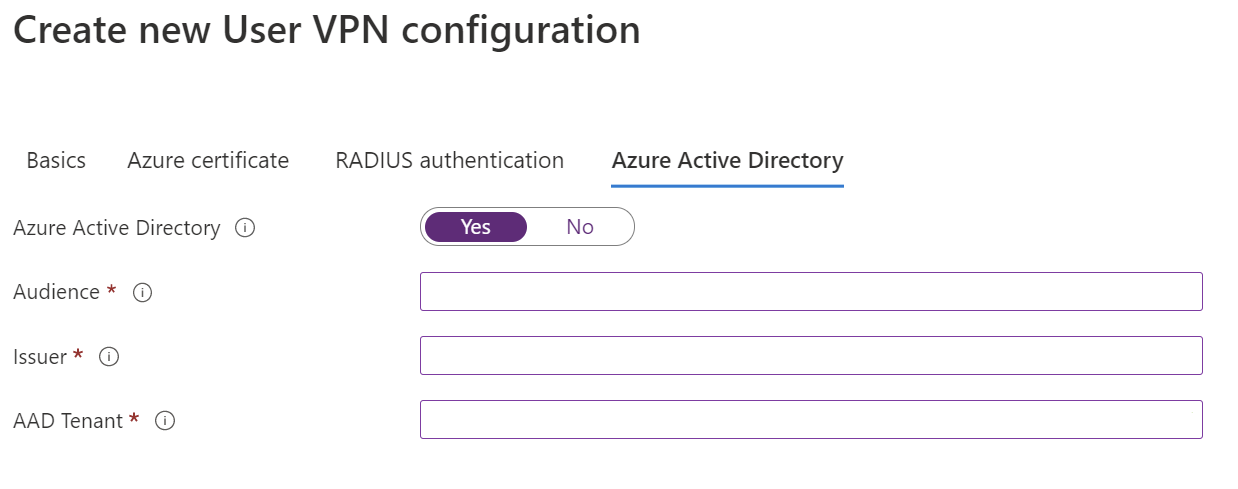
Example - Azure Active Directory authentication
To configure this setting, the tunnel type on the Basics page must be OpenVPN. Azure Active Directory-based authentication is only supported with OpenVPN.
When you have finished configuring the settings, select Review + create at the bottom of the page.
Select Create to create the User VPN configuration.
Create the hub and gateway
In this section, you create the virtual hub with a point-to-site gateway. When configuring, you can use the following example values:
- Hub private IP address space: 10.1.0.0/16
- Client address pool: 10.5.0.0/16
- Custom DNS Servers: You can list up to 5 DNS Servers
Basics page
Go to the virtual WAN that you created. On the virtual WAN page left pane, under the Connectivity, select Hubs.
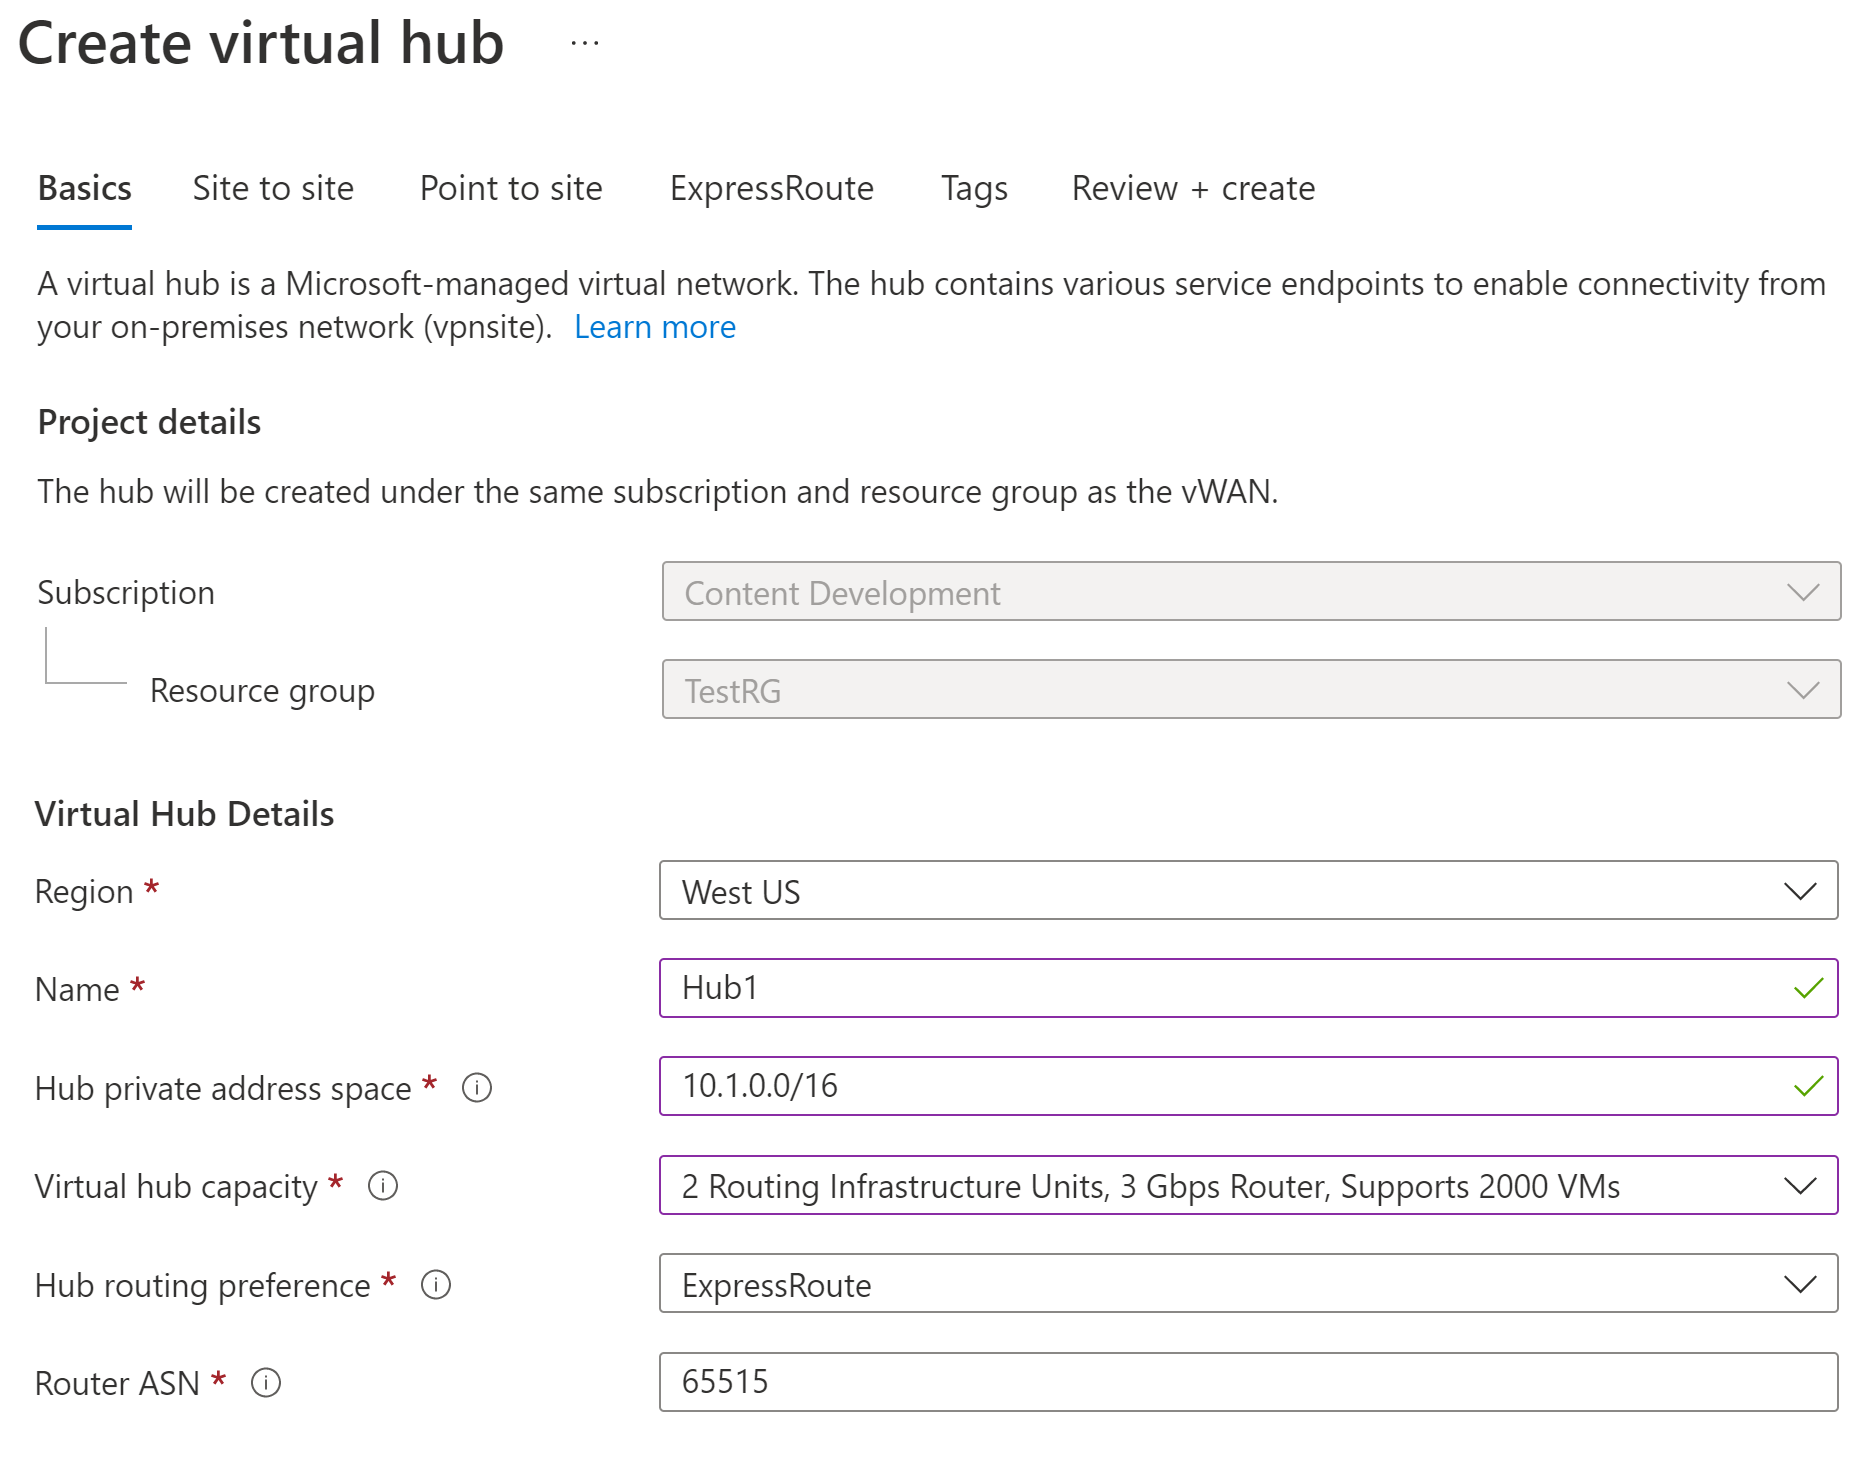
On the Hubs page, select +New Hub to open the Create virtual hub page.
On the Create virtual hub page Basics tab, complete the following fields:
- Region: Select the region in which you want to deploy the virtual hub.
- Name: The name by which you want the virtual hub to be known.
- Hub private address space: The hub's address range in CIDR notation. The minimum address space is /24 to create a hub.
- Virtual hub capacity: Select from the dropdown. For more information, see Virtual hub settings.
Point to site page
Click the Point to site tab to open the configuration page for point-to-site. To view the point to site settings, click Yes.
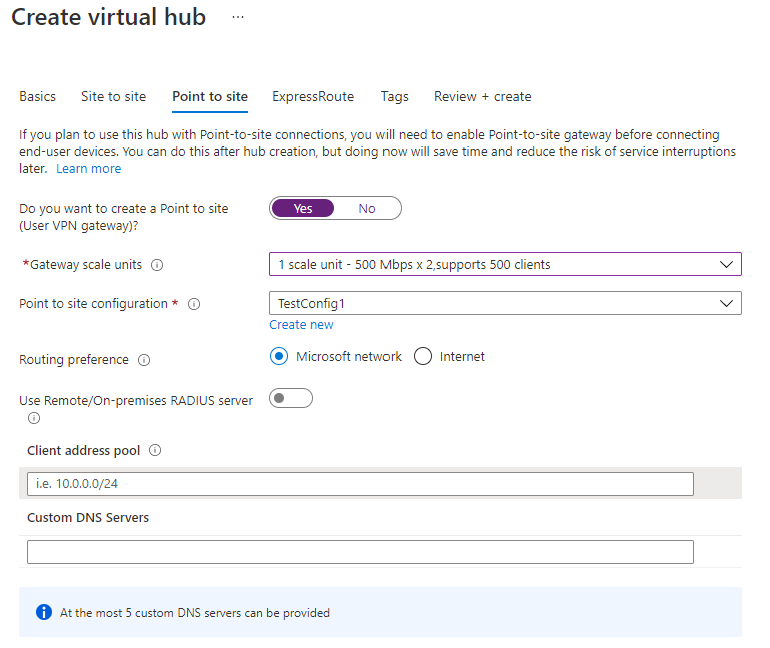
Configure the following settings:
Gateway scale units - This represents the aggregate capacity of the User VPN gateway. If you select 40 or more gateway scale units, plan your client address pool accordingly. For information about how this setting impacts the client address pool, see About client address pools. For information about gateway scale units, see the FAQ.
Point to site configuration - Select the User VPN configuration that you created in a previous step.
Use Remote/On-premises RADIUS server - When a Virtual WAN User VPN gateway is configured to use RADIUS-based authentication, the User VPN gateway acts as a proxy and sends RADIUS access requests to your RADIUS server. The "Use Remote/On-premises RADIUS server" setting is disabled by default, meaning the User VPN gateway will only be able to forward authentication requests to RADIUS servers in virtual networks connected to the gateway's hub. Enabling the setting will enable the User VPN gateway to authenticate with RADIUS servers connected to remote hubs or deployed on-premises.
Note
The Remote/On-premises RADIUS server setting and related proxy IPs are only used if the Gateway is configured to use RADIUS-based authentication. If the Gateway is not configured to use RADIUS-based authentication, this setting will be ignored.
You must turn on "Use Remote/On-premises RADIUS server" if users will connect to the global VPN profile instead of the hub-based profile. For more information, see global and hub-level profiles.
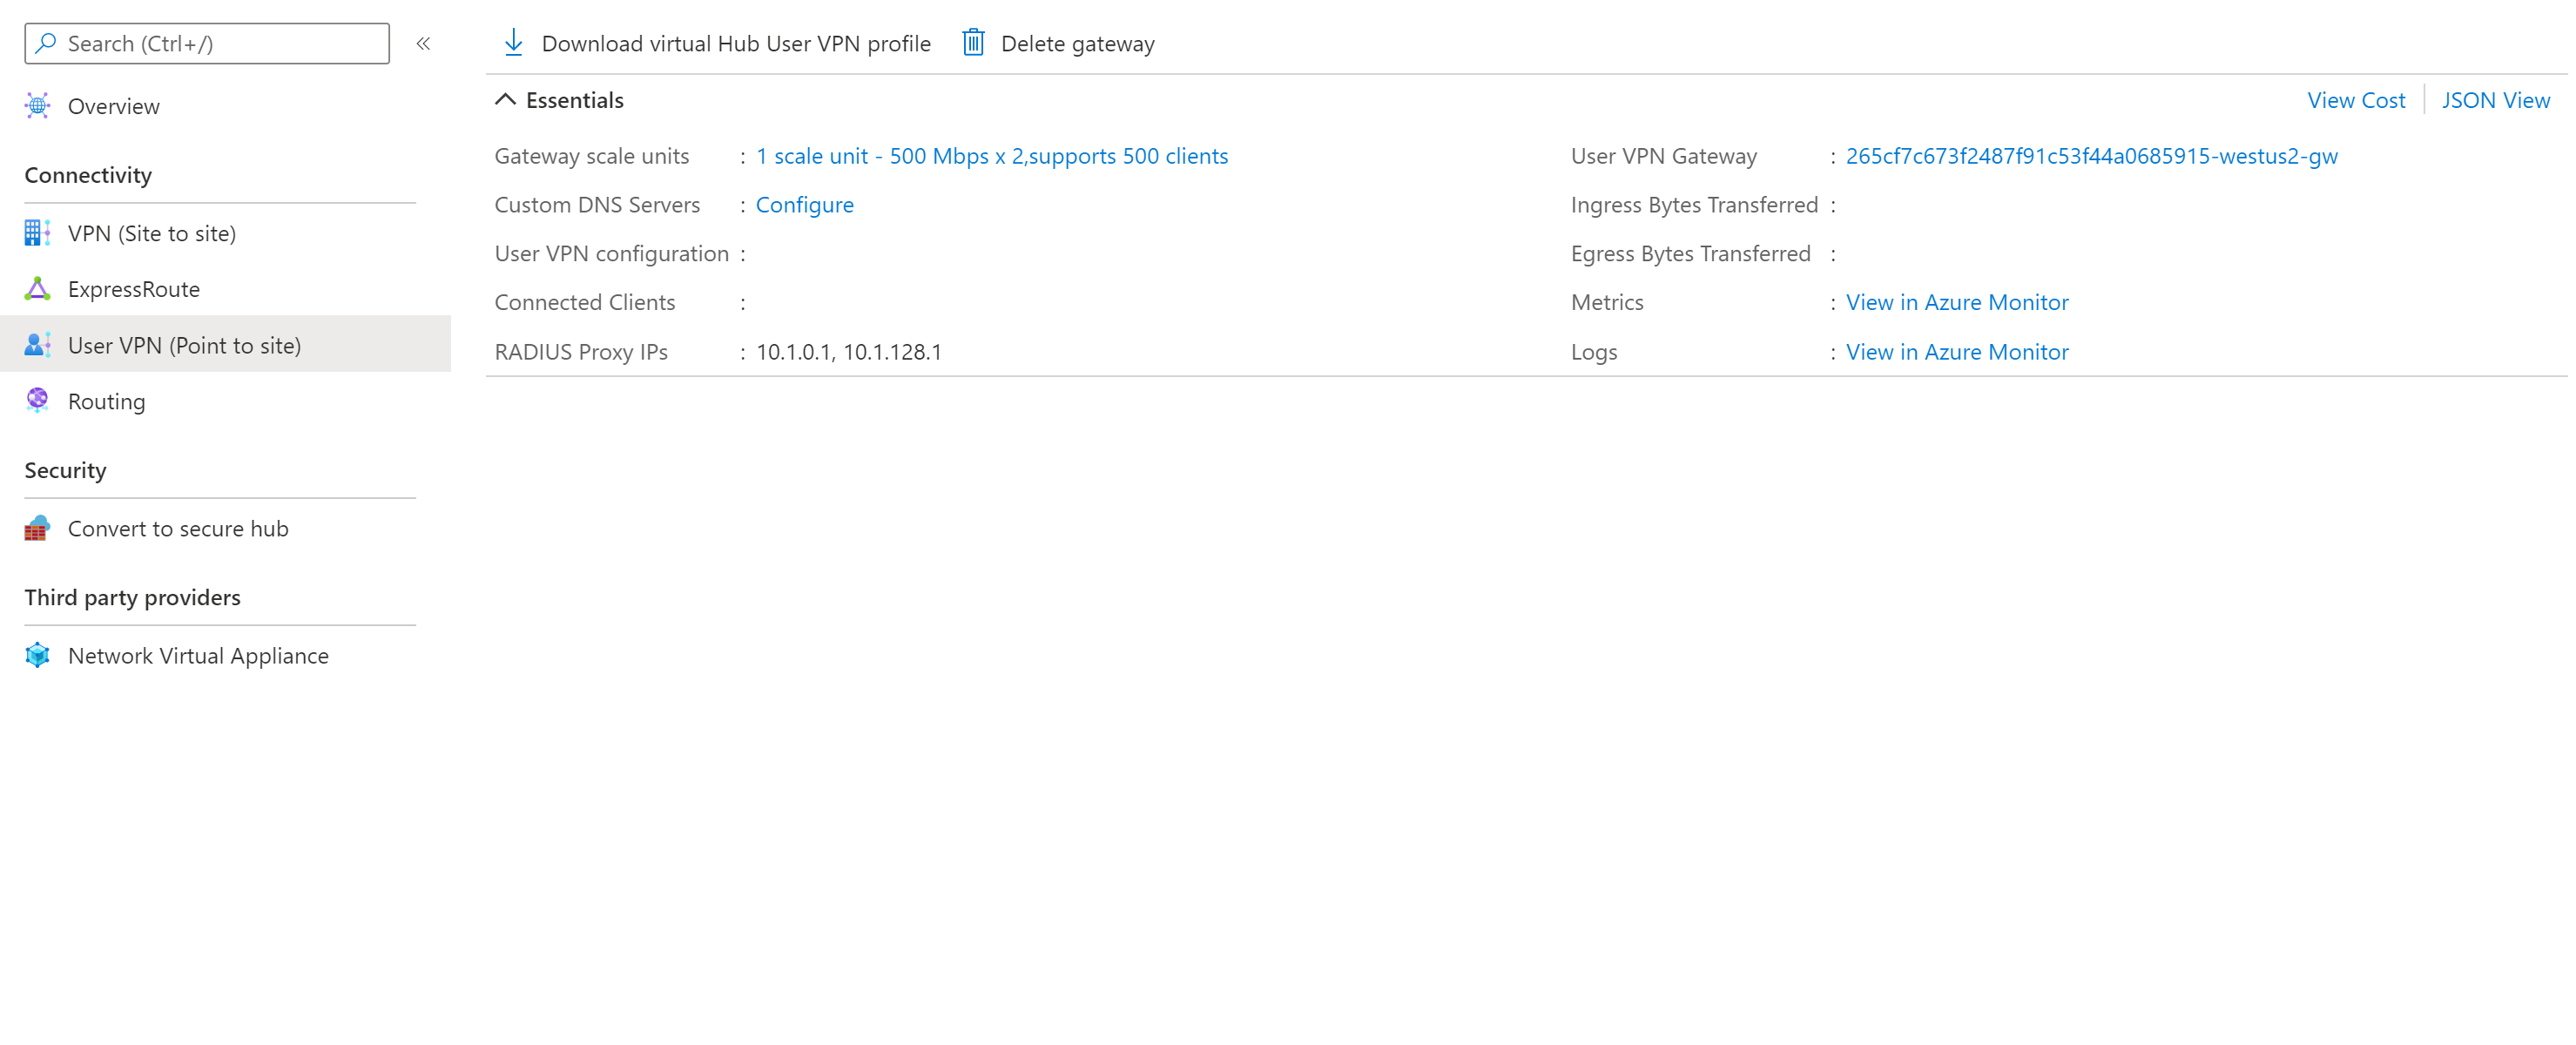
After you create the User VPN gateway, go to gateway and note the RADIUS proxy IPs field. The RADIUS proxy IPs are the source IPs of the RADIUS packets the User VPN gateway sends to your RADIUS server. Therefore, your RADIUS server needs to be configured to accept authentication requests from the RADIUS proxy IPs. If the RADIUS proxy IPs field is blank or none, configure the RADIUS server to accept authentication requests from the hub's address space.
Additionally, make sure to set the associations and propagations of the connection (VNet or on-premises) hosting the RADIUS server propagates to the defaultRouteTable of the hub deployed with the Point-to-site VPN gateway, and that the Point-to-site VPN configuration propagates to the route table of the connection hosting the RADIUS server. This is mandatory to make sure the gateway can talk to the RADIUS server and vice versa.
Client address pool - The address pool from which IP addresses will be automatically assigned to VPN clients. For more information, see About client address pools.
Custom DNS Servers - The IP address of the DNS server(s) the clients will use. You can specify up to 5.
Select Review + create to validate your settings.
When validation passes, select Create. Creating a hub can take 30 minutes or more to complete.
Generate VPN client configuration files
In this section, you generate and download the configuration profile files. These files are used to configure the native VPN client on the client computer.
To generate a WAN-level global profile VPN client configuration package, go to the virtual WAN (not the virtual hub).
In the left pane, select User VPN configurations.
Select the configuration for which you want to download the profile. If you have multiple hubs assigned to the same profile, expand the profile to show the hubs, then select one of the hubs that uses the profile.
Select Download virtual WAN user VPN profile.
On the download page, select EAPTLS, then Generate and download profile. A profile package (zip file) containing the client configuration settings is generated and downloads to your computer. The contents of the package depend on the authentication and tunnel choices for your configuration.
Configure VPN clients
Use the downloaded profile to configure the remote access clients. The procedure for each operating system is different, follow the instructions that apply to your system.
IKEv2
In the User VPN configuration, if you specified the IKEv2 VPN tunnel type, you can configure the native VPN client (Windows and macOS Catalina or later).
The following steps are for Windows. For macOS, see Configure P2S User VPN clients - native VPN client - macOS steps.
Select the VPN client configuration files that correspond to the architecture of the Windows computer. For a 64-bit processor architecture, choose the 'VpnClientSetupAmd64' installer package. For a 32-bit processor architecture, choose the 'VpnClientSetupX86' installer package.
Double-click the package to install it. If you see a SmartScreen popup, select More info, then Run anyway.
On the client computer, navigate to Network Settings and select VPN. The VPN connection shows the name of the virtual network that it connects to.
Install a client certificate on each computer that you want to connect via this User VPN configuration. A client certificate is required for authentication when using the native Azure certificate authentication type. For more information about generating certificates, see Generate Certificates. For information about how to install a client certificate, see Install a client certificate.
OpenVPN
In the User VPN configuration, if you specified the OpenVPN tunnel type, you can download and configure the Azure VPN Client or, in some cases, you can use OpenVPN client software. For steps, use the link that corresponds to your configuration.
Connect the spoke VNet
In this section, you create a connection between your hub and the spoke VNet.
In the Azure portal, go to your Virtual WAN In the left pane, select Virtual network connections.
On the Virtual network connections page, select + Add connection.
On the Add connection page, configure the connection settings. For information about routing settings, see About routing.
- Connection name: Name your connection.
- Hubs: Select the hub you want to associate with this connection.
- Subscription: Verify the subscription.
- Resource group: Select the resource group that contains the virtual network to which you want to connect.
- Virtual network: Select the virtual network you want to connect to this hub. The virtual network you select can't have an already existing virtual network gateway.
- Propagate to none: This is set to No by default. Changing the switch to Yes makes the configuration options for Propagate to Route Tables and Propagate to labels unavailable for configuration.
- Associate Route Table: From the dropdown, you can select a route table that you want to associate.
- Propagate to labels: Labels are a logical group of route tables. For this setting, select from the dropdown.
- Static routes: Configure static routes, if necessary. Configure static routes for Network Virtual Appliances (if applicable). Virtual WAN supports a single next hop IP for static route in a virtual network connection. For example, if you have a separate virtual appliance for ingress and egress traffic flows, it would be best to have the virtual appliances in separate VNets and attach the VNets to the virtual hub.
- Bypass Next Hop IP for workloads within this VNet: This setting lets you deploy NVAs and other workloads into the same VNet without forcing all the traffic through the NVA. This setting can only be configured when you're configuring a new connection. If you want to use this setting for a connection you've already created, delete the connection, then add a new connection.
Once you've completed the settings you want to configure, click Create to create the connection.
Create virtual machines
In this section, you create two VMs in your VNet, VM1 and VM2. In the network diagram, we use 10.18.0.4 and 10.18.0.5. When configuring your VMs, make sure to select the virtual network that you created (found on the Networking tab). For steps to create a VM, see Quickstart: Create a VM.
Secure the virtual hub
A standard virtual hub has no built-in security policies to protect the resources in spoke virtual networks. A secured virtual hub uses Azure Firewall or a third-party provider to manage incoming and outgoing traffic to protect your resources in Azure.
Convert the hub to a secured hub using the following article: Configure Azure Firewall in a Virtual WAN hub.
Create rules to manage and filter traffic
Create rules that dictate the behavior of Azure Firewall. By securing the hub, we ensure that all packets that enter the virtual hub are subject to firewall processing before accessing your Azure resources.
Once you complete these steps, you'll have created an architecture that allows VPN users to access the VM with private IP address 10.18.0.4, but NOT access the VM with private IP address 10.18.0.5
In the Azure portal, navigate to Firewall Manager.
Under Security, select Azure Firewall policies.
Select Create Azure Firewall Policy.
Under Policy details, type in a name and select the region your virtual hub is deployed in.
Select Next: DNS Settings.
Select Next: Rules.
On the Rules tab, select Add a rule collection.
Provide a name for the collection. Set the type as Network. Add a priority value 100.
Fill in the name of the rule, source type, source, protocol, destination ports, and destination type, as shown in the following example. Then, select add. This rule allows any IP address from the VPN client pool to access the VM with private IP address 10.18.04, but not any other resource connected to the virtual hub. Create any rules you want that fit your desired architecture and permissions rules.

Select Next: Threat intelligence.
Select Next: Hubs.
On the Hubs tab, select Associate virtual hubs.
Select the virtual hub you created earlier, and then select Add.
Select Review + create.
Select Create.
It can take 5 minutes or more for this process to complete.
Route traffic through Azure Firewall
In this section, you need to ensure that the traffic is routed through Azure Firewall.
- In the portal, from Firewall Manager, select Secured virtual hubs.
- Select the virtual hub you created.
- Under Settings, select Security configuration.
- Under Private traffic, select Send via Azure Firewall.
- Verify that the VNet connection and the Branch connection private traffic is secured by Azure Firewall.
- Select Save.
Note
If you want to inspect traffic destined to private endpoints using Azure Firewall in a secured virtual hub, see Secure traffic destined to private endpoints in Azure Virtual WAN. You need to add /32 prefix for each private endpoint in the Private traffic prefixes under Security configuration of your Azure Firewall manager for them to be inspected via Azure Firewall in secured virtual hub. If these /32 prefixes are not configured, traffic destined to private endpoints will bypass Azure Firewall.
Validate
Verify the setup of your secured hub.
- Connect to the Secured Virtual Hub via VPN from your client device.
- Ping the IP address 10.18.0.4 from your client. You should see a response.
- Ping the IP address 10.18.0.5 from your client. You shouldn't be able to see a response.
Considerations
- Make sure that the Effective Routes Table on the secured virtual hub has the next hop for private traffic by the firewall. To access the Effective Routes Table, navigate to your Virtual Hub resource. Under Connectivity, select Routing, and then select Effective Routes. From there, select the Default Route table.
- Verify that you created rules in the Create Rules section. If these steps are missed, the rules you created won't actually be associated to the hub and the route table and packet flow won't use Azure Firewall.
Next steps
- For more information about Virtual WAN, see the Virtual WAN FAQ.
- For more information about Azure Firewall, see the Azure Firewall FAQ.

