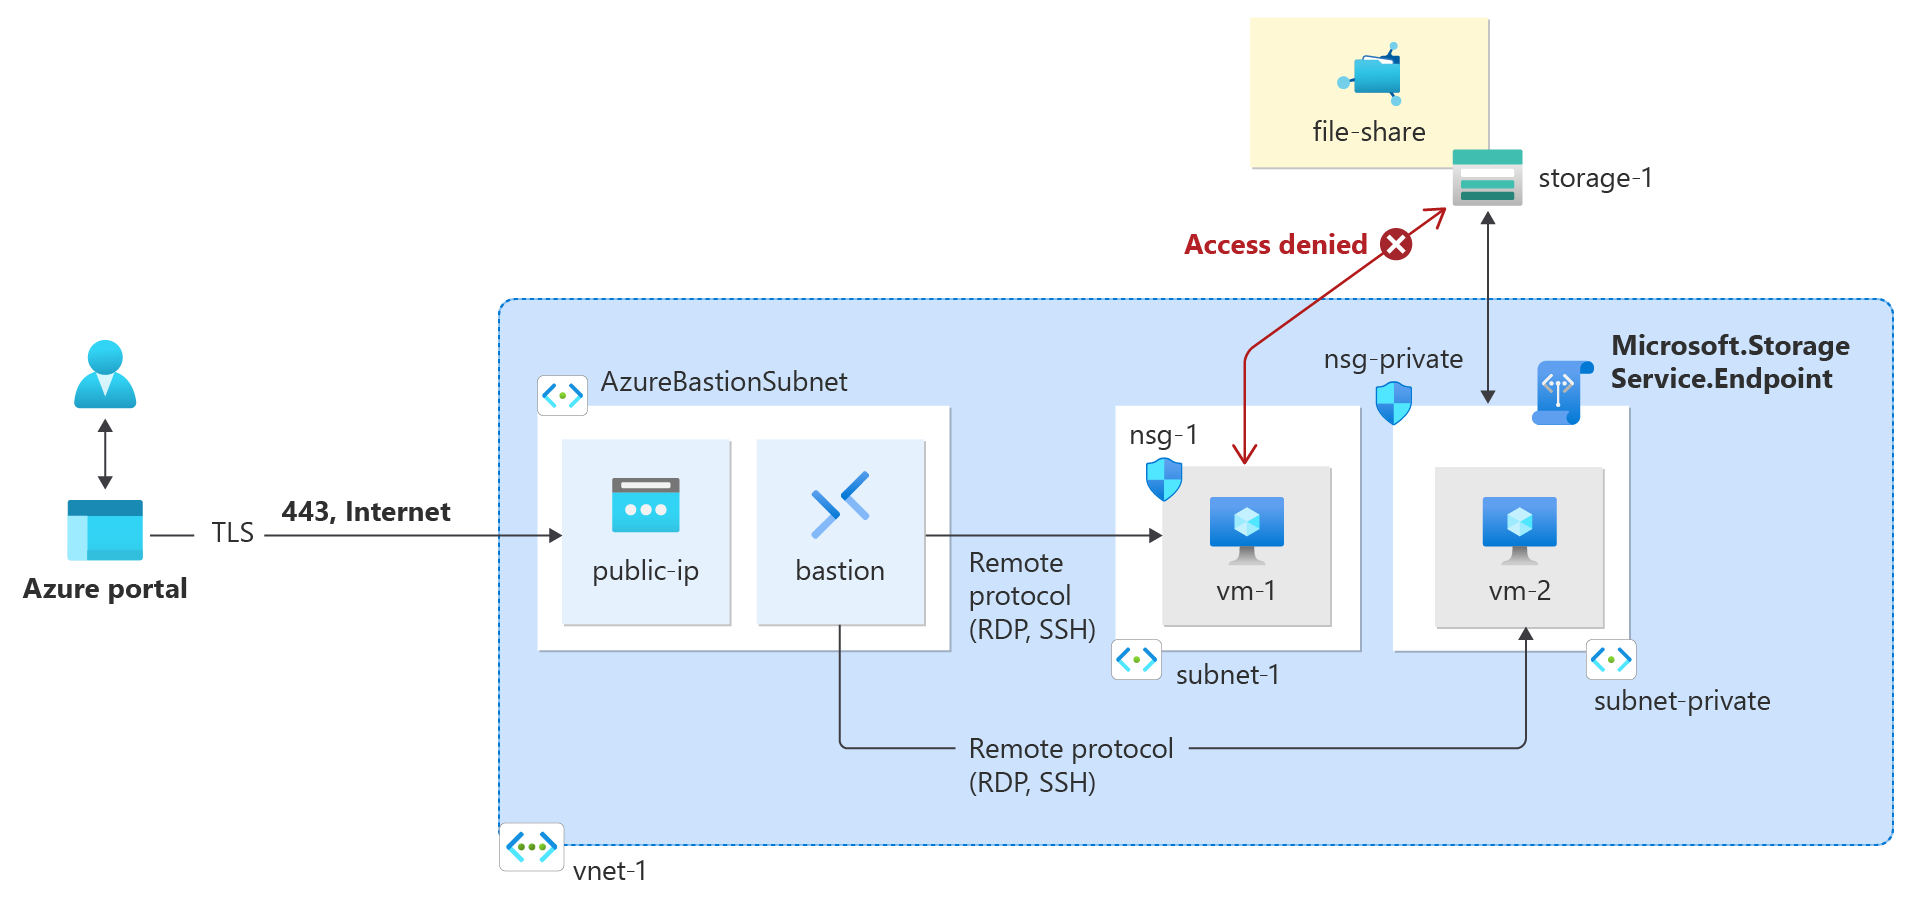
Virtual network service endpoints enable you to limit network access to some Azure service resources to a virtual network subnet. You can also remove internet access to the resources. Service endpoints provide direct connection from your virtual network to supported Azure services, allowing you to use your virtual network's private address space to access the Azure services. Traffic destined to Azure resources through service endpoints always stays on the Azure backbone network.
In this tutorial, you learn how to:
- Create a virtual network with one subnet
- Add a subnet and enable a service endpoint
- Create an Azure resource and allow network access to it from only a subnet
- Deploy a virtual machine (VM) to each subnet
- Confirm access to a resource from a subnet
- Confirm access is denied to a resource from a subnet and the internet
Prerequisites
If you don't have an Azure subscription, create a Trial before you begin.
If you choose to install and use PowerShell locally, this article requires the Azure PowerShell module version 1.0.0 or later. Run Get-Module -ListAvailable Az to find the installed version. If you need to upgrade, see Install Azure PowerShell module. If you're running PowerShell locally, you also need to run Connect-AzAccount -Environment AzureChinaCloud to create a connection with Azure.
If you don't have an Azure trail subscription, create a trial subscription before you begin.
You can use the local Azure CLI.
- This article requires version 2.0.28 or later of the Azure CLI.
Enable a service endpoint
Create a virtual network and an Azure Bastion host
The following procedure creates a virtual network with a resource subnet, an Azure Bastion subnet, and a Bastion host:
In the portal, search for and select Virtual networks.
On the Virtual networks page, select + Create.
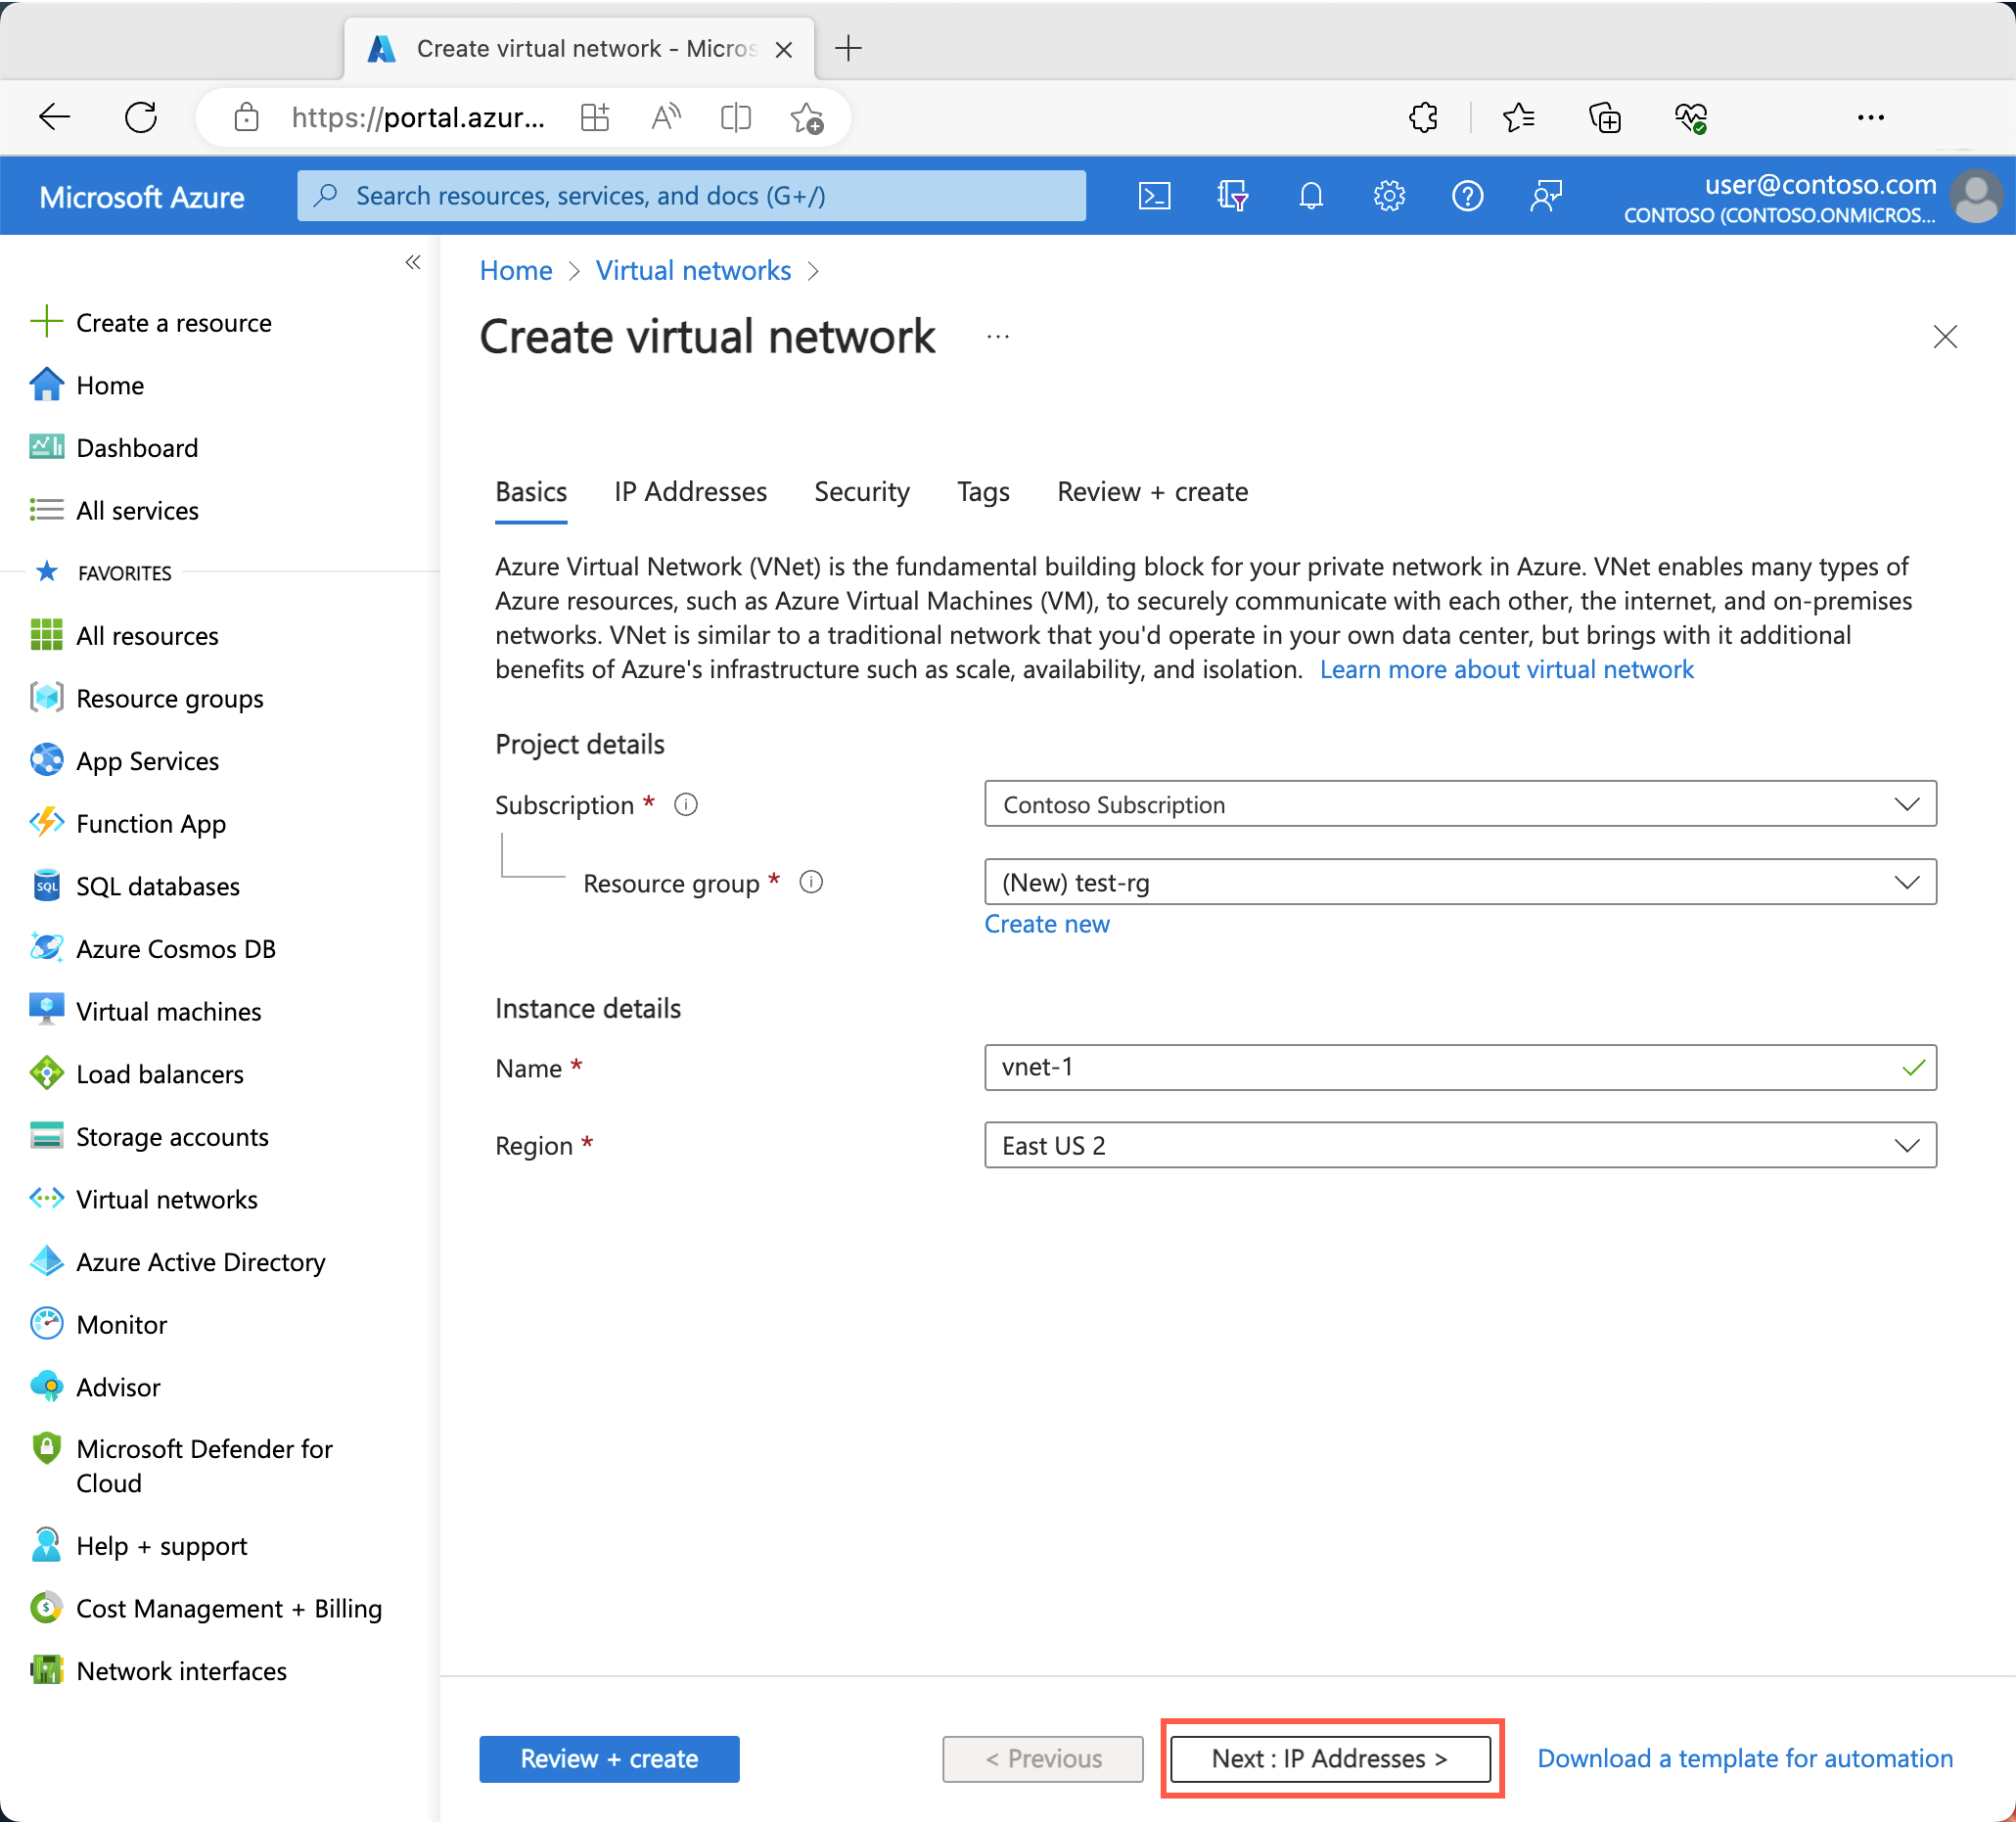
On the Basics tab of Create virtual network, enter or select the following information:
| Setting |
Value |
| Project details |
|
| Subscription |
Select your subscription. |
| Resource group |
Select Create new.
Enter test-rg for the name.
Select OK. |
| Instance details |
|
| Name |
Enter vnet-1. |
| Region |
Select (Asia Pacific) China East 2. |
Select Next to proceed to the Security tab.
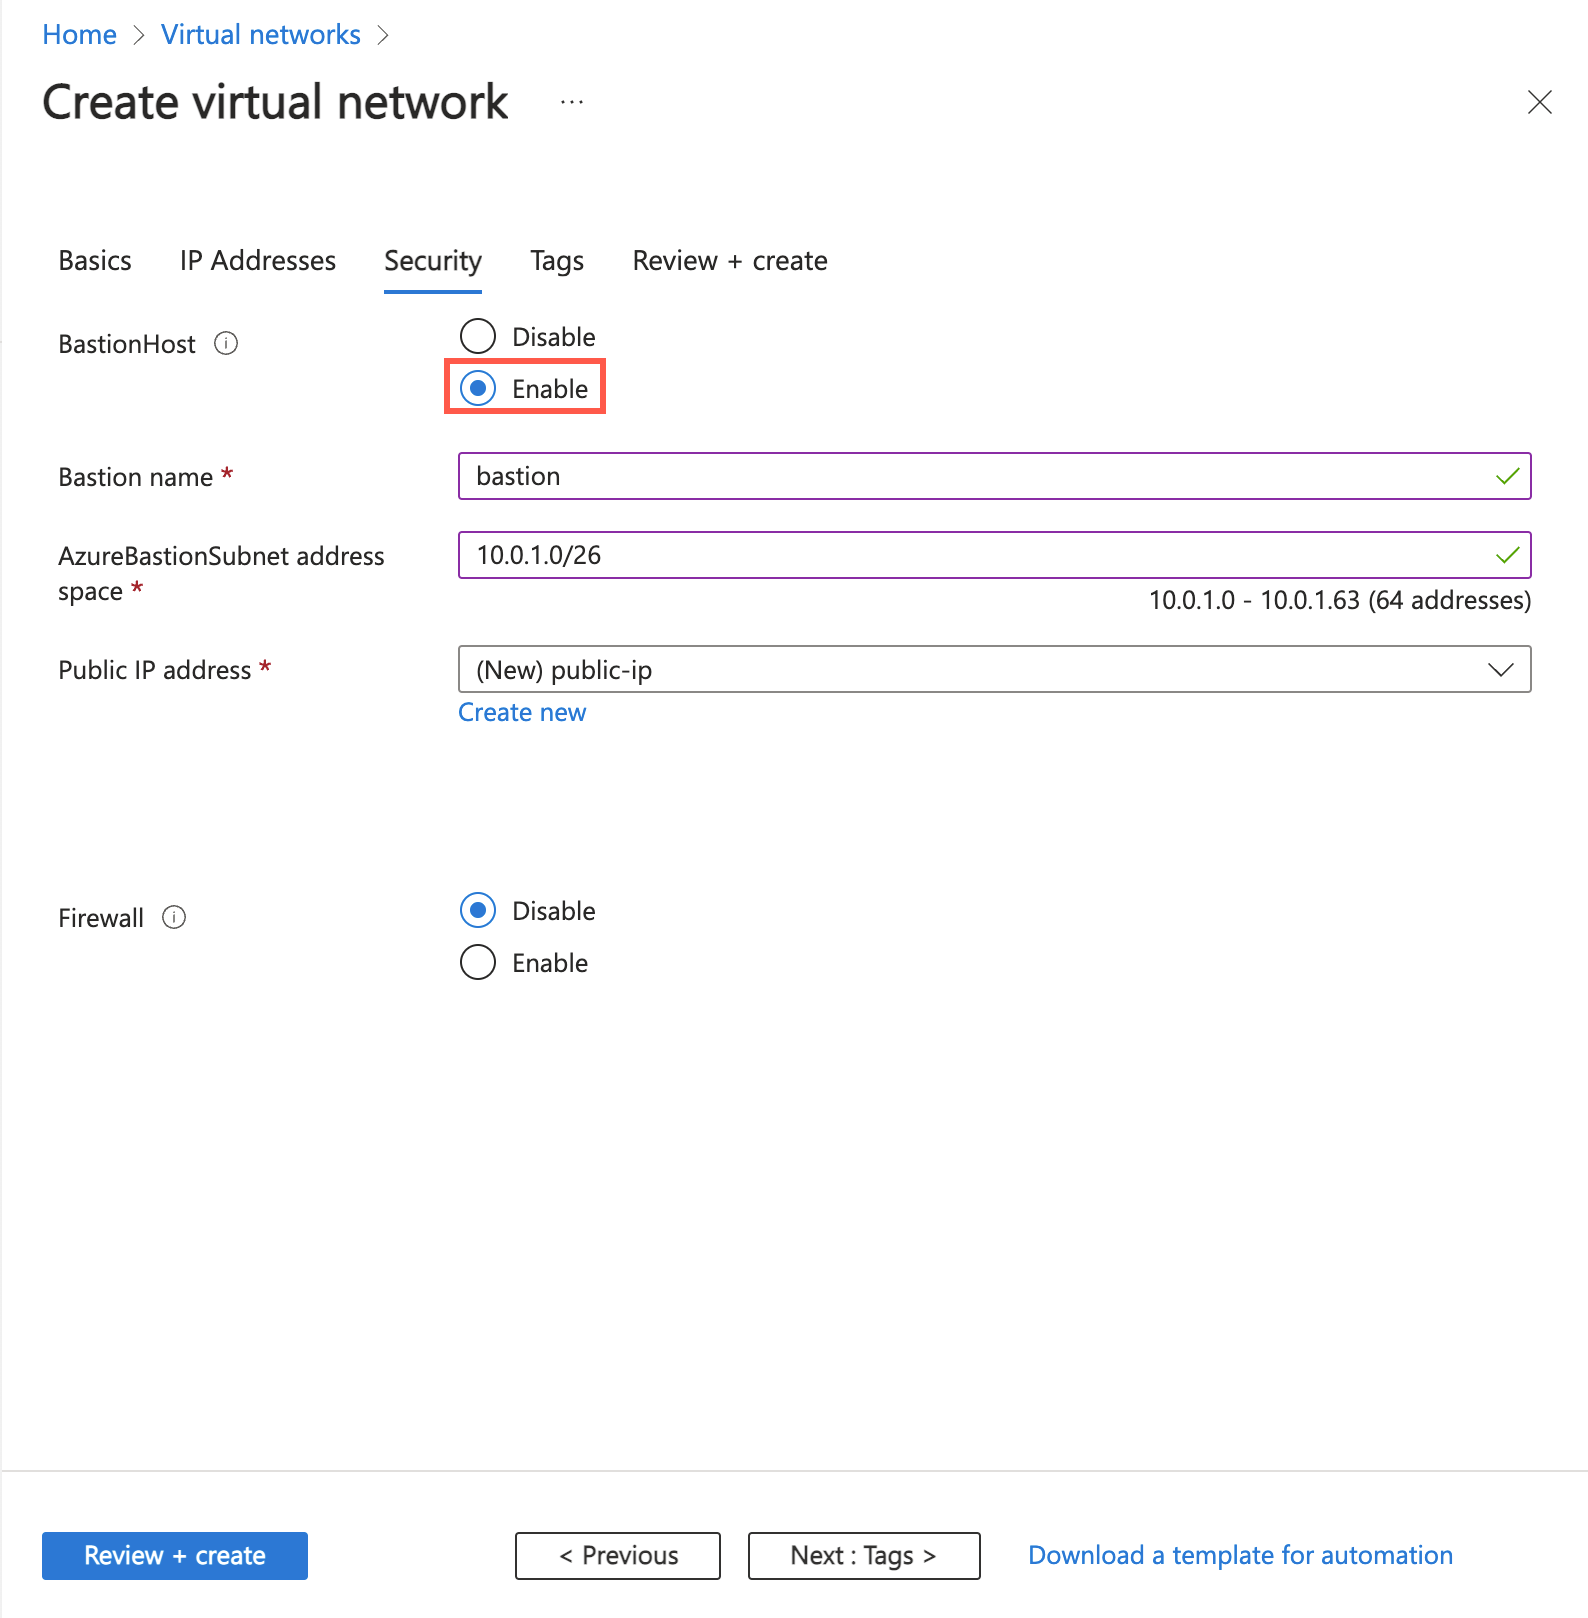
In the Azure Bastion section, select Enable Bastion.
Bastion uses your browser to connect to VMs in your virtual network over Secure Shell (SSH) or Remote Desktop Protocol (RDP) by using their private IP addresses. The VMs don't need public IP addresses, client software, or special configuration. For more information, see What is Azure Bastion?.
Note
Hourly pricing starts from the moment that Bastion is deployed, regardless of outbound data usage. For more information, see Pricing and SKUs. If you're deploying Bastion as part of a tutorial or test, we recommend that you delete this resource after you finish using it.
In Azure Bastion, enter or select the following information:
| Setting |
Value |
| Azure Bastion host name |
Enter bastion. |
| Azure Bastion public IP address |
Select Create a public IP address.
Enter public-ip-bastion in Name.
Select OK. |
Select Next to proceed to the IP Addresses tab.
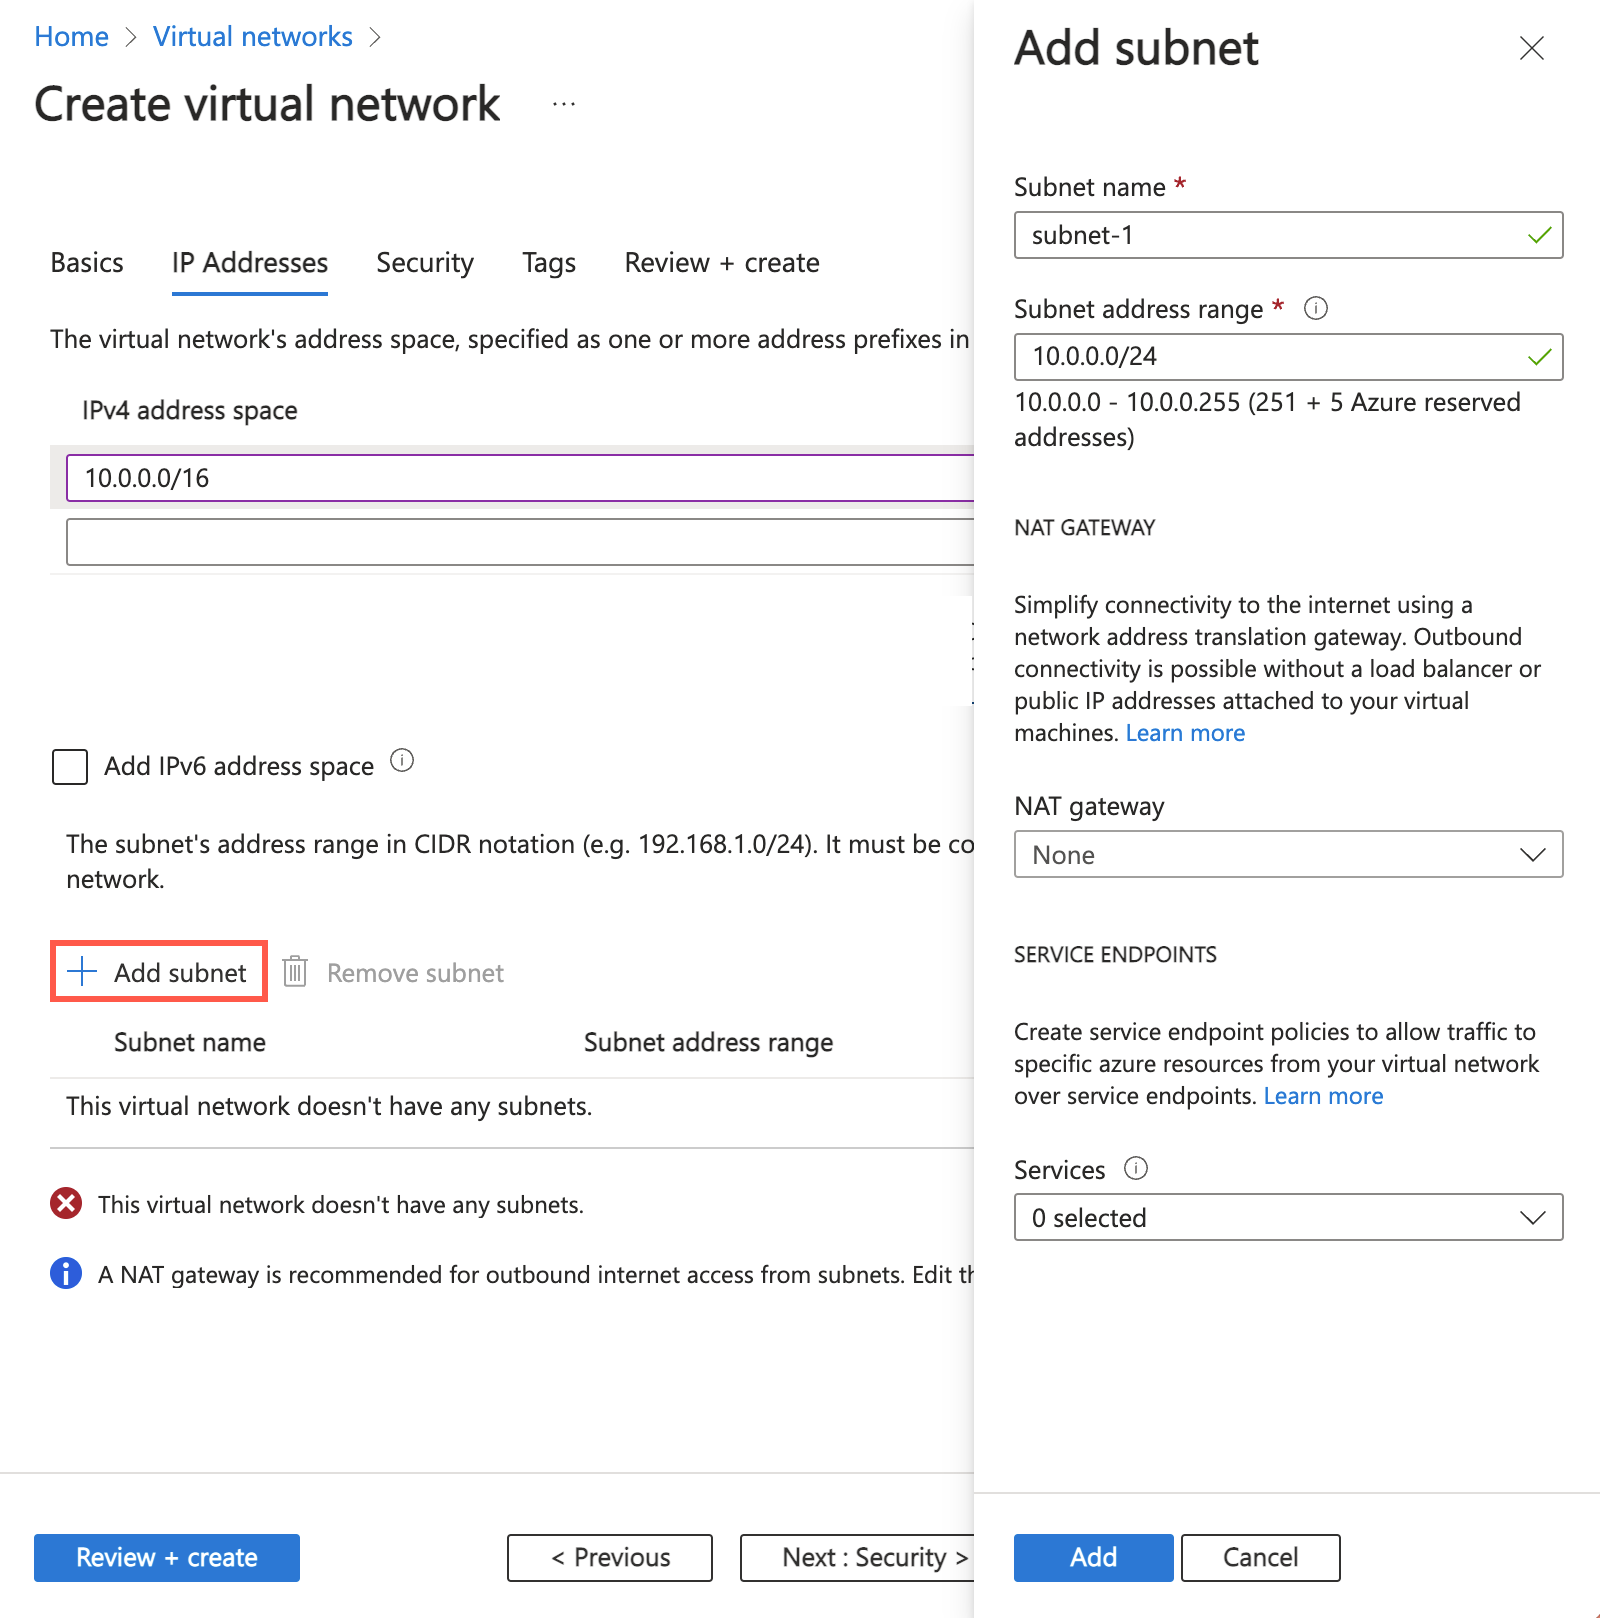
In the address space box in Subnets, select the default subnet.
In Edit subnet, enter or select the following information:
| Setting |
Value |
| Subnet details |
|
| Subnet template |
Leave the default of Default. |
| Name |
Enter subnet-1. |
| Starting address |
Leave the default of 10.0.0.0. |
| Subnet size |
Leave the default of /24 (256 addresses). |
Select Save.
Select Review + create at the bottom of the window. When validation passes, select Create.
Service endpoints are enabled per service, per subnet.
In the search box at the top of the portal page, search for Virtual network. Select Virtual networks in the search results.
In Virtual networks, select vnet-1.
In the Settings section of vnet-1, select Subnets.
Select + Subnet.
On the Add subnet page, enter, or select the following information:
| Setting |
Value |
| Name |
subnet-private |
| Subnet address range |
Leave the default of 10.0.2.0/24. |
| SERVICE ENDPOINTS |
|
| Services |
Select Microsoft.Storage |
Select Save.
Caution
Before enabling a service endpoint for an existing subnet that has resources in it, see Change subnet settings.
Create a virtual network
Before creating a virtual network, you have to create a resource group for the virtual network, and all other resources created in this article. Create a resource group with New-AzResourceGroup. The following example creates a resource group named test-rg:
$rg = @{
    ResourceGroupName = "test-rg"
    Location = "chinanorth3"
}
New-AzResourceGroup @rg
Create a virtual network with New-AzVirtualNetwork. The following example creates a virtual network named vnet-1 with the address prefix 10.0.0.0/16.
$vnet = @{
    ResourceGroupName = "test-rg"
    Location = "chinanorth3"
    Name = "vnet-1"
    AddressPrefix = "10.0.0.0/16"
}
$virtualNetwork = New-AzVirtualNetwork @vnet
Create a subnet configuration with New-AzVirtualNetworkSubnetConfig. The following example creates a subnet configuration for a subnet named subnet-public:
$subpub = @{
    Name = "subnet-public"
    AddressPrefix = "10.0.0.0/24"
    VirtualNetwork = $virtualNetwork
}
$subnetConfigPublic = Add-AzVirtualNetworkSubnetConfig @subpub
Create the subnet in the virtual network by writing the subnet configuration to the virtual network with Set-AzVirtualNetwork:
$virtualNetwork | Set-AzVirtualNetwork
Create another subnet in the virtual network. In this example, a subnet named subnet-private is created with a service endpoint for Microsoft.Storage:
$subpriv = @{
    Name = "subnet-private"
    AddressPrefix = "10.0.2.0/24"
    VirtualNetwork = $virtualNetwork
    ServiceEndpoint = "Microsoft.Storage"
}
$subnetConfigPrivate = Add-AzVirtualNetworkSubnetConfig @subpriv

$virtualNetwork | Set-AzVirtualNetwork
Deploy Azure Bastion
Azure Bastion uses your browser to connect to VMs in your virtual network over Secure Shell (SSH) or Remote Desktop Protocol (RDP) by using their private IP addresses. The VMs don't need public IP addresses, client software, or special configuration. For more information about Bastion, see What is Azure Bastion?.
Hourly pricing starts from the moment that Bastion is deployed, regardless of outbound data usage. For more information, see Pricing and SKUs. If you're deploying Bastion as part of a tutorial or test, we recommend that you delete this resource after you finish using it.
Configure a Bastion subnet for your virtual network. This subnet is reserved exclusively for Bastion resources and must be named AzureBastionSubnet.
$subnet = @{
    Name = 'AzureBastionSubnet'
    VirtualNetwork = $virtualNetwork
    AddressPrefix = '10.0.1.0/26'
}
$subnetConfig = Add-AzVirtualNetworkSubnetConfig @subnet
Set the configuration:
$virtualNetwork | Set-AzVirtualNetwork
Create a public IP address for Bastion. The Bastion host uses the public IP to access SSH and RDP over port 443.
$ip = @{
        ResourceGroupName = 'test-rg'
        Name = 'public-ip'
        Location = 'chinanorth3'
        AllocationMethod = 'Static'
        Sku = 'Standard'
        Zone = 1,2,3
}
New-AzPublicIpAddress @ip
Use the New-AzBastion command to create a new standard Bastion host in AzureBastionSubnet:
$bastion = @{
    Name = 'bastion'
    ResourceGroupName = 'test-rg'
    PublicIpAddressRgName = 'test-rg'
    PublicIpAddressName = 'public-ip'
    VirtualNetworkRgName = 'test-rg'
    VirtualNetworkName = 'vnet-1'
    Sku = 'Basic'
}
New-AzBastion @bastion -AsJob
It takes about 10 minutes to deploy the Bastion resources. You can create VMs in the next section while Bastion deploys to your virtual network.
Create a virtual network
Before creating a virtual network, you have to create a resource group for the virtual network, and all other resources created in this article. Create a resource group with az group create. The following example creates a resource group named test-rg in the chinanorth3 location.
az group create \
  --name test-rg \
  --location chinanorth3
Create a virtual network with one subnet with az network vnet create.
az network vnet create \
  --name vnet-1 \
  --resource-group test-rg \
  --address-prefix 10.0.0.0/16 \
  --subnet-name subnet-public \
  --subnet-prefix 10.0.0.0/24
You can enable service endpoints only for services that support service endpoints. View service endpoint-enabled services available in an Azure location with az network vnet list-endpoint-services. The following example returns a list of service-endpoint-enabled services available in the chinanorth3 region. The list of services returned will grow over time, as more Azure services become service endpoint enabled.
az network vnet list-endpoint-services \
  --location chinanorth3 \
  --out table
Create another subnet in the virtual network with az network vnet subnet create. In this example, a service endpoint for Microsoft.Storage is created for the subnet:
az network vnet subnet create \
  --vnet-name vnet-1 \
  --resource-group test-rg \
  --name subnet-private \
  --address-prefix 10.0.1.0/24 \
  --service-endpoints Microsoft.Storage
Restrict network access for a subnet
By default, all virtual machine instances in a subnet can communicate with any resources. You can limit communication to and from all resources in a subnet by creating a network security group, and associating it to the subnet.
In the search box at the top of the portal page, search for Network security group. Select Network security groups in the search results.
In Network security groups, select + Create.
In the Basics tab of Create network security group, enter, or select the following information:
| Setting |
Value |
| Project details |
|
| Subscription |
Select your subscription. |
| Resource group |
Select test-rg. |
| Instance details |
|
| Name |
Enter nsg-storage. |
| Region |
Select China North 3. |
Select Review + create, then select Create.
Create a network security group with New-AzNetworkSecurityGroup. The following example creates a network security group named nsg-private.
$nsgpriv = @{
    ResourceGroupName = 'test-rg'
    Location = 'chinanorth3'
    Name = 'nsg-private'
}
$nsg = New-AzNetworkSecurityGroup @nsgpriv
Create a network security group with az network nsg create. The following example creates a network security group named nsg-private.
az network nsg create \
  --resource-group test-rg \
  --name nsg-private
Create outbound Network Security Group (NSG) rules
In the search box at the top of the portal page, search for Network security group. Select Network security groups in the search results.
Select nsg-storage.
Select Outbound security rules in Settings.
Select + Add.
Create a rule that allows outbound communication to the Azure Storage service. Enter or select the following information in Add outbound security rule:
| Setting |
Value |
| Source |
Select Service Tag. |
| Source service tag |
Select VirtualNetwork. |
| Source port ranges |
Leave the default of *. |
| Destination |
Select Service Tag. |
| Destination service tag |
Select Storage. |
| Service |
Leave default of Custom. |
| Destination port ranges |
Enter 445. |
| Protocol |
Select Any. |
| Action |
Select Allow. |
| Priority |
Leave the default of 100. |
| Name |
Enter allow-storage-all. |
Select + Add.
Create another outbound security rule that denies communication to the internet. This rule overrides a default rule in all network security groups that allows outbound internet communication. Complete the previous steps with the following values in Add outbound security rule:
| Setting |
Value |
| Source |
Select Service Tag. |
| Source service tag |
Select VirtualNetwork. |
| Source port ranges |
Leave the default of *. |
| Destination |
Select Service Tag. |
| Destination service tag |
Select Internet. |
| Service |
Leave default of Custom. |
| Destination port ranges |
Enter *. |
| Protocol |
Select Any. |
| Action |
Select Deny. |
| Priority |
Leave the default 110. |
| Name |
Enter deny-internet-all. |
Select Add.
In the search box at the top of the portal page, search for Network security group. Select Network security groups in the search results.
Select nsg-storage.
Select Subnets in Settings.
Select + Associate.
In Associate subnet, select vnet-1 in Virtual network. Select subnet-private in Subnet.
Select OK.
Create network security group security rules with New-AzNetworkSecurityRuleConfig. The following rule allows outbound access to the public IP addresses assigned to the Azure Storage service:
$r1 = @{
    Name = "Allow-Storage-All"
    Access = "Allow"
    DestinationAddressPrefix = "Storage"
    DestinationPortRange = "*"
    Direction = "Outbound"
    Priority = 100
    Protocol = "*"
    SourceAddressPrefix = "VirtualNetwork"
    SourcePortRange = "*"
}

$rule1 = New-AzNetworkSecurityRuleConfig @r1
The following rule denies access to all public IP addresses. The previous rule overrides this rule, due to its higher priority, which allows access to the public IP addresses of Azure Storage.
$r2 = @{
    Name = "Deny-Internet-All"
    Access = "Deny"
    DestinationAddressPrefix = "Internet"
    DestinationPortRange = "*"
    Direction = "Outbound"
    Priority = 110
    Protocol = "*"
    SourceAddressPrefix = "VirtualNetwork"
    SourcePortRange = "*"
}
$rule2 = New-AzNetworkSecurityRuleConfig @r2
Use Get-AzNetworkSecurityGroup to retrieve the network security group object into a variable. Use Set-AzNetworkSecurityRuleConfig to add the rules to the network security group.
# Retrieve the existing network security group
$nsgpriv = @{
    ResourceGroupName = 'test-rg'
    Name = 'nsg-private'
}
$nsg = Get-AzNetworkSecurityGroup @nsgpriv

# Add the new rules to the security group
$nsg.SecurityRules += $rule1
$nsg.SecurityRules += $rule2

# Update the network security group with the new rules
Set-AzNetworkSecurityGroup -NetworkSecurityGroup $nsg
Associate the network security group to the subnet-private subnet with Set-AzVirtualNetworkSubnetConfig and then write the subnet configuration to the virtual network. The following example associates the nsg-private network security group to the subnet-private subnet:
$subnet = @{
    VirtualNetwork = $VirtualNetwork
    Name = "subnet-private"
    AddressPrefix = "10.0.2.0/24"
    ServiceEndpoint = "Microsoft.Storage"
    NetworkSecurityGroup = $nsg
}
Set-AzVirtualNetworkSubnetConfig @subnet

$virtualNetwork | Set-AzVirtualNetwork
Create security rules with az network nsg rule create. The following rule allows outbound access to the public IP addresses assigned to the Azure Storage service:
az network nsg rule create \
  --resource-group test-rg \
  --nsg-name nsg-private \
  --name Allow-Storage-All \
  --access Allow \
  --protocol "*" \
  --direction Outbound \
  --priority 100 \
  --source-address-prefix "VirtualNetwork" \
  --source-port-range "*" \
  --destination-address-prefix "Storage" \
  --destination-port-range "*"
Each network security group contains several default security rules. The rule that follows overrides a default security rule that allows outbound access to all public IP addresses. The destination-address-prefix "Internet" option denies outbound access to all public IP addresses. The previous rule overrides this rule, due to its higher priority, which allows access to the public IP addresses of Azure Storage.
az network nsg rule create \
  --resource-group test-rg \
  --nsg-name nsg-private \
  --name Deny-Internet-All \
  --access Deny \
  --protocol "*" \
  --direction Outbound \
  --priority 110 \
  --source-address-prefix "VirtualNetwork" \
  --source-port-range "*" \
  --destination-address-prefix "Internet" \
  --destination-port-range "*"
The following rule allows SSH traffic inbound to the subnet from anywhere. The rule overrides a default security rule that denies all inbound traffic from the internet. SSH is allowed to the subnet so that connectivity can be tested in a later step.
az network nsg rule create \
  --resource-group test-rg \
  --nsg-name nsg-private \
  --name Allow-SSH-All \
  --access Allow \
  --protocol Tcp \
  --direction Inbound \
  --priority 120 \
  --source-address-prefix "*" \
  --source-port-range "*" \
  --destination-address-prefix "VirtualNetwork" \
  --destination-port-range "22"
Associate the network security group to the subnet-private subnet with az network vnet subnet update. The following example associates the nsg-private network security group to the subnet-private subnet:
az network vnet subnet update \
  --vnet-name vnet-1 \
  --name subnet-private \
  --resource-group test-rg \
  --network-security-group nsg-private
Restrict network access to a resource
The steps required to restrict network access to resources created through Azure services, which are enabled for service endpoints vary across services. See the documentation for individual services for specific steps for each service. The rest of this tutorial includes steps to restrict network access for an Azure Storage account, as an example.
Create a storage account
Create an Azure Storage account for the steps in this article. If you already have a storage account, you can use it instead.
In the search box at the top of the portal, enter Storage account. Select Storage accounts in the search results.
Select + Create.
On the Basics tab of Create a storage account, enter or select the following information:
| Setting |
Value |
| Project Details |
|
| Subscription |
Select your Azure subscription. |
| Resource Group |
Select test-rg. |
| Instance details |
|
| Storage account name |
Enter storage1. If the name is unavailable, enter a unique name. |
| Location |
Select (Asia Pacific) China North 3. |
| Performance |
Leave the default Standard. |
| Redundancy |
Select Locally-redundant storage (LRS). |
Select Review.
Select Create.
Create an Azure storage account with New-AzStorageAccount. Replace <replace-with-your-unique-storage-account-name> with a name that is unique across all Azure locations, between 3-24 characters in length, using only numbers and lower-case letters.
$storageAcctName = '<replace-with-your-unique-storage-account-name>'

$storage = @{
    Location = 'chinanorth3'
    Name = $storageAcctName
    ResourceGroupName = 'test-rg'
    SkuName = 'Standard_LRS'
    Kind = 'StorageV2'
}
New-AzStorageAccount @storage
After the storage account is created, retrieve the key for the storage account into a variable with Get-AzStorageAccountKey:
$storagekey = @{
  ResourceGroupName = 'test-rg'
  AccountName       = $storageAcctName
}
$storageAcctKey = (Get-AzStorageAccountKey @storagekey).Value[0]
The key is used to create a file share in a later step. Enter $storageAcctKey and note the value. You manually enter it in a later step when you map the file share to a drive in a virtual machine.
The steps necessary to restrict network access to resources created through Azure services enabled for service endpoints varies across services. See the documentation for individual services for specific steps for each service. The remainder of this article includes steps to restrict network access for an Azure Storage account, as an example.
Create a storage account
Create an Azure storage account with az storage account create. Replace <replace-with-your-unique-storage-account-name> with a name that is unique across all Azure locations, between 3-24 characters in length, using only numbers and lower-case letters.
storageAcctName="<replace-with-your-unique-storage-account-name>"

az storage account create \
  --name $storageAcctName \
  --resource-group test-rg \
  --sku Standard_LRS \
  --kind StorageV2
After the storage account is created, retrieve the connection string for the storage account into a variable with az storage account show-connection-string. The connection string is used to create a file share in a later step.
saConnectionString=$(az storage account show-connection-string \
  --name $storageAcctName \
  --resource-group test-rg \
  --query 'connectionString' \
  --out tsv)
Important
Microsoft recommends that you use the most secure authentication flow available. The authentication flow described in this procedure requires a very high degree of trust in the application, and carries risks that are not present in other flows. You should only use this flow when other more secure flows, such as managed identities, aren't viable.
For more information about connecting to a storage account using a managed identity, see Use a managed identity to access Azure Storage.
Create a file share in the storage account
In the search box at the top of the portal, enter Storage account. Select Storage accounts in the search results.
In Storage accounts, select the storage account you created in the previous step.
In Data storage, select File shares.
Select + File share.
Enter or select the following information in New file share:
| Setting |
Value |
| Name |
Enter file-share. |
| Tier |
Leave the default of Transaction optimized. |
Select Next: Backup.
Deselect Enable backup.
Select Review + create, then select Create.
Create a context for your storage account and key with New-AzStorageContext. The context encapsulates the storage account name and account key:
$storagecontext = @{
    StorageAccountName = $storageAcctName
    StorageAccountKey = $storageAcctKey
}
$storageContext = New-AzStorageContext @storagecontext
Create a file share with New-AzStorageShare:
$fs = @{
    Name = "file-share"
    Context = $storageContext
}
$share = New-AzStorageShare @fs
Create a file share in the storage account with az storage share create. In a later step, this file share is mounted to confirm network access to it.
az storage share create \
  --name file-share \
  --quota 2048 \
  --connection-string $saConnectionString > /dev/null
Restrict network access to a subnet
By default, storage accounts accept network connections from clients in any network, including the internet. You can restrict network access from the internet, and all other subnets in all virtual networks (except the subnet-private subnet in the vnet-1 virtual network.)
To restrict network access to a subnet:
In the search box at the top of the portal, enter Storage account. Select Storage accounts in the search results.
Select your storage account.
In Security + networking, select Networking.
In the Firewalls and virtual networks tab, select Enabled from selected virtual networks and IP addresses in Public network access.
In Virtual networks, select + Add existing virtual network.
In Add networks, enter or select the following information:
| Setting |
Value |
| Subscription |
Select your subscription. |
| Virtual networks |
Select vnet-1. |
| Subnets |
Select subnet-private. |
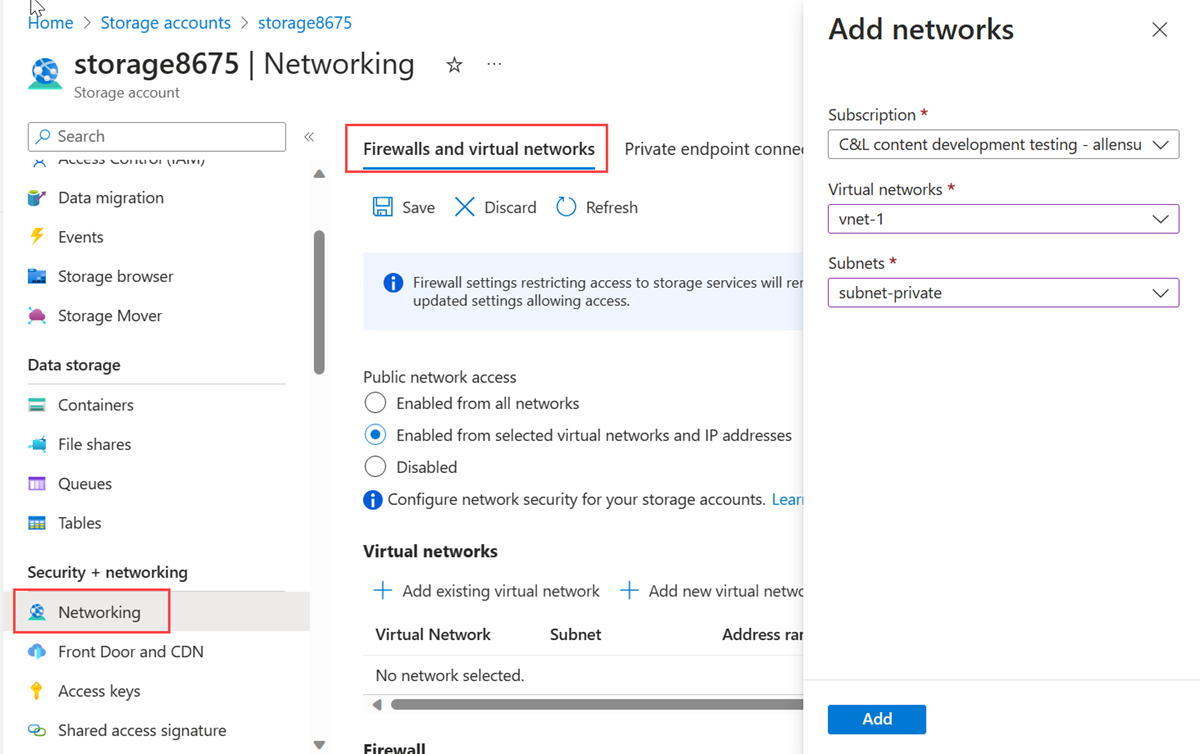
Select Add.
Select Save to save the virtual network configurations.
By default, storage accounts accept network connections from clients in any network. To limit access to selected networks, change the default action to Deny with Update-AzStorageAccountNetworkRuleSet. Once network access is denied, the storage account isn't accessible from any network.
$storagerule = @{
    ResourceGroupName = "test-rg"
    Name = $storageAcctName
    DefaultAction = "Deny"
}
Update-AzStorageAccountNetworkRuleSet @storagerule
Retrieve the created virtual network with Get-AzVirtualNetwork and then retrieve the private subnet object into a variable with Get-AzVirtualNetworkSubnetConfig:
$subnetpriv = @{
    ResourceGroupName = "test-rg"
    Name = "vnet-1"
}
$privateSubnet = Get-AzVirtualNetwork @subnetpriv | Get-AzVirtualNetworkSubnetConfig -Name "subnet-private"
Allow network access to the storage account from the subnet-private subnet with Add-AzStorageAccountNetworkRule.
$storagenetrule = @{
    ResourceGroupName = "test-rg"
    Name = $storageAcctName
    VirtualNetworkResourceId = $privateSubnet.Id
}
Add-AzStorageAccountNetworkRule @storagenetrule
By default, storage accounts accept network connections from clients in any network. To limit access to selected networks, change the default action to Deny with az storage account update. Once network access is denied, the storage account isn't accessible from any network.
az storage account update \
  --name $storageAcctName \
  --resource-group test-rg \
  --default-action Deny
Allow network access to the storage account from the subnet-private subnet with az storage account network-rule add.
az storage account network-rule add \
  --resource-group test-rg \
  --account-name $storageAcctName \
  --vnet-name vnet-1 \
  --subnet subnet-private
Deploy virtual machines to subnets
To test network access to a storage account, deploy a virtual machine to each subnet.
Create test virtual machine
The following procedure creates a test virtual machine (VM) named vm-1 in the virtual network.
In the portal, search for and select Virtual machines.
In Virtual machines, select + Create.
On the Basics tab of Create a virtual machine, enter or select the following information:
| Setting |
Value |
| Project details |
|
| Subscription |
Select your subscription. |
| Resource group |
Select test-rg. |
| Instance details |
|
| Virtual machine name |
Enter vm-1. |
| Region |
Select China East 2. |
| Availability options |
Select No infrastructure redundancy required. |
| Security type |
Leave the default of Standard. |
| Image |
Select Windows Server 2022 Datacenter - x64 Gen2. |
| VM architecture |
Leave the default of x64. |
| Size |
Select a size. |
| Administrator account |
|
| Authentication type |
Select Password. |
| Username |
Enter azureuser. |
| Password |
Enter a password. |
| Confirm password |
Reenter the password. |
| Inbound port rules |
|
| Public inbound ports |
Select None. |
Select the Networking tab at the top of the page.
Enter or select the following information in the Networking tab:
| Setting |
Value |
| Network interface |
|
| Virtual network |
Select vnet-1. |
| Subnet |
Select subnet-1 (10.0.0.0/24). |
| Public IP |
Select None. |
| NIC network security group |
Select Advanced. |
| Configure network security group |
Select Create new.
Enter nsg-1 for the name.
Leave the rest at the defaults and select OK. |
Leave the rest of the settings at the defaults and select Review + create.
Review the settings and select Create.
Note
Virtual machines in a virtual network with a bastion host don't need public IP addresses. Bastion provides the public IP, and the VMs use private IPs to communicate within the network. You can remove the public IPs from any VMs in bastion hosted virtual networks. For more information, see Dissociate a public IP address from an Azure VM.
Note
Azure provides a default outbound access IP for VMs that either aren't assigned a public IP address or are in the backend pool of an internal basic Azure load balancer. The default outbound access IP mechanism provides an outbound IP address that isn't configurable.
The default outbound access IP is disabled when one of the following events happens:
- A public IP address is assigned to the VM.
- The VM is placed in the backend pool of a standard load balancer, with or without outbound rules.
- An Azure Virtual Network NAT gateway resource is assigned to the subnet of the VM.
VMs that you create by using virtual machine scale sets in flexible orchestration mode don't have default outbound access.
For more information about outbound connections in Azure, see Default outbound access in Azure and Use Source Network Address Translation (SNAT) for outbound connections.
Create the second virtual machine
Create a second virtual machine repeating the steps in the previous section. Replace the following values in Create a virtual machine:
| Setting |
Value |
| Virtual machine name |
Enter vm-private. |
| Subnet |
Select subnet-private. |
| Public IP |
Select None. |
| NIC network security group |
Select None. |
Warning
Do not continue to the next step until the deployment is completed.
Create the first virtual machine
Create a virtual machine in the subnet-public subnet with New-AzVM. When running the command that follows, you're prompted for credentials. The values that you enter are configured as the user name and password for the VM.
$vm1 = @{
    ResourceGroupName = "test-rg"
    Location = "chinanorth3"
    VirtualNetworkName = "vnet-1"
    SubnetName = "subnet-public"
    Name = "vm-public"
    PublicIpAddressName  = $null
}
New-AzVm @vm1
Create the second virtual machine
Create a virtual machine in the subnet-private subnet:
$vm2 = @{
    ResourceGroupName = "test-rg"
    Location = "chinanorth3"
    VirtualNetworkName = "vnet-1"
    SubnetName = "subnet-private"
    Name = "vm-private"
    PublicIpAddressName = $null
}
New-AzVm @vm2
It takes a few minutes for Azure to create the VM. Don't continue to the next step until Azure finishes creating the VM and returns output to PowerShell.
To test network access to a storage account, deploy a VM to each subnet.
Create the first virtual machine
Create a VM in the subnet-public subnet with az vm create. If SSH keys don't already exist in a default key location, the command creates them. To use a specific set of keys, use the --ssh-key-value option.
az vm create \
  --resource-group test-rg \
  --name vm-public \
  --image Ubuntu2204 \
  --vnet-name vnet-1 \
  --subnet subnet-public \
  --admin-username azureuser \
  --generate-ssh-keys
The VM takes a few minutes to create. After the VM is created, the Azure CLI shows information similar to the following example:
{
  "fqdns": "",
  "id": "/subscriptions/00000000-0000-0000-0000-000000000000/resourceGroups/test-rg/providers/Microsoft.Compute/virtualMachines/vm-public",
  "location": "westus2",
  "macAddress": "00-0D-3A-23-9A-49",
  "powerState": "VM running",
  "privateIpAddress": "10.0.0.4",
  "publicIpAddress": "203.0.113.24",
  "resourceGroup": "test-rg"
}
Create the second virtual machine
az vm create \
  --resource-group test-rg \
  --name vm-private \
  --image Ubuntu2204 \
  --vnet-name vnet-1 \
  --subnet subnet-private \
  --admin-username azureuser \
  --generate-ssh-keys
The VM takes a few minutes to create.
Confirm access to storage account
The virtual machine you created earlier that is assigned to the subnet-private subnet is used to confirm access to the storage account. The virtual machine you created in the previous section that is assigned to the subnet-1 subnet is used to confirm that access to the storage account is blocked.
Get storage account access key
In the search box at the top of the portal, enter Storage account. Select Storage accounts in the search results.
In Storage accounts, select your storage account.
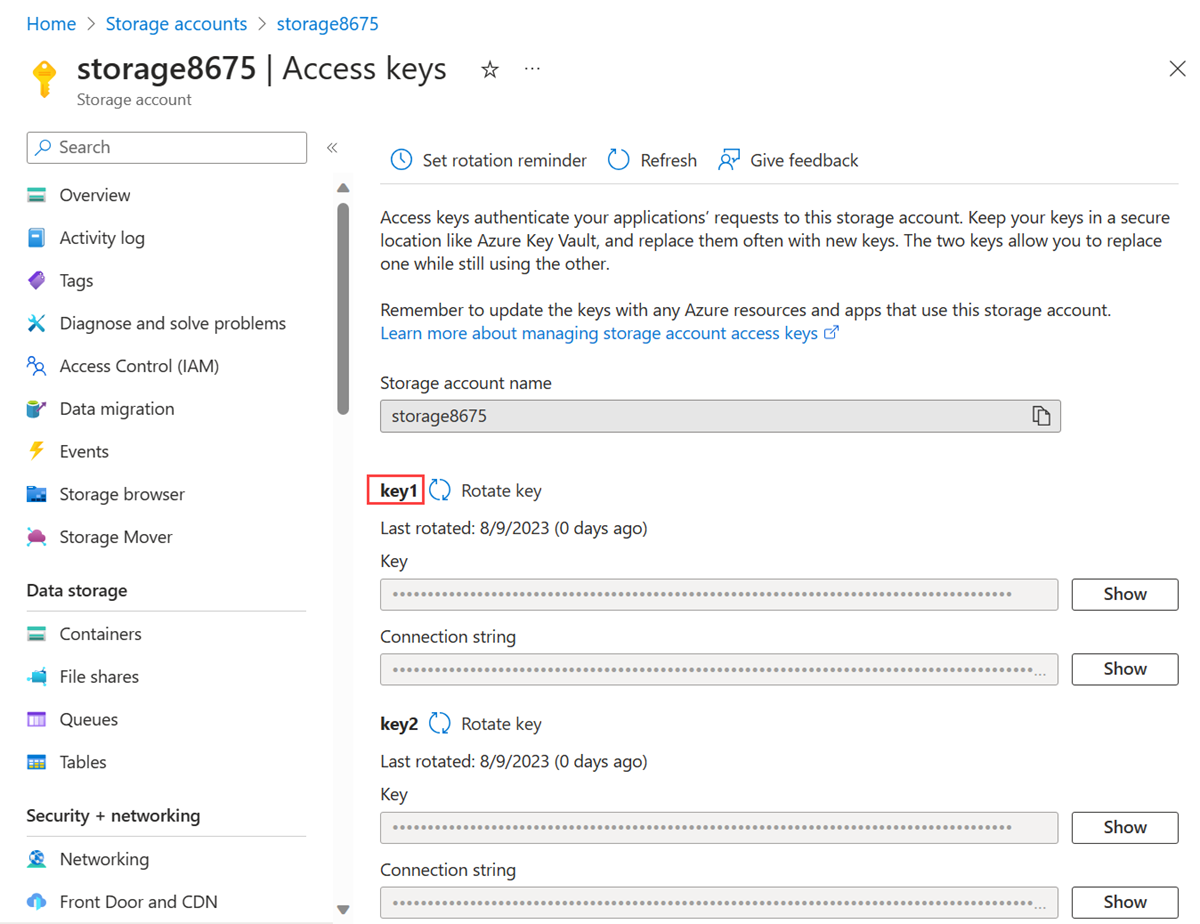
In Security + networking, select Access keys.
Copy the value of key1. You might need to select the Show button to display the key.
In the search box at the top of the portal, enter Virtual machine. Select Virtual machines in the search results.
Select vm-private.
Select Bastion in Operations.
Enter the username and password you specified when creating the virtual machine. Select Connect.
Open Windows PowerShell. Use the following script to map the Azure file share to drive Z.
Replace <storage-account-key> with the key you copied in the previous step.
Replace <storage-account-name> with the name of your storage account. In this example, it's storage8675.
 $key = @{
     String = "<storage-account-key>"
 }
 $acctKey = ConvertTo-SecureString @key -AsPlainText -Force

 $cred = @{
     ArgumentList = "Azure\<storage-account-name>", $acctKey
 }
 $credential = New-Object System.Management.Automation.PSCredential @cred

 $map = @{
     Name = "Z"
     PSProvider = "FileSystem"
     Root = "\\<storage-account-name>.file.core.chinacloudapi.cn\file-share"
     Credential = $credential
 }
 New-PSDrive @map
PowerShell returns output similar to the following example output:
Name        Used (GB)     Free (GB) Provider      Root
----        ---------     --------- --------      ----
Z                                      FileSystem    \\storage8675.file.core.chinacloudapi.cn\f...
The Azure file share successfully mapped to the Z drive.
Close the Bastion connection to vm-private.
The virtual machine you created earlier that is assigned to the subnet-private subnet is used to confirm access to the storage account. The virtual machine you created in the previous section that is assigned to the subnet-1 subnet is used to confirm that access to the storage account is blocked.
Get storage account access key
Sign-in to the Azure portal.
In the search box at the top of the portal, enter Storage account. Select Storage accounts in the search results.
In Storage accounts, select your storage account.
In Security + networking, select Access keys.
Copy the value of key1. You might need to select the Show button to display the key.
In the search box at the top of the portal, enter Virtual machine. Select Virtual machines in the search results.
Select vm-private.
Select Connect then Connect via Bastion in Overview.
Enter the username and password you specified when creating the virtual machine. Select Connect.
Open Windows PowerShell. Use the following script to map the Azure file share to drive Z.
Replace <storage-account-key> with the key you copied in the previous step.
Replace <storage-account-name> with the name of your storage account. In this example, it's storage8675.
 $key = @{
     String = "<storage-account-key>"
 }
 $acctKey = ConvertTo-SecureString @key -AsPlainText -Force

 $cred = @{
     ArgumentList = "Azure\<storage-account-name>", $acctKey
 }
 $credential = New-Object System.Management.Automation.PSCredential @cred

 $map = @{
     Name = "Z"
     PSProvider = "FileSystem"
     Root = "\\<storage-account-name>.file.core.chinacloudapi.cn\file-share"
     Credential = $credential
 }
 New-PSDrive @map
PowerShell returns output similar to the following example output:
Name        Used (GB)     Free (GB) Provider      Root
----        ---------     --------- --------      ----
Z                                      FileSystem    \\storage8675.file.core.chinacloudapi.cn\f...
The Azure file share successfully mapped to the Z drive.
Confirm that the VM has no outbound connectivity to any other public IP addresses:
ping bing.com
You receive no replies, because the network security group associated to the Private subnet doesn't allow outbound access to public IP addresses other than the addresses assigned to the Azure Storage service.
Close the Bastion connection to vm-private.
SSH into the vm-private VM.
Run the following command to store the IP address of the VM as an environment variable:
export IP_ADDRESS=$(az vm show --show-details --resource-group test-rg --name vm-private --query publicIps --output tsv)

ssh -o StrictHostKeyChecking=no azureuser@$IP_ADDRESS
Create a folder for a mount point:
sudo mkdir /mnt/file-share
Mount the Azure file share to the directory you created. Before running the following command, replace <storage-account-name> with the account name and <storage-account-key> with the key you retrieved in Create a storage account.
sudo mount --types cifs //<storage-account-name>.file.core.chinacloudapi.cn/my-file-share /mnt/file-share --options vers=3.0,username=<storage-account-name>,password=<storage-account-key>,dir_mode=0777,file_mode=0777,serverino
You receive the user@vm-private:~$ prompt. The Azure file share successfully mounted to /mnt/file-share.
Confirm that the VM has no outbound connectivity to any other public IP addresses:
ping bing.com -c 4
You receive no replies, because the network security group associated to the subnet-private subnet doesn't allow outbound access to public IP addresses other than the addresses assigned to the Azure Storage service.
Exit the SSH session to the vm-private VM.
Confirm access is denied to storage account
From vm-1
In the search box at the top of the portal, enter Virtual machine. Select Virtual machines in the search results.
Select vm-1.
Select Bastion in Operations.
Enter the username and password you specified when creating the virtual machine. Select Connect.
Repeat the previous command to attempt to map the drive to the file share in the storage account. You might need to copy the storage account access key again for this procedure:
$key = @{
    String = "<storage-account-key>"
}
$acctKey = ConvertTo-SecureString @key -AsPlainText -Force

$cred = @{
    ArgumentList = "Azure\<storage-account-name>", $acctKey
}
$credential = New-Object System.Management.Automation.PSCredential @cred

$map = @{
    Name = "Z"
    PSProvider = "FileSystem"
    Root = "\\<storage-account-name>.file.core.chinacloudapi.cn\file-share"
    Credential = $credential
}
New-PSDrive @map
You should receive the following error message:
New-PSDrive : Access is denied
At line:1 char:5
+     New-PSDrive @map
+     ~~~~~~~~~~~~~~~~
    + CategoryInfo          : InvalidOperation: (Z:PSDriveInfo) [New-PSDrive], Win32Exception
    + FullyQualifiedErrorId : CouldNotMapNetworkDrive,Microsoft.PowerShell.Commands.NewPSDriveCommand
Close the Bastion connection to vm-1.
From a local machine
In the search box at the top of the portal, enter Storage account. Select Storage accounts in the search results.
In Storage accounts, select your storage account.
In Data storage, select File shares.
Select file-share.
Select Browse in the left-hand menu.
You should receive the following error message:
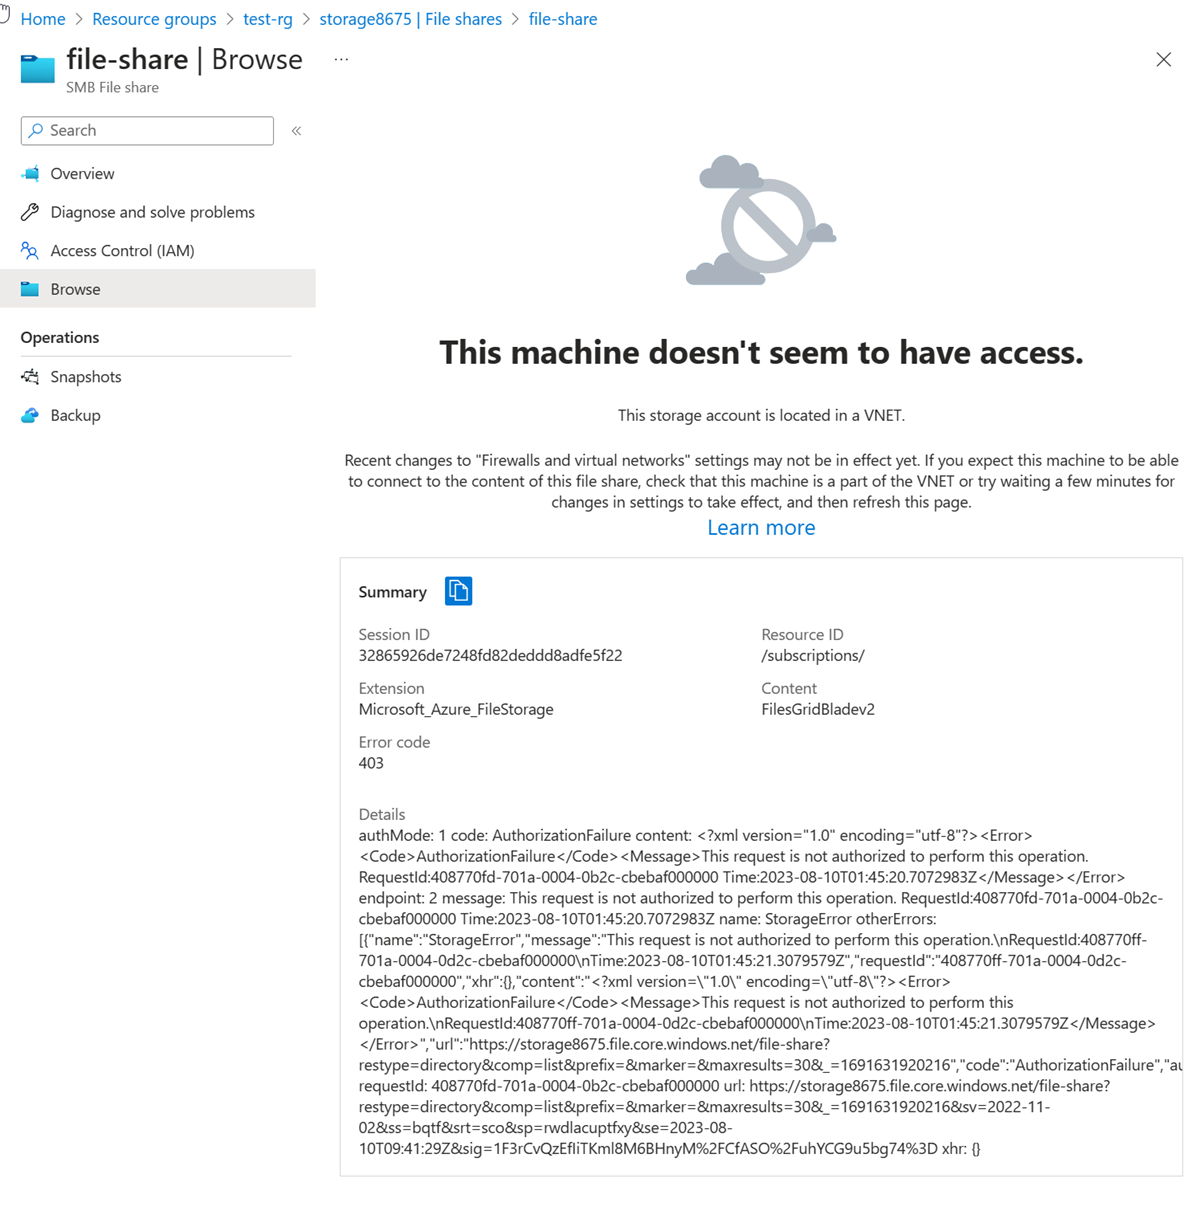
Note
The access is denied because your computer isn't in the subnet-private subnet of the vnet-1 virtual network.
From vm-1
In the search box at the top of the portal, enter Virtual machine. Select Virtual machines in the search results.
Select vm-1.
Select Bastion in Operations.
Enter the username and password you specified when creating the virtual machine. Select Connect.
Repeat the previous command to attempt to map the drive to the file share in the storage account. You might need to copy the storage account access key again for this procedure:
$key = @{
    String = "<storage-account-key>"
}
$acctKey = ConvertTo-SecureString @key -AsPlainText -Force

$cred = @{
    ArgumentList = "Azure\<storage-account-name>", $acctKey
}
$credential = New-Object System.Management.Automation.PSCredential @cred

$map = @{
    Name = "Z"
    PSProvider = "FileSystem"
    Root = "\\<storage-account-name>.file.core.chinacloudapi.cn\file-share"
    Credential = $credential
}
New-PSDrive @map
You should receive the following error message:
New-PSDrive : Access is denied
At line:1 char:5
+     New-PSDrive @map
+     ~~~~~~~~~~~~~~~~
    + CategoryInfo          : InvalidOperation: (Z:PSDriveInfo) [New-PSDrive], Win32Exception
    + FullyQualifiedErrorId : CouldNotMapNetworkDrive,Microsoft.PowerShell.Commands.NewPSDriveCommand
Close the Bastion connection to vm-1.
From your computer, attempt to view the file shares in the storage account with the following command:
$storage = @{
    ShareName = "file-share"
    Context = $storageContext
}
Get-AzStorageFile @storage
Access is denied. You receive an output similar to the following example.
Get-AzStorageFile : The remote server returned an error: (403) Forbidden. HTTP Status Code: 403 - HTTP Error Message: This request isn't authorized to perform this operation
Your computer isn't in the subnet-private subnet of the vnet-1 virtual network.
SSH into the vm-public VM.
Run the following command to store the IP address of the VM as an environment variable:
export IP_ADDRESS=$(az vm show --show-details --resource-group test-rg --name vm-public --query publicIps --output tsv)

ssh -o StrictHostKeyChecking=no azureuser@$IP_ADDRESS
Create a directory for a mount point:
sudo mkdir /mnt/file-share
Attempt to mount the Azure file share to the directory you created. This article assumes you deployed the latest version of Ubuntu. If you're using earlier versions of Ubuntu, see Mount on Linux for more instructions about mounting file shares. Before running the following command, replace <storage-account-name> with the account name and <storage-account-key> with the key you retrieved in Create a storage account:
sudo mount --types cifs //storage-account-name>.file.core.chinacloudapi.cn/file-share /mnt/file-share --options vers=3.0,username=<storage-account-name>,password=<storage-account-key>,dir_mode=0777,file_mode=0777,serverino
Access is denied, and you receive a mount error(13): Permission denied error, because the vm-public VM is deployed within the subnet-public subnet. The subnet-public subnet doesn't have a service endpoint enabled for Azure Storage, and the storage account only allows network access from the subnet-private subnet, not the subnet-public subnet.
Exit the SSH session to the vm-public VM.
From your computer, attempt to view the shares in your storage account with az storage share list. Replace <account-name> and <account-key> with the storage account name and key from Create a storage account:
az storage share list \
  --account-name <account-name> \
  --account-key <account-key>
Access is denied and you receive a This request isn't authorized to perform this operation error, because your computer isn't in the subnet-private subnet of the vnet-1 virtual network.
Clean up resources
When you finish using the resources that you created, you can delete the resource group and all its resources:
In the Azure portal, search for and select Resource groups.
On the Resource groups page, select the test-rg resource group.
On the test-rg page, select Delete resource group.
Enter test-rg in Enter resource group name to confirm deletion, and then select Delete.
When no longer needed, you can use Remove-AzResourceGroup to remove the resource group and all of the resources it contains:
$cleanup = @{
  Name  = "test-rg"
}
Remove-AzResourceGroup @cleanup -Force
Clean up resources
When no longer needed, use az group delete to remove the resource group and all of the resources it contains.
az group delete \
    --name test-rg \
    --yes \
    --no-wait
Next steps
In this tutorial:
You enabled a service endpoint for a virtual network subnet.
You learned that you can enable service endpoints for resources deployed from multiple Azure services.
You created an Azure Storage account and restricted the network access to the storage account to only resources within a virtual network subnet.
To learn more about service endpoints, see Service endpoints overview and Manage subnets.
If you have multiple virtual networks in your account, you might want to establish connectivity between them so that resources can communicate with each other. To learn how to connect virtual networks, advance to the next tutorial.
