Configure USB redirection on Windows over the Remote Desktop Protocol
Tip
This article is shared for services and products that use the Remote Desktop Protocol (RDP) to provide remote access to Windows desktops and apps.
Select a product using the buttons at the top of this article to show the relevant content.
You can configure the redirection of certain USB peripherals between a local Windows device and a remote session over the Remote Desktop Protocol (RDP).
Important
This article covers USB devices that use opaque low-level redirection only. USB devices that use high-level redirection are covered by the article for the specific device type. You should use high-level redirection methods where possible.
For a list of which device type uses which redirection method, see Supported resources and peripherals. Peripherals redirected using opaque low-level redirection require drivers installed in the remote session.
For Azure Virtual Desktop, USB redirection must be configured at the following points. If any of these components aren't configured correctly, USB redirection won't work as expected. You can use Group Policy to configure your session hosts and the local device.
- Session host
- Host pool RDP property
- Local device
By default, the host pool RDP property will redirect all supported USB peripherals, but you can also specify individual USB peripherals to redirect or exclude from redirection, and redirect an entire device setup class, such as multimedia peripherals. Take care when configuring redirection settings as the most restrictive setting is the resultant behavior.
Some USB peripherals might have functions that use opaque low-level USB redirection or high-level redirection. By default, these peripherals are redirected using high-level redirection. You can force these peripherals to use opaque low-level USB redirection also by following the steps in this article.
For Windows 365, USB redirection must be configured on the Cloud PC and the local device. If either of these components aren't configured correctly, USB redirection won't work as expected. You can use Group Policy to configure your Cloud PC and the local device. Once configured, Windows 365 redirects all supported USB peripherals.
For Microsoft Dev Box, USB redirection must be configured on the dev box and the local device. If either of these components aren't configured correctly, USB redirection won't work as expected. You can use Group Policy to configure your dev box and the local device. Once configured, Microsoft Dev Box redirects all supported USB peripherals.
Tip
If you use the following features in a remote session, they have their own optimizations that are independent from the redirection configuration on the session host, host pool RDP properties, or local device.
- Microsoft Teams for camera, microphone, and audio redirection.
- Multimedia redirection for audio, video and call redirection.
Tip
If you use the following features in a remote session, they have their own optimizations that are independent from the redirection configuration on the Cloud PC or local device.
- Microsoft Teams for camera, microphone, and audio redirection.
- Multimedia redirection for audio, video and call redirection.
Tip
If you use the following features in a remote session, they have their own optimizations that are independent from the redirection configuration on the dev box or local device.
- Microsoft Teams for camera, microphone, and audio redirection.
- Multimedia redirection for audio, video and call redirection.
Prerequisites
Before you can configure USB redirection using opaque low-level redirection, you need:
An existing host pool with session hosts.
A Microsoft Entra ID account that is assigned the Desktop Virtualization Host Pool Contributor built-in role-based access control (RBAC) roles on the host pool as a minimum.
- An existing Cloud PC.
- An existing dev box.
A USB device you can use to test the redirection configuration.
To configure Group Policy, you need:
- A domain account that has permission to create or edit Group Policy objects.
- A security group or organizational unit (OU) containing the devices you want to configure.
You need to connect to a remote session from a supported app and platform. To view redirection support in Windows App and the Remote Desktop app, see Compare Windows App features across platforms and devices and Compare Remote Desktop app features across platforms and devices.
Session host configuration
To configure a session host for USB redirection using opaque low-level redirection, you need to enable Plug and Play redirection. You can do this using Group Policy.
Cloud PC configuration
To configure a Cloud PC for USB redirection using opaque low-level redirection, you need to enable Plug and Play redirection. You can do this using Group Policy.
Dev box configuration
To configure a dev box for USB redirection using opaque low-level redirection, you need to enable Plug and Play redirection. You can do this using Group Policy.
The default configuration is:
- Windows operating system: USB redirection isn't allowed.
Select the relevant tab for your scenario.
To allow or disable video capture redirection, which includes cameras and webcams, using Group Policy:
Open the Group Policy Management console on a device you use to manage the Active Directory domain.
Create or edit a policy that targets the computers providing a remote session you want to configure.
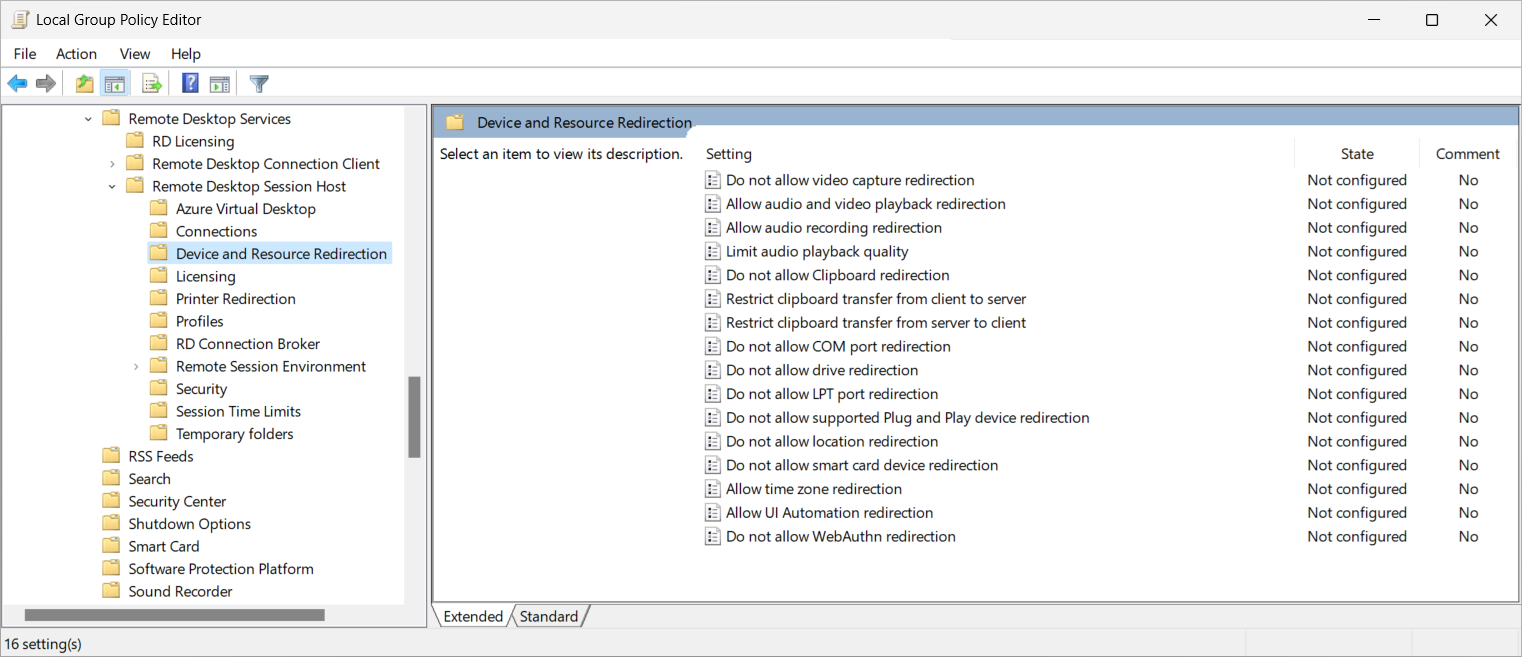
Navigate to Computer Configuration > Policies > Administrative Templates > Windows Components > Remote Desktop Services > Remote Desktop Session Host > Device and Resource Redirection.
Double-click the policy setting Do not allow supported Plug and Play device redirection to open it. Select Disabled, then select OK.
Ensure the policy is applied to the computers providing a remote session, then restart them for the settings to take effect.
Important
With opaque low-level USB redirection, drivers for redirected USB peripherals will be installed in the remote session by using the same process that a physical Windows computer uses when a device is plugged in. Please ensure that Windows Update is enabled in the remote session, or that drivers are available for the USB peripheral being redirected.
Local Windows device configuration
To configure a local Windows device for USB redirection using opaque low-level redirection, you need to allow RDP redirection of other supported USB peripherals for users and administrators. You can do this using Group Policy.
The default configuration is:
- Windows operating system: other supported USB peripherals aren't available for RDP redirection by using any user account.
To allow RDP redirection of other supported USB peripherals using Group Policy:
Open the Group Policy Management console on a device you use to manage the Active Directory domain.
Create or edit a policy that targets the computers providing a remote session you want to configure.
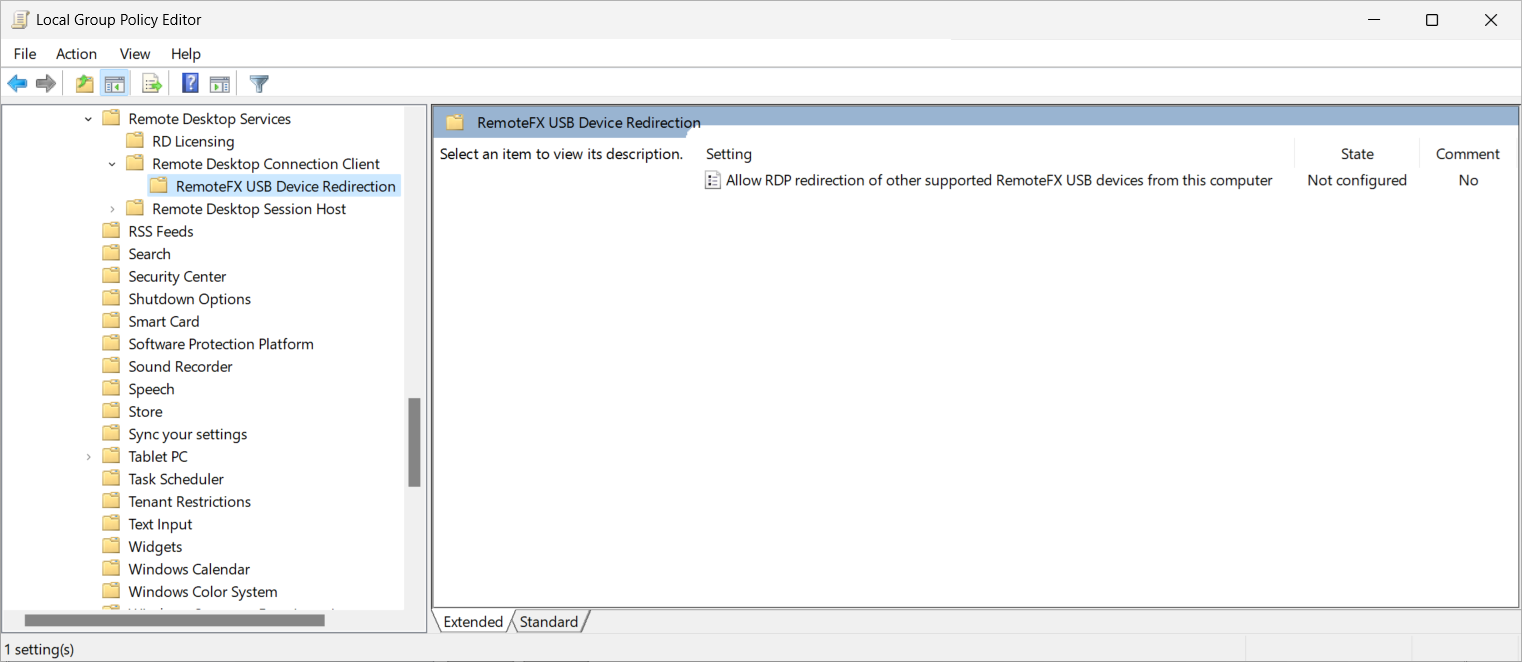
Navigate to Computer Configuration > Policies > Administrative Templates > Windows Components > Remote Desktop Services > Remote Desktop Connection Client > RemoteFX USB Device Redirection.
Double-click the policy setting Allow RDP redirection of other supported RemoteFX USB devices from this computer to open it. Select Enabled
For the drop-down list for RemoteFX USB Redirection Access Rights, select Administrators and Users, then select OK.
Ensure the policy is applied to the local Windows devices, then you must restart them for USB redirection to work.
Optional: Retrieve specific USB device instance IDs to use with opaque low-level redirection
Optional: Discover available devices to redirect using opaque low-level redirection
For Azure Virtual Desktop, you can enter specific device instance IDs in the host pool properties so that only the peripherals you approve are redirected. To retrieve the device instance IDs available of the USB devices on a local device you want to redirect:
Windows 365 redirects all supported peripherals for opaque low-level redirection connected to a local device. To discover which devices:
Microsoft Dev Box redirects all supported peripherals for opaque low-level redirection connected to a local device. To discover which devices:
On the local device, connect any devices you want to redirect.
Open the Remote Desktop Connection app from the start menu, or run
mstsc.exefrom the command line.Select Show Options, then select the Local Resources tab.
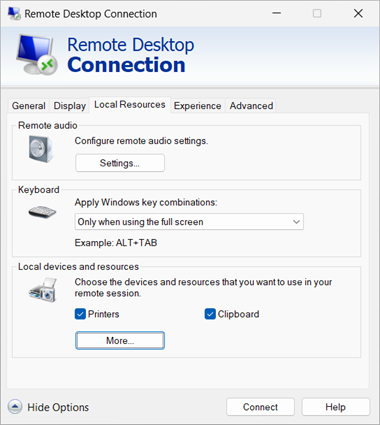
In the section Local devices and resources, select More....
From the list of devices and resources, check the box for Other supported RemoteFX USB devices. This option only appears if you enable the setting Allow RDP redirection of other supported RemoteFX USB devices from this computer covered in the section Local Windows device configuration. You can select the + (plus) icon to expand the list and see which devices are available to be redirected using opaque low-level redirection.
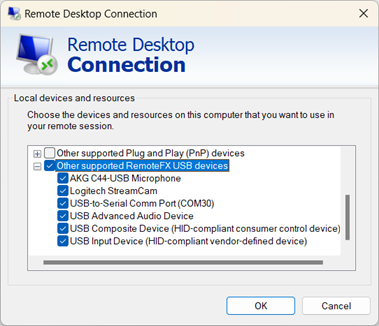
Select OK to close Local devices and resources.
Select the General tab, then select Save As... and save the
.rdpfile.Open a PowerShell prompt on the local device.
Run the following commands to match each supported USB device name with the USB instance ID. You need to replace the
<placeholder>value for the.rdpfile you saved previously.$rdpFile = "<RDP file path>" $testPath = Test-Path $rdpFile If ($testPath) { # Function used for recursively getting all child devices of a parent device Function Lookup-Device-Children { [CmdletBinding()] Param( [Parameter(Mandatory, ValueFromPipeline)] [ValidateNotNullOrEmpty()] [object] $ChildDeviceIds ) foreach ($childDeviceId in $childDeviceIds) { $pnpDeviceProperties = Get-PnpDeviceProperty -InstanceId $childDeviceId [string]$childDevice = ($pnpDeviceProperties | ? KeyName -eq DEVPKEY_NAME).Data Write-Output " $childDevice" If ($pnpDeviceProperties.KeyName -contains "DEVPKEY_Device_Children") { $pnpChildDeviceIds = ($pnpDeviceProperties | ? KeyName -eq DEVPKEY_Device_Children).Data Lookup-Device-Children -ChildDeviceIds $pnpChildDeviceIds } } } # Get a list of the supported devices from the .rdp file and store them in an array [string]$usb = Get-Content -Path $rdpFile | Select-String USB $devices = @($usb.Replace("usbdevicestoredirect:s:","").Replace("-","").Split(";")) # Get the devices foreach ($device in $devices) { $pnpDeviceProperties = Get-PnpDeviceProperty -InstanceId $device [string]$parentDevice = ($pnpDeviceProperties | ? KeyName -eq DEVPKEY_NAME).Data Write-Output "`n-------------------`n`nParent device name: $parentDevice`nUSB device ID: $device`n" If ($pnpDeviceProperties.KeyName -contains "DEVPKEY_Device_Children") { $pnpChildDeviceIds = ($pnpDeviceProperties | ? KeyName -eq DEVPKEY_Device_Children).Data Write-Output "This parent device has the following child devices:" Lookup-Device-Children -ChildDeviceIds $pnpChildDeviceIds } } } else { Write-Output "Error: file doesn't exist. Please check the file path and try again." }The output is similar to the following example:
-------------------

Parent device name: USB Composite Device
USB device ID: USB\VID_0ECB&PID_1F58\9&2E5F6FA0&0&1

This parent device has the following child devices:
    AKG C44-USB Microphone
    Headphones (AKG C44-USB Microphone)
    Microphone (AKG C44-USB Microphone)
    USB Input Device
    HID-compliant consumer control device
    HID-compliant consumer control device

-------------------

Parent device name: USB Composite Device
USB device ID: USB\VID_262A&PID_180A\6&22E6BE6&0&1

This parent device has the following child devices:
    USB Input Device
    HID-compliant consumer control device
    Klipsch R-41PM
    Speakers (Klipsch R-41PM)

-------------------

Parent device name: USB-to-Serial Comm Port (COM30)
USB device ID: USB\VID_012A&PID_0123\A&3A944CE5&0&2

-------------------

Parent device name: USB Composite Device
USB device ID: USB\VID_046D&PID_0893\88A44075

This parent device has the following child devices:
    Logitech StreamCam
    Logitech StreamCam
    Microphone (Logitech StreamCam)
    Logitech StreamCam WinUSB
    USB Input Device
    HID-compliant vendor-defined device
- Make a note of the device instance ID of any of the parent devices you want to use for redirection. Only the parent device instance ID is applicable for USB redirection.
Optional: Discover peripherals matching a device setup class
For Azure Virtual Desktop, you can enter a device class GUID in the host pool properties so that only the devices that match that device class are redirected. To retrieve a list of the devices that match a specific device class GUID on a local device:
On the local device, open a PowerShell prompt.
Run the following command, replacing
<device class GUID>with the device class GUID you want to search for and list the matching devices. For a list of device class GUID values, see System-Defined Device Setup Classes Available to Vendors.$deviceClassGuid = "<device class GUID>" Get-PnpDevice | Where-Object {$_.ClassGuid -like "*$deviceClassGuid*" -and $_.InstanceId -like "USB\*" -and $_.Present -like "True"} | FT -AutoSizeFor example, using the device class GUID
4d36e96c-e325-11ce-bfc1-08002be10318for multimedia devices, The output is similar to the following example:Status Class FriendlyName InstanceId ------ ----- ------------ ---------- OK MEDIA USB Advanced Audio Device USB\VID_0D8C&PID_0147&MI_00\B&35486F89&0&0000 OK MEDIA AKG C44-USB Microphone USB\VID_0ECB&PID_1F58&MI_00\A&250837E1&0&0000 OK MEDIA Logitech StreamCam USB\VID_046D&PID_0893&MI_02\6&4886529&0&0002 OK MEDIA Klipsch R-41PM USB\VID_262A&PID_180A&MI_01\7&3598D0A0&0&0001
Host pool configuration
The Azure Virtual Desktop host pool setting USB device redirection determines which supported USB devices connected to the local device are available in the remote session. The corresponding RDP property is usbdevicestoredirect:s:<value>. For more information, see Supported RDP properties.
To configure USB redirection using host pool RDP properties:
Sign in to the Azure portal.
In the search bar, type Azure Virtual Desktop and select the matching service entry.
Select Host pools, then select the host pool you want to configure.
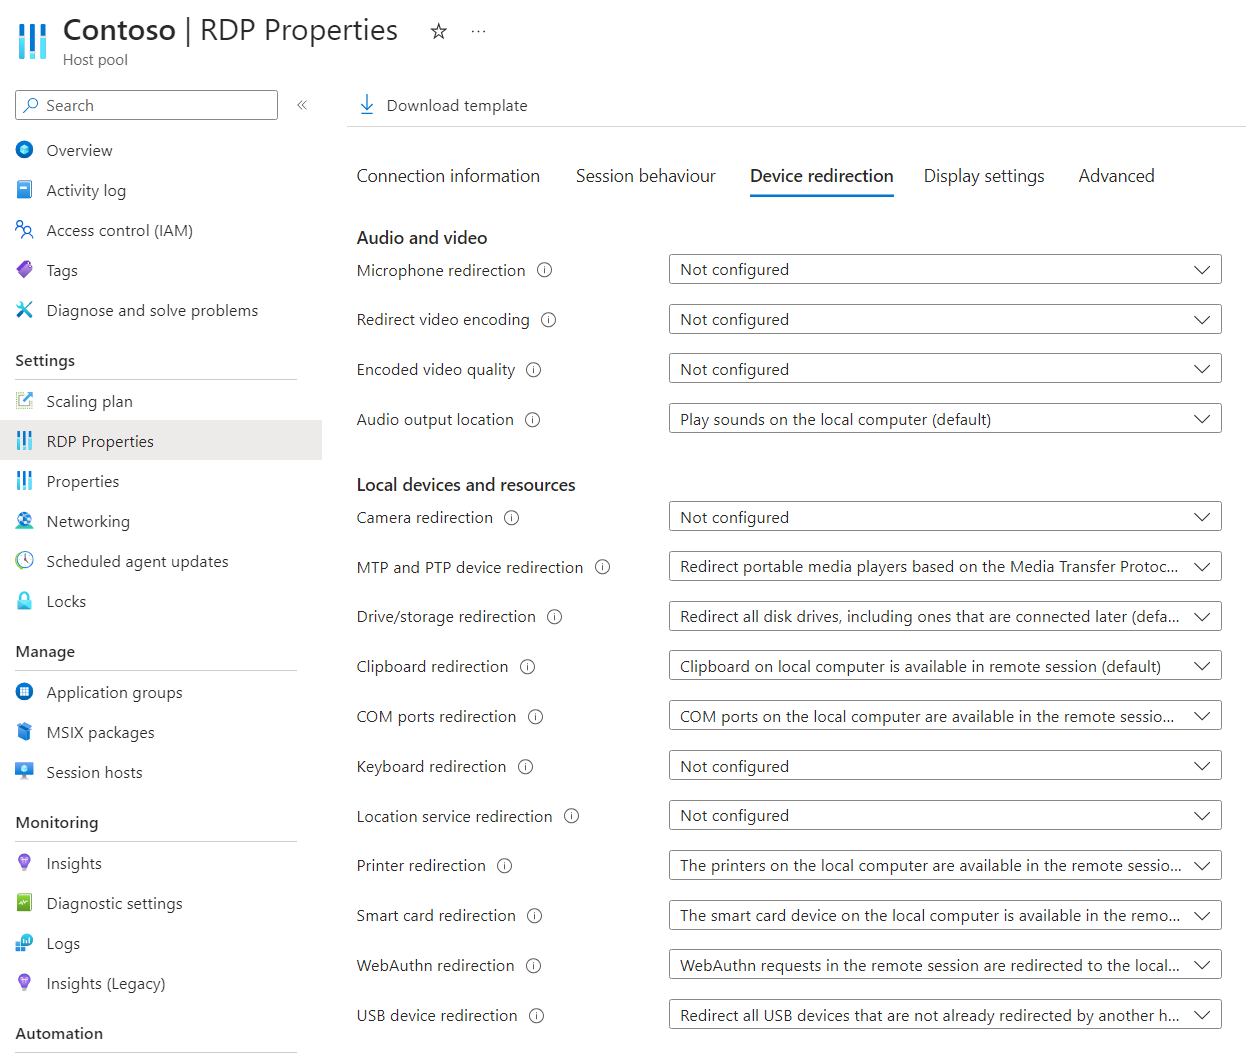
Select RDP Properties, then select Device redirection.
For USB device redirection, select the drop-down list, then select one of the following options:
- Redirect all USB devices that are not already redirected by another high-level redirection (default)
- Redirect all devices that are members of the specified device setup class or devices defined by specific instance ID
If you select Redirect all devices that are members of the specified device setup class or devices defined by specific instance ID, an extra box shows. You need to enter the device setup class or specific device instance path for the devices you want to redirect, separated by a semicolon. For more information, see Controlling opaque low-level USB redirection. To get the values for supported devices, see Optional: Retrieve specific device instance IDs, and for device class GUIDs, see Optional: Discover peripherals matching a device setup class. For Azure Virtual Desktop, the characters
\,:, and;must be escaped using a backslash character.Here are some examples:
To redirect a specific peripheral where it's only redirected when based on whole device instance path (that is, it's connected to a particular USB port), enter the device instance path using double backslash characters, such as
USB\\VID_045E&PID_0779\\5&21F6DCD1&0&5. For multiple devices, separate them with a semicolon, such asUSB\\VID_045E&PID_0779\\5&21F6DCD1&0&5;USB\\VID_0ECB&PID_1F58\\9&2E5F6FA0&0&1.To redirect all peripherals that are members of a specific device setup class (that is, all supported multimedia devices), enter the device class GUID, including braces. For example, to redirect all multimedia devices, enter
{4d36e96c-e325-11ce-bfc1-08002be10318}. For multiple device class IDs, separate them with a semicolon, such as{4d36e96c-e325-11ce-bfc1-08002be10318};{6bdd1fc6-810f-11d0-bec7-08002be2092f}.
Tip
You can create advanced configurations by combining device instance paths and device class GUIDs, and you enter the configuration on the Advanced tab of RDP Properties. For more examples, see usbdevicestoredirect RDP property.
Select Save. You can now test the USB redirection configuration.
Test USB redirection
Once you configure your session hosts, host pool RDP property, and local devices, you can test USB redirection. Consider the following behavior:
Once you configure your Cloud PCs and local devices, you can test USB redirection. Consider the following behavior:
Once you configure your dev boxes and local devices, you can test USB redirection. Consider the following behavior:
Drivers for redirected USB peripherals are installed in the remote session using the same process as the local device. Ensure that Windows Update is enabled in the remote session, or that drivers are available for the peripheral.
Opaque low-level USB redirection is designed for LAN connections (< 20 ms latency); with higher latency, some USB peripherals might not function properly, or the user experience might not suitable.
USB peripherals aren't available on the local device locally while it's redirected to the remote session.
USB peripherals can only be used in one remote session at a time.
USB redirection is only available from a local Windows device.
To test USB redirection:
Plug in the supported USB peripherals you want to use in a remote session.
Connect to a remote session using Window App or the Remote Desktop app on a platform that supports USB redirection. For more information, see Compare Windows App features across platforms and devices and Compare Remote Desktop app features across platforms and devices.
Check the peripherals are connected to the remote session. With the display in full screen, on the status bar select the icon to select devices to use. This icon only shows when USB redirection is correctly configured.

Check the box for each USB peripheral you want to redirect to the remote session, and uncheck the box for those peripherals you don't want to redirect. Some devices might appear in this list as Remote Desktop Generic USB Device once directed.
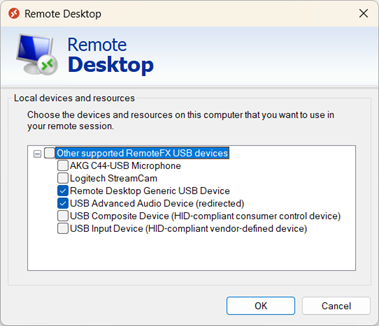
Check the device is functioning correctly in the remote session. The correct driver needs to be installed in the remote session. Here are some ways to check the USB peripherals are available in the remote session, depending on the permission you have in the remote session:
Open Device Manager in the remote session from the start menu, or run
devmgmt.mscfrom the command line. Check the redirected peripherals appear in the expected device category and don't show any errors.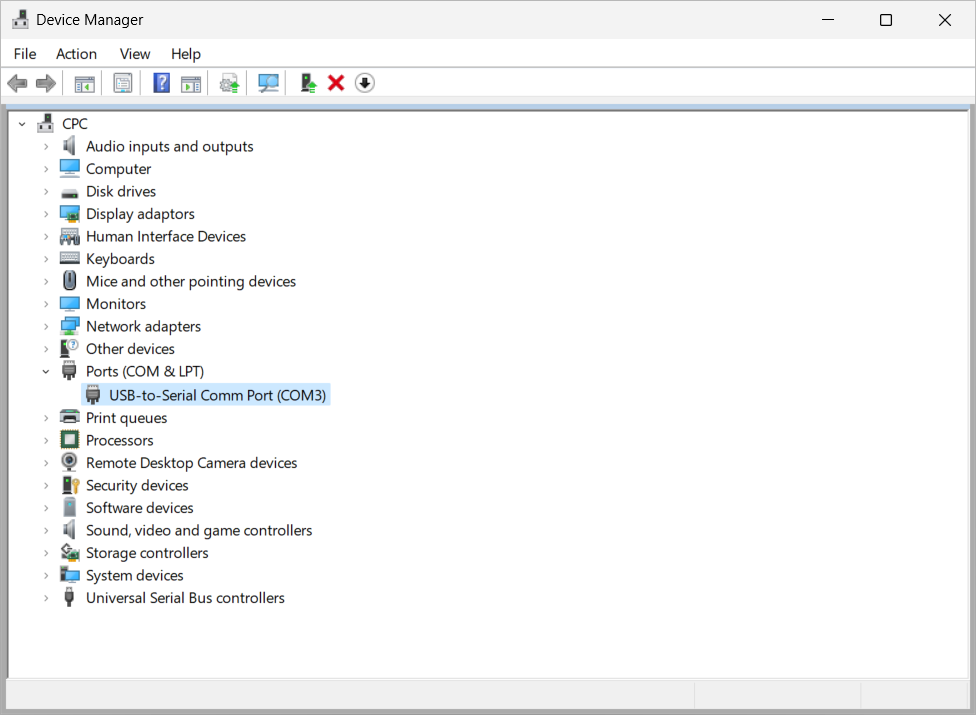
Open a PowerShell prompt in the remote session and run the following command:
Get-PnPDevice | Where-Object {$_.InstanceId -like "*TSUSB*" -and $_.Present -eq "true"} | FT -AutoSizeThe output is similar to the following example. Check the status column for any entries that show Error. If there are any entries with an error, troubleshoot the device according to the manufacturer's instructions.
Status Class FriendlyName                   InstanceId
------ ----- ------------                   ----------
OK     USB   USB Composite Device           USB\VID_0D8C&PID_0147&REV_0109\3&2DCEE32&0&TSUSB-SESSION4...
OK     Ports USB-to-Serial Comm Port (COM6) USB\VID_012A&PID_0123&REV_0202\3&2DCEE32&0&TSUSB-SESSION4...
Once the peripherals are redirected and functioning correctly, you can use them as you would on a local device.
usbdevicestoredirect RDP property
The usbdevicestoredirect RDP property is used to specify which USB devices are redirected to the remote session and its syntax usbdevicestoredirect:s:<value> provides flexibility when redirecting USB peripherals using opaque low-level redirection. Valid values for the property are shown in the following table. Values can be used on their own, or a combination of these values can be used with each other when separated with a semicolon, subject to a processing order. For more information, see Controlling opaque low-level USB redirection.
| Processing order | Value | Description |
|---|---|---|
| N/A | No value specified | Don't redirect any supported USB peripherals using opaque low-level redirection. |
| 1 | * |
Redirect all peripherals that aren't using high-level redirection. |
| 2 | {<DeviceClassGUID>} |
Redirect all peripherals that are members of the specified device setup class. For a list of device class GUID values, see System-Defined Device Setup Classes Available to Vendors. |
| 3 | <USBInstanceID> |
Redirect a USB peripheral specified by the given device instance path. |
| 4 | <-USBInstanceID> |
Don't redirect a peripheral specified by the given device instance path. |
When constructed as a string in the correct processing order, the syntax is:
usbdevicestoredirect:s:*;{<DeviceClassGUID>};<USBInstanceID>;<-USBInstanceID>`
Here are some examples of using the usbdevicestoredirect RDP property:
To redirect all supported USB peripherals that high-level redirection doesn't redirect, use:
usbdevicestoredirect:s:*To redirect all supported USB peripherals with a device class GUID of
{6bdd1fc6-810f-11d0-bec7-08002be2092f}(imaging), use:usbdevicestoredirect:s:{6bdd1fc6-810f-11d0-bec7-08002be2092f}To redirect all supported USB peripherals that high-level redirection doesn't redirect and USB peripherals with a device class GUIDs of
{6bdd1fc6-810f-11d0-bec7-08002be2092f}(imaging) and{4d36e96c-e325-11ce-bfc1-08002be10318}(multimedia), use:usbdevicestoredirect:s:*;{6bdd1fc6-810f-11d0-bec7-08002be2092f};{4d36e96c-e325-11ce-bfc1-08002be10318}To redirect a supported a USB peripheral with instance IDs
USB\VID_095D&PID_9208\5&23639F31&0&2andUSB\VID_045E&PID_076F\5&14D1A39&0&7, use:usbdevicestoredirect:s:USB\VID_095D&PID_9208\5&23639F31&0&2;USB\VID_045E&PID_076F\5&14D1A39&0&7To redirect all supported USB peripherals that high-level redirection doesn't redirect, except for a device with an instance ID of
USB\VID_045E&PID_076F\5&14D1A39&0&7, use:usbdevicestoredirect:s:*;-USB\VID_045E&PID_076F\5&14D1A39&0&7Use the following syntax to achieve the following scenario:
- Redirect all supported USB peripherals that high-level redirection doesn't redirect.
- Redirect all supported USB peripherals with a device setup class GUID of
{6bdd1fc6-810f-11d0-bec7-08002be2092f}(imaging). - Redirect a supported a USB peripheral with instance ID
USB\VID_095D&PID_9208\5&23639F31&0&2. - Don't redirect a supported USB peripheral with an instance ID of
USB\VID_045E&PID_076F\5&14D1A39&0&7.
usbdevicestoredirect:s:*;{6bdd1fc6-810f-11d0-bec7-08002be2092f};USB\VID_095D&PID_9208\5&23639F31&0&2;-USB\VID_045E&PID_076F\5&14D1A39&0&7
Tip
For Azure Virtual Desktop, the characters \, :, and ; must be escaped using a backslash character. This includes any device instance paths, such as USB\\VID_045E&PID_0779\\5&21F6DCD1&0&5. It doesn't affect the redirection behavior.
