Note
Access to this page requires authorization. You can try signing in or changing directories.
Access to this page requires authorization. You can try changing directories.
Note
The Time Series Insights service will be retired on 7 July 2024. Consider migrating existing environments to alternative solutions as soon as possible.
This tutorial guides you through the process of creating an Azure Time Series Insights Gen2 pay-as-you-go (PAYG) environment.
In this tutorial, you learn how to:
- Create an Azure Time Series Insights Gen2 environment.
- Connect the Azure Time Series Insights Gen2 environment to an IoT Hub.
- Run a solution accelerator sample to stream data into the Azure Time Series Insights Gen2 environment.
- Perform basic analysis on the data.
- Define a Time Series Model type and hierarchy, and associate it with your instances.
Sign up for a Azure subscription if you don't already have one.
Prerequisites
At minimum, you must have the Contributor role for the Azure subscription. For more information, read Assign Azure roles using the Azure portal.
Create an environment using either the Azure portal or CLI.
Create an Azure Time Series Insights Gen2 environment
This section describes how to create an Azure Time Series Insights Gen2 environment and connect it to the IoT hub created by the IoT Solution Accelerator using the Azure portal.
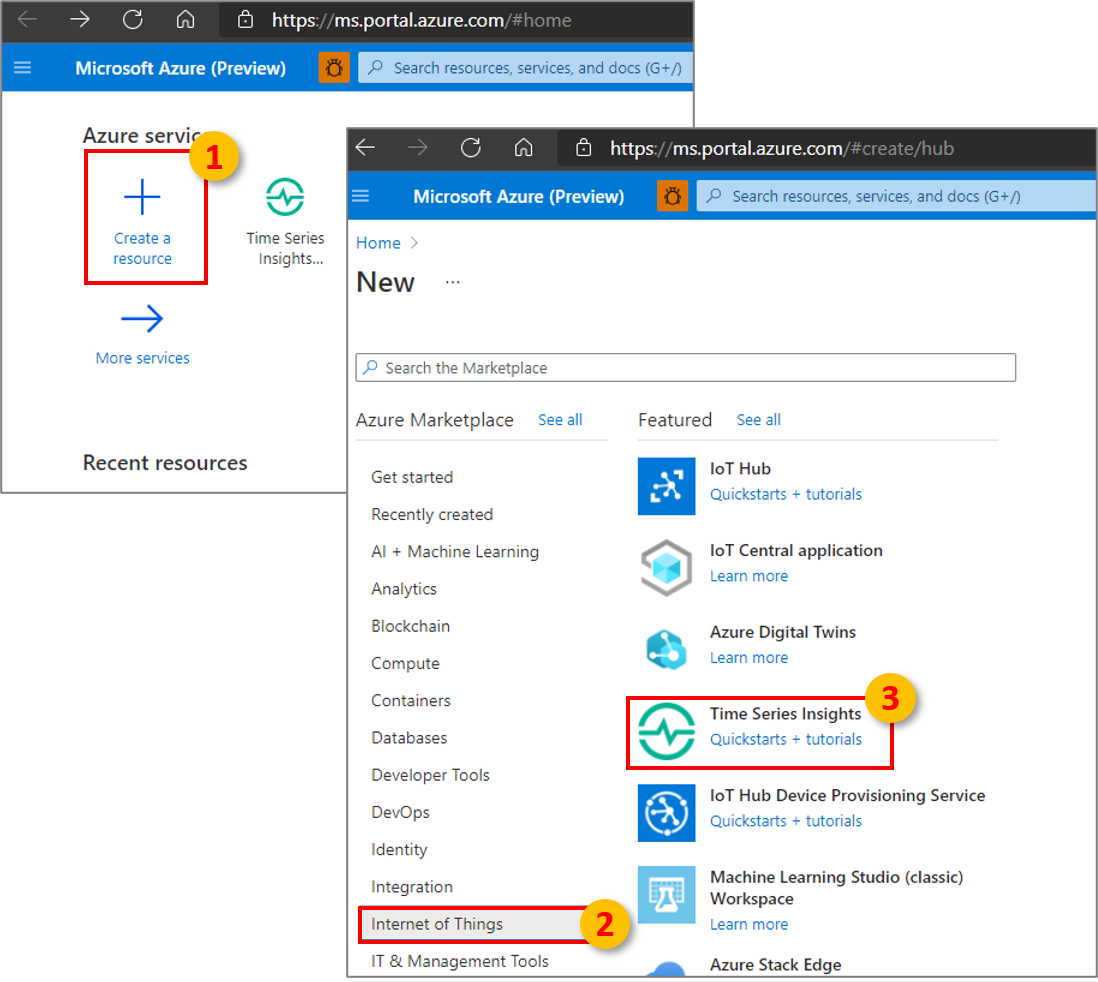
Sign in to the Azure portal by using your Azure subscription account.
Select + Create a resource in the upper left.
Select the Internet of Things category, and then select Time Series Insights.
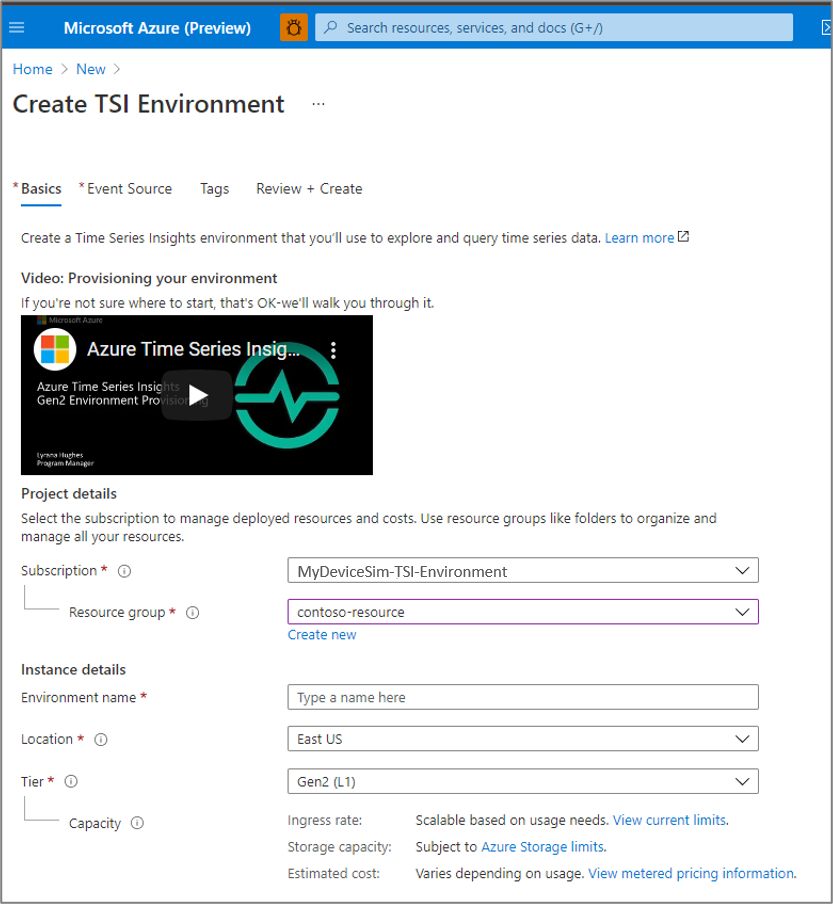
In the Create Time Series Insights environment pane, on the Basics tab, set the following parameters:
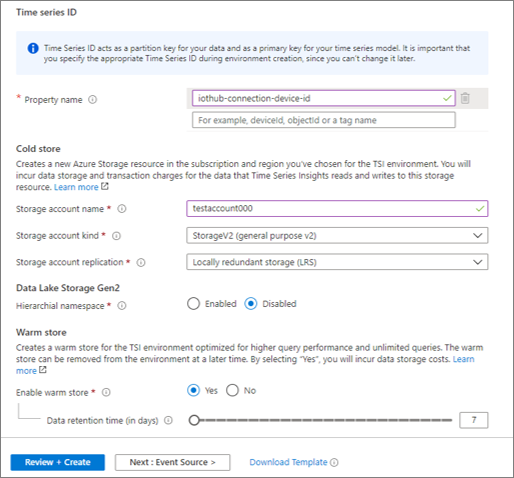
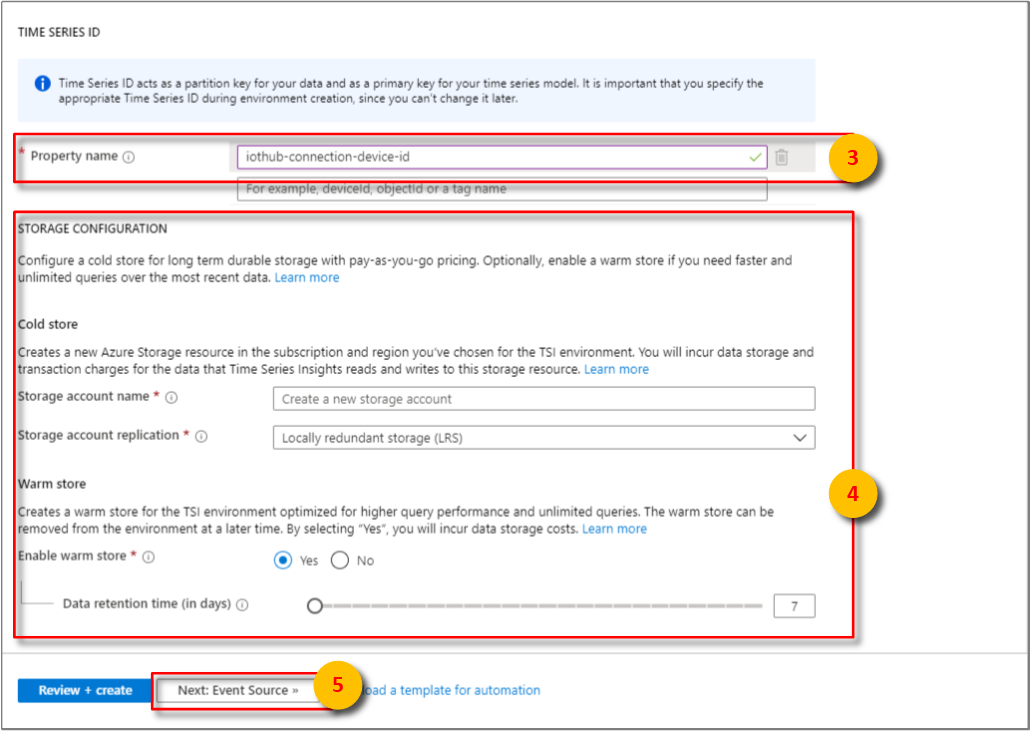
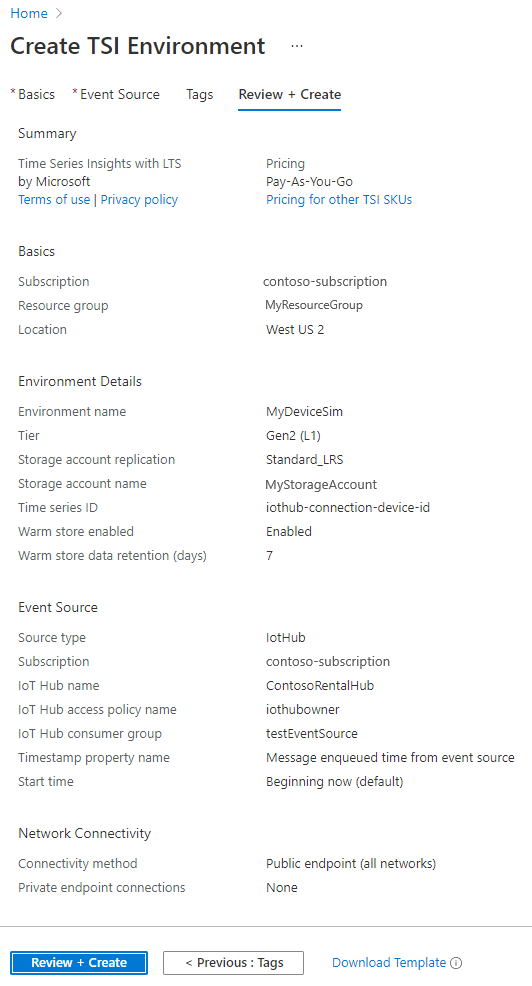
Parameter Action Environment name Enter a unique name for the Azure Time Series Insights Gen2 environment. Subscription Enter the subscription where you want to create the Azure Time Series Insights Gen2 environment. A best practice is to use the same subscription as the rest of the IoT resources that are created by the device simulator. Resource group Select an existing resource group or create a new resource group for the Azure Time Series Insights Gen2 environment resource. A resource group is a container for Azure resources. A best practice is to use the same resource group as the other IoT resources that are created by the device simulator. Location Select a data center region for your Azure Time Series Insights Gen2 environment. To avoid additional latency, it's best to create your Azure Time Series Insights Gen2 environment in the same region as your IoT hub created by the device simulator. Tier Select Gen2(L1). This is the SKU for the Azure Time Series Insights Gen2 product. Time Series ID property name Enter a name of a property that contains values that uniquely identify your time series instances. The value you enter in the Property name box as Time Series ID cannot be changed later. For this tutorial, enter iothub-connection-device-id. To learn more about Time Series ID including composite Time Series ID, read Best practices for choosing a Time Series ID. Storage account name Enter a globally unique name for a new storage account. Storage account kind Select the storage kind for a new storage account. We recommend StorageV2 Storage account replication Select the storage kind for a new storage account. Based on your location selection, you can choose from LRS, GRS, and ZRS. For this tutorial, you can select LRS Hierarchical namespace This option is selectable, once you select the storage kind to be StorageV2. By default, it is disabled. For this tutorial, you can leave it in its default disabled state Enable warm store Select Yes to enable warm store. This setting can be disabled and re-enabled after the environment has been created as well. Data retention (in days) Choose the default option of 7 days. Select Next: Event Source.
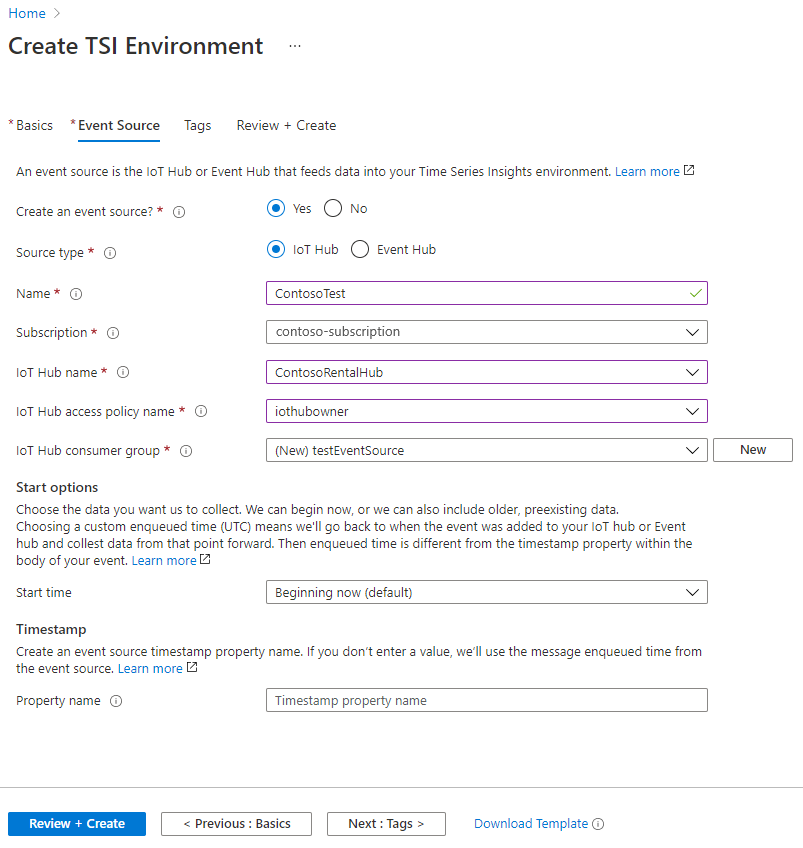
On the Event Source tab, set the following parameters:
Parameter Action Create an event source? Select Yes. Source type Select IoT Hub. Name Enter a unique value for the event source name. Select a hub Choose Select existing. Subscription Select the subscription that you used for the device simulator. IoT Hub name Select the IoT hub name you created for the device simulator. IoT Hub access policy Select iothubowner. IoT Hub consumer group Select New, enter a unique name, and then select + Add. The consumer group must be a unique value in Azure Time Series Insights Gen2. Start options Select Beginning now. Timestamp property This value is used to identify the Timestamp property in your incoming telemetry data. For this tutorial, leave this box empty. This simulator uses the incoming timestamp from IoT Hub, which Azure Time Series Insights Gen2 defaults to. Select Review + Create.
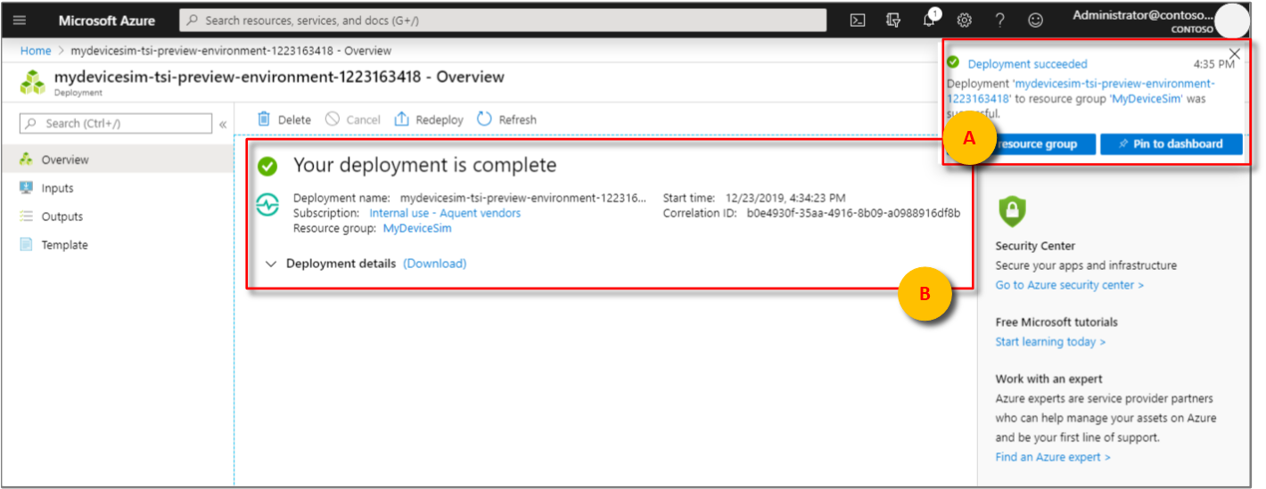
You can review the status of your deployment:
Expand deployment details.
Stream data
Now that you've deployed your Azure Time Series Insights Gen2 environment, begin streaming data for analysis.
You will be given a URL once the solution accelerator deployment is complete.
Click on the URL to launch the device simulation.
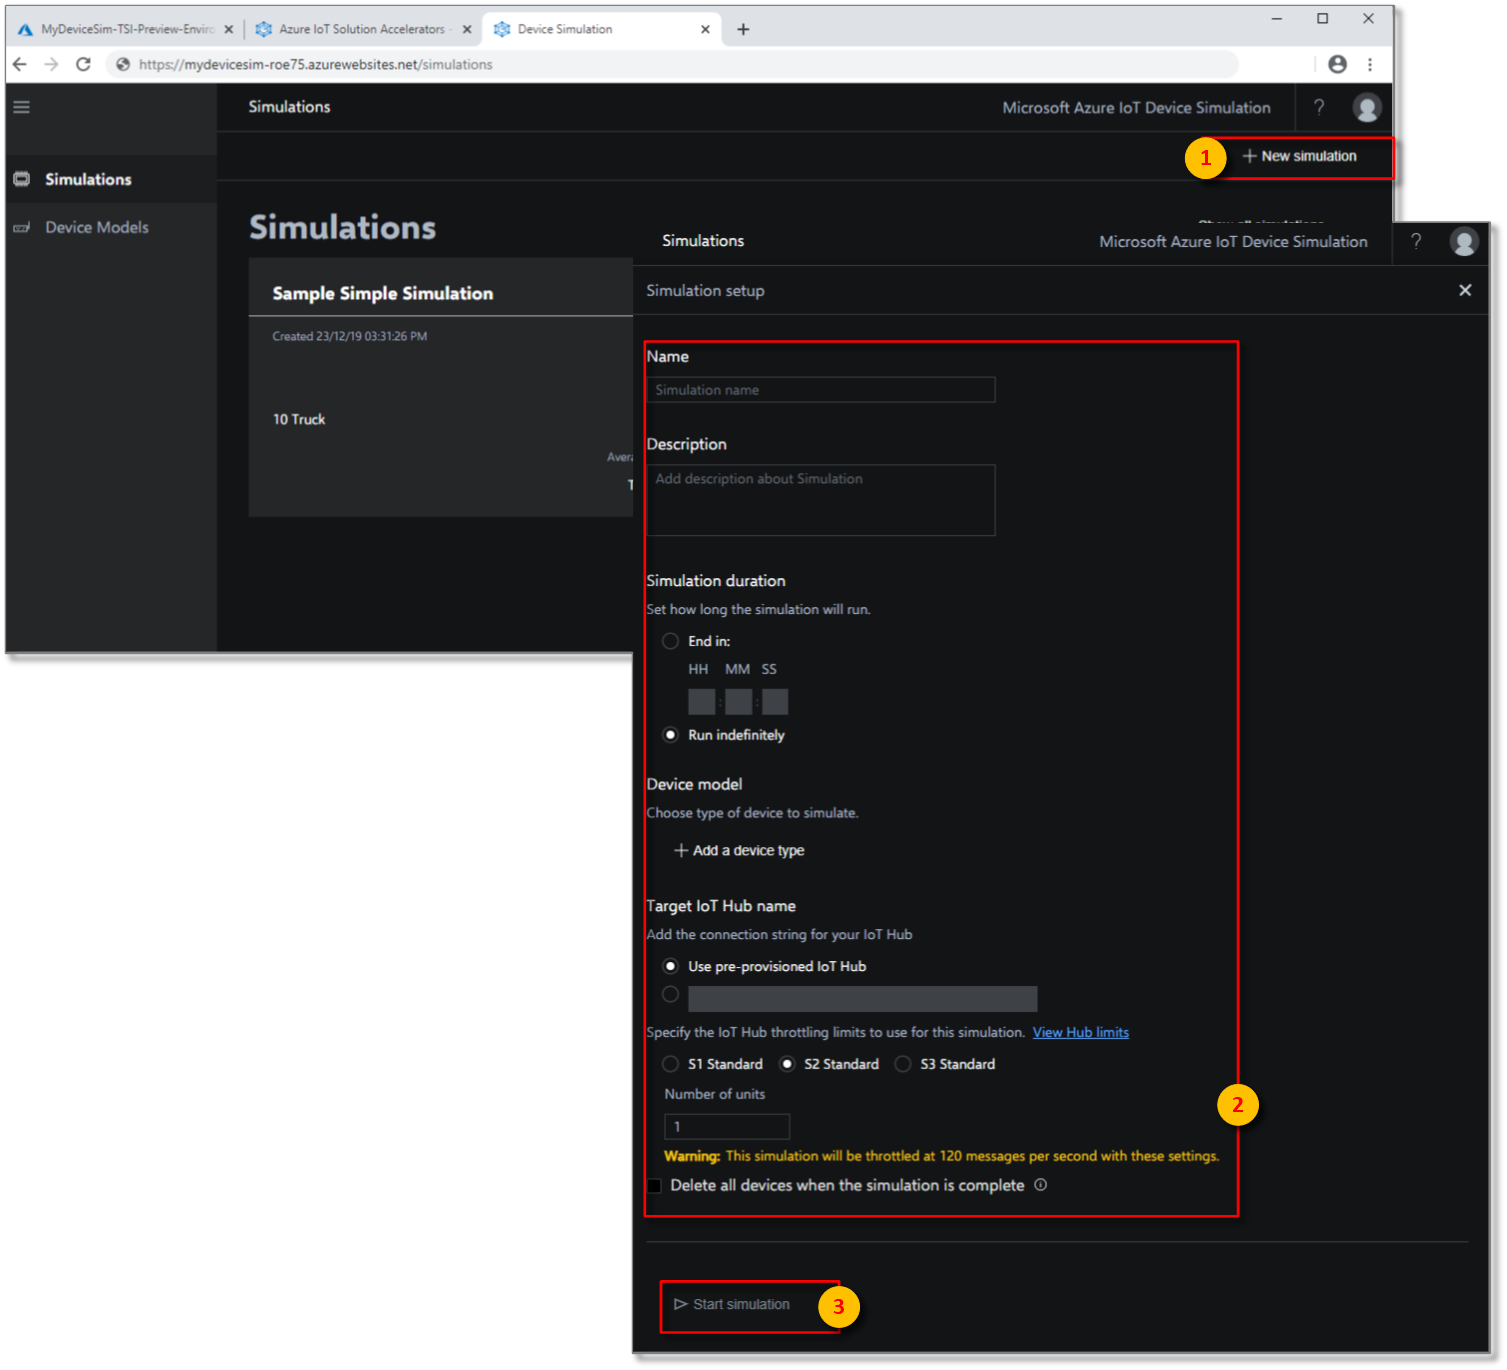
Select + New simulation.
After the Simulation setup page loads, enter the required parameters.
Parameter Action Name Enter a unique name for a simulator. Description Enter a definition. Simulation duration Set to Run indefinitely. Device model Click + Add a device type
Name: Enter Elevator.
Amount: Enter 3.
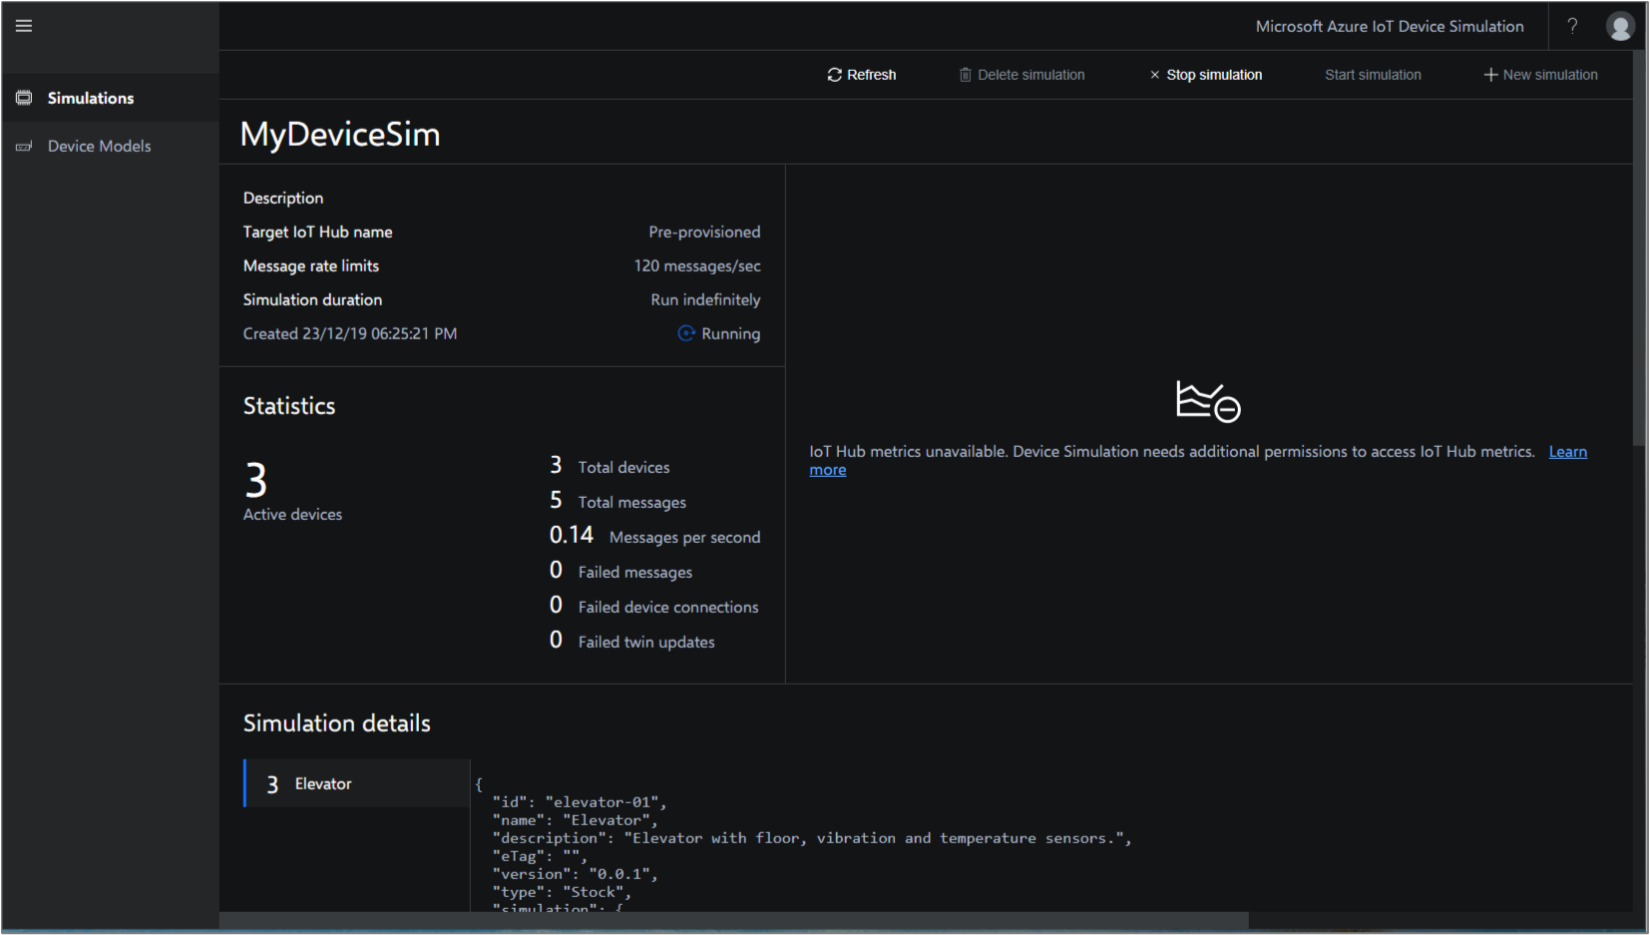
Leave the remaining default valuesTarget IoT Hub Set to Use pre-provisioned IoT Hub. Select Start simulation. In the device simulation dashboard, Active devices and Total messages are displayed.
Analyze data
In this section, you perform basic analytics on your time series data by using the Azure Time Series Insights Gen2 Explorer.
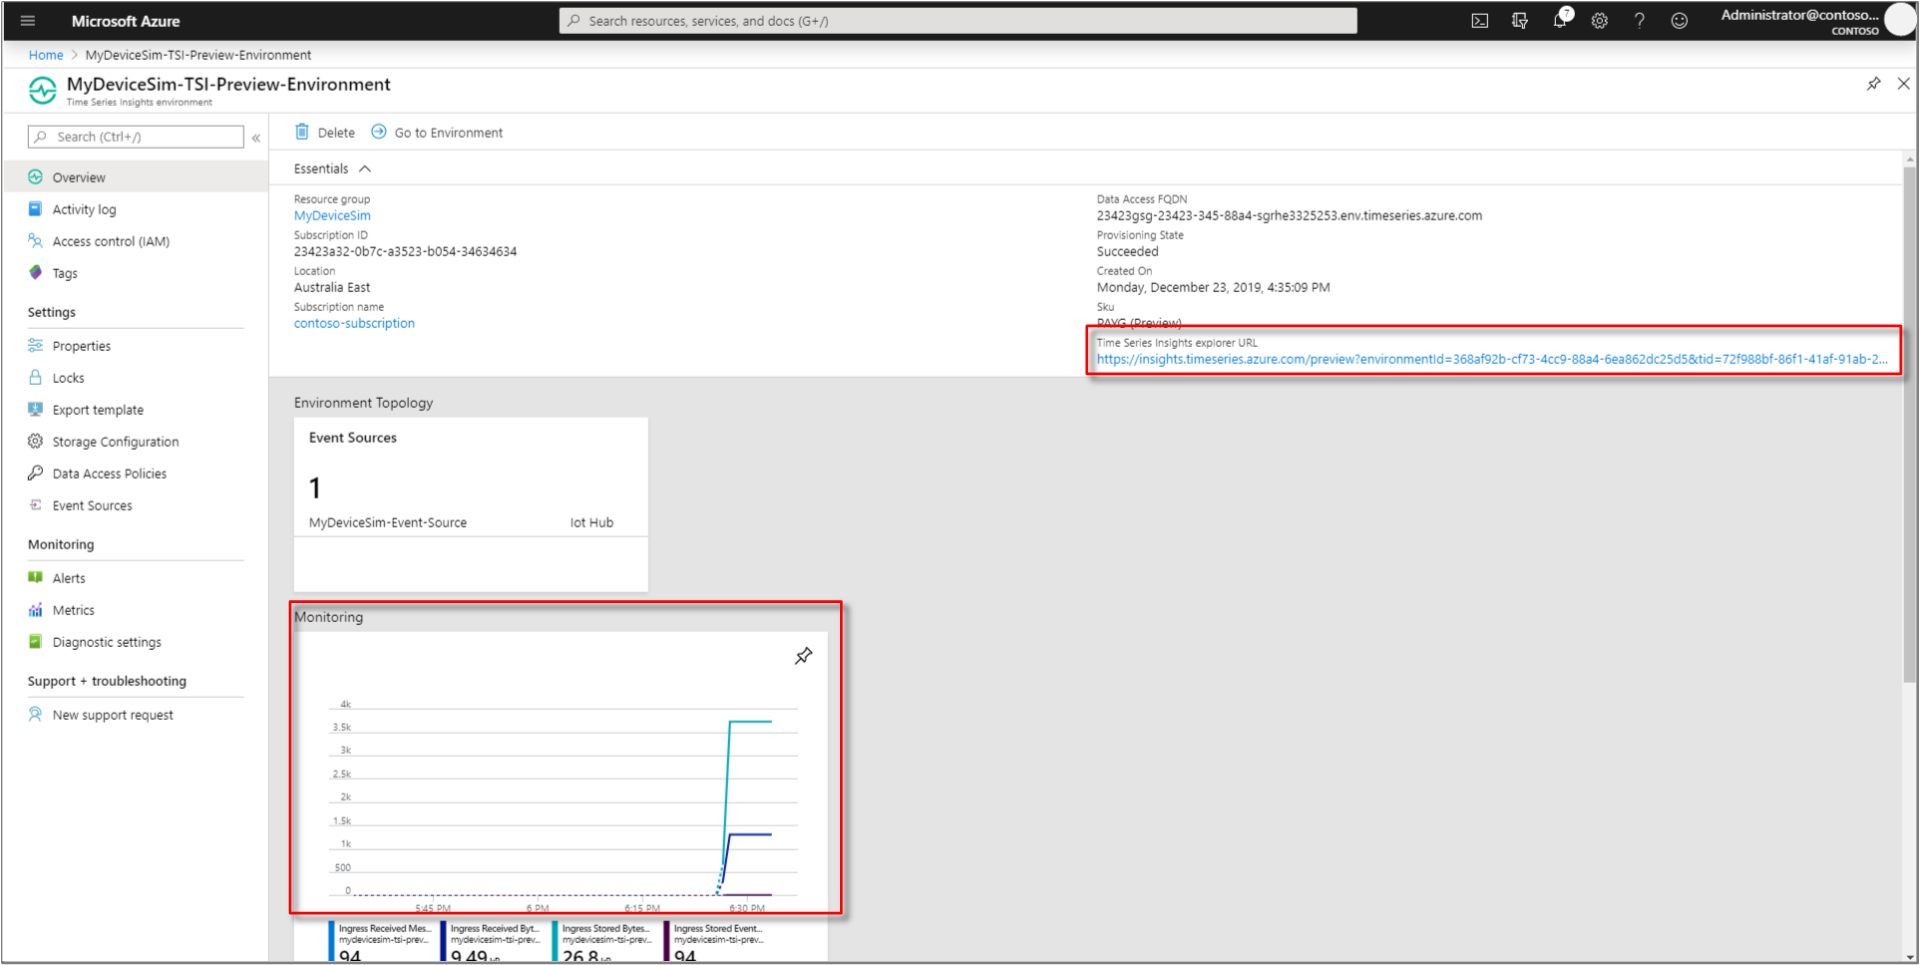
Go to your Azure Time Series Insights Gen2 Explorer by selecting the URL from the resource page in the Azure portal.
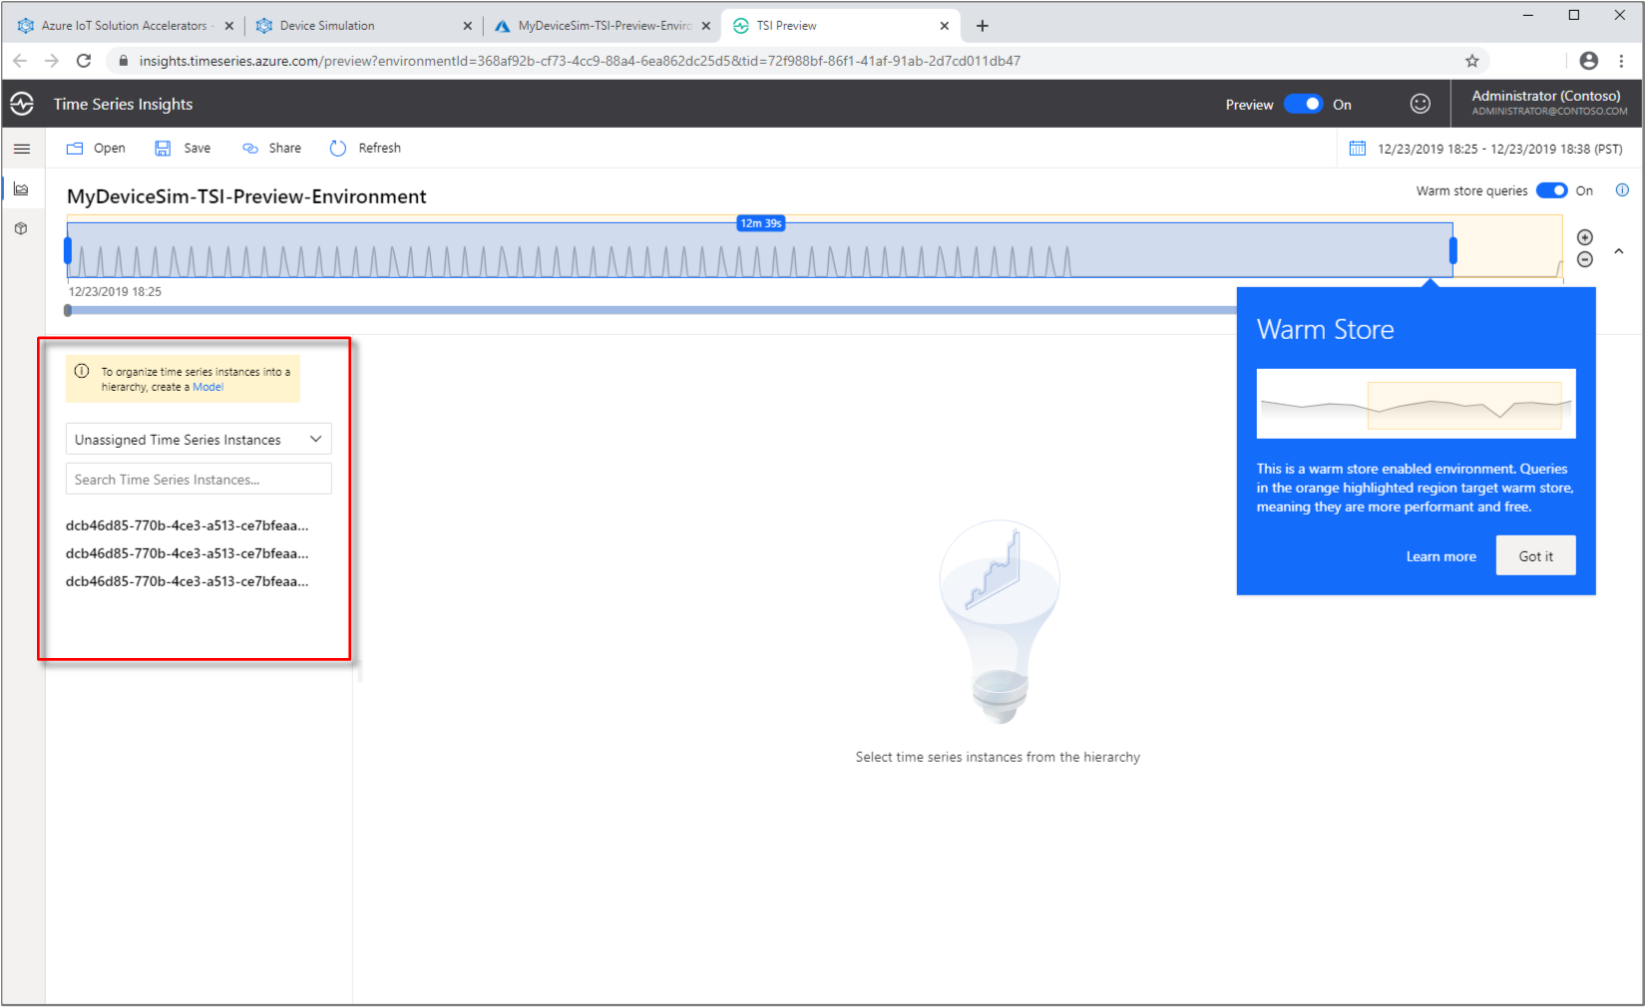
In the Azure Time Series Insights Gen2 Explorer, a bar spanning the top of the screen will appear. This is your availability picker. Ensure that you have at least two 2 m selected, and if needed, expand the time frame by selecting and dragging the picker handles to the left and right.
Time Series Instances will be displayed on the left-hand side.
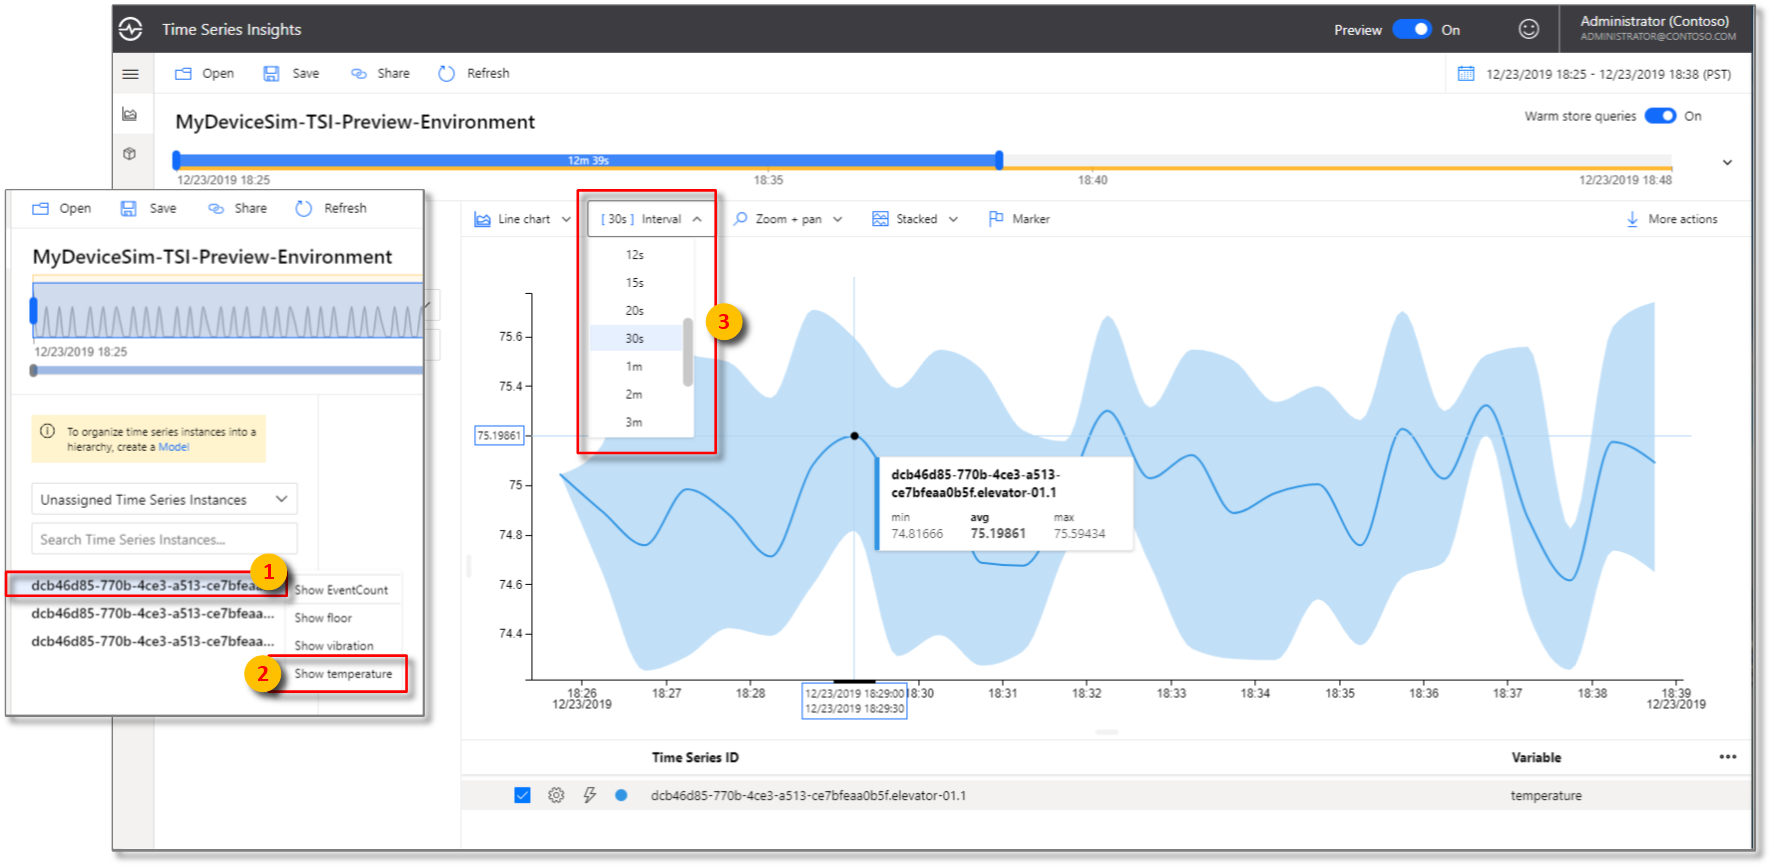
Select the first-time series instance. Then, select Show temperature.
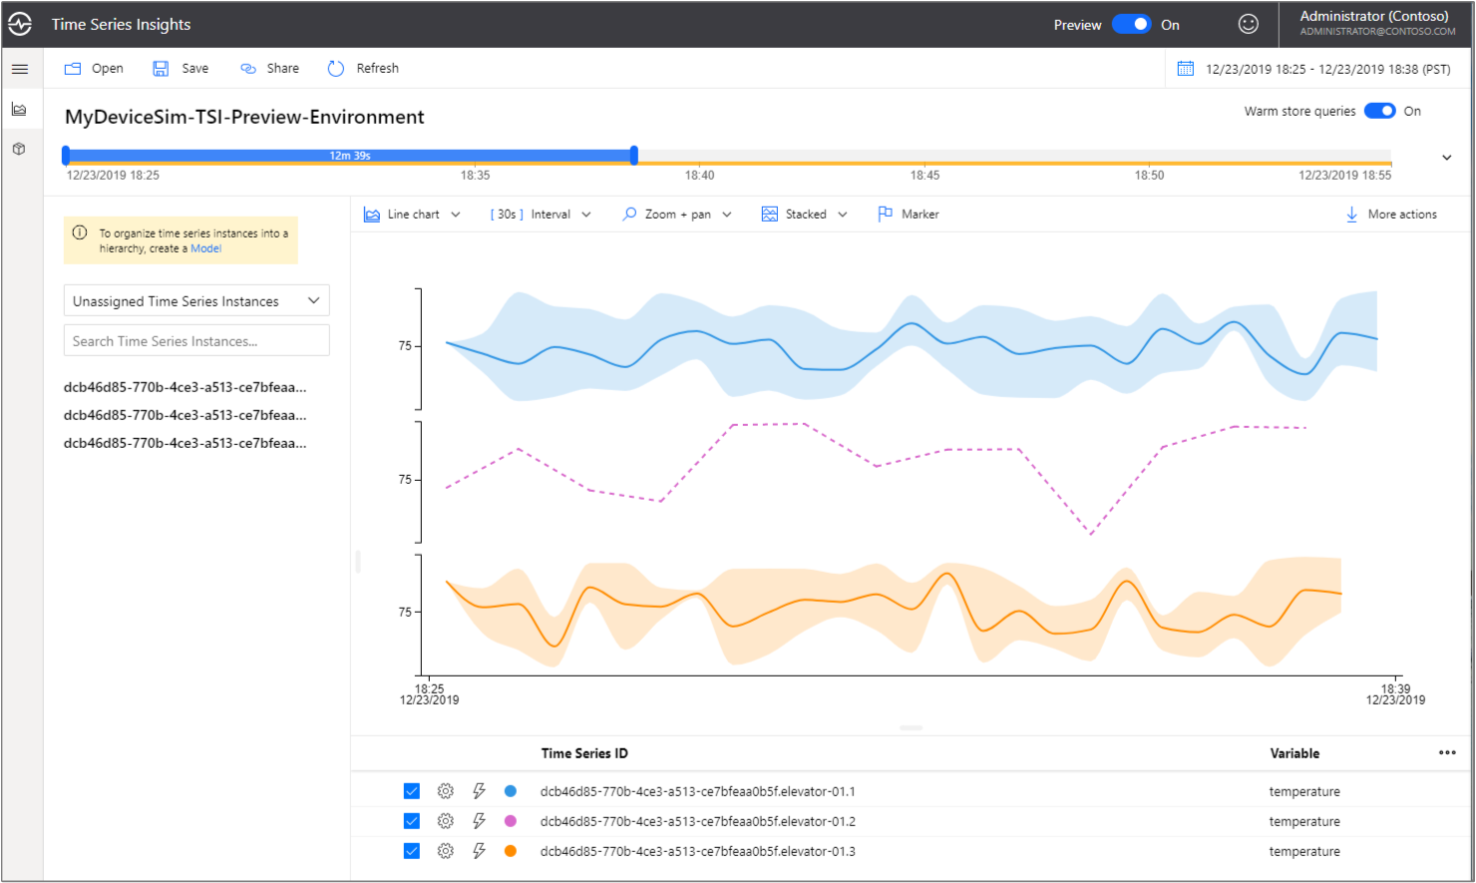
A time series chart appears. Change the Interval to 30s.
Repeat the previous step with the other two time series instances so that you're viewing all three, as shown in this chart:
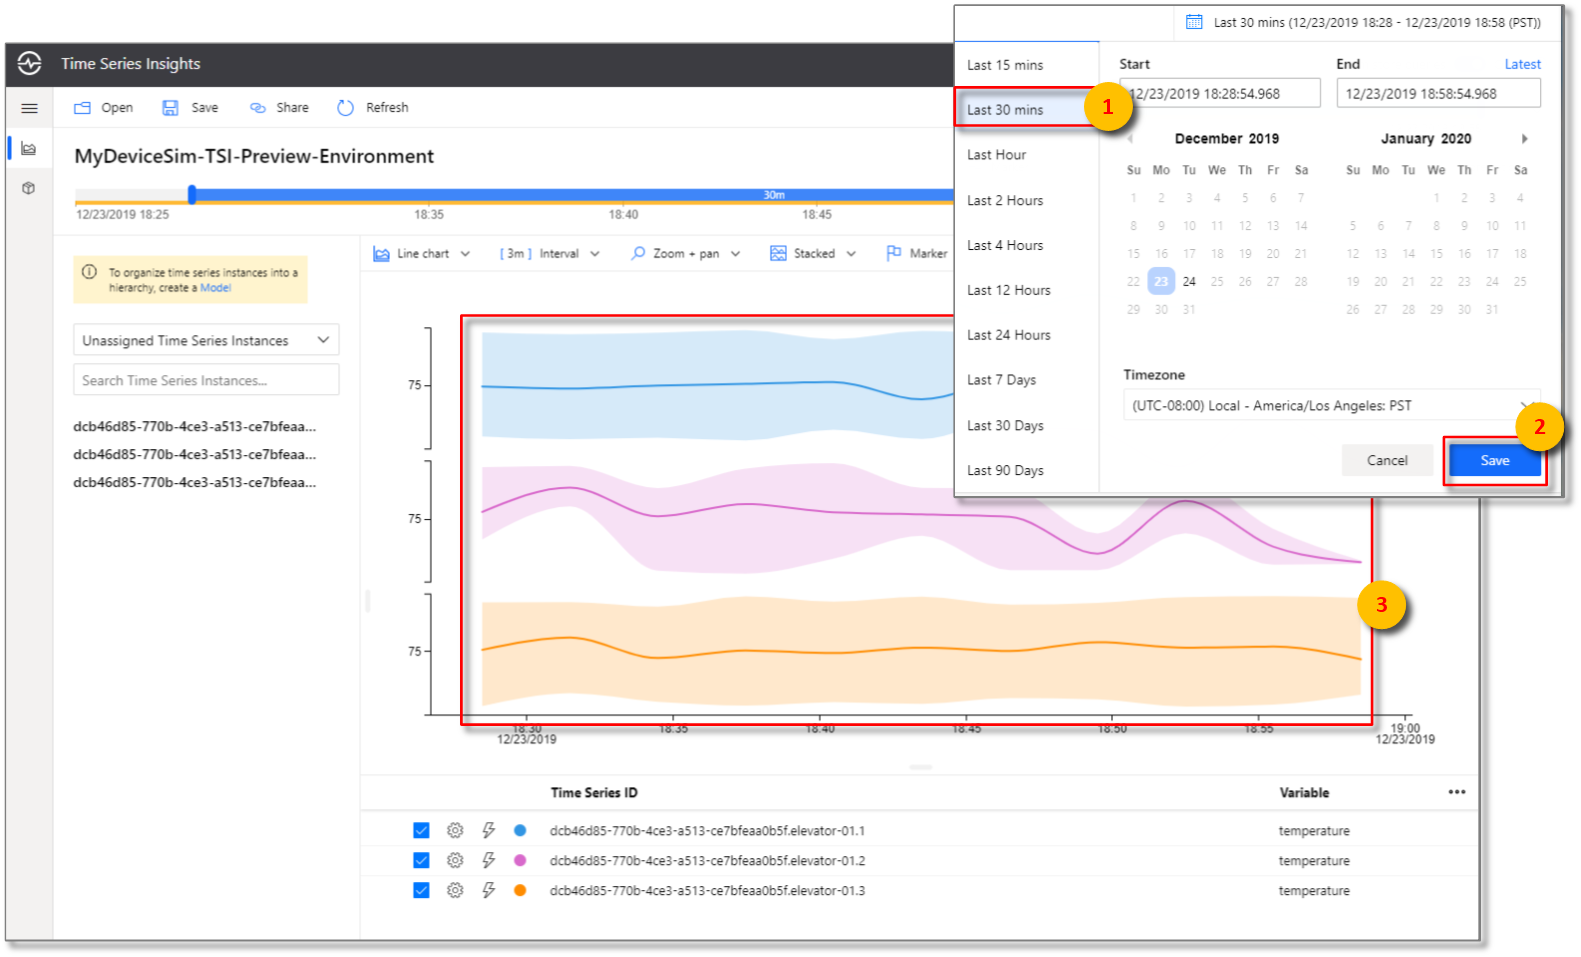
Select the time span picker in the upper right corner. Here you can select specific start and end times down to the millisecond, or choose from pre-configured options such as Last 30 minutes. You can also change the default time zone.
The solution accelerator's progress over the Last 30 minutes is now displayed in the Azure Time Series Insights Gen2 Explorer.
Define and apply a model
In this section, you apply a model to structure your data. To complete the model, you define types, hierarchies, and instances. To learn more about data modeling, read Time Series Model.
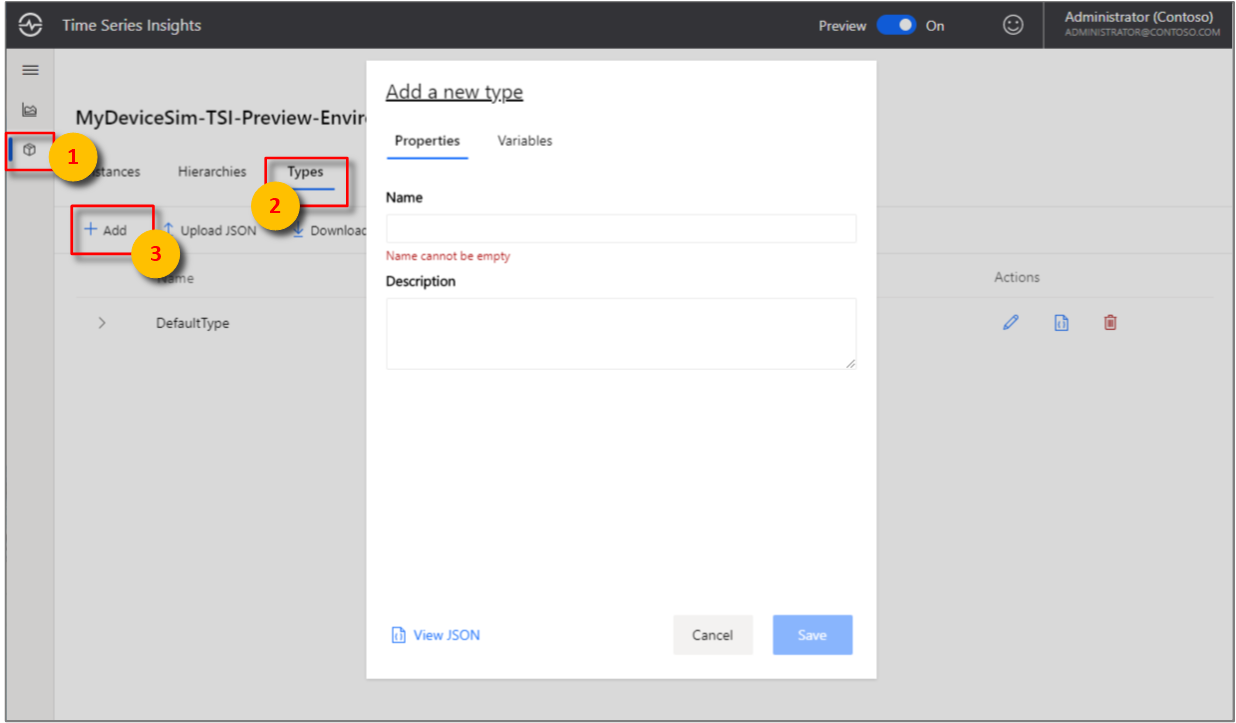
In the Explorer, select the Model tab:
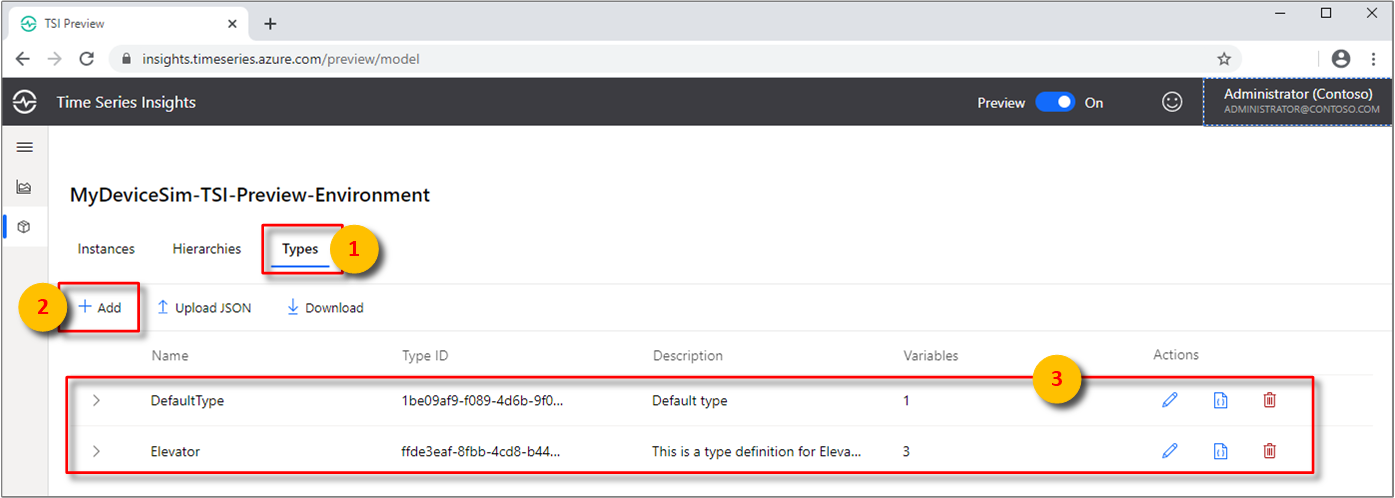
In the Types tab, select + Add.
Enter the following parameters:
Parameter Action Name Enter Elevator Description Enter This is a type definition for Elevator Next, select the Variables tab.
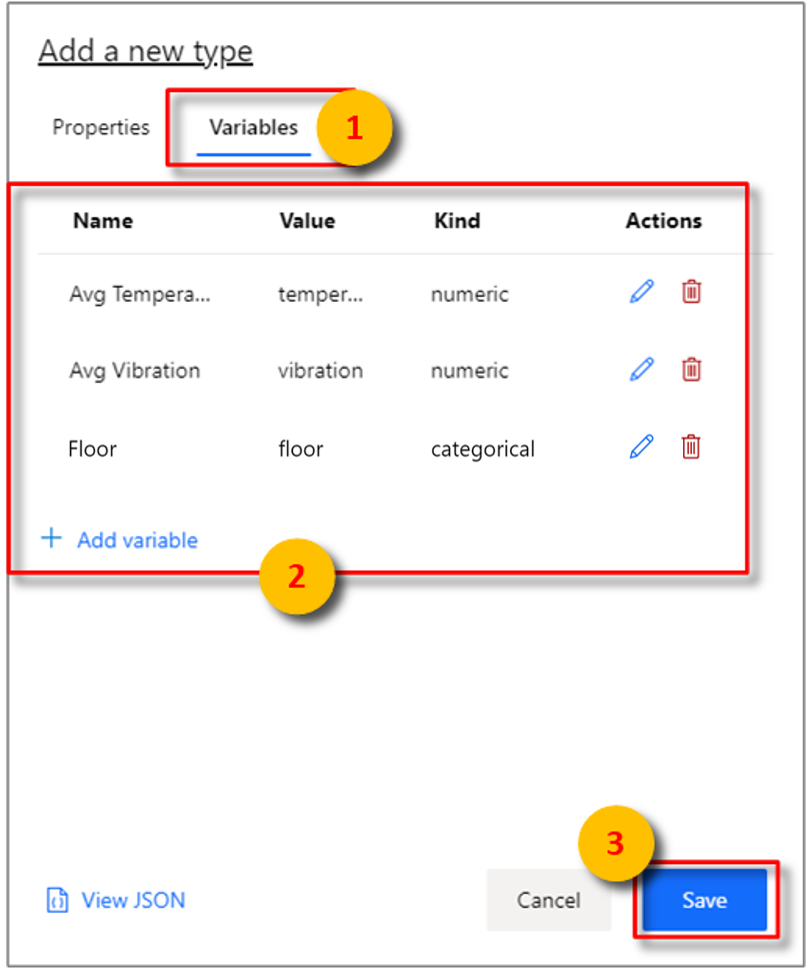
Select + Add Variable and fill in the following values for the first variable of the Elevator type. You will author three variables in total.
Parameter Action Name Enter Avg Temperature. Kind Select Numeric Value Select from preset: Select temperature (Double).
Note: It might take a few minutes for Value to be automatically populated after Azure Time Series Insights Gen2 starts receiving events.Aggregation Operation Expand Advanced Options.
Select AVG.Select Apply. Then, + Add Variable again, and set the following values:
Parameter Action Name Enter Avg Vibration. Kind Select Numeric Value Select from preset: Select vibration (Double).
Note: It might take a few minutes for Value to be automatically populated after Azure Time Series Insights Gen2 starts receiving events.Aggregation Operation Expand Advanced Options.
Select AVG.Select Apply. Then, + Add Variable again, and set the following values for the third and final variable:
Parameter Action Name Enter Floor. Kind Select Categorical Value Select from preset: Select Floor (Double).
Note: It might take a few minutes for Value to be automatically populated after Azure Time Series Insights Gen2 starts receiving events.Categories Label: Values
Lower: 1,2,3,4
Middle: 5,6,7,8,9
Upper: 10,11,12,13,14,15Default Category Enter Unknown Select Apply.
Select Save. Three variables are created and displayed.
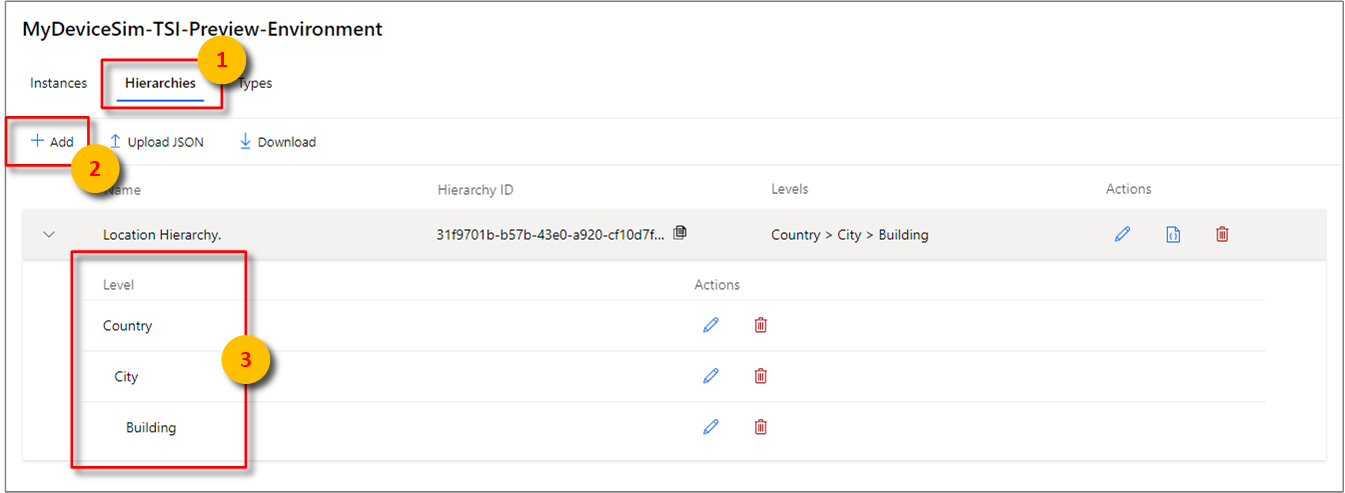
Select the Hierarchies tab. Then, select + Add.
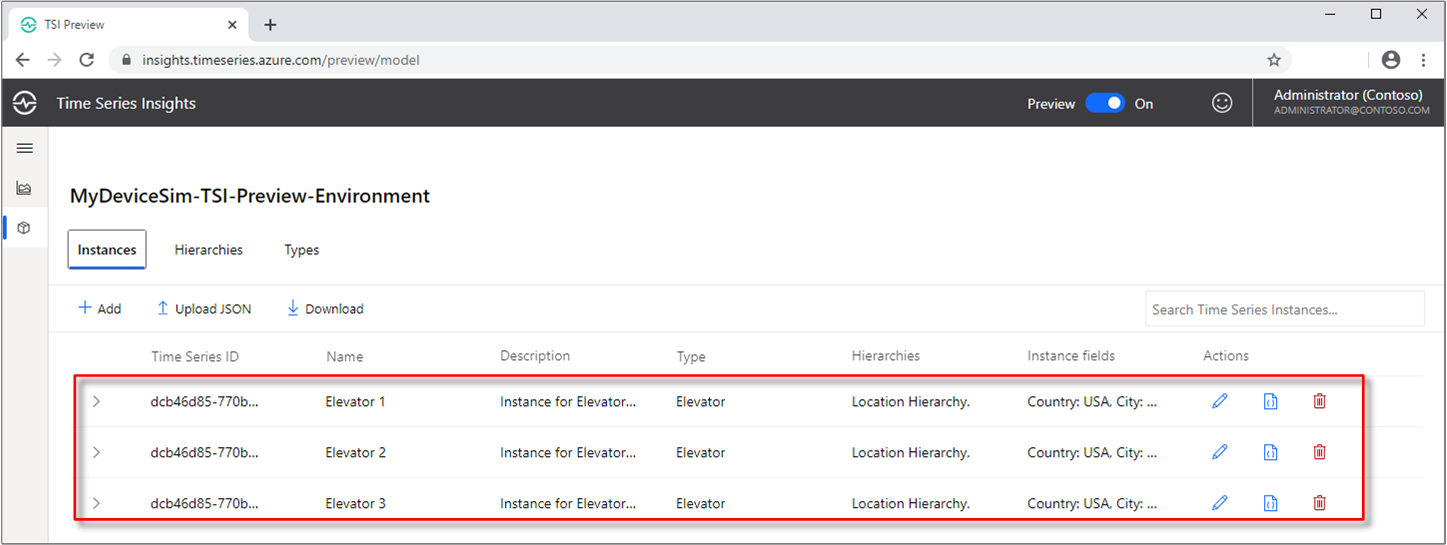
Navigate to Instances.
Under Actions on the far right, and select the pencil icon to edit the first instance with the following values:
Parameter Action Type Select Elevator. Name Enter Elevator 1 Description Enter Instance for Elevator 1 Navigate to Instance Fields and enter the following values:
Parameter Action Hierarchies Select Location Hierarchy Country Enter USA City Enter Seattle Building Enter Space Needle Select Save.
Repeat the previous step with the other two instances while using the following values:
For Elevator 2:
Parameter Action Type Select Elevator. Name Enter Elevator 2 Description Enter Instance for Elevator 2 Hierarchies Select Location Hierarchy Country Enter USA City Enter Seattle Building Enter Pacific Science Center For Elevator 3:
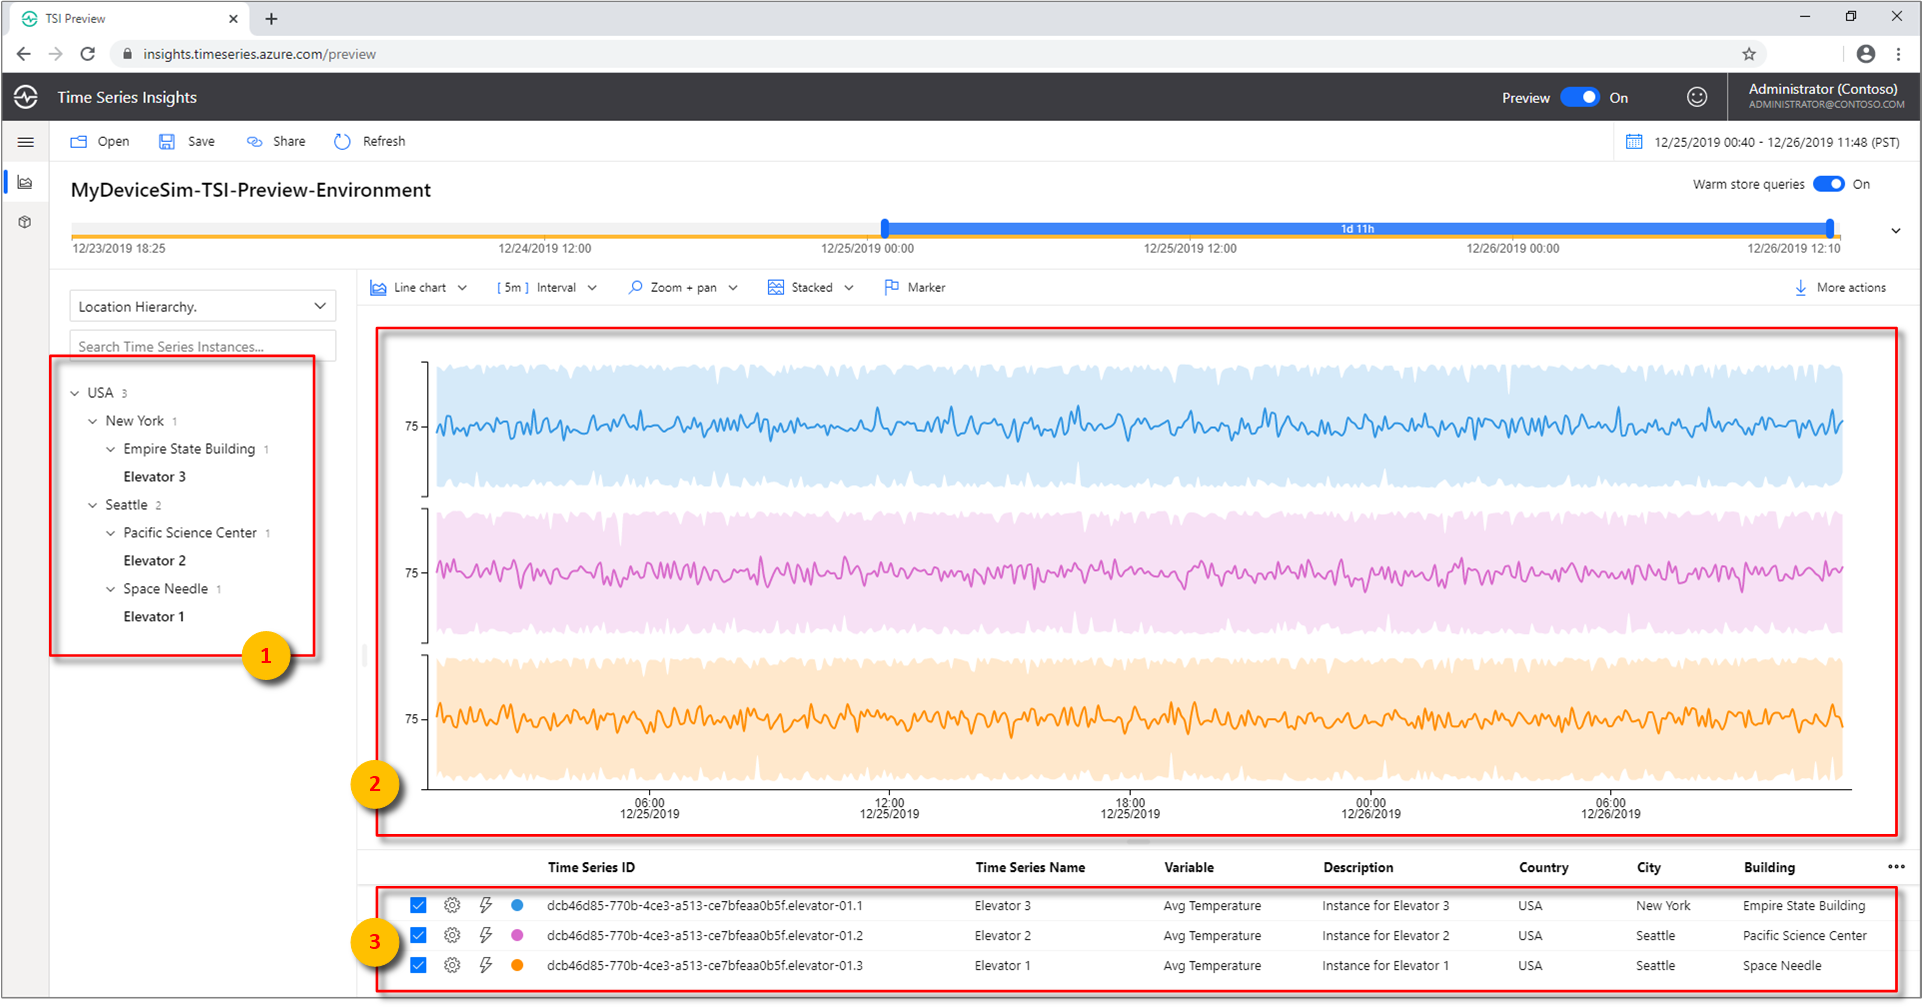
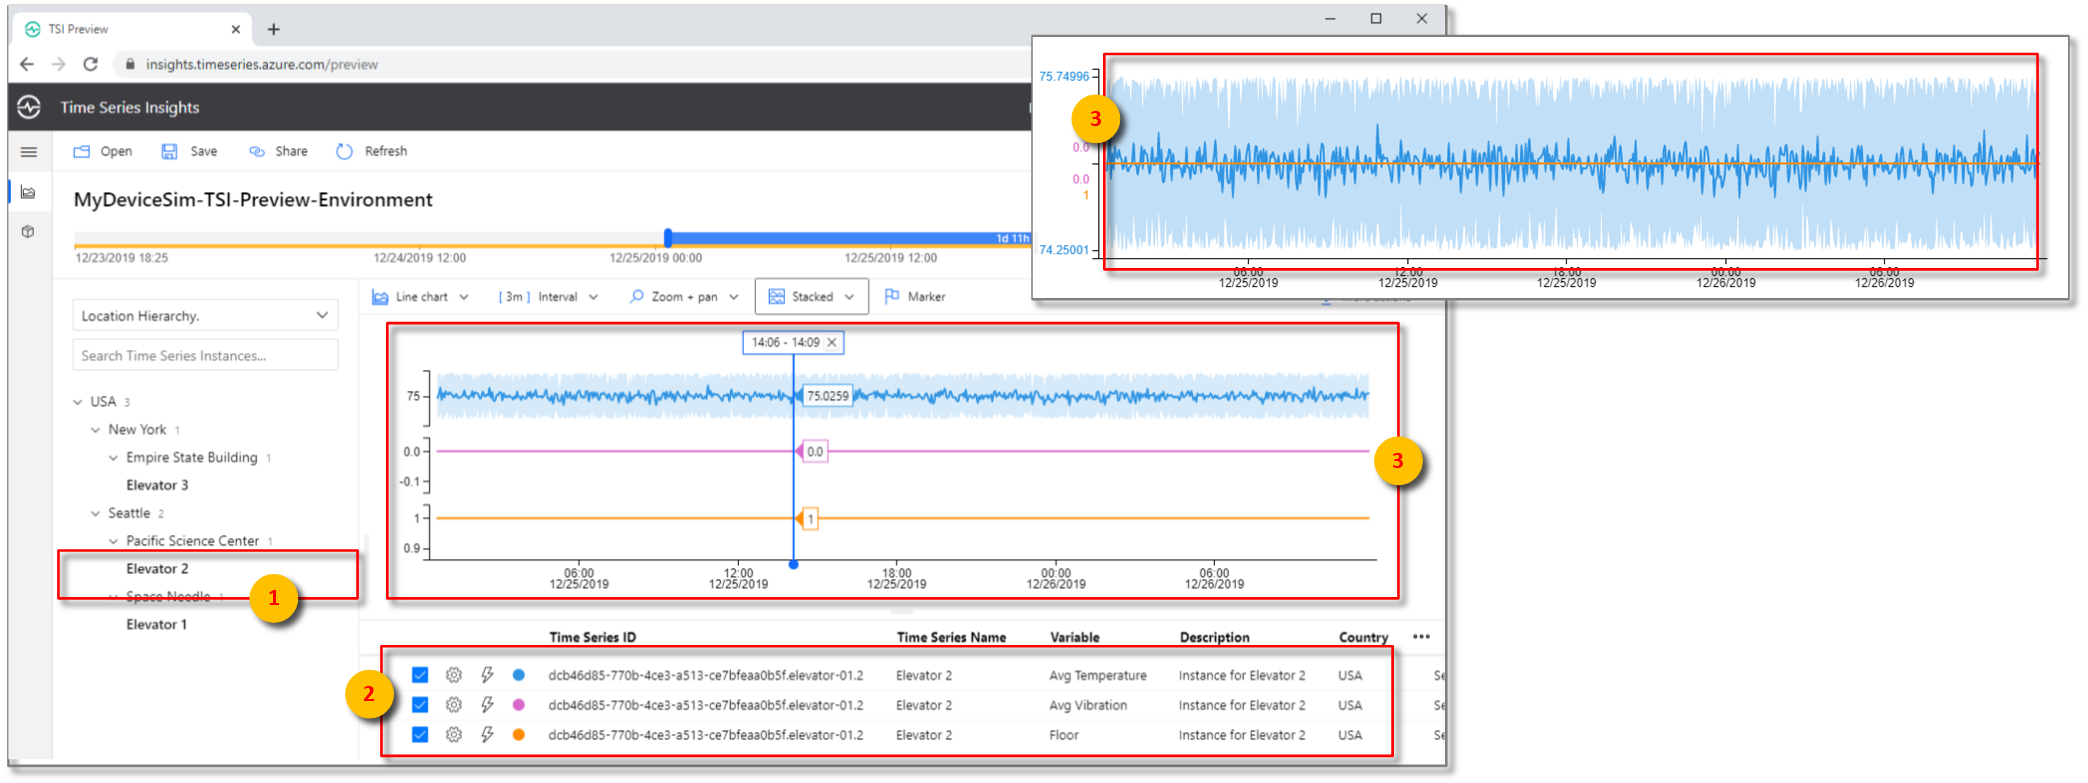
Parameter Action Type Select Elevator. Name Enter Elevator 3 Description Enter Instance for Elevator 3 Hierarchies Select Location Hierarchy Country Enter USA City Enter New York Building Enter Empire State Building Navigate back to the Analyze tab to view the charting pane. Under Location Hierarchy, expand all hierarchy levels to display the time series instances:
Under Pacific Science Center, select the Time Series Instance Elevator 2, and then select Show Average Temperature.
For the same instance, Elevator 2, select Show Floor.
With your categorical variable, you can determine how much time the elevator spent on the upper, lower, and middle floors.
Clean up resources
Now that you've completed the tutorial, clean up the resources you created:
- From the left menu in the Azure portal, select All resources, locate your Azure Time Series Insights Gen2 resource group.
- Either delete the entire resource group (and all resources contained within it) by selecting Delete or remove each resource individually.
Next steps
In this tutorial, you learned how to:
- Create an Azure Time Series Insights Gen2 PAYG environment.
- Connect the Azure Time Series Insights Gen2 environment to an iot hub.
- Run a solution accelerator sample to stream data to the Azure Time Series Insights Gen2 environment.
- Perform a basic analysis of the data.
- Define a Time Series Model type and hierarchy, and associate them with your instances.
Now that you know how to create your own Azure Time Series Insights Gen2 environment, learn more about the key concepts in Azure Time Series Insights Gen2.
Read about Azure Time Series Insights Gen2 ingestion:
Read about Azure Time Series Insights Gen2 storage:
Learn more about Time Series Models:
Learn more about connecting your environment to Power BI:
