Note
Access to this page requires authorization. You can try signing in or changing directories.
Access to this page requires authorization. You can try changing directories.
Azure Files offers fully managed file shares in the cloud that are accessible via the industry standard Server Message Block (SMB) protocol or Network File System (NFS) protocol. In this tutorial, you'll learn a few ways you can use an SMB Azure file share in a Windows virtual machine (VM).
If you don't have an Azure subscription, create a trial account before you begin.
- Create an Azure storage account
- Create an SMB Azure file share
- Deploy a VM
- Connect to the VM
- Mount the file share to your VM
Applies to
| File share type | SMB | NFS |
|---|---|---|
| Standard file shares (GPv2), LRS/ZRS | ||
| Standard file shares (GPv2), GRS/GZRS | ||
| Premium file shares (FileStorage), LRS/ZRS |
Getting started
Create a storage account
Before you can work with an Azure file share, you must create an Azure storage account.
A storage account is a shared pool of storage in which you can deploy an Azure file share or other storage resources, such as blobs or queues. A storage account can contain an unlimited number of shares. A share can store an unlimited number of files, up to the capacity limits of the storage account.
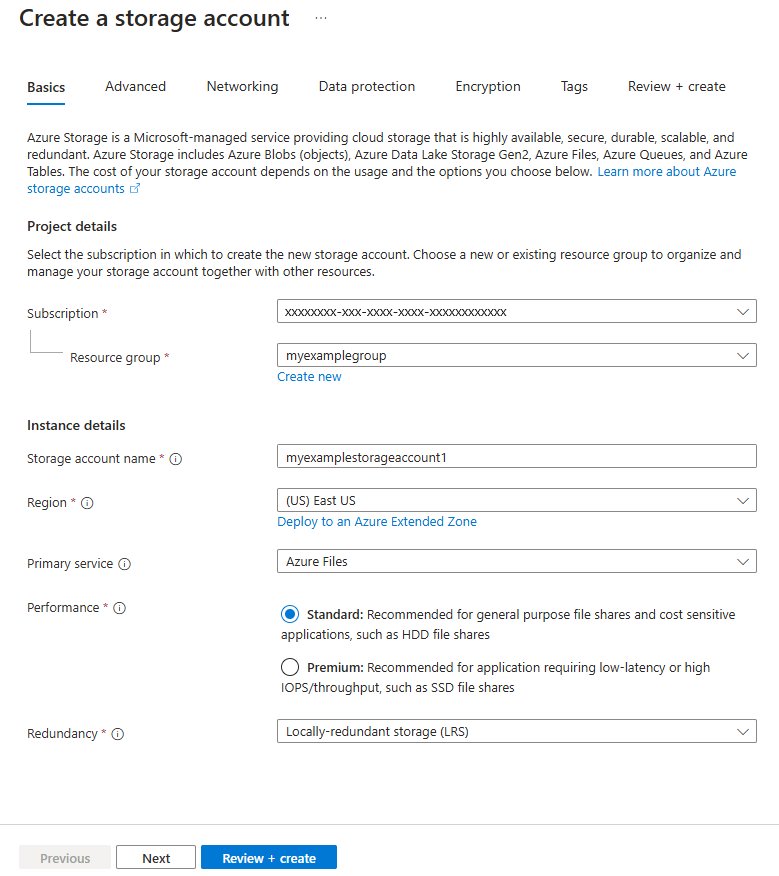
To create a storage account using the Azure portal:
Under Azure services, select Storage accounts.
Select + Create to create a storage account.
Under Project details, select the Azure subscription in which to create the storage account. If you have only one subscription, it should be the default.
If you want to create a new resource group, select Create new and enter a name such as myexamplegroup.
Under Instance details, provide a name for the storage account. You might need to add a few random numbers to make it a globally unique name. A storage account name must be all lowercase and numbers, and must be between 3 and 24 characters. Make a note of your storage account name. You'll use it later.
In Region, select the region you want to create your storage account in.
In Primary service, select Azure Files.
In Performance, keep the default value of Standard.
In Redundancy, select Locally redundant storage (LRS).
Select Review + create to review your settings. Azure will run a final validation.
When validation is complete, select Create. You should see a notification that deployment is in progress.
When you see a notification that your deployment is complete, select Go to resource.
Create an Azure file share
Next, create an SMB Azure file share.
When the Azure storage account deployment is complete, select Go to resource.
In the service menu, under Data storage, select File shares.
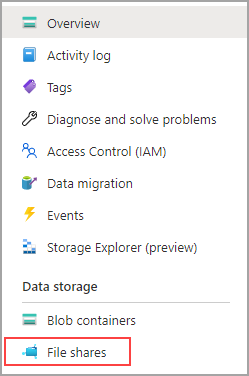
Select + File Share.

Name the new file share qsfileshare and leave Transaction optimized selected for Tier.
Select Review + create and then Create to create the file share.
Create a new txt file called qsTestFile on your local machine.
Select the new file share, then on the file share location, select Upload.

Browse to the location where you created your .txt file > select qsTestFile.txt > select Upload.
Deploy a VM
So far, you've created an Azure storage account and a file share with one file in it. Next, create an Azure VM to represent the on-premises server.
Select Home, and then select Create a resource in the upper left-hand corner of the Azure portal.
Under Popular services, select Virtual machine.
In the Basics tab, under Project details, select the resource group you created earlier.
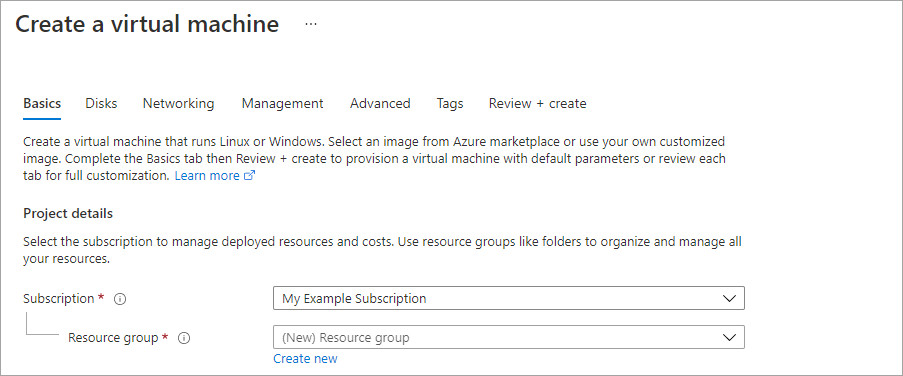
Under Instance details, name the VM qsVM.
Under Availability options, select No infrastructure redundancy required.
For Security type, select Standard.
For Image, select Windows Server 2022 Datacenter: Azure Edition - Gen2.
Leave the default settings for Region, and Size.
Under Administrator account, add a Username and enter a Password for the VM.
Under Inbound port rules, choose Allow selected ports and then select RDP (3389) and HTTP from the drop-down.
Select Review + create.
Select Create. Creating a new VM will take a few minutes to complete.
Once your VM deployment is complete, select Go to resource.
Connect to your VM
Now that you've created the VM, connect to it so you can mount your file share.
Select Connect on the virtual machine properties page.

In the Connect to virtual machine page, keep the default options to connect by IP address over port number 3389 and select Download RDP file.
Open the downloaded RDP file and select Connect when prompted.
In the Windows Security window, select More choices and then Use a different account. Type the username as localhost\username, where <username> is the VM admin username you created for the virtual machine. Enter the password you created for the virtual machine, and then select OK.
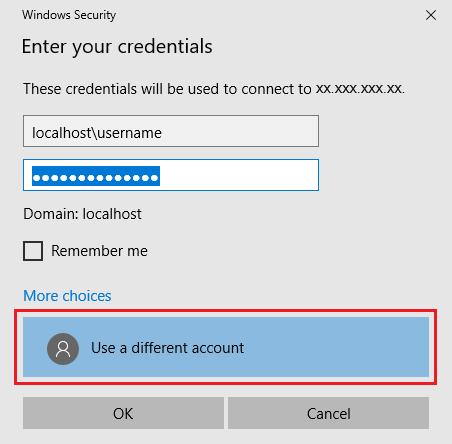
You might receive a certificate warning during the sign-in process. Select Yes or Continue to create the connection.
Map the Azure file share to a Windows drive
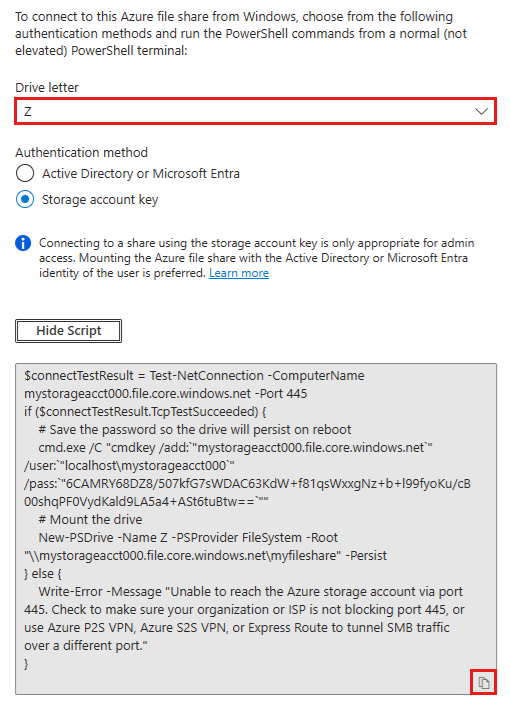
In the Azure portal, navigate to the qsfileshare fileshare and select Connect.
Select a drive letter and then Show script.
Copy the script from the Azure portal and paste it into Notepad, as in the following example.
In the VM, open PowerShell and paste in the contents of the Notepad, then press enter to run the command. It should map the drive.
Clean up resources
When you're done, delete the resource group. Deleting the resource group deletes the storage account, the Azure file share, and any other resources deployed inside the resource group.
If there are locks on the storage account, you'll need to remove them first. Navigate to the storage account and select Settings > Locks. If any locks are listed, delete them.
You might also need to delete the Azure Backup Recovery Services vault before you're allowed to delete the resource group.
- Select Home and then Resource groups.
- Select the resource group you want to delete.
- Select Delete resource group. A window opens and displays a warning about the resources that will be deleted with the resource group.
- Enter the name of the resource group, and then select Delete.
