Tutorial: Optimize indexing by using the push API
Azure AI Search supports two basic approaches for importing data into a search index: push your data into the index programmatically, or pull in the data by pointing an Azure AI Search indexer at a supported data source.
This tutorial explains how to efficiently index data using the push model by batching requests and using an exponential backoff retry strategy. You can download and run the sample application. This article explains the key aspects of the application and what factors to consider when indexing data.
This tutorial uses C# and the Azure.Search.Documents library from the Azure SDK for .NET to perform the following tasks:
- Create an index
- Test various batch sizes to determine the most efficient size
- Index batches asynchronously
- Use multiple threads to increase indexing speeds
- Use an exponential backoff retry strategy to retry failed documents
Prerequisites
The following services and tools are required for this tutorial.
An Azure subscription. If you don't have one, you can create a trial subscription.
Visual Studio, any edition. Sample code and instructions were tested on the free Community edition.
Download files
Source code for this tutorial is in the optimize-data-indexing/v11 folder in the Azure-Samples/azure-search-dotnet-scale GitHub repository.
Key considerations
Factors that affect indexing speeds are listed next. To learn more, see Index large data sets.
- Service tier and number of partitions/replicas: Adding partitions or upgrading your tier increases indexing speeds.
- Index schema complexity: Adding fields and field properties lowers indexing speeds. Smaller indexes are faster to index.
- Batch size: The optimal batch size varies based on your index schema and dataset.
- Number of threads/workers: A single thread doesn't take full advantage of indexing speeds.
- Retry strategy: An exponential backoff retry strategy is a best practice for optimum indexing.
- Network data transfer speeds: Data transfer speeds can be a limiting factor. Index data from within your Azure environment to increase data transfer speeds.
Step 1: Create an Azure AI Search service
To complete this tutorial, you need an Azure AI Search service, which you can create in the Azure portal, or find an existing service under your current subscription. We recommend using the same tier you plan to use in production so that you can accurately test and optimize indexing speeds.
Get an admin key and URL for Azure AI Search
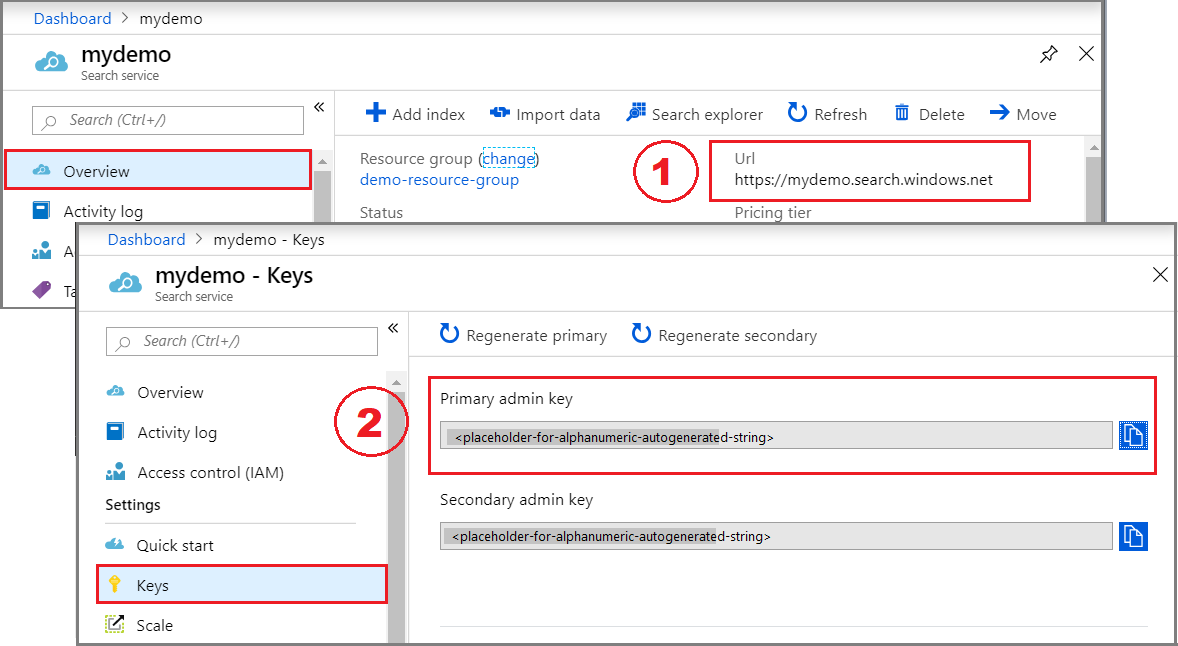
This tutorial uses key-based authentication. Copy an admin API key to paste into the appsettings.json file.
Sign in to the Azure portal. Get the endpoint URL from your search service Overview page. An example endpoint might look like
https://mydemo.search.azure.cn.In Settings > Keys, get an admin key for full rights on the service. There are two interchangeable admin keys, provided for business continuity in case you need to roll one over. You can use either the primary or secondary key on requests for adding, modifying, and deleting objects.

Step 2: Set up your environment
Start Visual Studio and open OptimizeDataIndexing.sln.
In Solution Explorer, open appsettings.json to provide your service's connection information.
{
  "SearchServiceUri": "https://{service-name}.search.azure.cn",
  "SearchServiceAdminApiKey": "",
  "SearchIndexName": "optimize-indexing"
}
Step 3: Explore the code
Once you update appsettings.json, the sample program in OptimizeDataIndexing.sln should be ready to build and run.
This code is derived from the C# section of Quickstart: Full text search using the Azure SDKs. You can find more detailed information on the basics of working with the .NET SDK in that article.
This simple C#/.NET console app performs the following tasks:
- Creates a new index based on the data structure of the C#
Hotelclass (which also references theAddressclass) - Tests various batch sizes to determine the most efficient size
- Indexes data asynchronously
- Using multiple threads to increase indexing speeds
- Using an exponential backoff retry strategy to retry failed items
Before running the program, take a minute to study the code and the index definitions for this sample. The relevant code is in several files:
- Hotel.cs and Address.cs contain the schema that defines the index
- DataGenerator.cs contains a simple class to make it easy to create large amounts of hotel data
- ExponentialBackoff.cs contains code to optimize the indexing process as described in this article
- Program.cs contains functions that create and delete the Azure AI Search index, indexes batches of data, and tests different batch sizes
Create the index
This sample program uses the Azure SDK for .NET to define and create an Azure AI Search index. It takes advantage of the FieldBuilder class to generate an index structure from a C# data model class.
The data model is defined by the Hotel class, which also contains references to the Address class. The FieldBuilder drills down through multiple class definitions to generate a complex data structure for the index. Metadata tags are used to define the attributes of each field, such as whether it's searchable or sortable.
The following snippets from the Hotel.cs file show how a single field, and a reference to another data model class, can be specified.
. . .
[SearchableField(IsSortable = true)]
public string HotelName { get; set; }
. . .
public Address Address { get; set; }
. . .
In the Program.cs file, the index is defined with a name and a field collection generated by the FieldBuilder.Build(typeof(Hotel)) method, and then created as follows:
private static async Task CreateIndexAsync(string indexName, SearchIndexClient indexClient)
{
    // Create a new search index structure that matches the properties of the Hotel class.
    // The Address class is referenced from the Hotel class. The FieldBuilder
    // will enumerate these to create a complex data structure for the index.
    FieldBuilder builder = new FieldBuilder();
    var definition = new SearchIndex(indexName, builder.Build(typeof(Hotel)));

    await indexClient.CreateIndexAsync(definition);
}
Generate data
A simple class is implemented in the DataGenerator.cs file to generate data for testing. The sole purpose of this class is to make it easy to generate a large number of documents with a unique ID for indexing.
To get a list of 100,000 hotels with unique IDs, run the following lines of code:
long numDocuments = 100000;
DataGenerator dg = new DataGenerator();
List<Hotel> hotels = dg.GetHotels(numDocuments, "large");
There are two sizes of hotels available for testing in this sample: small and large.
The schema of your index has an effect on indexing speeds. For this reason, it makes sense to convert this class to generate data that best matches your intended index schema after you run through this tutorial.
Step 4: Test batch sizes
Azure AI Search supports the following APIs to load single or multiple documents into an index:
Indexing documents in batches significantly improves indexing performance. These batches can be up to 1,000 documents, or up to about 16 MB per batch.
Determining the optimal batch size for your data is a key component of optimizing indexing speeds. The two primary factors influencing the optimal batch size are:
- The schema of your index
- The size of your data
Because the optimal batch size is dependent on your index and your data, the best approach is to test different batch sizes to determine what results in the fastest indexing speeds for your scenario.
The following function demonstrates a simple approach to testing batch sizes.
public static async Task TestBatchSizesAsync(SearchClient searchClient, int min = 100, int max = 1000, int step = 100, int numTries = 3)
{
    DataGenerator dg = new DataGenerator();

    Console.WriteLine("Batch Size \t Size in MB \t MB / Doc \t Time (ms) \t MB / Second");
    for (int numDocs = min; numDocs <= max; numDocs += step)
    {
        List<TimeSpan> durations = new List<TimeSpan>();
        double sizeInMb = 0.0;
        for (int x = 0; x < numTries; x++)
        {
            List<Hotel> hotels = dg.GetHotels(numDocs, "large");

            DateTime startTime = DateTime.Now;
            await UploadDocumentsAsync(searchClient, hotels).ConfigureAwait(false);
            DateTime endTime = DateTime.Now;
            durations.Add(endTime - startTime);

            sizeInMb = EstimateObjectSize(hotels);
        }

        var avgDuration = durations.Average(timeSpan => timeSpan.TotalMilliseconds);
        var avgDurationInSeconds = avgDuration / 1000;
        var mbPerSecond = sizeInMb / avgDurationInSeconds;

        Console.WriteLine("{0} \t\t {1} \t\t {2} \t\t {3} \t {4}", numDocs, Math.Round(sizeInMb, 3), Math.Round(sizeInMb / numDocs, 3), Math.Round(avgDuration, 3), Math.Round(mbPerSecond, 3));

        // Pausing 2 seconds to let the search service catch its breath
        Thread.Sleep(2000);
    }

    Console.WriteLine();
}
Because not all documents are the same size (although they are in this sample), we estimate the size of the data we're sending to the search service. You can do this by using the following function that first converts the object to json and then determines its size in bytes. This technique allows us to determine which batch sizes are most efficient in terms of MB/s indexing speeds.
// Returns size of object in MB
public static double EstimateObjectSize(object data)
{
    // converting object to byte[] to determine the size of the data
    BinaryFormatter bf = new BinaryFormatter();
    MemoryStream ms = new MemoryStream();
    byte[] Array;

    // converting data to json for more accurate sizing
    var json = JsonSerializer.Serialize(data);
    bf.Serialize(ms, json);
    Array = ms.ToArray();

    // converting from bytes to megabytes
    double sizeInMb = (double)Array.Length / 1000000;

    return sizeInMb;
}
The function requires a SearchClient plus the number of tries you'd like to test for each batch size. Because there might be variability in indexing times for each batch, try each batch three times by default to make the results more statistically significant.
await TestBatchSizesAsync(searchClient, numTries: 3);
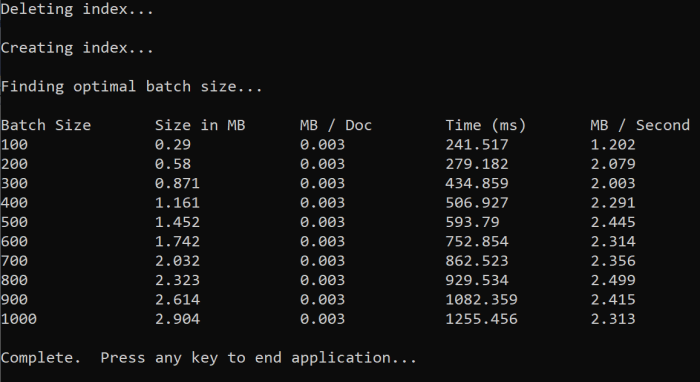
When you run the function, you should see an output in your console like the following example:

Identify which batch size is most efficient and then use that batch size in the next step of the tutorial. You might see a plateau in MB/s across different batch sizes.
Step 5: Index the data
Now that you identified the batch size you intend to use, the next step is to begin to index the data. To index data efficiently, this sample:
- uses multiple threads/workers
- implements an exponential backoff retry strategy
Uncomment lines 41 through 49, and then rerun the program. On this run, the sample generates and sends batches of documents, up to 100,000 if you run the code without changing the parameters.
Use multiple threads/workers
To take full advantage of Azure AI Search's indexing speeds, use multiple threads to send batch indexing requests concurrently to the service.
Several of the key considerations previously mentioned can affect the optimal number of threads. You can modify this sample and test with different thread counts to determine the optimal thread count for your scenario. However, as long as you have several threads running concurrently, you should be able to take advantage of most of the efficiency gains.
As you ramp up the requests hitting the search service, you might encounter HTTP status codes indicating the request didn't fully succeed. During indexing, two common HTTP status codes are:
- 503 Service Unavailable: This error means that the system is under heavy load and your request can't be processed at this time.
- 207 Multi-Status: This error means that some documents succeeded, but at least one failed.
Implement an exponential backoff retry strategy
If a failure happens, requests should be retried using an exponential backoff retry strategy.
Azure AI Search's .NET SDK automatically retries 503s and other failed requests but you should implement your own logic to retry 207s. Open-source tools such as Polly can be useful in a retry strategy.
In this sample, we implement our own exponential backoff retry strategy. We start by defining some variables including the maxRetryAttempts and the initial delay for a failed request:
// Create batch of documents for indexing
var batch = IndexDocumentsBatch.Upload(hotels);

// Create an object to hold the result
IndexDocumentsResult result = null;

// Define parameters for exponential backoff
int attempts = 0;
TimeSpan delay = delay = TimeSpan.FromSeconds(2);
int maxRetryAttempts = 5;
The results of the indexing operation are stored in the variable IndexDocumentResult result. This variable is important because it allows you to check if any documents in the batch failed, as shown in the following example. If there's a partial failure, a new batch is created based on the failed documents' ID.
RequestFailedException exceptions should also be caught as they indicate the request failed completely and should also be retried.
// Implement exponential backoff
do
{
    try
    {
        attempts++;
        result = await searchClient.IndexDocumentsAsync(batch).ConfigureAwait(false);

        var failedDocuments = result.Results.Where(r => r.Succeeded != true).ToList();

        // handle partial failure
        if (failedDocuments.Count > 0)
        {
            if (attempts == maxRetryAttempts)
            {
                Console.WriteLine("[MAX RETRIES HIT] - Giving up on the batch starting at {0}", id);
                break;
            }
            else
            {
                Console.WriteLine("[Batch starting at doc {0} had partial failure]", id);
                Console.WriteLine("[Retrying {0} failed documents] \n", failedDocuments.Count);

                // creating a batch of failed documents to retry
                var failedDocumentKeys = failedDocuments.Select(doc => doc.Key).ToList();
                hotels = hotels.Where(h => failedDocumentKeys.Contains(h.HotelId)).ToList();
                batch = IndexDocumentsBatch.Upload(hotels);

                Task.Delay(delay).Wait();
                delay = delay * 2;
                continue;
            }
        }

        return result;
    }
    catch (RequestFailedException ex)
    {
        Console.WriteLine("[Batch starting at doc {0} failed]", id);
        Console.WriteLine("[Retrying entire batch] \n");

        if (attempts == maxRetryAttempts)
        {
            Console.WriteLine("[MAX RETRIES HIT] - Giving up on the batch starting at {0}", id);
            break;
        }

        Task.Delay(delay).Wait();
        delay = delay * 2;
    }
} while (true);
From here, wrap the exponential backoff code into a function so it can be easily called.
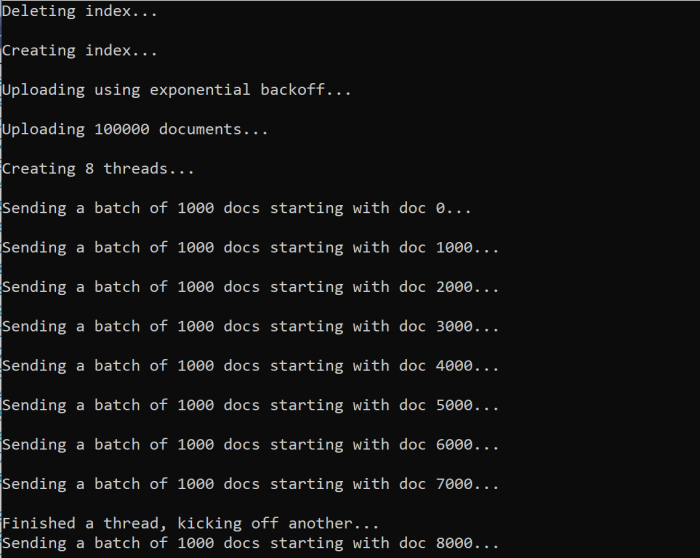
Another function is then created to manage the active threads. For simplicity, that function isn't included here but can be found in ExponentialBackoff.cs. The function can be called with the following command where hotels is the data we want to upload, 1000 is the batch size, and 8 is the number of concurrent threads:
await ExponentialBackoff.IndexData(indexClient, hotels, 1000, 8);
When you run the function, you should see an output:

When a batch of documents fails, an error is printed out indicating the failure and that the batch is being retried:
[Batch starting at doc 6000 had partial failure]
[Retrying 560 failed documents]
After the function is finished running, you can verify that all of the documents were added to the index.
Step 6: Explore the index
You can explore the populated search index after the program has run either programmatically or by using the Search explorer in the Azure portal.
Programatically
There are two main options for checking the number of documents in an index: the Count Documents API and the Get Index Statistics API. Both paths require time to process so don't be alarmed if the number of documents returned is initially lower than you expect.
Count Documents
The Count Documents operation retrieves a count of the number of documents in a search index:
long indexDocCount = await searchClient.GetDocumentCountAsync();
Get Index Statistics
The Get Index Statistics operation returns a document count for the current index, plus storage usage. Index statistics take longer than document count to update.
var indexStats = await indexClient.GetIndexStatisticsAsync(indexName);
Azure portal
In the Azure portal, from the left navigation pane, and find the optimize-indexing index in the Indexes list.

The Document Count and Storage Size are based on Get Index Statistics API and can take several minutes to update.
Reset and rerun
In the early experimental stages of development, the most practical approach for design iteration is to delete the objects from Azure AI Search and allow your code to rebuild them. Resource names are unique. Deleting an object lets you recreate it using the same name.
The sample code for this tutorial checks for existing indexes and deletes them so that you can rerun your code.
You can also use the Azure portal to delete indexes.
Clean up resources
When you're working in your own subscription, at the end of a project, it's a good idea to remove the resources that you no longer need. Resources left running can cost you money. You can delete resources individually or delete the resource group to delete the entire set of resources.
You can find and manage resources in the Azure portal, using the All resources or Resource groups link in the left-navigation pane.
Next step
To learn more about indexing large amounts data, try the following tutorial.