Tutorial: Create a custom analyzer for phone numbers
In search solutions, strings that have complex patterns or special characters can be a challenge to work with because the default analyzer strips out or misinterprets meaningful parts of a pattern, resulting in a poor search experience when users can't find the information they expected. Phone numbers are a classic example of strings that are hard to analyze. They come in various formats, and they include special characters that the default analyzer ignores.
With phone numbers as its subject, this tutorial takes a close look at the problems of patterned data, and shows you to solve that problem using a custom analyzer. The approach outlined here can be used as-is for phone numbers, or adapted for fields having the same characteristics (patterned, with special characters), such as URLs, emails, postal codes, and dates.
In this tutorial, you use a REST client and the Azure AI Search REST APIs to:
- Understand the problem
- Develop an initial custom analyzer for handling phone numbers
- Test the custom analyzer
- Iterate on custom analyzer design to further improve results
Prerequisites
The following services and tools are required for this tutorial.
Visual Studio Code with a REST client.
Azure AI Search. Create or find an existing Azure AI Search resource under your current subscription. You can use a free service for this quickstart.
Download files
Source code for this tutorial is the custom-analyzer.rest file in the Azure-Samples/azure-search-rest-samples GitHub repository.
Copy a key and URL
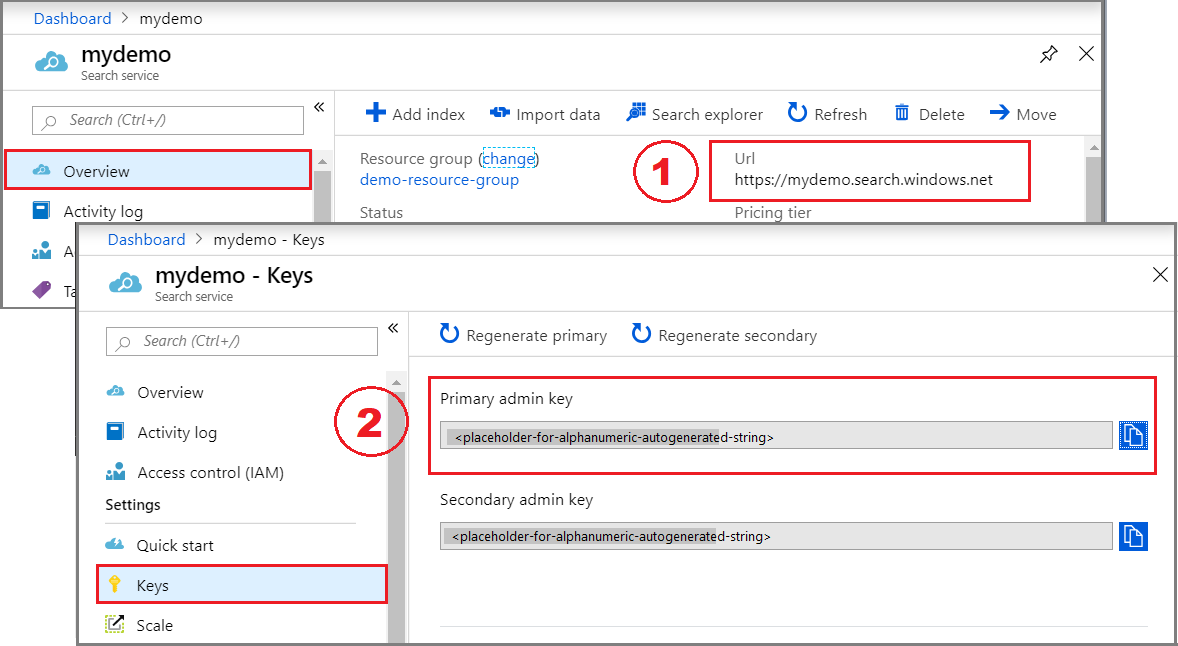
The REST calls in this tutorial require a search service endpoint and an admin API key. You can get these values from the Azure portal.
Sign in to the Azure portal, navigate to the Overview page, and copy the URL. An example endpoint might look like
https://mydemo.search.azure.cn.Under Settings > Keys, copy an admin key. Admin keys are used to add, modify, and delete objects. There are two interchangeable admin keys. Copy either one.

A valid API key establishes trust, on a per request basis, between the application sending the request and the search service handling it.
Create an initial index
Open a new text file in Visual Studio Code.
Set variables to the search endpoint and the API key you collected in the previous step.
@baseUrl = PUT-YOUR-SEARCH-SERVICE-URL-HERE
@apiKey = PUT-YOUR-ADMIN-API-KEY-HERE
Save the file with a
.restfile extension.Paste in the following example to create a small index called
phone-numbers-indexwith two fields:idandphone_number. We haven't defined an analyzer yet, so thestandard.luceneanalyzer is used by default.### Create a new index POST {{baseUrl}}/indexes?api-version=2024-07-01 HTTP/1.1 Content-Type: application/json api-key: {{apiKey}} { "name": "phone-numbers-index", "fields": [ { "name": "id", "type": "Edm.String", "key": true, "searchable": true, "filterable": false, "facetable": false, "sortable": true }, { "name": "phone_number", "type": "Edm.String", "sortable": false, "searchable": true, "filterable": false, "facetable": false } ] }Select Send request. You should have an
HTTP/1.1 201 Createdresponse and the response body should include the JSON representation of the index schema.Load data into the index, using documents that contain various phone number formats. This is your test data.
### Load documents
POST {{baseUrl}}/indexes/phone-numbers-index/docs/index?api-version=2024-07-01  HTTP/1.1
  Content-Type: application/json
  api-key: {{apiKey}}

  {
    "value": [
      {
        "@search.action": "upload",
        "id": "1",
        "phone_number": "425-555-0100"
      },
      {
        "@search.action": "upload",
        "id": "2",
        "phone_number": "(321) 555-0199"
      },
      {
        "@search.action": "upload",
        "id": "3",
        "phone_number": "+1 425-555-0100"
      },
      {
        "@search.action": "upload",
        "id": "4",
        "phone_number": "+1 (321) 555-0199"
      },
      {
        "@search.action": "upload",
        "id": "5",
        "phone_number": "4255550100"
      },
      {
        "@search.action": "upload",
        "id": "6",
        "phone_number": "13215550199"
      },
      {
        "@search.action": "upload",
        "id": "7",
        "phone_number": "425 555 0100"
      },
      {
        "@search.action": "upload",
        "id": "8",
        "phone_number": "321.555.0199"
      }
    ]
  }
Let's try a few queries similar to what a user might type. A user could search for
(425) 555-0100in any number of formats and still expect results to be returned. Start by searching(425) 555-0100:### Search for a phone number GET {{baseUrl}}/indexes/phone-numbers-index/docs/search?api-version=2024-07-01&search=(425) 555-0100 HTTP/1.1 Content-Type: application/json api-key: {{apiKey}}The query returns three out of four expected results, but also returns two unexpected results:
{
    "value": [
        {
            "@search.score": 0.05634898,
            "phone_number": "+1 425-555-0100"
        },
        {
            "@search.score": 0.05634898,
            "phone_number": "425 555 0100"
        },
        {
            "@search.score": 0.05634898,
            "phone_number": "425-555-0100"
        },
        {
            "@search.score": 0.020766128,
            "phone_number": "(321) 555-0199"
        },
        {
            "@search.score": 0.020766128,
            "phone_number": "+1 (321) 555-0199"
        }
    ]
}
Let's try again without any formatting:
4255550100.### Search for a phone number GET {{baseUrl}}/indexes/phone-numbers-index/docs/search?api-version=2024-07-01&search=4255550100 HTTP/1.1 Content-Type: application/json api-key: {{apiKey}}This query does even worse, returning only one of four correct matches.
{
    "value": [
        {
            "@search.score": 0.6015292,
            "phone_number": "4255550100"
        }
    ]
}
If you find these results confusing, you're not alone. In the next section, let's dig into why we're getting these results.
Review how analyzers work
To understand these search results, we need to understand what the analyzer is doing. From there, we can test the default analyzer using the Analyze API, providing a foundation for designing an analyzer that better meets our needs.
An analyzer is a component of the full text search engine responsible for processing text in query strings and indexed documents. Different analyzers manipulate text in different ways depending on the scenario. For this scenario, we need to build an analyzer tailored to phone numbers.
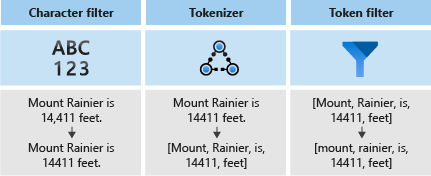
Analyzers consist of three components:
- Character filters that remove or replace individual characters from the input text.
- A Tokenizer that breaks the input text into tokens, which become keys in the search index.
- Token filters that manipulate the tokens produced by the tokenizer.
In the following diagram, you can see how these three components work together to tokenize a sentence:

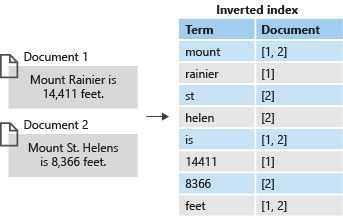
These tokens are then stored in an inverted index, which allows for fast, full-text searches. An inverted index enables full-text search by mapping all unique terms extracted during lexical analysis to the documents in which they occur. You can see an example in the next diagram:

All of search comes down to searching for the terms stored in the inverted index. When a user issues a query:
- The query is parsed and the query terms are analyzed.
- The inverted index is then scanned for documents with matching terms.
- Finally, the retrieved documents are ranked by the scoring algorithm.

If the query terms don't match the terms in your inverted index, results aren't returned. To learn more about how queries work, see this article on full text search.
Note
Partial term queries are an important exception to this rule. These queries (prefix query, wildcard query, regex query) bypass the lexical analysis process unlike regular term queries. Partial terms are only lowercased before being matched against terms in the index. If an analyzer isn't configured to support these types of queries, you'll often receive unexpected results because matching terms don't exist in the index.
Test analyzers using the Analyze API
Azure AI Search provides an Analyze API that allows you to test analyzers to understand how they process text.
The Analyze API is called using the following request:
POST {{baseUrl}}/indexes/phone-numbers-index/analyze?api-version=2024-07-01  HTTP/1.1
  Content-Type: application/json
  api-key: {{apiKey}}

  {
    "text": "(425) 555-0100",
    "analyzer": "standard.lucene"
  }
The API returns the tokens extracted from the text, using the analyzer you specified. The standard Lucene analyzer splits the phone number into three separate tokens:
{
    "tokens": [
        {
            "token": "425",
            "startOffset": 1,
            "endOffset": 4,
            "position": 0
        },
        {
            "token": "555",
            "startOffset": 6,
            "endOffset": 9,
            "position": 1
        },
        {
            "token": "0100",
            "startOffset": 10,
            "endOffset": 14,
            "position": 2
        }
    ]
}
Conversely, the phone number 4255550100 formatted without any punctuation is tokenized into a single token.
{
  "text": "4255550100",
  "analyzer": "standard.lucene"
}
Response:
{
    "tokens": [
        {
            "token": "4255550100",
            "startOffset": 0,
            "endOffset": 10,
            "position": 0
        }
    ]
}
Keep in mind that both query terms and the indexed documents undergo analysis. Thinking back to the search results from the previous step, we can start to see why those results were returned.
In the first query, unexpected phone numbers were returned because one of their tokens, 555, matched one of the terms we searched. In the second query, only the one number was returned because it was the only record that had a token matching 4255550100.
Build a custom analyzer
Now that we understand the results we're seeing, let's build a custom analyzer to improve the tokenization logic.
The goal is to provide intuitive search against phone numbers no matter what format the query or indexed string is in. To achieve this outcome, we'll specify a character filter, a tokenizer, and a token filter.
Character filters
Character filters are used to process text before it's fed into the tokenizer. Common uses of character filters include filtering out HTML elements or replacing special characters.
For phone numbers, we want to remove whitespace and special characters because not all phone number formats contain the same special characters and spaces.
"charFilters": [
    {
      "@odata.type": "#Microsoft.Azure.Search.MappingCharFilter",
      "name": "phone_char_mapping",
      "mappings": [
        "-=>",
        "(=>",
        ")=>",
        "+=>",
        ".=>",
        "\\u0020=>"
      ]
    }
  ]
The filter removes - ( ) + . and spaces from the input.
| Input | Output |
|---|---|
(321) 555-0199 |
3215550199 |
321.555.0199 |
3215550199 |
Tokenizers
Tokenizers split text into tokens and discard some characters, such as punctuation, along the way. In many cases, the goal of tokenization is to split a sentence into individual words.
For this scenario, we'll use a keyword tokenizer, keyword_v2, because we want to capture the phone number as a single term. Note that this isn't the only way to solve this problem. See the Alternate approaches section below.
Keyword tokenizers always output the same text it was given as a single term.
| Input | Output |
|---|---|
The dog swims. |
[The dog swims.] |
3215550199 |
[3215550199] |
Token filters
Token filters will filter out or modify the tokens generated by the tokenizer. One common use of a token filter is to lowercase all characters using a lowercase token filter. Another common use is filtering out stopwords such as the, and, or is.
While we don't need to use either of those filters for this scenario, we'll use an nGram token filter to allow for partial searches of phone numbers.
"tokenFilters": [
  {
    "@odata.type": "#Microsoft.Azure.Search.NGramTokenFilterV2",
    "name": "custom_ngram_filter",
    "minGram": 3,
    "maxGram": 20
  }
]
NGramTokenFilterV2
The nGram_v2 token filter splits tokens into n-grams of a given size based on the minGram and maxGram parameters.
For the phone analyzer, we set minGram to 3 because that is the shortest substring we expect users to search. maxGram is set to 20 to ensure that all phone numbers, even with extensions, will fit into a single n-gram.
The unfortunate side effect of n-grams is that some false positives will be returned. We'll fix this in a later step by building out a separate analyzer for searches that doesn't include the n-gram token filter.
| Input | Output |
|---|---|
[12345] |
[123, 1234, 12345, 234, 2345, 345] |
[3215550199] |
[321, 3215, 32155, 321555, 3215550, 32155501, 321555019, 3215550199, 215, 2155, 21555, 215550, ... ] |
Analyzer
With our character filters, tokenizer, and token filters in place, we're ready to define our analyzer.
"analyzers": [
  {
    "@odata.type": "#Microsoft.Azure.Search.CustomAnalyzer",
    "name": "phone_analyzer",
    "tokenizer": "keyword_v2",
    "tokenFilters": [
      "custom_ngram_filter"
    ],
    "charFilters": [
      "phone_char_mapping"
    ]
  }
]
From the Analyze API, given the following inputs, outputs from the custom analyzer are shown in the following table.
| Input | Output |
|---|---|
12345 |
[123, 1234, 12345, 234, 2345, 345] |
(321) 555-0199 |
[321, 3215, 32155, 321555, 3215550, 32155501, 321555019, 3215550199, 215, 2155, 21555, 215550, ... ] |
All of the tokens in the output column exist in the index. If our query includes any of those terms, the phone number is returned.
Rebuild using the new analyzer
Delete the current index:
 ### Delete the index
 DELETE {{baseUrl}}/indexes/phone-numbers-index?api-version=2024-07-01 HTTP/1.1
     api-key: {{apiKey}}
Recreate the index using the new analyzer. This index schema adds a custom analyzer definition, and a custom analyzer assignment on the phone number field.
### Create a new index
POST {{baseUrl}}/indexes?api-version=2024-07-01  HTTP/1.1
  Content-Type: application/json
  api-key: {{apiKey}}

{
    "name": "phone-numbers-index-2",
    "fields": [
      {
          "name": "id",
          "type": "Edm.String",
          "key": true,
          "searchable": true,
          "filterable": false,
          "facetable": false,
          "sortable": true
      },
      {
          "name": "phone_number",
          "type": "Edm.String",
          "sortable": false,
          "searchable": true,
          "filterable": false,
          "facetable": false,
          "analyzer": "phone_analyzer"
      }
    ],
    "analyzers": [
        {
          "@odata.type": "#Microsoft.Azure.Search.CustomAnalyzer",
          "name": "phone_analyzer",
          "tokenizer": "keyword_v2",
          "tokenFilters": [
          "custom_ngram_filter"
        ],
        "charFilters": [
          "phone_char_mapping"
          ]
        }
      ],
      "charFilters": [
        {
          "@odata.type": "#Microsoft.Azure.Search.MappingCharFilter",
          "name": "phone_char_mapping",
          "mappings": [
            "-=>",
            "(=>",
            ")=>",
            "+=>",
            ".=>",
            "\\u0020=>"
          ]
        }
      ],
      "tokenFilters": [
        {
          "@odata.type": "#Microsoft.Azure.Search.NGramTokenFilterV2",
          "name": "custom_ngram_filter",
          "minGram": 3,
          "maxGram": 20
        }
      ]
    }
Test the custom analyzer
After recreating the index, you can now test out the analyzer using the following request:
POST {{baseUrl}}/indexes/tutorial-first-analyzer/analyze?api-version=2024-07-01  HTTP/1.1
  Content-Type: application/json
  api-key: {{apiKey}}

  {
    "text": "+1 (321) 555-0199",
    "analyzer": "phone_analyzer"
  }
You should now see the collection of tokens resulting from the phone number:
{
    "tokens": [
        {
            "token": "132",
            "startOffset": 1,
            "endOffset": 17,
            "position": 0
        },
        {
            "token": "1321",
            "startOffset": 1,
            "endOffset": 17,
            "position": 0
        },
        {
            "token": "13215",
            "startOffset": 1,
            "endOffset": 17,
            "position": 0
        },
        ...
        ...
        ...
    ]
}
Revise the custom analyzer to handle false positives
After making some sample queries against the index with the custom analyzer, you'll find that recall has improved and all matching phone numbers are now returned. However, the n-gram token filter causes some false positives to be returned as well. This is a common side effect of an n-gram token filter.
To prevent false positives, we'll create a separate analyzer for querying. This analyzer is identical to the previous one, except that it omits the custom_ngram_filter.
    {
      "@odata.type": "#Microsoft.Azure.Search.CustomAnalyzer",
      "name": "phone_analyzer_search",
      "tokenizer": "custom_tokenizer_phone",
      "tokenFilters": [],
      "charFilters": [
        "phone_char_mapping"
      ]
    }
In the index definition, we then specify both an indexAnalyzer and a searchAnalyzer.
    {
      "name": "phone_number",
      "type": "Edm.String",
      "sortable": false,
      "searchable": true,
      "filterable": false,
      "facetable": false,
      "indexAnalyzer": "phone_analyzer",
      "searchAnalyzer": "phone_analyzer_search"
    }
With this change, you're all set. Here are your next steps:
Delete the index.
Recreate the index after adding the new custom analyzer (
phone_analyzer-search) and assigning that analyzer to thephone-numberfield'ssearchAnalyzerproperty.Reload the data.
Retest the queries to verify the search works as expected. If you're using the sample file, this step creates the third index named
phone-number-index-3.
Alternate approaches
The analyzer described in the previous section is designed to maximize the flexibility for search. However, it does so at the cost of storing many potentially unimportant terms in the index.
The following example shows an alternative analyzer that's more efficient in tokenization, but has drawbacks.
Given an input of 14255550100, the analyzer can't logically chunk the phone number. For example, it can't separate the country code, 1, from the area code, 425. This discrepancy would lead to the phone number not being returned if a user didn't include a country code in their search.
"analyzers": [
  {
    "@odata.type": "#Microsoft.Azure.Search.CustomAnalyzer",
    "name": "phone_analyzer_shingles",
    "tokenizer": "custom_tokenizer_phone",
    "tokenFilters": [
      "custom_shingle_filter"
    ]
  }
],
"tokenizers": [
  {
    "@odata.type": "#Microsoft.Azure.Search.StandardTokenizerV2",
    "name": "custom_tokenizer_phone",
    "maxTokenLength": 4
  }
],
"tokenFilters": [
  {
    "@odata.type": "#Microsoft.Azure.Search.ShingleTokenFilter",
    "name": "custom_shingle_filter",
    "minShingleSize": 2,
    "maxShingleSize": 6,
    "tokenSeparator": ""
  }
]
You can see in the following example that the phone number is split into the chunks you would normally expect a user to be searching for.
| Input | Output |
|---|---|
(321) 555-0199 |
[321, 555, 0199, 321555, 5550199, 3215550199] |
Depending on your requirements, this might be a more efficient approach to the problem.
Takeaways
This tutorial demonstrated the process for building and testing a custom analyzer. You created an index, indexed data, and then queried against the index to see what search results were returned. From there, you used the Analyze API to see the lexical analysis process in action.
While the analyzer defined in this tutorial offers an easy solution for searching against phone numbers, this same process can be used to build a custom analyzer for any scenario that shares similar characteristics.
Clean up resources
When you're working in your own subscription, it's a good idea to remove the resources that you no longer need at the end of a project. Resources left running can cost you money. You can delete resources individually or delete the resource group to delete the entire set of resources.
You can find and manage resources in the Azure portal, using the All resources or Resource groups link in the left-navigation pane.
Next steps
Now that you're familiar with how to create a custom analyzer, let's take a look at all of the different filters, tokenizers, and analyzers available to you to build a rich search experience.