Note
Access to this page requires authorization. You can try signing in or changing directories.
Access to this page requires authorization. You can try changing directories.
This guide describes how to merge an existing classic Microsoft Purview account into your Microsoft Purview tenant account as a domain. Merge is a one-time process to 'copy' the information in your secondary classic Microsoft Purview account into your tenant level account. All the information is incorporated into a new domain. Your existing classic account remains as-is, so you can migrate your managed identity and deactivate and remove the secondary account once you have validated the merge.
Throughout this document, we use the terms primary account and secondary account:
- Primary account - refers to your tenant-level Microsoft Purview instance.
- Secondary account - refers to the Microsoft Purview instance you're migrating into your primary account as a domain.
Prerequisites
- Tenant with multiple Microsoft Purview accounts.
- Public network access enabled on your secondary account for the merging process.
- A Microsoft Purview account upgraded to the new experience as a primary account.
Limitations
- Secondary accounts can only be merged once. Any values added to your secondary account after merging will have to be manually added to your primary account. It's recommended you stop using your secondary account after merging and either deactivate or delete the account.
- Any values or assets added to a secondary account during an active merge aren't guaranteed to be migrated to the primary account. It's recommended you stop update and scanning activities on your secondary account during a merge.
There are also some current limitations that could prevent you from merging your existing Microsoft Purview account as a domain. Review these limitations and the behavior changes to confirm that merging is the correct option for you. The limitations could be updated in the future.
| Category | Limitation | Potential resolution |
|---|---|---|
| Primary account can only have five domains. | Contact support to provide your business requirement and increase the domain number. | |
| Either primary account or secondary account has more than 1,000,000 assets. | Remove assets to the allowed limit, choose to filter out the asset category, or contact support to provide your business requirements. | |
| Secondary account’s collection number + primary account’s collection number > 400. | Remove or consolidate collections to the allowed limit. | |
| Scan limitations | Secondary account has a user-assigned managed identity (UAMI) scan. | Remove all scheduled UAMI scans from any data sources or filter out the user assigned managed identity category during merge. |
| Scan run histories aren't migrated to the primary account. | No resolution. | |
| Secondary account has private endpoints enabled. | Remove all private endpoints from secondary account or filter out the private endpoint category during merge. | |
| Secondary account has a self-hosted integration runtimes. | Remove all self-hosted integration runtimes from secondary account or filter out the self-hosted integration runtime category during merge. | |
| Secondary account has managed virtual networks. | Remove all managed virtual networks from secondary account or filter out the managed virtual networks category during merge. | |
| Secondary account has "bring your own Event Hubs" configured. | Remove all Kafka configurations from secondary accounts. | |
| Secondary account has managed Event Hubs enabled and it's actively used in last 30 days. | Disable managed event hub. | |
| Secondary account has a data factory connection. | Remove data factory connections. | |
| Asset limitations | Secondary account has lineage scans. | Remove all lineage scans from any data sources. |
| Source limitations | Secondary account has a Website data source registered. | Unregister all Website data sources |
Behavior changes
Any secondary accounts' scans that use the managed identity (MSI) to scan a data source will keep using the same MSI after migrating to the primary account. So, if the secondary account is deleted after merge, these migrated scans won't work unless you follow the managed identity switchover process after merging.
Any secondary accounts' key vault connections that use managed identity (MSI) to connect will keep using the same MSI after migrating to the primary account. So if the secondary account is deleted after merge, these migrated scans won't work unless you follow the managed identity switchover process after merging.
If secondary account has a glossary named Glossary, the migrated glossary is named Glossary-{secondary account name} in the primary account. This behavior could cause glossary conflicts during assessment:
- Secondary account already has a glossary named Glossary-{secondary account name}
- Primary account has a glossary named Glossary-{secondary account name}
If the secondary account was created before 7/12/2022 and the primary account was created after this date, after the merge, the scan will populate hierarchical schema types(parquet_schema, json_schema, xml_schema, and delimited_text_schema) rather than tabular_schema.
Request account merge
You can request an account merge from your primary account or from the secondary account you want to merge.
Tip
It's recommended to assess your merge before requesting a full merge to check for any conflicts or limitations.
Request account merge from the primary account
Important
To request account merge from the primary account, requestors need to be a member of the Purview Administrator role group.
Open the Microsoft Purview portal.
To select an existing account to be mapped as a new domain in primary account. You can either:
Select the Select account button in the pop-up.
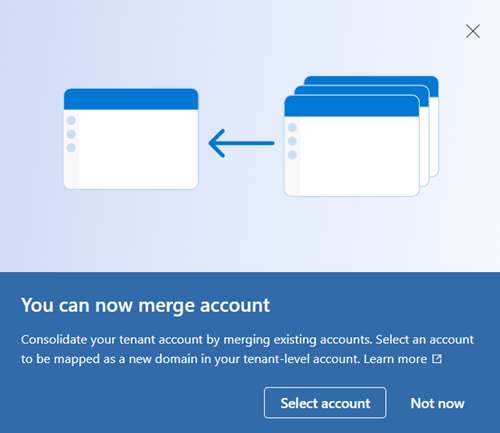
If you're using the Microsoft Purview governance portal, open the Management center, navigate to the Overview in the General section. If you're using the Microsoft Purview portal, open Settings solution card, select Account and then select Select account in the alert box.

Note
If a merge is currently in progress within the tenant, then the Submit request pop-up and alert box won't appear.
If the logged-in user doesn't have the proper permissions to request a merge, the Submit request pop-up and alert box won't appear.
Select an account to merge. (It's recommended that you perform an assessment before you merge.)
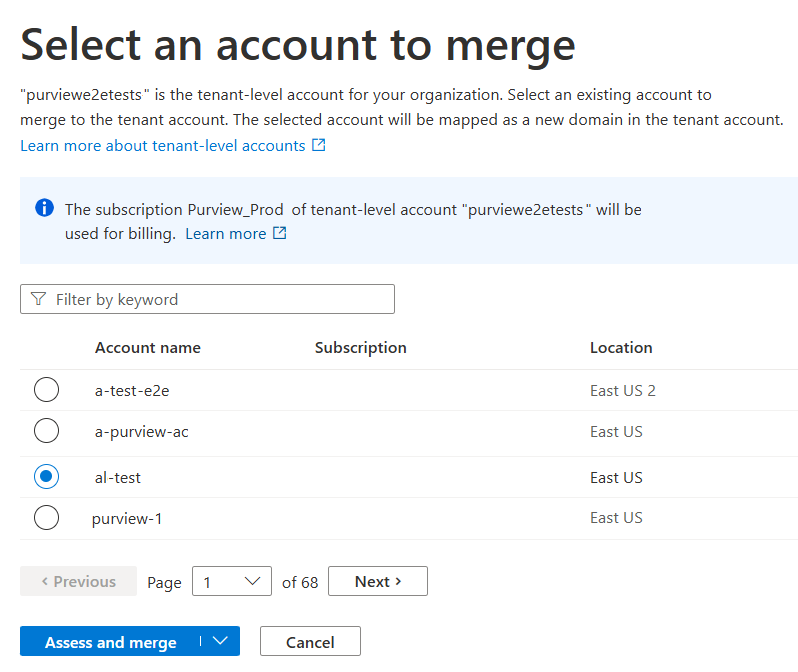
Specify categories for the merge filter, and select whether you want to allow auto-resolve for conflicts in that category.
Select Submit.
An assessment runs to confirm if there are any conflicts or limitations, and if the assessment is successful, the merge process begins.
Important
Failed merges start the cleanup process to revert everything back to its previous state.
Request account merge from secondary account
Important
To request account merge from the secondary account, requestors need to be either be a Collection Admin on the root collection or an ARM Resource Owner, and then they also need to be assigned one of these roles: Compliance Manager Administration, Role Management, Case Management .
Open the secondary account's Microsoft Purview portal
To select this account to be mapped as a new domain in primary account, you can either:
Select Submit merge request in the pop-up.
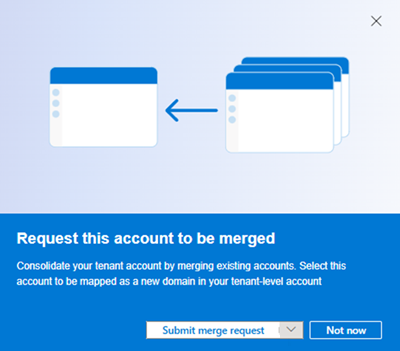
Or in the Microsoft Purview governance portal, open the Management center, navigate to the Overview in the General section and then select the alert box.

Note
If a merge is currently in progress within the tenant, then the Submit request pop-up and alert box will not appear.
If the logged-in user doesn't have the proper permissions to request a merge, the Submit request pop-up and alert box will not appear.
Specify categories for the merge filter, and select whether you want to allow auto-resolve for conflicts in that category.
Select Submit.
The request is sent through an approval process where a Purview Administrator needs to approve the request.
After approval, an assessment will run to confirm if there are any conflicts or limitations, and if the assessment is successful, the merge process will begin.
Important
Failed merges start the cleanup process to revert everything back to its previous state.
Merge filter
Whenever you merge an account, you can select which objects to migrate and which objects to exclude. In many cases, the filter will impact objects in its own category. However, there are potential behavior changes when you unselect some objects that might apply to associated objects. Some of these categories and the associated behavior changes are listed below:
| Unselected category | Behavior change |
|---|---|
| Contact assignment | If unselected, contact assignments configured to glossary terms or assets are removed. |
| Credential | If unselected, scans that use credentials to scan data sources aren't migrated. |
| Custom classification rule | If unselected, scans that applied custom classification rules aren't migrated. |
| Custom scan rule set | If unselected, scans that use applied custom scan rule sets aren't migrated. |
| Custom type | If unselected: - All custom type assets aren't migrated - All relationships for custom types and affected assets aren't migrated. - All classification instances of custom types attached to glossary terms or assets aren't migrated. |
| Glossary | If unselected, workflows applied to glossary or glossary term aren't migrated, and assets won't have associated glossaries. |
| Key vault connection | If unselected, scans that use key vault credentials to scan data sources aren't migrated. |
| Managed virtual network | If unselected, scans that use managed virtual network to scan data sources aren't migrated. |
| Self-hosted integration runtime | If unselected, scans that use a self-hosted integration runtime to scan data sources aren't migrated. |
| User assigned managed identity | If unselected, scans that use a user assigned managed identity to scan data sources aren't migrated |
| Resource set rule | If unselected, future assets scanned will have no resource set rule applied util users configure new resource set rules in the primary account. |
| Contact assignment | If unselected, contact assignments configured to assets and glossary terms are removed. |
Approval for account merges
If the merge is requested from the secondary account, it needs to be approved by a Purview Administrator before proceeding with the merge. Purview Administrators receive an email notification to approve the merge request. Alternatively, the merge request can be approved within primary account's Microsoft Purview portal.
Important
If the outlook account and Microsoft Purview accounts are in different tenants, approving from the email might fail. In this case, use the Microsoft Purview portal to approve.
Open primary account's Microsoft Purview portal.
Depending on which portal you're using:
- If you're using the Microsoft Purview governance portal:
- Open the Management center
- Select Request and approvals in the Workflow section.
- If you're using the Microsoft Purview portal:
- open Workflows solution card
- select Requests and approvals.

- If you're using the Microsoft Purview governance portal:
Select the request.
Choose your response and select Confirm.
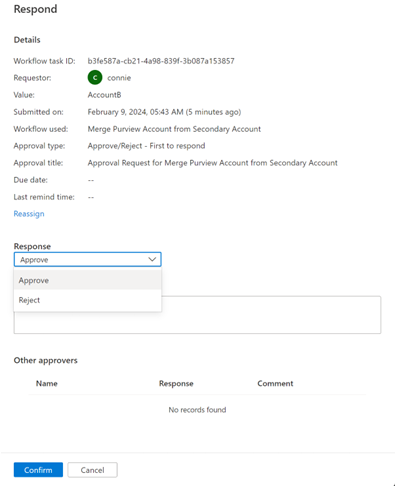
Assess conflicts and limitations
Before you run a merge, Microsoft Purview will assess a secondary account to see if it meets the prerequisites for merging with the primary account. If conflicts/limitations are detected and validation fails, manual intervention is required to proceed with the merge. After assessment, you'll have a report of any conflicts, and you can use our conflicts and resolutions to help resolve them.
Auto-resolve
During the Account Merge process, if the auto-resolve rule is set for a category, the system will automatically resolve any conflicts encountered according to the rule. Currently, we only support the skip rule, which means the object causing the conflict will be skipped and not moved from the secondary account to the primary account. Any other objects that depend on this object will also be skipped.
For example: If an auto-resolve rule is set for the Glossary category, and a Glossary term encounters a conflict, the system will automatically skip the merge of that term, and also skip the merge of any of that term's children.
Any conflicts encountered when auto-resolve is enabled won't be shown as errors in the assessment or merge process, because they'll be automatically resolved according to the rule.
Assessment only
You can submit an account for a merge assessment without merging it, to check for any conflicts.
To run an assessment from your primary account:
Open the Microsoft Purview portal.
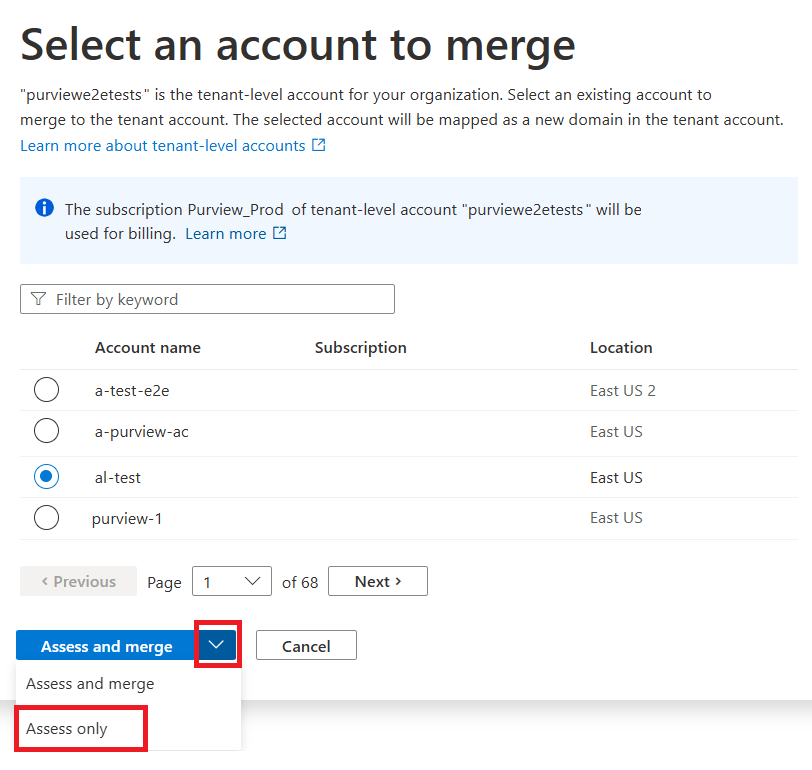
To assess an existing account for merging, if you're using the Microsoft Purview governance portal, open the Management center, navigate to the Overview in the General section. If you're using the Microsoft Purview portal, open Settings solution card, select Account and then select Select account in the alert box.

Select an account to assess.
Select the drop-down on the Assess and merge button and select Assess only. Only an assessment is run and the merge process won't start afterwards, regardless of the assessment result.
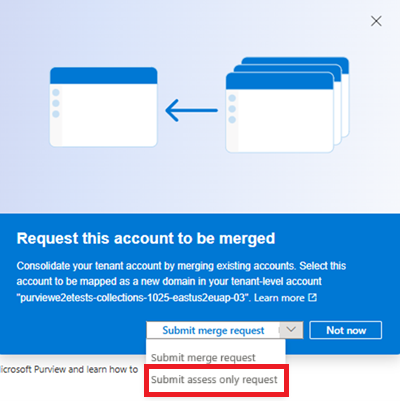
To run an assessment from your secondary account:
Select the dropdown in the pop-up and select Submit assess only request.
After assessment, you'll have a report of any conflicts, and you can use our conflicts and resolutions to help resolve them.
Conflicts and resolutions
Tip
For many conflicts, three potential options to resolve the issue are:
- Remove the conflicting asset from either the primary or secondary account.
- Choose to filter out that asset category during merge.
- Select auto-resolve to skip migration for conflicting assets.
Here's a table of conflicts and their possible resolutions:
| Conflict | Potential resolution |
|---|---|
| Asset with the same qualified name exists in both the primary and secondary accounts. | There are a few options: - Remove the conflicting asset from either primary or secondary account - Choose to filter out the assets category - Select auto-resolve to skip migration when initiating a merge. |
| Glossary with the same name exists in both the primary and secondary accounts. | Remove the conflict glossary from either the primary or secondary account or filter out the glossary category during merge. |
| Glossary term with the same qualified name exists in both the primary and secondary accounts. | Remove the conflict glossary term from either the primary or secondary account. |
| Term template with the same name exists in both the primary and secondary accounts. | Remove the conflict term template from either the primary or secondary account. |
| Classification rule with the same name exists in both the primary and secondary accounts. | Remove the conflict classification rule from either the primary or secondary account. |
| Workflow with the same name exists in both the primary and secondary account. | Remove the conflict workflow from either the primary or secondary account. |
| Key vault connection with the same name exists in both the primary and secondary accounts. | Remove the conflict key vault connection from either the primary or secondary account. |
| Credential with the same name exists in both the primary and secondary accounts. | Remove the conflict credential from either the primary or secondary account. |
| Data source with the same data source name registered in both the primary and secondary accounts. | Unregister the conflict data source from either the primary or secondary account. |
| The same data source registered in both the primary and secondary account. | Unregister the conflict data source from either the primary or secondary account. |
| Scan rule set with the same name exists in both the primary and secondary accounts. | Remove the conflict scan rule set from either the primary or secondary account. |
| The same contact assignment exists in both the primary and secondary accounts. | Remove the conflict contact assignment from either the primary or secondary account. |
| Secondary account has a glossary named 'Glossary' and another glossary named 'Glossary-{secondary account name}' | Remove either 'Glossary' or 'Glossary-{secondary account name}' from the secondary account. |
| Secondary account has a glossary named 'Glossary' and primary account has a glossary named 'Glossary-{secondary account name}' | Remove 'Glossary' from secondary account or remove 'Glossary-{secondary account name}' from the primary account. |
| Collections with the same name (not display name) exists in both the primary and secondary accounts. | Remove the conflicting collection from either the secondary account or the primary account. |
View merge and assessment reports
You can track the merge progress in real time during the merging process. To view merge report, users need to be a member of Purview Administrator role group.
Open the Data Map and select Monitoring
The merge reports are located in the Account merging tab
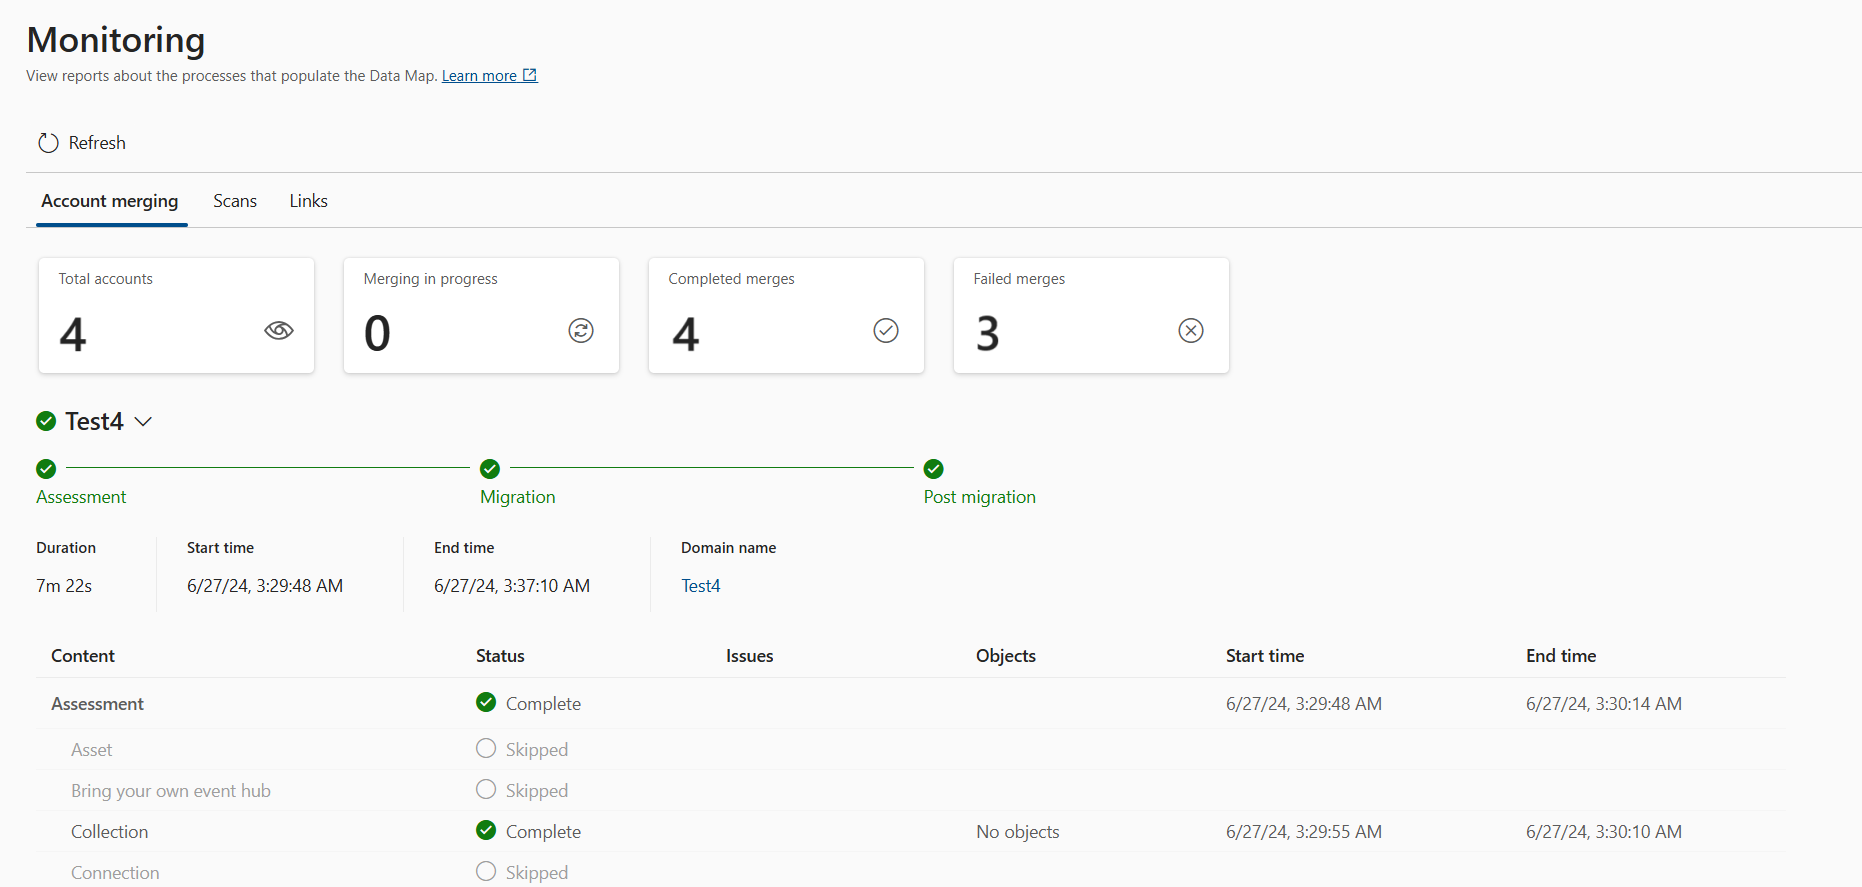
Select any account name to see full information about its merge or assessment. Select the account name again to collapse its details and see the full account list.
On the report page, you can see the merge statistics summaries:
Total accounts: Number of accounts that have attempted to merge
Merging in progress: Accounts currently undergoing merging
Completed merges: accounts that have successfully merged
Failed merges: accounts that failed to merge

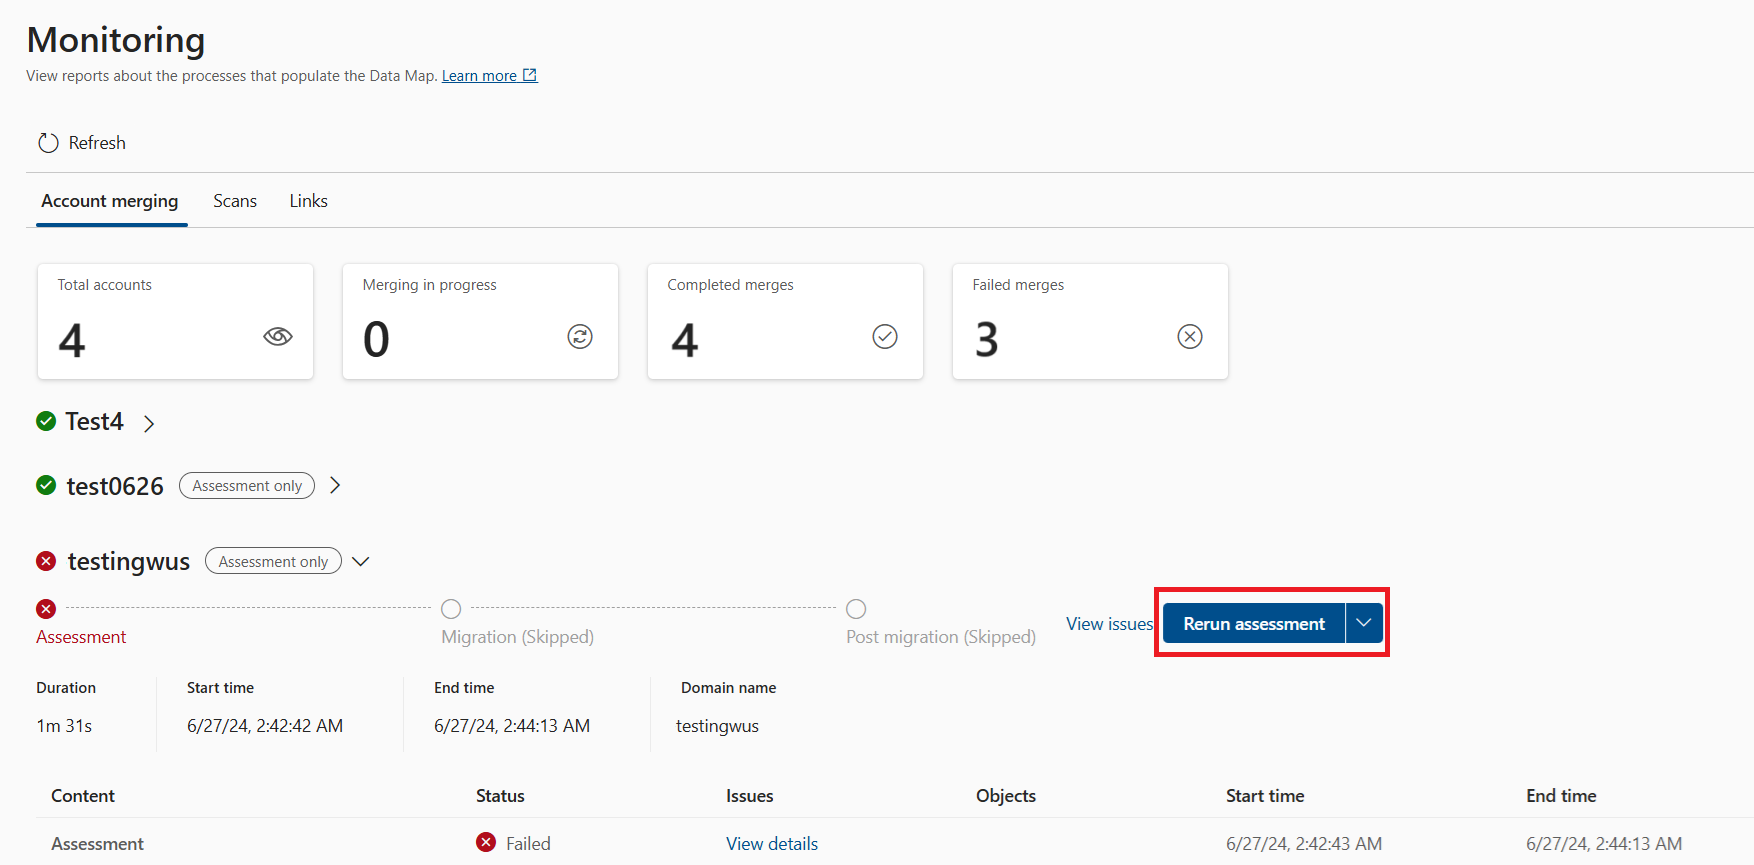
For any completed assessment, you can rerun an assessment, or rerun an assessment and merge by selecting the button in the assessment details.
Merge and assessment summary
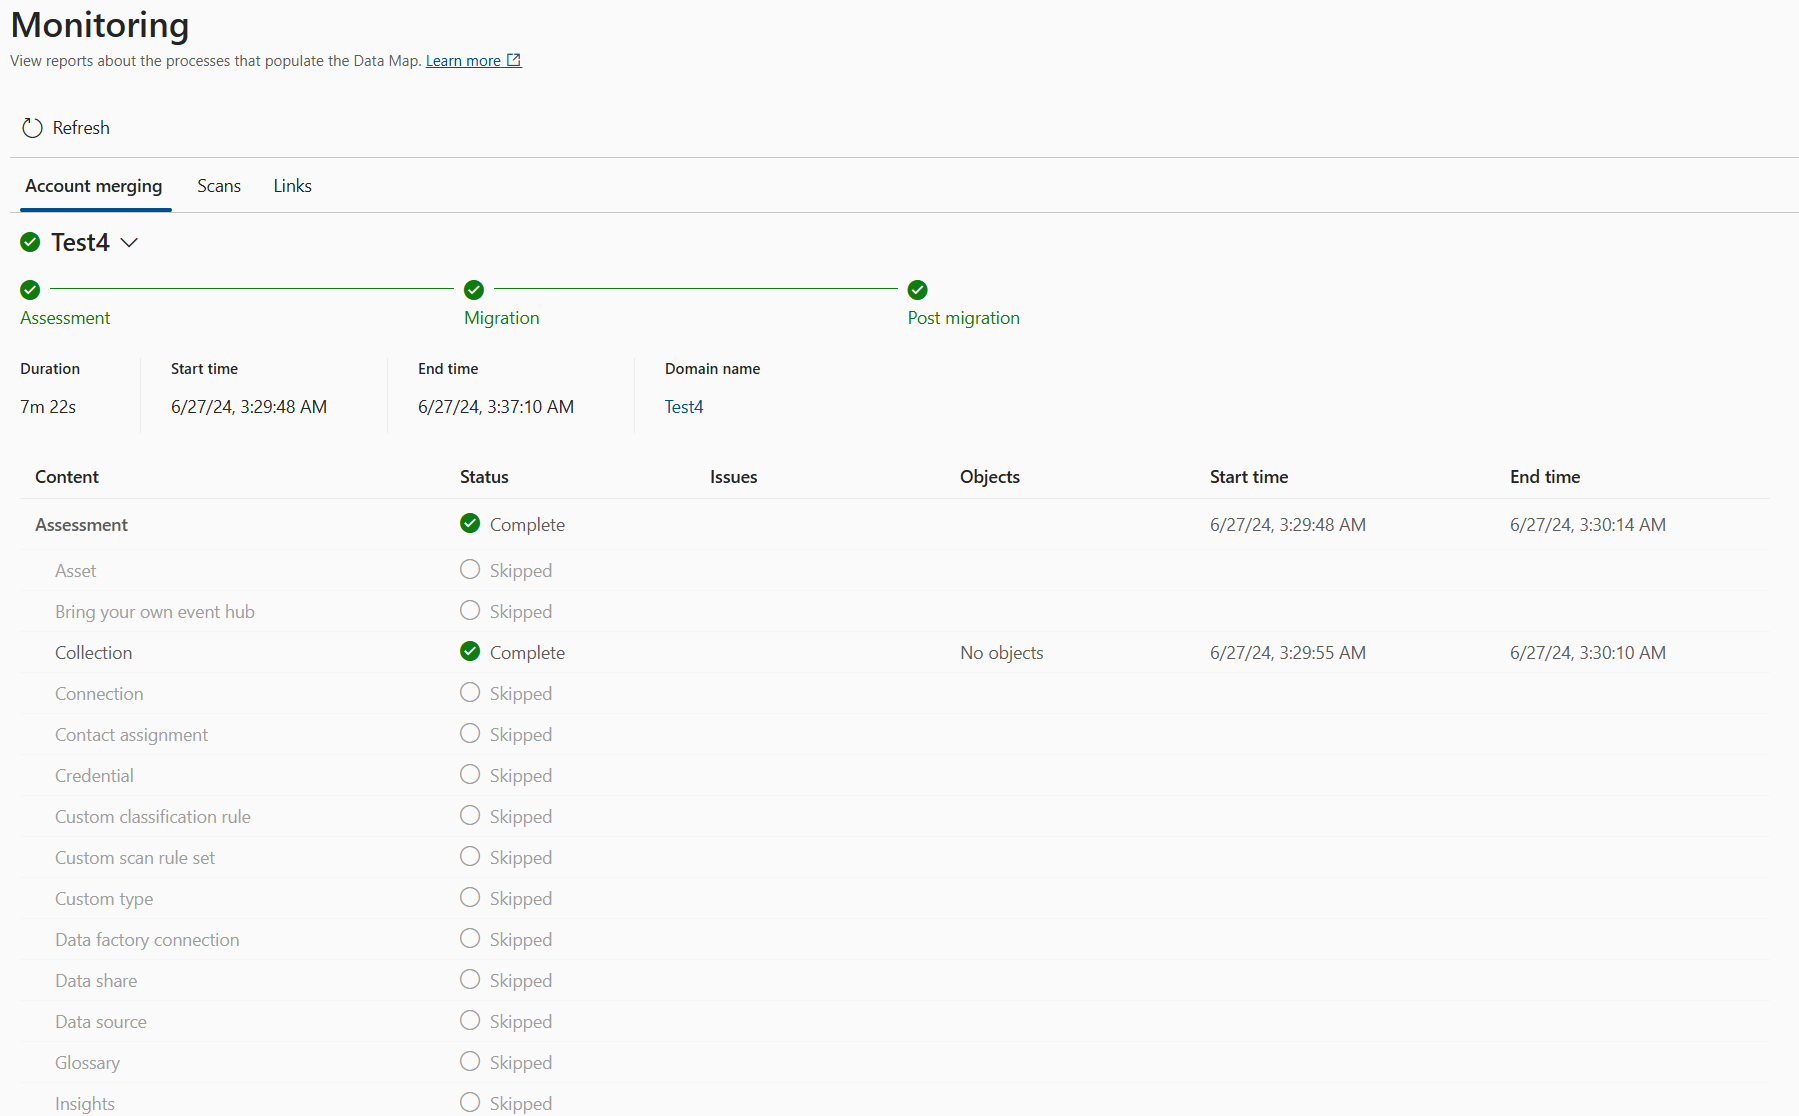
On the account merging page, select an account, and you can view the merge or assessment summary and the detailed progress for that account.
- Assessment: the step that identifies conflicts and limitations between the primary and secondary accounts.
Note
The discovered conflicts and limitations are blocking the merge from proceeding. You must resolve all of them before selecting Rerun.
- Migration: the step that copies the objects from the secondary account to the primary account
Note
Migrated objects in the primary account are invisible, and their associated functions are disabled during this step. For example, scan schedules are disabled in the primary account during migration and will be enabled before merge complete.
Since both the primary and secondary accounts remain operational during the merge, new conflicts and limitations may arise. In such cases, migration will fail and automatic cleanup be triggered to roll back the state of the primary account back to its state before the merge.
- Cleanup: the step that is automatically triggered to clean up migrated objects from the primary account in case the prior step Migration fails.
- PostMigration: the step involves preparation work before merge completes.
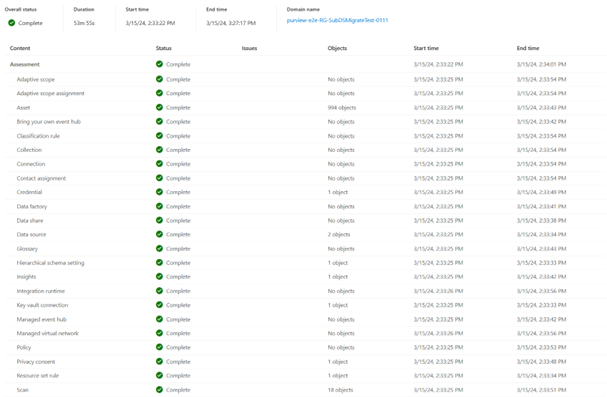
You can also view detailed merge progress at object category level under a step (Assessment/Migration/PostMigration/Cleanup).
Tip
Objects that were filtered to not be merged will show as Skipped in the report.
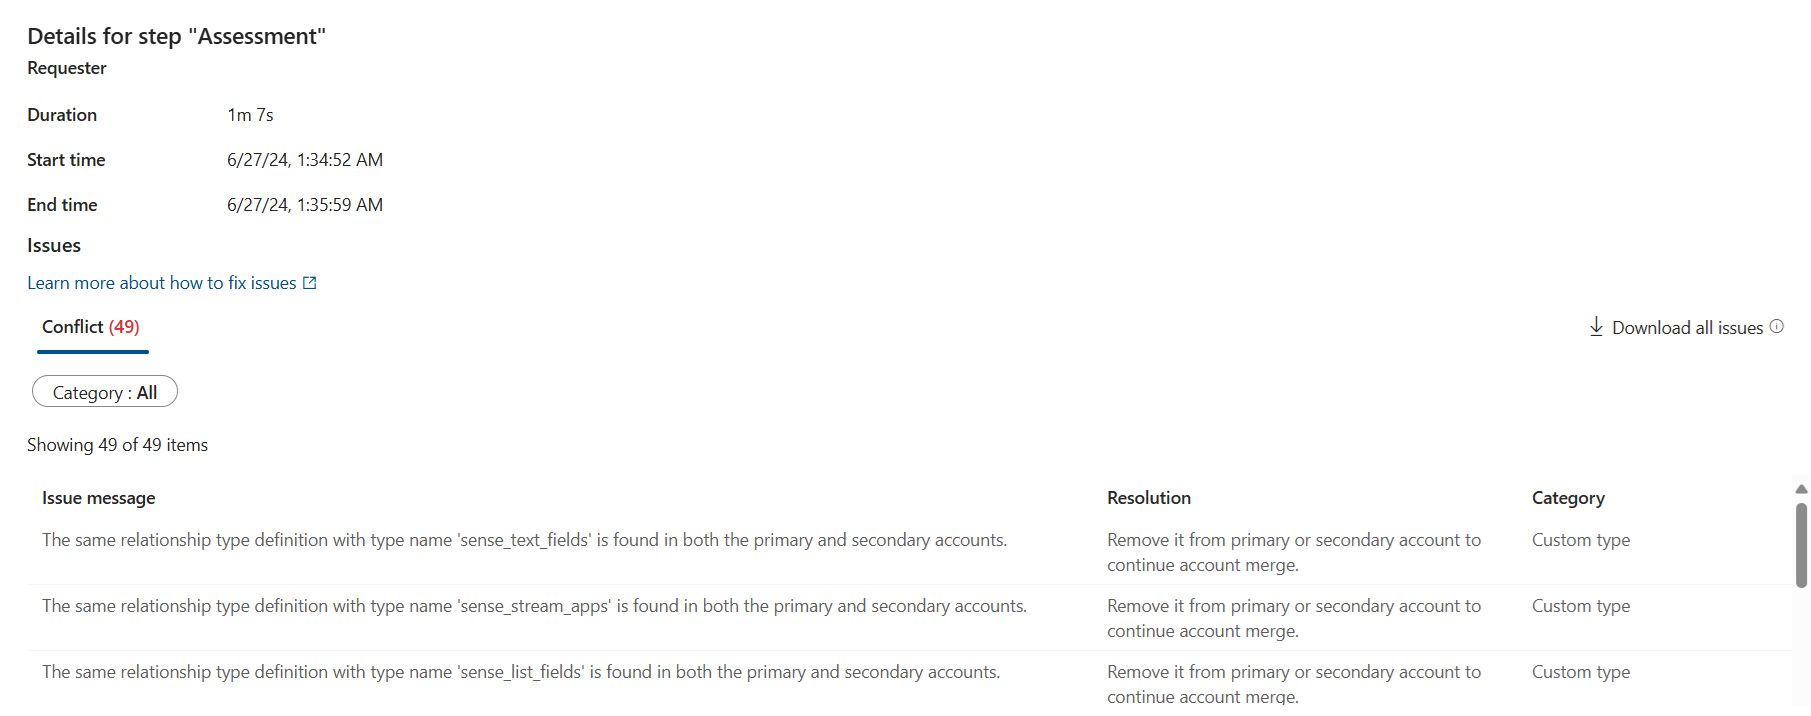
You can view issues details by selecting View details. It lists all conflicts and limitations detected during the assessment.

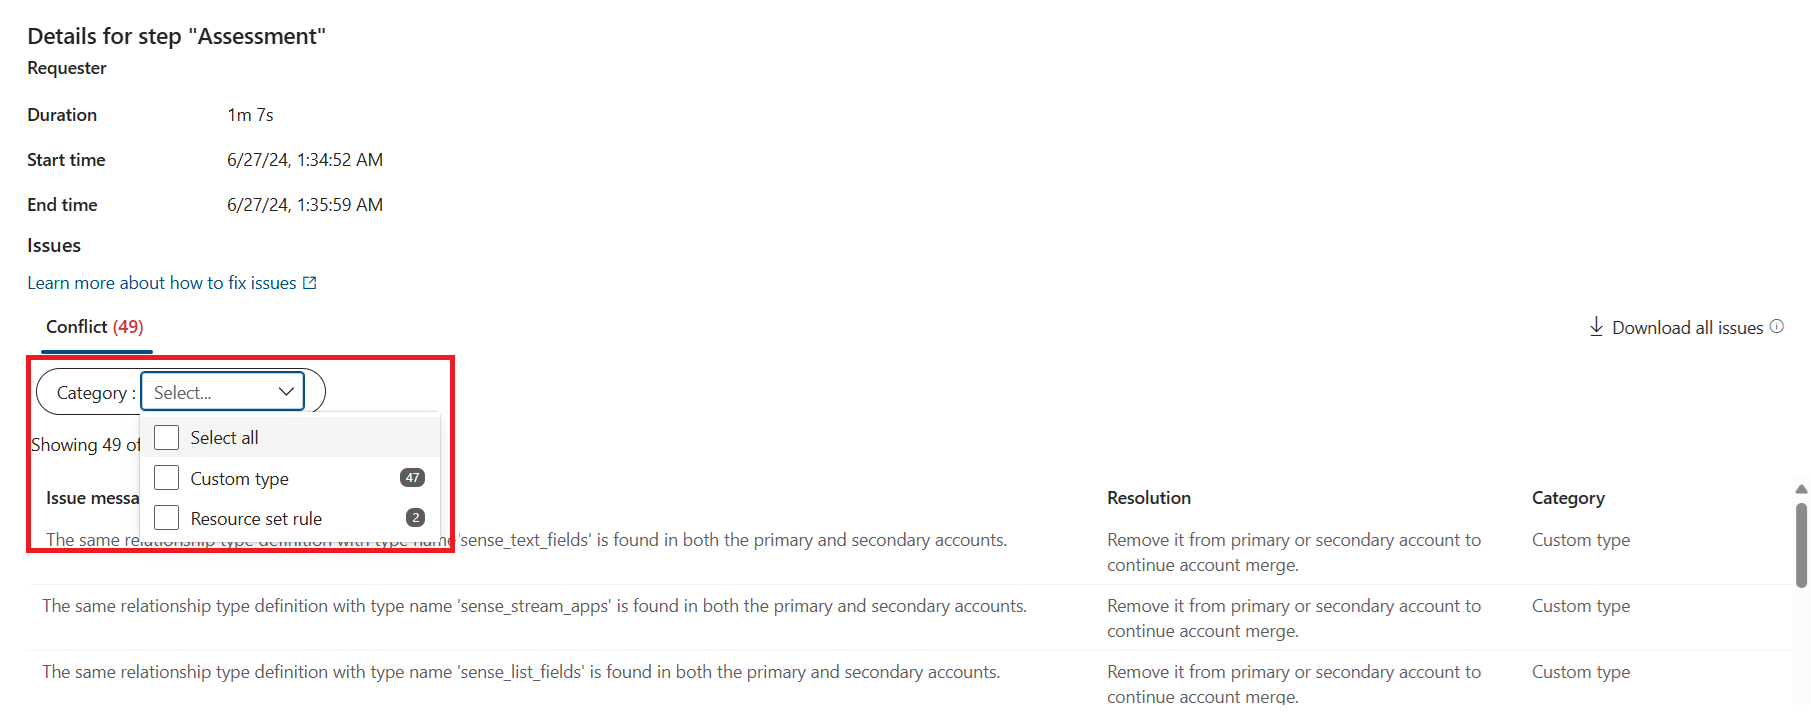
Use filters to drill down to conflicts and limitations within selected categories.
Download report
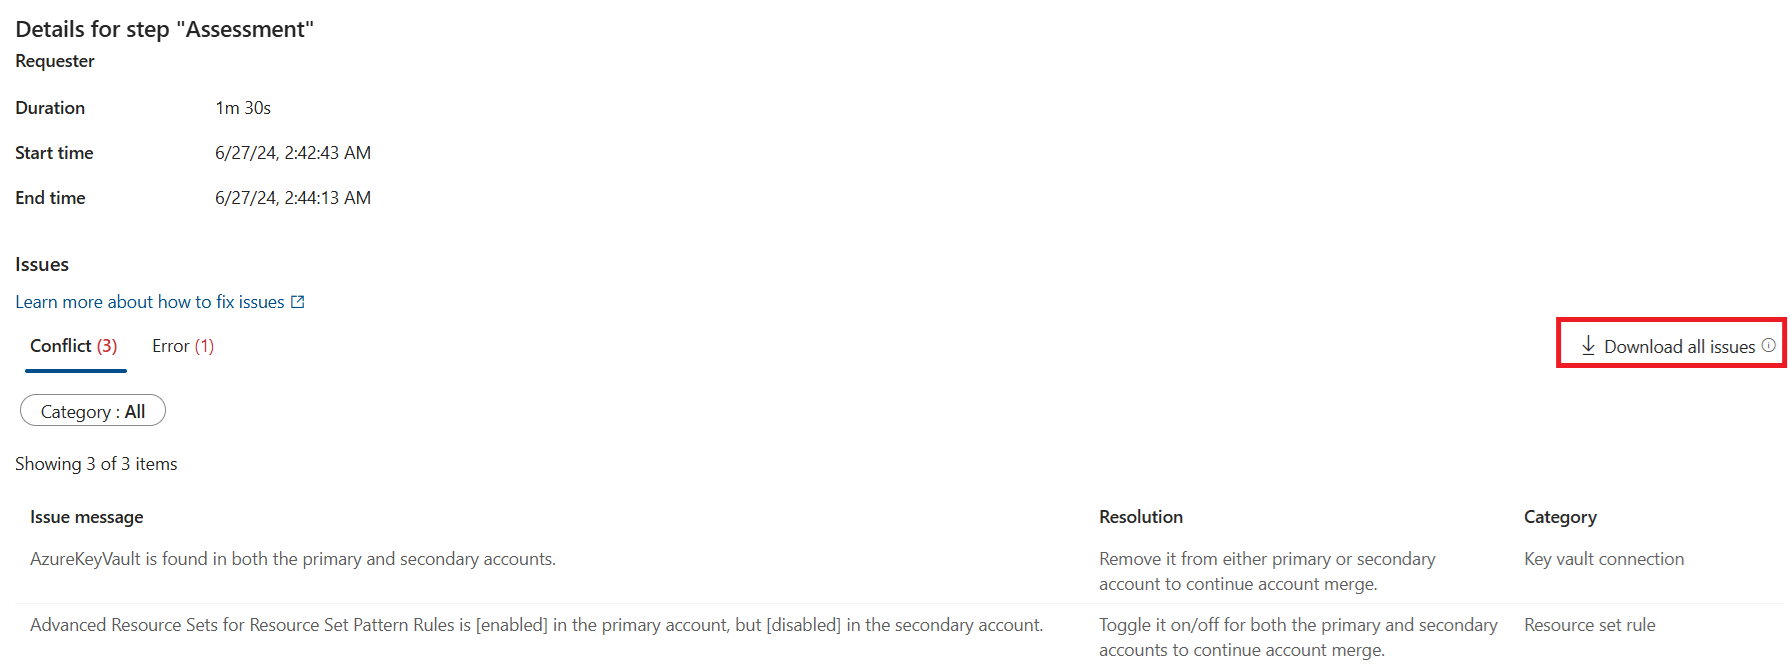
You can download all conflict details for any failed assessment.
Go do Data Map -> Monitoring -> Account merging
Select the secondary account's assessment.
Select any links in the Issues column.

Select the Download all issues button to download the conflict detail report that has Description, Object category, Resolution, and Type columns.
Tip
Objects that were filtered to not be merged will show as Skipped in the report.
After merge completion
After the merge has successfully completed, a new domain will appear in the primary account. (There might be a delay of a few minutes before it appears.) Its display name will be the root collection's friendly name of the secondary account. This contains all the domain level data migrated from the secondary account.
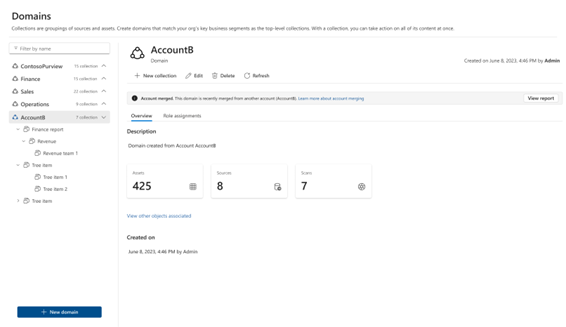
Next, you should switch over your managed identity connections from your secondary to your primary account using the managed identity switchover process.
After merger completion, the merged account still incurs billing. To prevent billing through the merged account, you can either:
Hard deletion of merged secondary account
Hard delete the Purview account will also delete System Assigned Managed Identity associated with the secondary account. To ensure your scans and resources will connect after deletion of the secondary account, you can use the managed identity switchover process to migrate your resources to the primary account's managed identity.
- Open the Azure portal and select your Microsoft Purview account.
- Select the Delete button and confirm the request.
- Wait for the deletion to successfully complete.
After hard deleting the account:
- Migrated scans that use secondary account's system assigned managed identity to access data source won't work in the Primary account.
- Migrated key vault connections that use secondary account's system assigned managed identity to access key vaults won't work in the Primary account.
Deactivate merged secondary account
If you want to stop billing on your secondary account, or you want to use secondary account's system assigned managed identity to access data sources and key vaults in the primary account, you can choose to deactivate the secondary account after merge complete. After the account is deactivated, the data plane operations for this account will be blocked and billing will stop. To switch your sources and scans to the primary managed identity, use the managed identity switchover process.
Caution
Once an account is deactivated, it can't be reactivated.
- Open secondary account's Microsoft Purview portal.
- Open Data Map and select Monitoring.
- Select Account merging tab.
- Select Deactivate button.

Managed identity switchover
When a secondary account is merged into the tenant-level account, switching your managed identity to the new tenant account is a required step to use the self-hosted integration runtime (SHIR), and is still highly recommended even if you're not. Once the secondary account is deleted, any scans or key vaults that use its managed identity will fail.
To switch your scans and resources from your secondary accounts' managed identity to your primary account's managed identity, follow the steps below. Users must hold the Domain admin role in order to perform these functions.
- Ensure that your primary/tenant-level Microsoft Purview account's managed identity has access to the migrated sources and connections.
- You can start the switchover from:
- The domain overview in your secondary account
- If your secondary account was using its own managed identity, on the domain overview page there's a Switch managed identity button. Select it.
- Select Confirm
- Once the switchover is completed, you'll receive a notification.
- On the create/edit scan page of your secondary account
- Once a merge has been completed, on the secondary account's scan pages there's a notification that asks you to confirm switching your managed identity.
- Select Confirm
- Once the switchover is completed, you'll receive a notification.
- On the create/edit key vault connection page in your secondary account
- Once a merge has been completed, on the secondary account's key vault connection page there's a notification that asks you to confirm switching your managed identity.
- Select Confirm
- Once the switchover is completed, you'll receive a notification.
- The domain overview in your secondary account
Billing
After merge completion, billing for the secondary account will be consolidated with the primary account and will be charged to the primary account's subscription. However, until you deactivate the secondary account, its billing will still be applicable to its subscription.
Tip
Once you've merged your secondary account, deactivate and then delete it to reduce billing.