Note
Access to this page requires authorization. You can try signing in or changing directories.
Access to this page requires authorization. You can try changing directories.
APPLIES TO:  Azure Database for PostgreSQL flexible server
This article guides you in migrating a PostgreSQL instance from your on-premises or Azure virtual machines (VMs) to Azure Database for PostgreSQL flexible server using the Azure portal and Azure CLI.
The migration service in Azure Database for PostgreSQL is a fully managed service integrated into the Azure portal and Azure CLI. It's designed to simplify your migration journey to the Azure Database for PostgreSQL flexible server.
- Configure your Azure Database for PostgreSQL Flexible Server
- Configure the migration task
- Monitor the migration
- Check the migration when completed
Prerequisites
To begin the migration, you need the following prerequisites:
Before starting the migration with the Azure Database for PostgreSQL migration service, it's important to fulfill the following prerequisites, specifically designed for online migration scenarios.
- Verify the source version
- Install test_decoding - Source Setup
- Configure target setup
- Enable CDC as a source
- Configure network setup
- Enable extensions
- Check server parameters
- Check users and roles
Verify the source version
The source PostgreSQL server version must be 9.5 or later.
If the source PostgreSQL version is less than 9.5, upgrade it to 9.5 or higher before you start the migration.
Install test_decoding - Source Setup
test_decoding receives WAL through the logical decoding mechanism and decodes it into text representations of the operations performed.
For more information about the test-decoding plugin, see the PostgreSQL documentation
Configure target setup
- Before migrating, Azure Database for PostgreSQL Flexible server must be created.
- SKU provisioned for Azure Database for PostgreSQL Flexible server should match with the source.
- To create a new Azure Database for PostgreSQL, visit Create an instance of Azure Database for PostgreSQL flexible server
- When migrating across PostgreSQL versions (major or minor), ensure compatibility between your database and application by reviewing the release notes for potential breaking changes.
Enable CDC as a source
test_decodinglogical decoding plugin captures the changed records from the source.- In the source PostgreSQL instance, set the following parameters and values in the postgresql.conf configuration file:
Set wal_level = logicalSet max_replication_slotsto a value greater than 1, the value should be greater than the number of databases selected for migration.Set max_wal_sendersto a value greater than 1, should be set to at least the same as max_replication_slots, plus the number of senders already used by your instance.- The
wal_sender_timeoutparameter ends replication connections that are inactive longer than the specified number of milliseconds. The default for an on-premises PostgreSQL database is 60000 milliseconds (60 seconds). Setting the value to 0 (zero) disables the timeout mechanism and is a valid setting for migration.
To prevent the Online migration from running out of space, ensure that you have sufficient tablespace space using a provisioned managed disk. To achieve this, disable the server parameter azure.enable_temp_tablespaces_on_local_ssd on the Flexible Server for the duration of the migration, and restore it to the original state after the migration.
Configure network setup
Network setup is crucial for the migration service to function correctly. Ensure that the source PostgreSQL server can communicate with the target Azure Database for PostgreSQL server. The following network configurations are essential for a successful migration.
For information about network setup, visit Network guide for migration service.
- Additional networking considerations:
pg_hba.conf Configuration: To facilitate connectivity between the source and target PostgreSQL instances, it's essential to verify and potentially modify the pg_hba.conf file. This file includes client authentication and must be configured to allow the target PostgreSQL to connect to the source. Changes to the pg_hba.conf file typically require a restart of the source PostgreSQL instance to take effect.
The pg_hba.conf file is located in the data directory of the PostgreSQL installation. This file should be checked and configured if the source database is an on-premises PostgreSQL server or a PostgreSQL server hosted on an Azure VM.
Enable extensions
To ensure a successful migration by using the migration service in Azure Database for PostgreSQL, you might need to verify extensions to your source PostgreSQL instance. Extensions provide functionality and features that might be required for your application. Make sure that you verify the extensions on the source PostgreSQL instance before you initiate the migration process.
In the target instance of Azure Database for PostgreSQL - Flexible Server, enable supported extensions that are identified in the source PostgreSQL instance.
For more information, see Extensions in Azure Database for PostgreSQL.
Note
A restart is required when you make any changes to the shared_preload_libraries parameter.
Check server parameters
- You need to manually configure the server parameter values in the Azure Database for PostgreSQL Flexible server based on the server parameter values configured in the source.
Check users and roles
- The users and different roles must be migrated manually to the Azure Database for PostgreSQL Flexible server. For migrating users and roles, you can use
pg_dumpall --globals-only -U <<username> -f <<filename>>.sql. - Azure Database for PostgreSQL - The flexible server doesn't support any superuser; users having roles of superuser need to be removed before migration.
Perform the migration
You can migrate by using the Azure portal or the Azure CLI.
This article guides you using the Azure portal to migrate your PostgreSQL database from an Azure VM or an on-premises PostgreSQL server to an Azure Database for PostgreSQL. The Azure portal allows you to perform various tasks, including database migration. Following the steps outlined in this tutorial, you can seamlessly transfer your database to Azure and take advantage of its powerful features and scalability.
Configure the migration task
The migration service comes with a simple, wizard-based experience on the Azure portal. Here's how to start:
Open your web browser and go to the portal. Enter your credentials to sign in. The default view is your service dashboard.
Go to your Azure Database for PostgreSQL Flexible Server target.
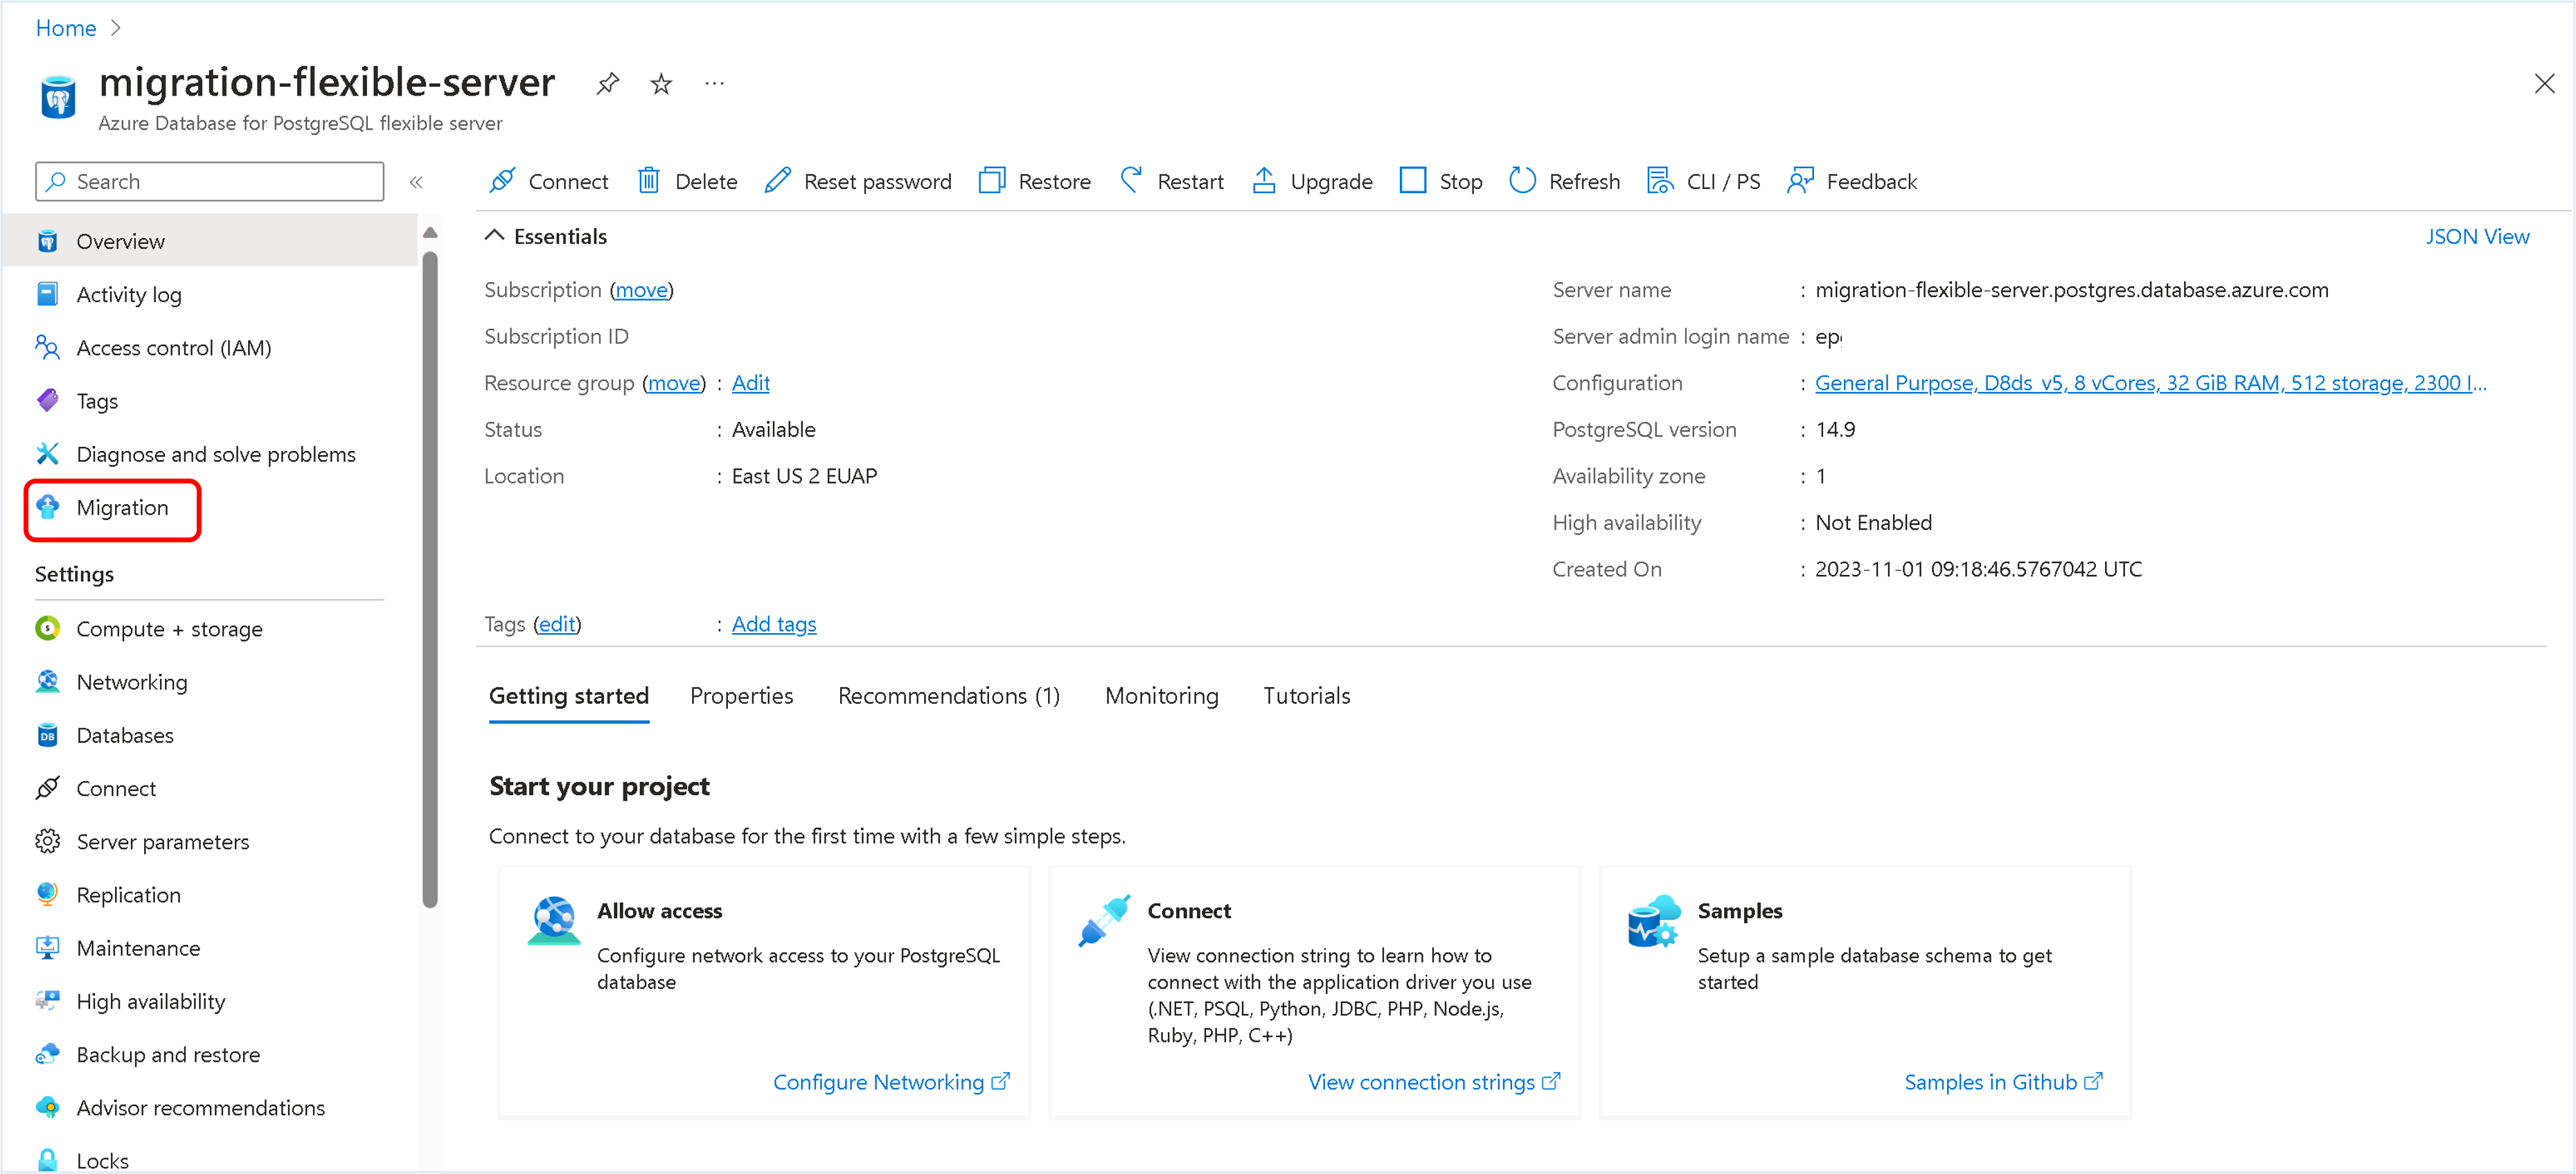
In the Flexible Server's Overview tab, on the left menu, scroll down to Migration and select it.
Select the Create button to migrate from an Azure virtual machine (VM) or an on-premises PostgreSQL server to the Flexible Server. If this is your first time using the migration service, an empty grid appears with a prompt to begin your first migration.
If you've already created migrations to your Flexible Server target, the grid contains information about attempted migrations.
Select the Create button. Then, you go through a wizard-based series of tabs to create a migration into this Flexible Server target from the PostgreSQL source Server.
Setup
The first tab is the setup tab, where the user initiates the migrations by providing migration details like migration name and source type.
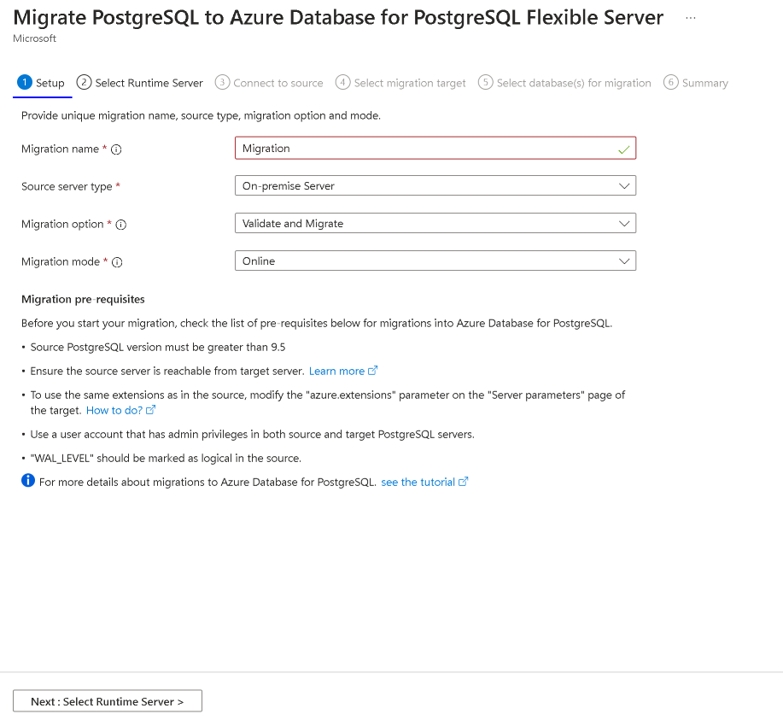
Migration name is the unique identifier for each migration to this Flexible Server target. This field accepts only alphanumeric characters and doesn't accept any special characters except a hyphen (-). The name can't start with a hyphen and should be unique for a target server. No two migrations to the same Flexible Server target can have the same name.
Source Server Type — Depending on your PostgreSQL source, you can select Azure VM or on-premises.
Migration Option allows you to perform validations before triggering a migration. You can pick any of the following options:
- Validate - Checks your server and database readiness for migration to the target.
- Migrate - Skips validations and starts migrations.
- Validate and Migrate—Performs validation before triggering a migration. The migration is triggered only if there are no validation failures.
Choosing the Validate or Validate and Migrate option is always a good practice when performing premigration validations before running the migration. To learn more about the premigration validation, refer to this documentation.
Migration mode allows you to choose the mode for the migration. Offline is the default option.
Select the Next: Connect to source button.
Runtime Server
The Migration Runtime Server is a specialized feature within the migration service in Azure Database for PostgreSQL, designed to act as an intermediary server during migration. It's a separate Azure Database for PostgreSQL flexible server instance that isn't the target server but is used to facilitate the migration of databases from a source environment that is only accessible via a private network.
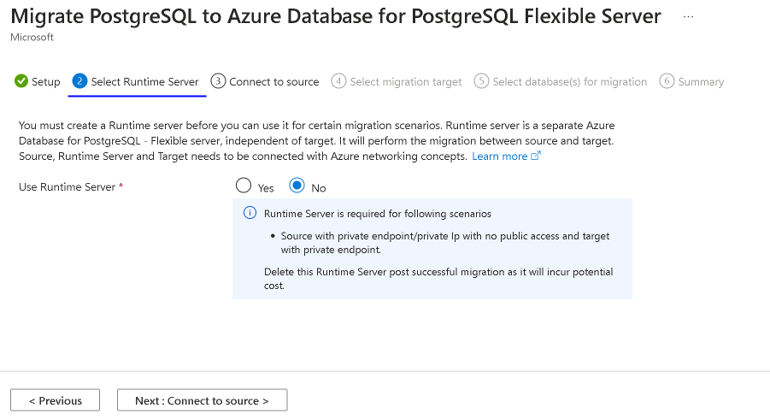
For more information about the Runtime Server, visit the Migration Runtime Server.
Connect to source
The Connect to Source tab prompts you to give details related to the source selected in the Setup Tab that is the source of the databases.
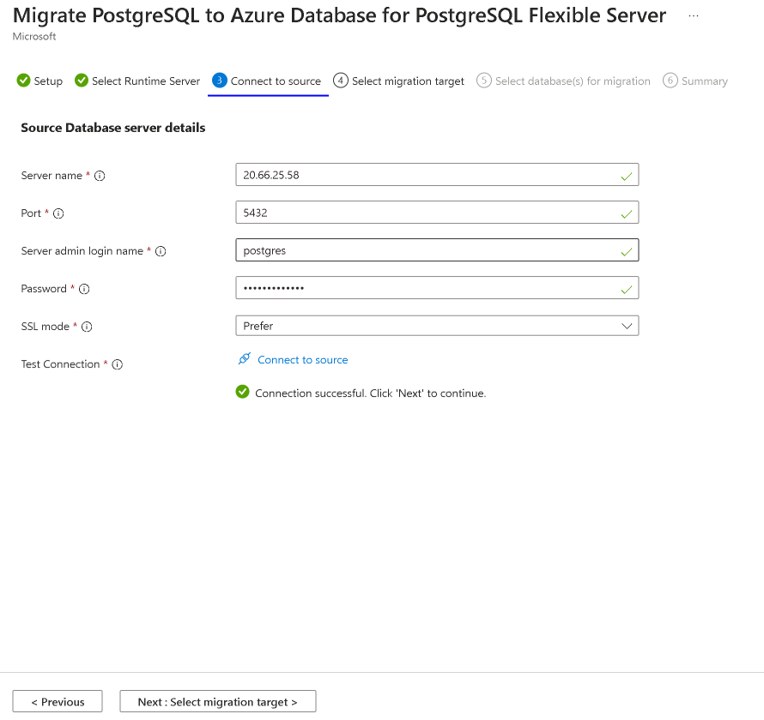
- Server Name - Provide the Hostname or the IP address of the source PostgreSQL instance
- Port - Port number of the Source server
- Server admin login name - Username of the source PostgreSQL server
- Password - Password of the source PostgreSQL server
- SSL Mode - Supported values are preferred and required. When the SSL at the source PostgreSQL server is OFF, use the SSLMODE=prefer. If the SSL at the source server is ON, use the SSLMODE=require. SSL values can be determined in postgresql.conf file.
- Test Connection - Performs the connectivity test between target and source. Once the connection is successful, users can proceed with the next step. Otherwise, you need to identify the networking issues between the target and source and verify the username/password for the source. Test connection takes a few minutes to establish a connection between the target and source
After the successful test connection, select the Next: Select Migration target
Select migration target
The select migration target tab displays metadata for the Flexible Server target, such as the subscription name, resource group, server name, location, and PostgreSQL version.
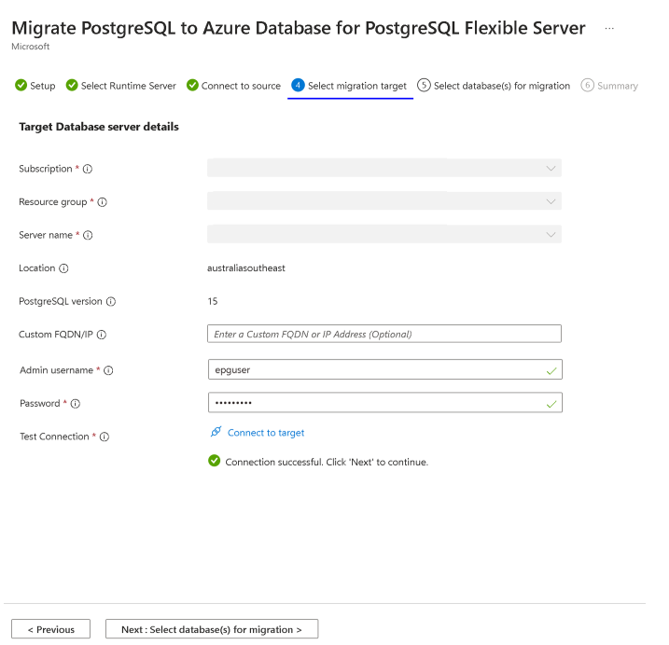
- Admin username - Admin username of the target PostgreSQL server
- Password - Password of the target PostgreSQL server
- Custom FQDN/IP (Optional): The custom FQDN/IP field is optional and can be used when the target is behind a custom DNS server or has custom DNS namespaces, making it accessible only via specific FQDNs or IP addresses. For example, this could include entries like
flexibleserver.example.com,198.1.0.2, or a PostgreSQL FQDN such asflexibleserver.postgres.database.chinacloudapi.cn, if the custom DNS server contains the DNS zonepostgres.database.chinacloudapi.cnor forward queries for this zone to168.63.129.16, where the FQDN is resolved in the Azure public or private DNS zone. - Test Connection - Performs the connectivity test between target and source. Once the connection is successful, users can proceed with the next step. Otherwise, we need to identify the networking issues between the target and the source and verify the username/password for the target. The test connection takes a few minutes to establish a connection between the target and the source.
After the successful test connection, select the Next: Select Database(s) for Migration
Select databases for migration
Under this tab, a list of user databases is inside the source server selected in the setup tab. You can select and migrate up to eight databases in a single migration attempt. If there are more than eight user databases, the migration process is repeated between the source and target servers for the next set of databases.
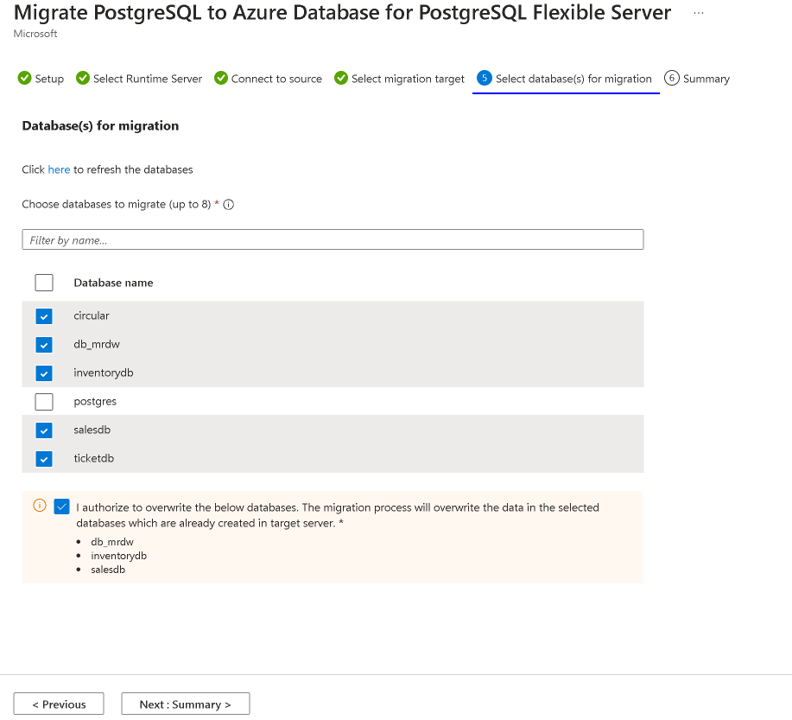
After selecting the databases, select the Next: Summary
Summary
The Summary tab summarizes all the source and target details for creating the validation or migration. Review the details and select the start button.
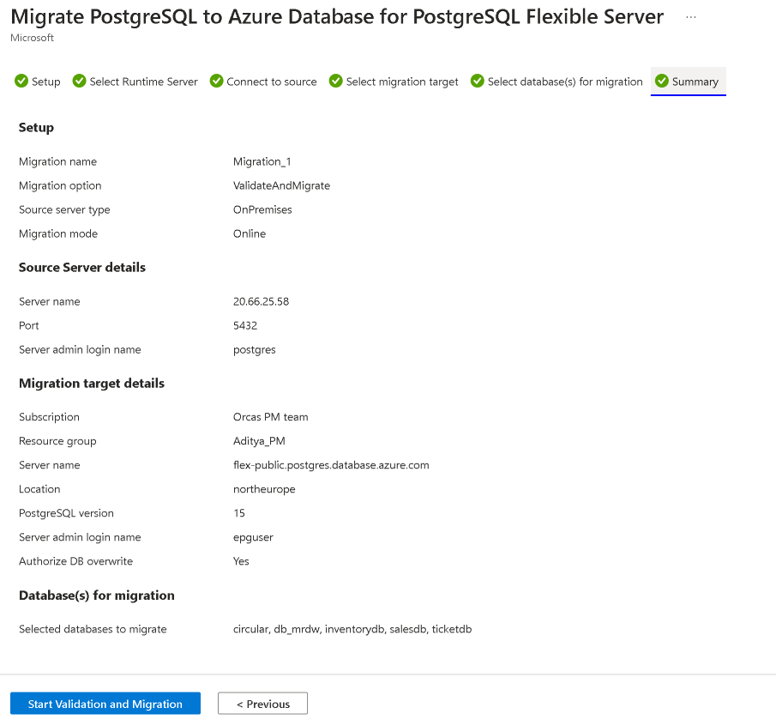
Monitor the migration
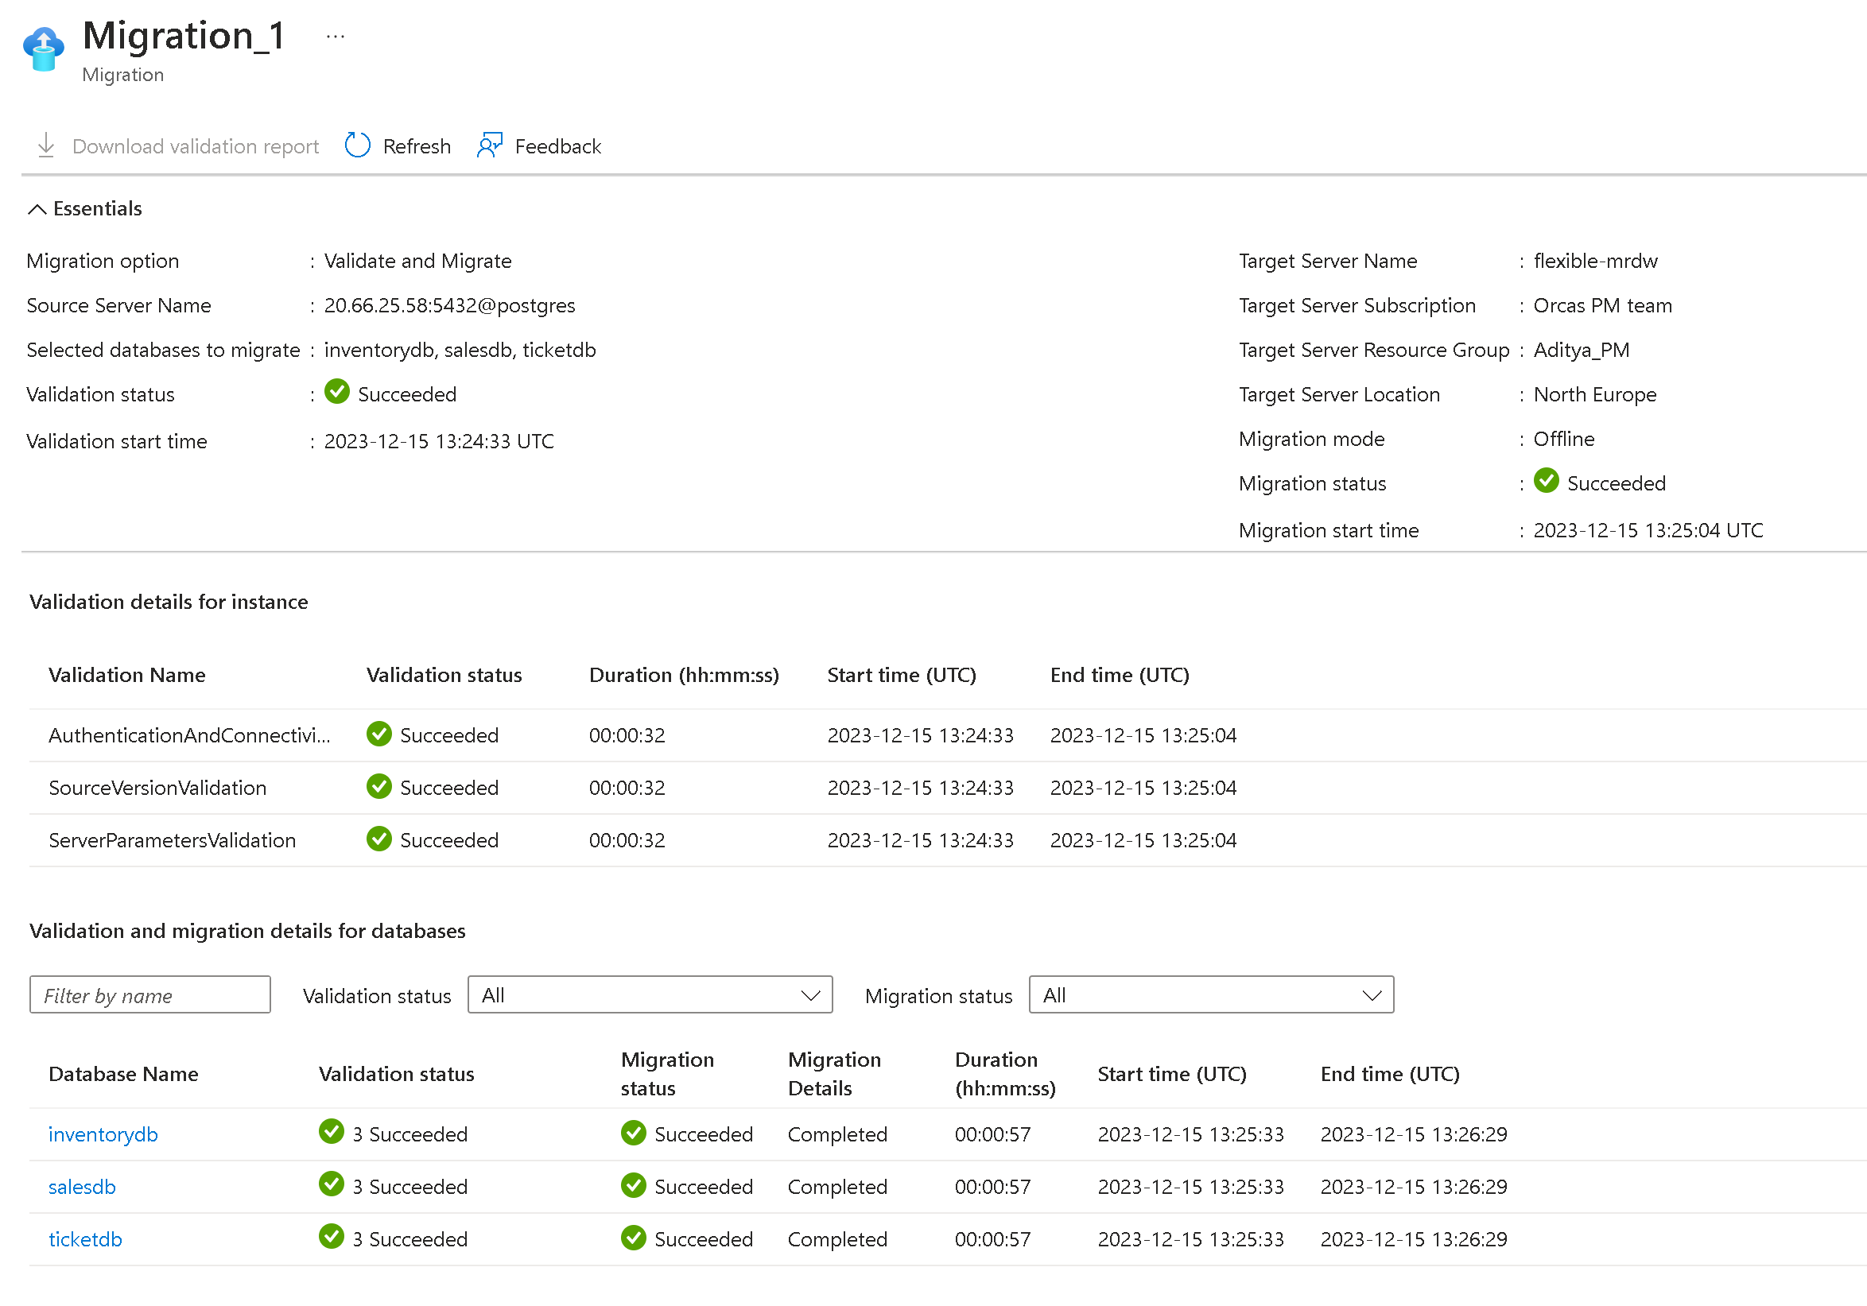
After you select the start button, a notification appears in a few seconds, saying that the validation or migration creation is successful. You're redirected automatically to the Migration blade of Flexible Server, which has a new entry for the recently created validation or migration.
The grid that displays the migrations has these columns: Name, Status, Migration mode, Migration type, Source server, Source server type, Databases, **Duration, and Start time. The entries are displayed in the descending order of the start time, with the most recent entry at the top. You can use the refresh button to refresh the status of the validation or migration. Select the migration name in the grid to see the associated details.
When the validation or migration is created, it moves to the InProgress state and PerformingPreRequisiteSteps substate. The workflow takes 2 to 3 minutes to set up the migration infrastructure and network connections.
Migration details
In the Setup tab, we have selected the migration option as Migrate and Validate. In this scenario, validations are performed first before migration starts. After the PerformingPreRequisiteSteps substate is completed, the workflow moves into the substate of Validation in Progress.
- If validation has errors, the migration moves into a Failed state.
- If validation completes without error, the migration starts, and the workflow moves into the substate of Migrating Data.
The validation results are displayed under the Validation tab, and the migration is monitored under the Migration tab.
Some possible migration states:
Migration states
| State | Description |
|---|---|
| InProgress | The migration infrastructure setup is underway, or the actual data migration is in progress. |
| Canceled | The migration is canceled or deleted. |
| Failed | The migration has failed. |
| Validation Failed | The validation has failed. |
| Succeeded | The migration has succeeded and is complete. |
| WaitingForUserAction | Applicable only for online migration. Waiting for user action to perform cutover. |
Migration substates
| Substate | Description |
|---|---|
| PerformingPreRequisiteSteps | Infrastructure setup is underway for data migration. |
| Validation in Progress | Validation is in progress. |
| MigratingData | Data migration is in progress. |
| CompletingMigration | Migration is in the final stages of completion. |
| Completed | Migration has been completed. |
| Failed | Migration has failed. |
Validation substates
| Substate | Description |
|---|---|
| Failed | Validation has failed. |
| Succeeded | Validation is successful. |
| Warning | Validation is in warning. |
Cutover
If there are both Migrate and Validate and Migrate, completing the online migration requires another step—the user must take a Cutover action. After the copy/clone of the base data is complete, the migration moves to the WaitingForUserAction state and the WaitingForCutoverTrigger substrate. In this state, the user can trigger the cutover from the portal by selecting the migration.
Before initiating cutover, it's important to ensure that:
- Writes to the source are stopped -
Latencyvalue is 0 or close to 0. TheLatencyinformation can be obtained from the migration details screen as shown below: latencyvalue decreases to 0 or close to 0- The
latencyvalue indicates when the target last synced with the source. Writing to the source can be stopped at this point, and a cutover can be initiated. In case there's heavy traffic at the source, it's recommended to stop writes first so thatLatencycan come close to 0, and then a cutover is initiated.
The Cutover operation applies all pending changes from the Source to the Target and completes the migration. If you trigger a "Cutover" even with nonzero Latency, the replication stops until that point in time. All the data on the source until the cutover point is then applied to the target. If you experience a latency of 15 minutes at the cutover point, all the changed data in the last 15 minutes are applied to the target.
The time depends on the backlog of changes occurring in the last 15 minutes. Hence, it's recommended that the latency go to zero or near zero before triggering the cutover.
- The migration moves to the
Succeededstate when theMigrating Datasubstate or the cutover (in Online migration) finishes successfully. If there's a problem at theMigrating Datasubstate, the migration moves into aFailedstate.
Cancel the migration
You can cancel any ongoing validations or migrations. The workflow must be in the InProgress state to be canceled. You can't cancel a validation or migration in the Succeeded or Failed state.
Canceling a validation stops any further validation activity and the validation moves to a Canceled state.
Canceling a migration stops further migration activity on your target server and moves to a Canceled state. It doesn't drop or roll back any changes on your target server. Be sure to drop the databases on your target server that is involved in a canceled migration.
Check the migration when complete
After completing the databases, you need to manually validate the data between source and target and verify that all the objects in the target database are successfully created.
After migration, you can perform the following tasks:
- Verify the data on your flexible server and ensure it's an exact copy of the source instance.
- Post verification, enable the high availability option on your flexible server as needed.
- Change the SKU of the flexible server to match the application needs. This change needs a database server restart.
- If you change any server parameters from their default values in the source instance, copy those server parameter values in the flexible server. Copy other server settings, such as tags, alerts, and firewall rules (if applicable), from the source instance to the flexible server.
- Make changes to your application to point the connection strings to a flexible server.
- Monitor the database performance closely to see if it requires performance tuning.
