Send cloud-to-device messages with IoT Hub (Python)
Azure IoT Hub is a fully managed service that helps enable reliable and secure bi-directional communications between millions of devices and a solution back end.
This article shows you how to:
Send cloud-to-device (C2D) messages from your solution backend to a single device through IoT Hub
Receive cloud-to-device messages on a device
Note
The features described in this article are available only in the standard tier of IoT Hub. For more information about the basic and standard/free IoT Hub tiers, see Choose the right IoT Hub tier for your solution.
At the end of this article, you run two Python console apps:
SimulatedDevice.py: simulates a device that connects to your IoT hub and receives cloud-to-device messages.
SendCloudToDeviceMessage.py: sends cloud-to-device messages to the simulated device app through IoT Hub.
To learn more about cloud-to-device messages, see Send cloud-to-device messages from an IoT hub.
Note
IoT Hub has SDK support for many device platforms and languages (C, Java, Python, and JavaScript) through the Azure IoT device SDKs.
Prerequisites
An active Azure account. (If you don't have an account, you can create a Trial in just a couple of minutes.)
An IoT hub. Create one with the CLI or the Azure portal.
A device registered in your IoT hub. If you don't have a device in your IoT hub, follow the steps in Register a device.
Python version 3.7 or later is recommended. Make sure to use the 32-bit or 64-bit installation as required by your setup. When prompted during the installation, make sure to add Python to your platform-specific environment variable.
Make sure that port 8883 is open in your firewall. The device sample in this article uses MQTT protocol, which communicates over port 8883. This port may be blocked in some corporate and educational network environments. For more information and ways to work around this issue, see Connecting to IoT Hub (MQTT).
Receive messages in the simulated device app
In this section, you create a Python console app to simulate a device and receive cloud-to-device messages from the IoT hub.
From a command prompt in your working directory, install the Azure IoT Hub Device SDK for Python:
pip install azure-iot-deviceUsing a text editor, create a file named SimulatedDevice.py.
Add the following
importstatements and variables at the start of the SimulatedDevice.py file:import time from azure.iot.device import IoTHubDeviceClient RECEIVED_MESSAGES = 0Add the following code to SimulatedDevice.py file. Replace the
{deviceConnectionString}placeholder value with the connection string for the registered device in Prerequisites:CONNECTION_STRING = "{deviceConnectionString}"Define the following function that is used to print received messages to the console:
def message_handler(message):
    global RECEIVED_MESSAGES
    RECEIVED_MESSAGES += 1
    print("")
    print("Message received:")

    # print data from both system and application (custom) properties
    for property in vars(message).items():
        print ("    {}".format(property))

    print("Total calls received: {}".format(RECEIVED_MESSAGES))
Add the following code to initialize the client and wait to receive the cloud-to-device message:
def main():
    print ("Starting the Python IoT Hub C2D Messaging device sample...")

    # Instantiate the client
    client = IoTHubDeviceClient.create_from_connection_string(CONNECTION_STRING)

    print ("Waiting for C2D messages, press Ctrl-C to exit")
    try:
        # Attach the handler to the client
        client.on_message_received = message_handler

        while True:
            time.sleep(1000)
    except KeyboardInterrupt:
        print("IoT Hub C2D Messaging device sample stopped")
    finally:
        # Graceful exit
        print("Shutting down IoT Hub Client")
        client.shutdown()
Add the following main function:
if __name__ == '__main__':
    main()
Save and close the SimulatedDevice.py file.
For more information about the cloud-to-device message lifecycle and how IoT Hub processes cloud-to-device messages, see Send cloud-to-device messages from an IoT hub.
Get the IoT hub connection string
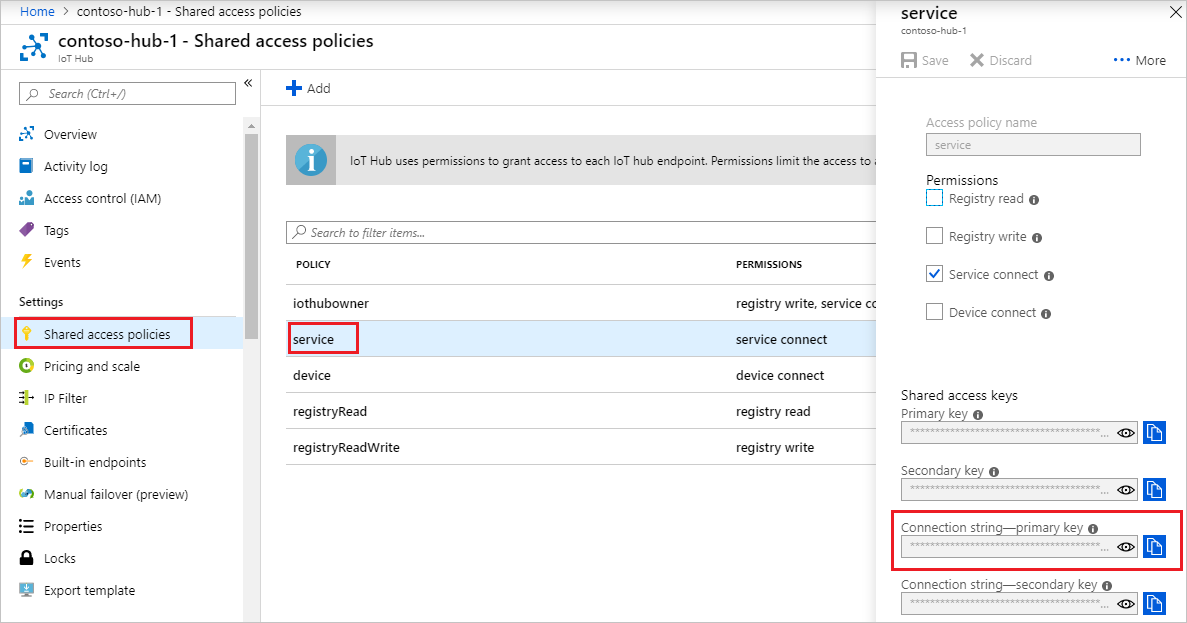
In this article, you create a backend service to send cloud-to-device messages through your IoT Hub. To send cloud-to-device messages, your service needs the service connect permission. By default, every IoT Hub is created with a shared access policy named service that grants this permission.
To get the IoT Hub connection string for the service policy, follow these steps:
In the Azure portal, select Resource groups. Select the resource group where your hub is located, and then select your hub from the list of resources.
On the left-side pane of your IoT hub, select Shared access policies.
From the list of policies, select the service policy.
Copy the Primary connection string and save the value.
For more information about IoT Hub shared access policies and permissions, see Access control and permissions.
Send a cloud-to-device message
In this section, you create a Python console app that sends cloud-to-device messages to the simulated device app. You need the device ID from your device and your IoT hub connection string.
In your working directory, open a command prompt and install the Azure IoT Hub Service SDK for Python.
pip install azure-iot-hubUsing a text editor, create a file named SendCloudToDeviceMessage.py.
Add the following
importstatements and variables at the start of the SendCloudToDeviceMessage.py file:import random import sys from azure.iot.hub import IoTHubRegistryManager MESSAGE_COUNT = 2 AVG_WIND_SPEED = 10.0 MSG_TXT = "{\"service client sent a message\": %.2f}"Add the following code to SendCloudToDeviceMessage.py file. Replace the
{iot hub connection string}and{device id}placeholder values with the IoT hub connection string and device ID you noted previously:CONNECTION_STRING = "{IoTHubConnectionString}" DEVICE_ID = "{deviceId}"Add the following code to send messages to your device:
def iothub_messaging_sample_run():
    try:
        # Create IoTHubRegistryManager
        registry_manager = IoTHubRegistryManager(CONNECTION_STRING)

        for i in range(0, MESSAGE_COUNT):
            print ( 'Sending message: {0}'.format(i) )
            data = MSG_TXT % (AVG_WIND_SPEED + (random.random() * 4 + 2))

            props={}
            # optional: assign system properties
            props.update(messageId = "message_%d" % i)
            props.update(correlationId = "correlation_%d" % i)
            props.update(contentType = "application/json")

            # optional: assign application properties
            prop_text = "PropMsg_%d" % i
            props.update(testProperty = prop_text)

            registry_manager.send_c2d_message(DEVICE_ID, data, properties=props)

        try:
            # Try Python 2.xx first
            raw_input("Press Enter to continue...\n")
        except:
            pass
            # Use Python 3.xx in the case of exception
            input("Press Enter to continue...\n")

    except Exception as ex:
        print ( "Unexpected error {0}" % ex )
        return
    except KeyboardInterrupt:
        print ( "IoT Hub C2D Messaging service sample stopped" )
Add the following main function:
if __name__ == '__main__':
    print ( "Starting the Python IoT Hub C2D Messaging service sample..." )

    iothub_messaging_sample_run()
Save and close SendCloudToDeviceMessage.py file.
Run the applications
You're now ready to run the applications.
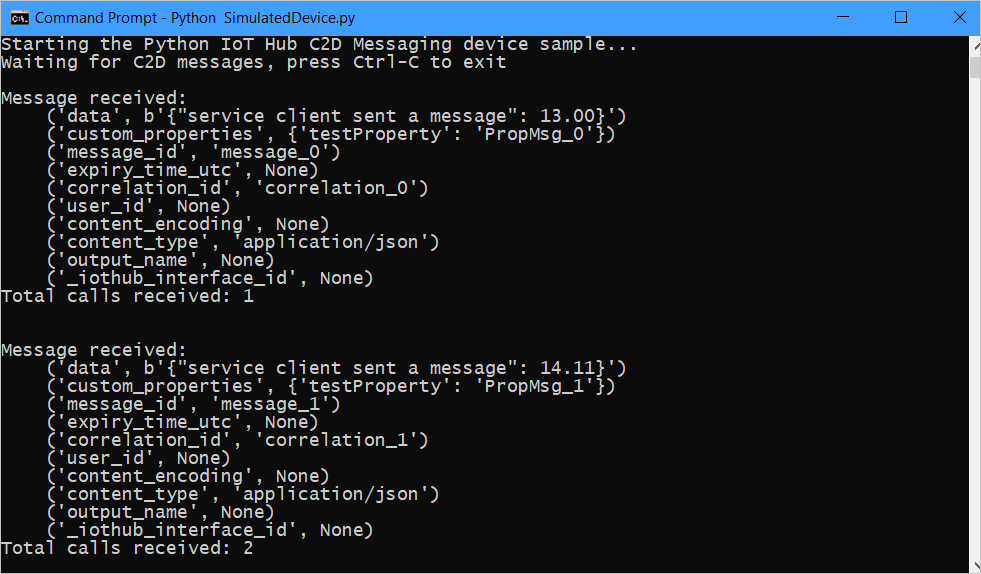
At the command prompt in your working directory, run the following command to listen for cloud-to-device messages:
python SimulatedDevice.py
Open a new command prompt in your working directory and run the following command to send cloud-to-device messages:
python SendCloudToDeviceMessage.py
Note the messages received by the device.

Next steps
In this article, you learned how to send and receive cloud-to-device messages.
To learn more about cloud-to-device messages, see Send cloud-to-device messages from an IoT hub.
To learn more about IoT Hub message formats, see Create and read IoT Hub messages.
