Note
Access to this page requires authorization. You can try signing in or changing directories.
Access to this page requires authorization. You can try changing directories.
Microsoft Entra Connect deployments vary from a single forest Express mode installation to complex deployments that synchronize across multiple forests by using custom synchronization rules. Because of the large number of configuration options and mechanisms, it's essential to understand what settings are in effect and be able to quickly deploy a server with an identical configuration. This feature introduces the ability to catalog the configuration of a given synchronization server and import the settings into a new deployment. Different synchronization settings snapshots can be compared to easily visualize the differences between two servers, or the same server over time.
Each time the configuration is changed from the Microsoft Entra Connect wizard, a new time-stamped JSON settings file is automatically exported to %ProgramData%\AADConnect. The settings file name is of the form Applied-SynchronizationPolicy-*.JSON, where the last part of the file name is a time stamp.
Important
Only changes made by Microsoft Entra Connect are automatically exported. Any changes made by using PowerShell, the Synchronization Service Manager, or the Synchronization Rules Editor must be exported on demand as needed to maintain an up-to-date copy. Export on demand can also be used to place a copy of the settings in a secure location for disaster recovery purposes.
Note
This feature cannot be used if the Microsoft Entra Connect installation was modified to include the G-SQL connector or the G-LDAP connector.
Note
This feature cannot be combined with using an existing ADSync database. The use of import/export configuration and using existing database are mutually exclusive.
Export Microsoft Entra Connect settings
To view a summary of your configuration settings, open the Microsoft Entra Connect tool, and select the additional task named View or Export Current Configuration. A quick summary of your settings is shown along with the ability to export the full configuration of your server.
By default, the settings are exported to %ProgramData%\AADConnect. You also can choose to save the settings to a protected location to ensure availability if a disaster occurs. Settings are exported by using the JSON file format and should not be hand-created or edited to ensure logical consistency. Importing a hand-created or edited file isn't supported and might lead to unexpected results.
Import Microsoft Entra Connect settings
To import previously exported settings:
Install Microsoft Entra Connect on a new server.
Select the Customize option after the Welcome page.
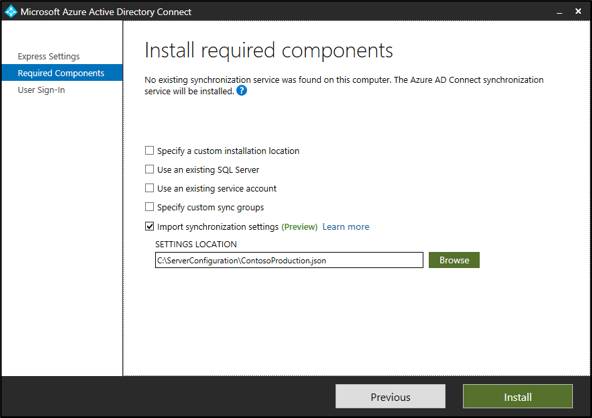
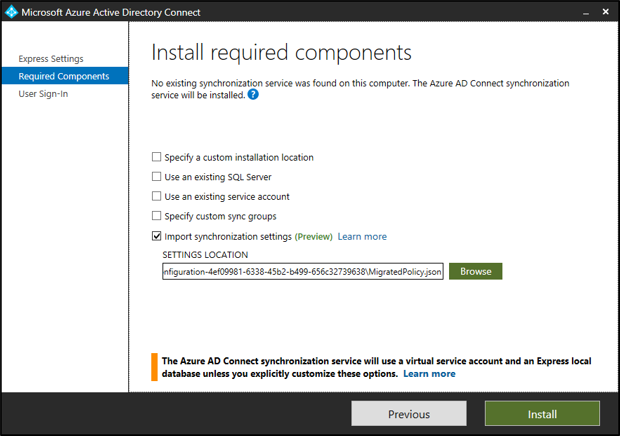
Select Import synchronization settings. Browse for the previously exported JSON settings file.
Select Install.
Note
Override settings on this page like the use of SQL Server instead of LocalDB or the use of an existing service account instead of a default VSA. These settings aren't imported from the configuration settings file. They are there for information and comparison purposes.
Note
It is not supported to modify the exported JSON file to change the configuration
Import installation experience
The import installation experience is intentionally kept simple with minimal inputs from the user to easily provide reproducibility of an existing server.
Here are the only changes that can be made during the installation experience. All other changes can be made after installation from the Microsoft Entra Connect wizard:
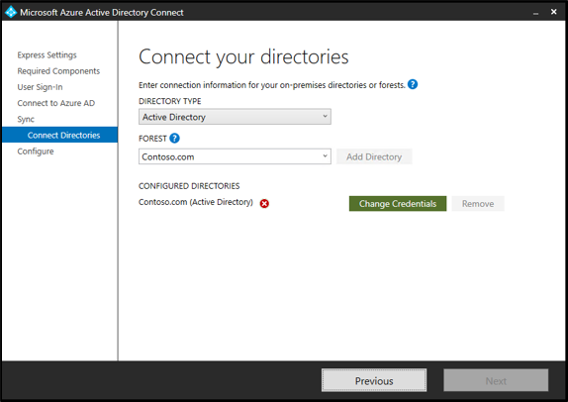
- Microsoft Entra credentials: The account name for the Global Administrator used to configure the original server is suggested by default. It must be changed if you want to synchronize information to a new directory.
- User sign-in: The sign-on options configured for your original server are selected by default and automatically prompt for credentials or other information that's needed during configuration. In rare cases, there might be a need to set up a server with different options to avoid changing the behavior of the active server. Otherwise, select Next to use the same settings.
- On-premises directory credentials: For each on-premises directory included in your synchronization settings, you must provide credentials to create a synchronization account or supply a pre-created custom synchronization account. This procedure is identical to the clean install experience with the exception that you can't add or remove directories.
- Configuration options: As with a clean install, you might choose to configure the initial settings for whether to start automatic synchronization or enable Staging mode. The main difference is that Staging mode is intentionally enabled by default to allow comparison of the configuration and synchronization results prior to actively exporting the results to Microsoft Entra ID.
Note
Only one synchronization server can be in the primary role and actively exporting configuration changes to Microsoft Entra ID. All other servers must be placed in Staging mode.
Migrate settings from an existing server
If an existing server doesn't support settings management, you can either choose to upgrade the server in-place or migrate the settings for use on a new staging server.
Migration requires running a PowerShell script that extracts the existing settings for use in a new installation. Use this method to catalog the settings of your existing server and then apply them to a newly installed staging server. Comparing the settings for the original server to a newly created server will quickly visualize the changes between the servers. As always, follow your organization's certification process to ensure no additional configuration is required.
Migration process
To migrate the settings:
Start AzureADConnect.msi on the new staging server, and stop at the Welcome page of Microsoft Entra Connect.
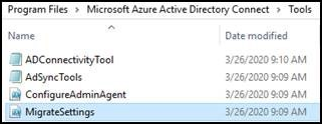
Copy MigrateSettings.ps1 from the Microsoft Entra Connect\Tools directory to a location on the existing server. An example is C:\setup, where setup is a directory that was created on the existing server.
Note
If you see a message: “A positional parameter cannot be found that accepts argument True.”, as below:
Then edit the MigrateSettings.ps1 file and remove $true and run the script:
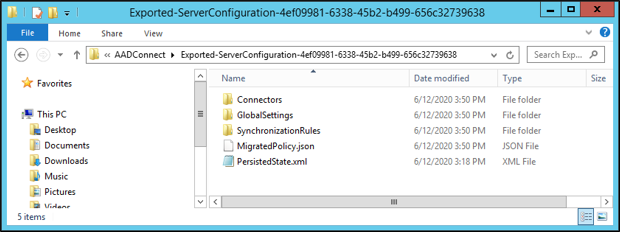
Run the script as shown here, and save the entire down-level server configuration directory. Copy this directory to the new staging server. You must copy the entire Exported-ServerConfiguration-* folder to the new server.

Start Microsoft Entra Connect by double-clicking the icon on the desktop. Accept the Microsoft Software License Terms, and on the next page, select Customize.
Select the Import synchronization settings check box. Select Browse to browse the copied-over Exported-ServerConfiguration-* folder. Select the MigratedPolicy.json to import the migrated settings.
Post-installation verification
Comparing the originally imported settings file with the exported settings file of the newly deployed server is an essential step in understanding any differences between the intended versus the resulting deployment. Using your favorite side-by-side text comparison application yields an instant visualization that quickly highlights any desired or accidental changes.
While many formerly manual configuration steps are now eliminated, you should still follow your organization's certification process to ensure no additional configuration is required. This configuration might occur if you use advanced settings, which aren't currently captured in this release of settings management.
Here are known limitations:
- Synchronization rules: The precedence for a custom rule must be in the reserved range of 0 to 99 to avoid conflicts with Microsoft's standard rules. Placing a custom rule outside the reserved range might result in your custom rule being shifted around as standard rules are added to the configuration. A similar issue will occur if your configuration contains modified standard rules. Modifying a standard rule is discouraged, and rule placement is likely to be incorrect.
- Device writeback: These settings are cataloged. They aren't currently applied during configuration. If device writeback was enabled for your original server, you must manually configure the feature on the newly deployed server.
- Synchronized object types: Although it's possible to constrain the list of synchronized object types (such as users, contacts, and groups) by using the Synchronization Service Manager, this feature isn't currently supported via synchronization settings. After you finish the installation, you must manually reapply the advanced configuration.
- Selected Attributes: Although it's possible to constrain the list of synchronized attributes (such as extension attributes) by using the Synchronization Service Manager, this feature isn't currently supported via synchronization settings. After you finish the installation, you must manually reapply the advanced configuration.
- Custom run profiles: Although it's possible to modify the default set of run profiles by using the Synchronization Service Manager, this feature isn't currently supported via synchronization settings. After you finish the installation, you must manually reapply the advanced configuration.
- Configuring the provisioning hierarchy: This advanced feature of the Synchronization Service Manager isn't supported via synchronization settings. It must be manually reconfigured after you finish the initial deployment.
- Active Directory Federation Services (AD FS) and PingFederate authentication: The sign-on methods associated with these authentication features are automatically preselected. You must interactively supply all other required configuration parameters.
