Note
Access to this page requires authorization. You can try signing in or changing directories.
Access to this page requires authorization. You can try changing directories.
APPLIES TO:  Azure Data Factory
  Azure Synapse Analytics
In this tutorial, you use Azure portal to create a Data Factory pipeline that transforms data using Hive Activity on a HDInsight cluster that is in an Azure Virtual Network (VNet). You perform the following steps in this tutorial:
- Create a data factory.
- Create a self-hosted integration runtime
- Create Azure Storage and Azure HDInsight linked services
- Create a pipeline with Hive activity.
- Trigger a pipeline run.
- Monitor the pipeline run
- Verify the output
If you don't have an Azure subscription, create a trial account before you begin.
Prerequisites
Note
We recommend that you use the Azure Az PowerShell module to interact with Azure. See Install Azure PowerShell to get started. To learn how to migrate to the Az PowerShell module, see Migrate Azure PowerShell from AzureRM to Az.
Azure Storage account. You create a hive script, and upload it to the Azure storage. The output from the Hive script is stored in this storage account. In this sample, HDInsight cluster uses this Azure Storage account as the primary storage.
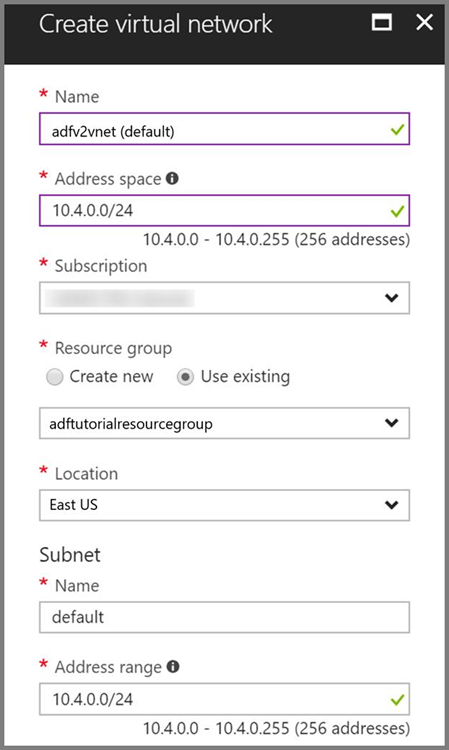
Azure Virtual Network. If you don't have an Azure virtual network, create it by following these instructions. In this sample, the HDInsight is in an Azure Virtual Network. Here is a sample configuration of Azure Virtual Network.
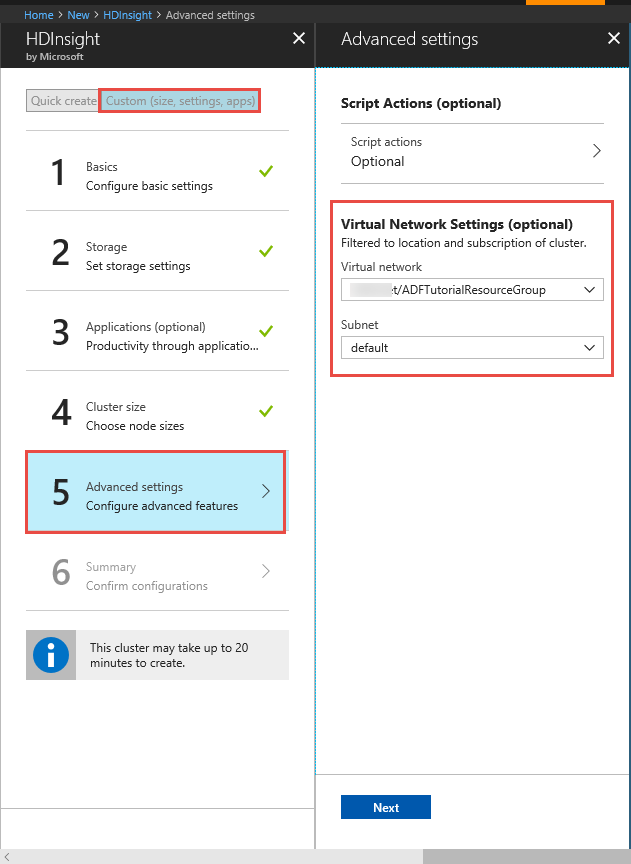
HDInsight cluster. Create a HDInsight cluster and join it to the virtual network you created in the previous step by following this article: Extend Azure HDInsight using an Azure Virtual Network. Here is a sample configuration of HDInsight in a virtual network.
Azure PowerShell. Follow the instructions in How to install and configure Azure PowerShell.
A virtual machine. Create an Azure virtual machine VM and join it into the same virtual network that contains your HDInsight cluster. For details, see How to create virtual machines.
Upload Hive script to your Blob Storage account
Create a Hive SQL file named hivescript.hql with the following content:
DROP TABLE IF EXISTS HiveSampleOut;
CREATE EXTERNAL TABLE HiveSampleOut (clientid string, market string, devicemodel string, state string)
ROW FORMAT DELIMITED FIELDS TERMINATED BY ' '
STORED AS TEXTFILE LOCATION '${hiveconf:Output}';

INSERT OVERWRITE TABLE HiveSampleOut
Select
    clientid,
    market,
    devicemodel,
    state
FROM hivesampletable
In your Azure Blob Storage, create a container named adftutorial if it does not exist.
Create a folder named hivescripts.
Upload the hivescript.hql file to the hivescripts subfolder.
Create a data factory
If you have not created your data factory yet, follow the steps in Quickstart: Create a data factory by using the Azure portal and Azure Data Factory Studio to create one. After creating it, browse to the data factory in the Azure portal.
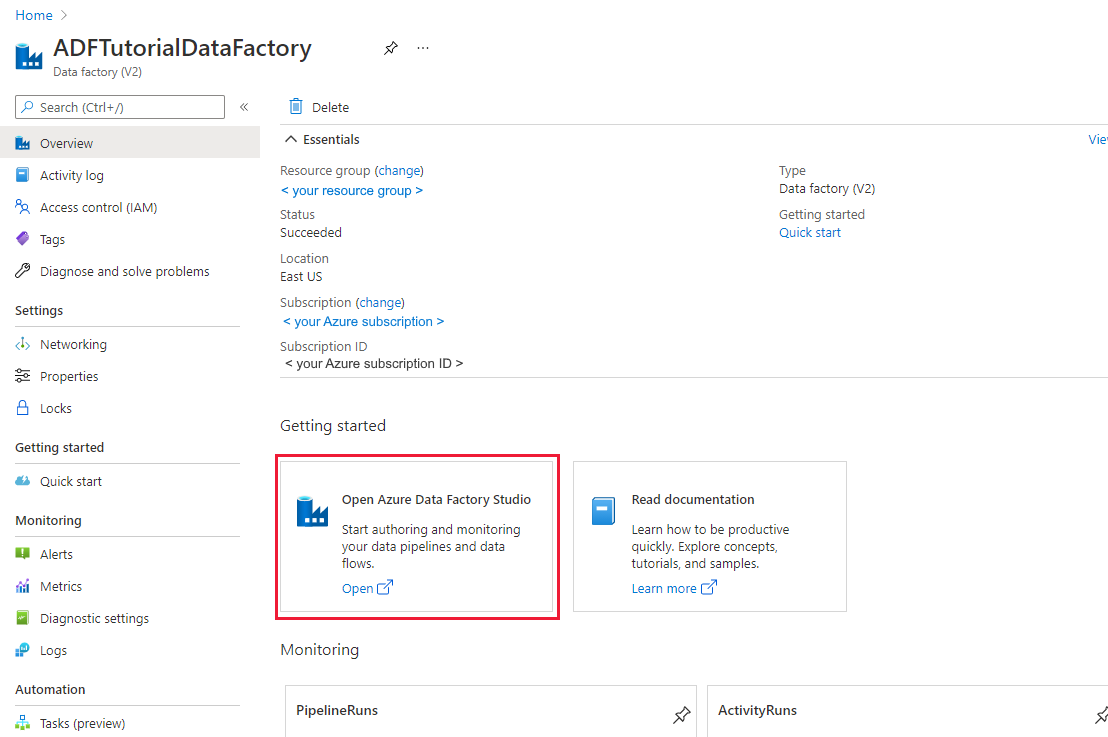
Select Open on the Open Azure Data Factory Studio tile to launch the Data Integration application in a separate tab.
Create a self-hosted integration runtime
As the Hadoop cluster is inside a virtual network, you need to install a self-hosted integration runtime (IR) in the same virtual network. In this section, you create a new VM, join it to the same virtual network, and install self-hosted IR on it. The self-hosted IR allows Data Factory service to dispatch processing requests to a compute service such as HDInsight inside a virtual network. It also allows you to move data to/from data stores inside a virtual network to Azure. You use a self-hosted IR when the data store or compute is in an on-premises environment as well.
In the Azure Data Factory UI, click Connections at the bottom of the window, switch to the Integration Runtimes tab, and click + New button on the toolbar.

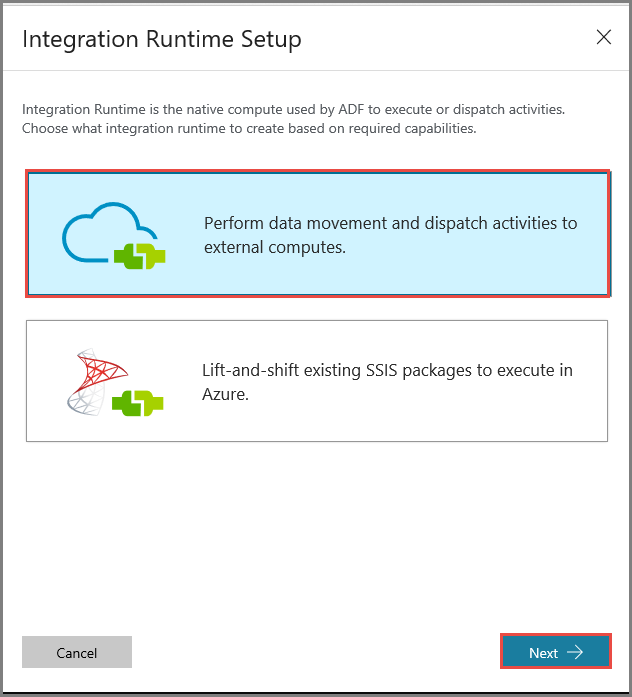
In the Integration Runtime Setup window, Select Perform data movement and dispatch activities to external computes option, and click Next.
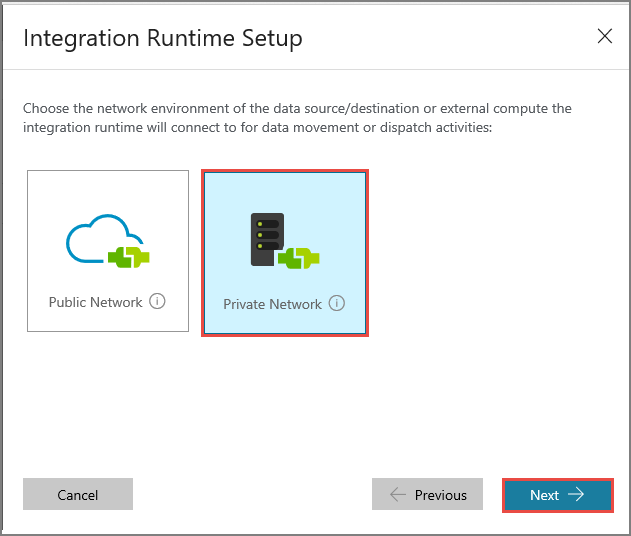
Select Private Network, and click Next.
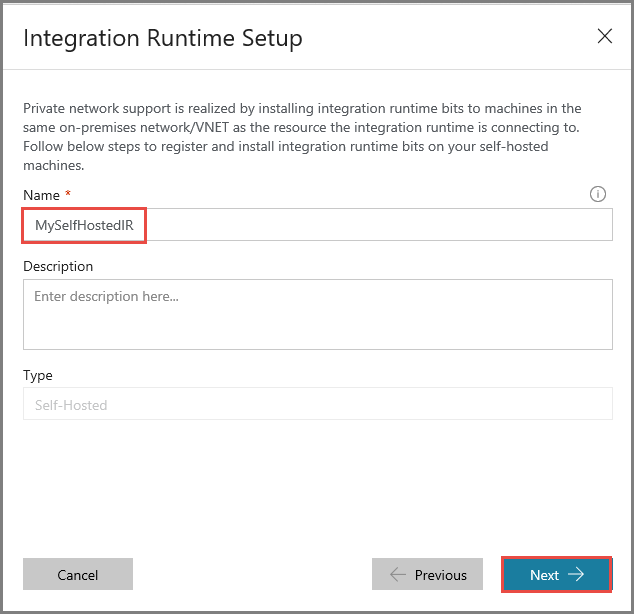
Enter MySelfHostedIR for Name, and click Next.
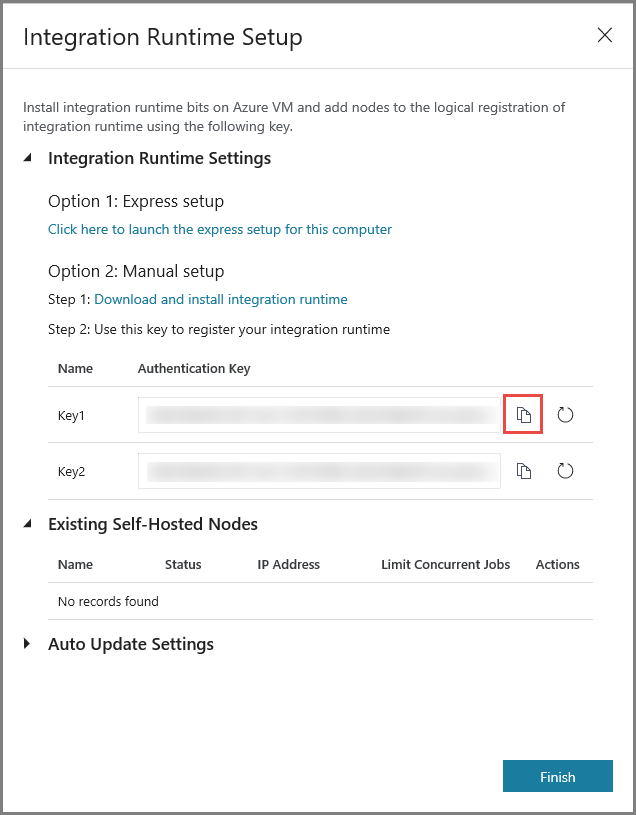
Copy the authentication key for the integration runtime by clicking the copy button, and save it. Keep the window open. You use this key to register the IR installed in a virtual machine.
Install IR on a virtual machine
On the Azure VM, download self-hosted integration runtime. Use the authentication key obtained in the previous step to manually register the self-hosted integration runtime.
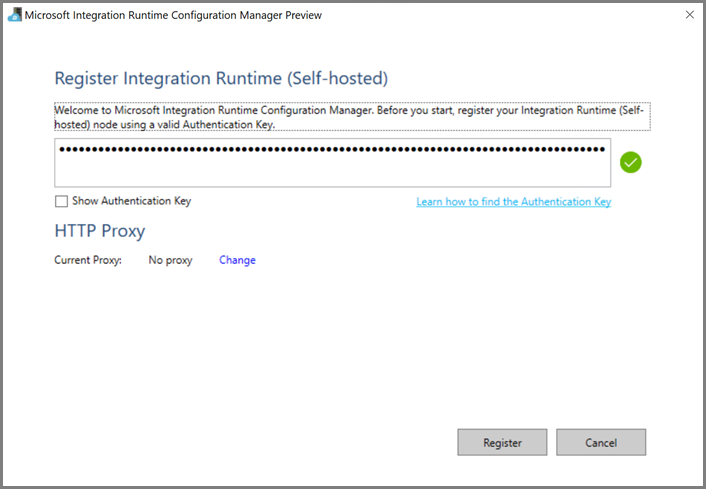
You see the following message when the self-hosted integration runtime is registered successfully.
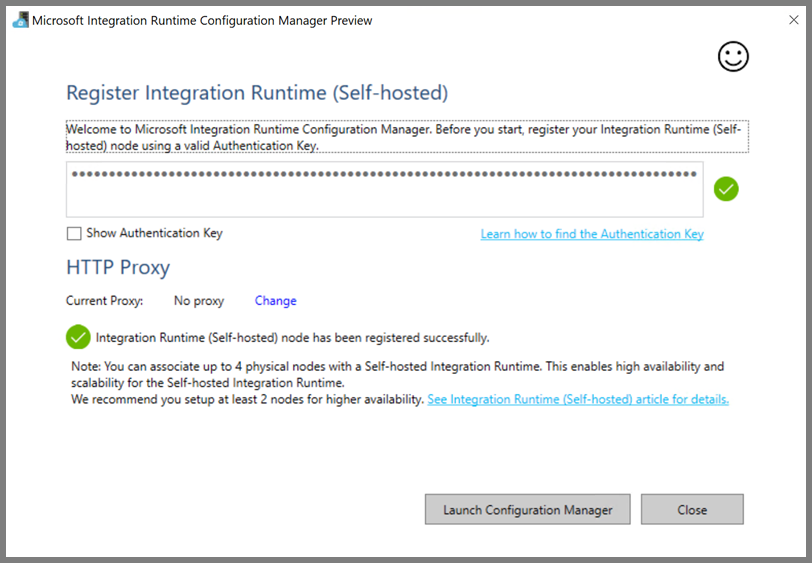
Click Launch Configuration Manager. You see the following page when the node is connected to the cloud service:
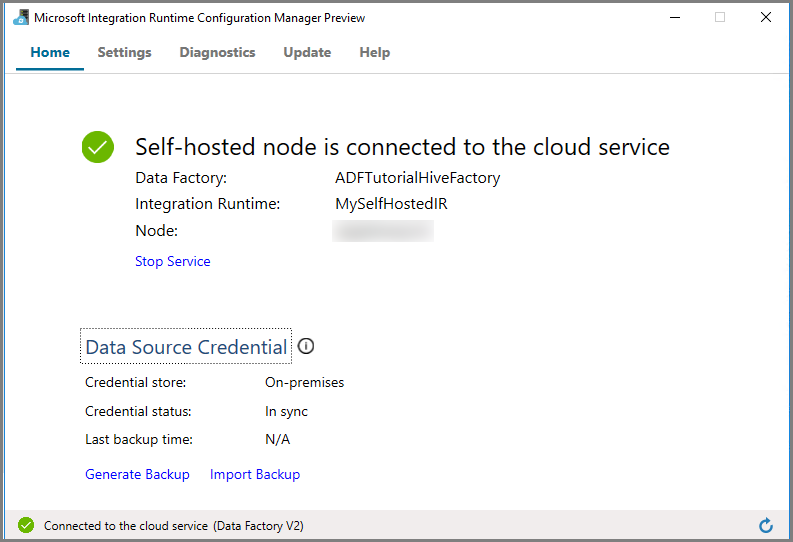
Self-hosted IR in the Azure Data Factory UI
In the Azure Data Factory UI, you should see the name of the self-hosted VM name and its status.
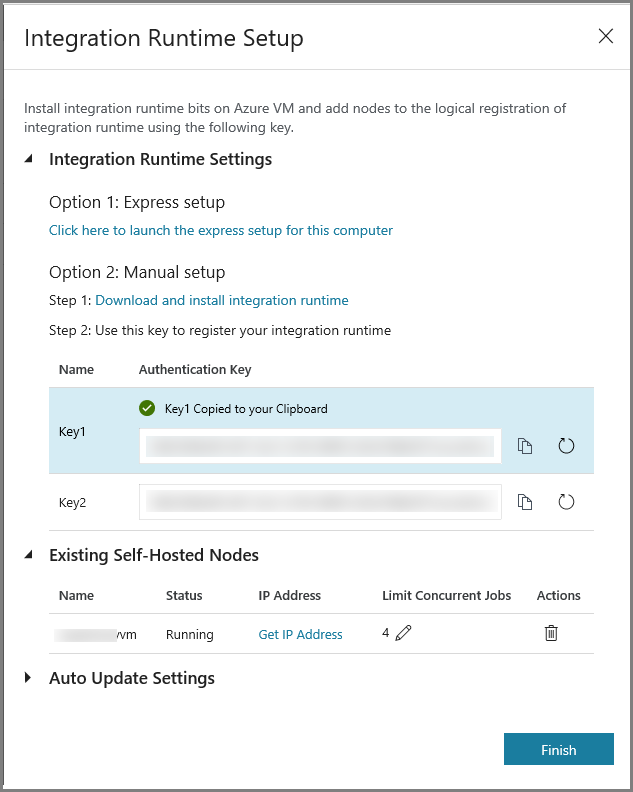
Click Finish to close the Integration Runtime Setup window. You see the self-hosted IR in the list of integration runtimes.

Create linked services
You author and deploy two Linked Services in this section:
- An Azure Storage Linked Service that links an Azure Storage account to the data factory. This storage is the primary storage used by your HDInsight cluster. In this case, you use this Azure Storage account to store the Hive script and output of the script.
- An HDInsight Linked Service. Azure Data Factory submits the Hive script to this HDInsight cluster for execution.
Create Azure Storage linked service
Switch to the Linked Services tab, and click New.
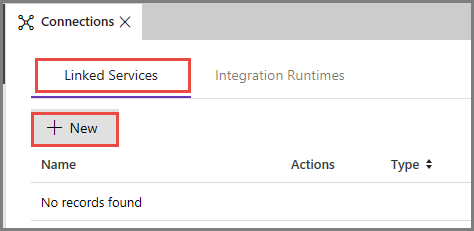
In the New Linked Service window, select Azure Blob Storage, and click Continue.
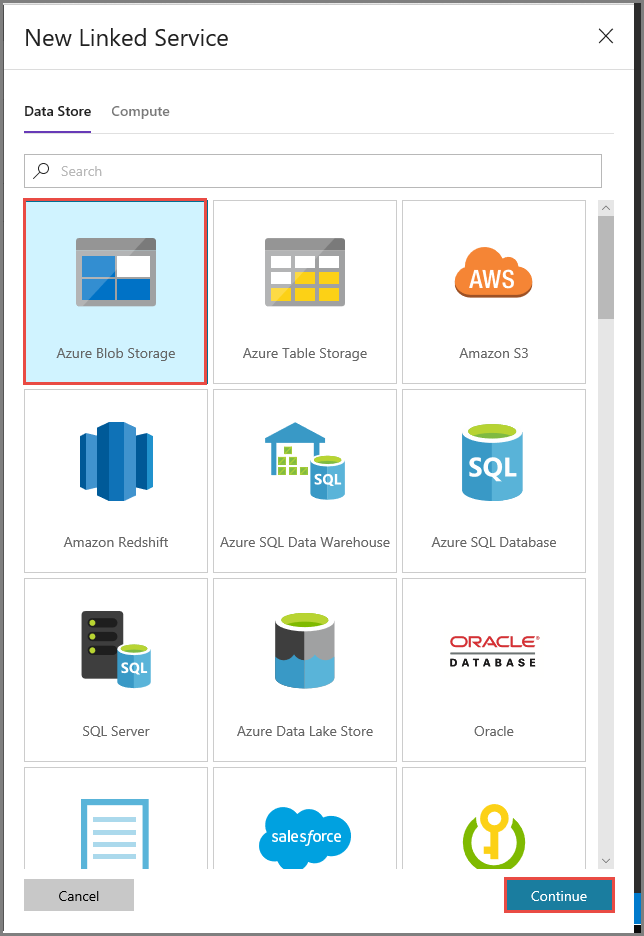
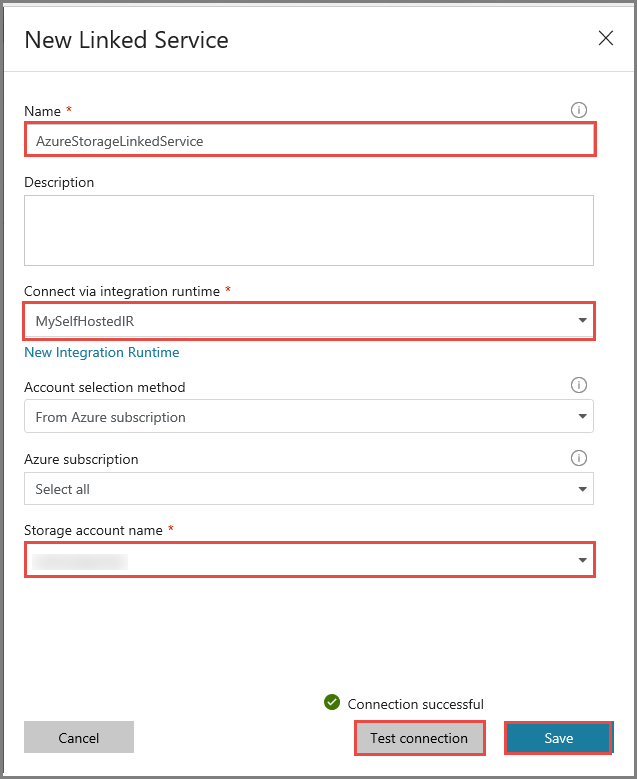
In the New Linked Service window, do the following steps:
Enter AzureStorageLinkedService for Name.
Select MySelfHostedIR for Connect via integration runtime.
Select your Azure storage account for Storage account name.
To test the connection to storage account, click Test connection.
Click Save.
Create HDInsight linked service
Click New again to create another linked service.

Switch to the Compute tab, select Azure HDInsight, and click Continue.
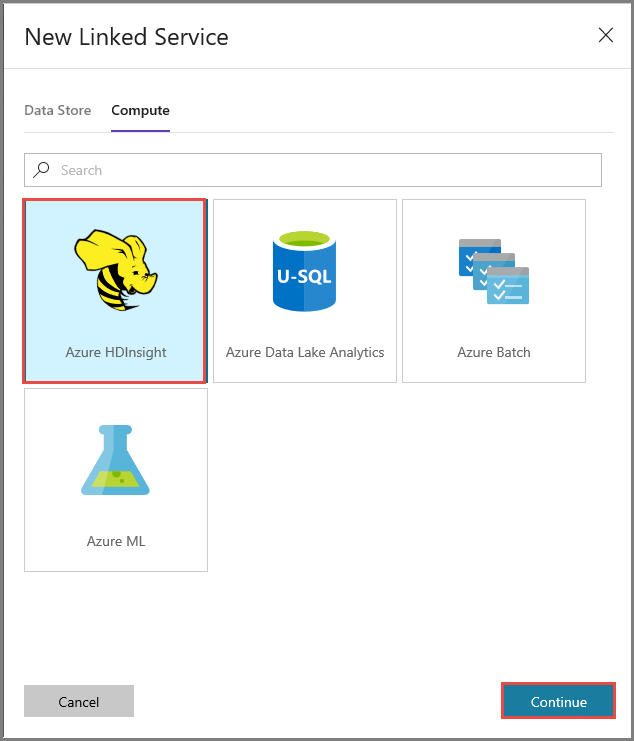
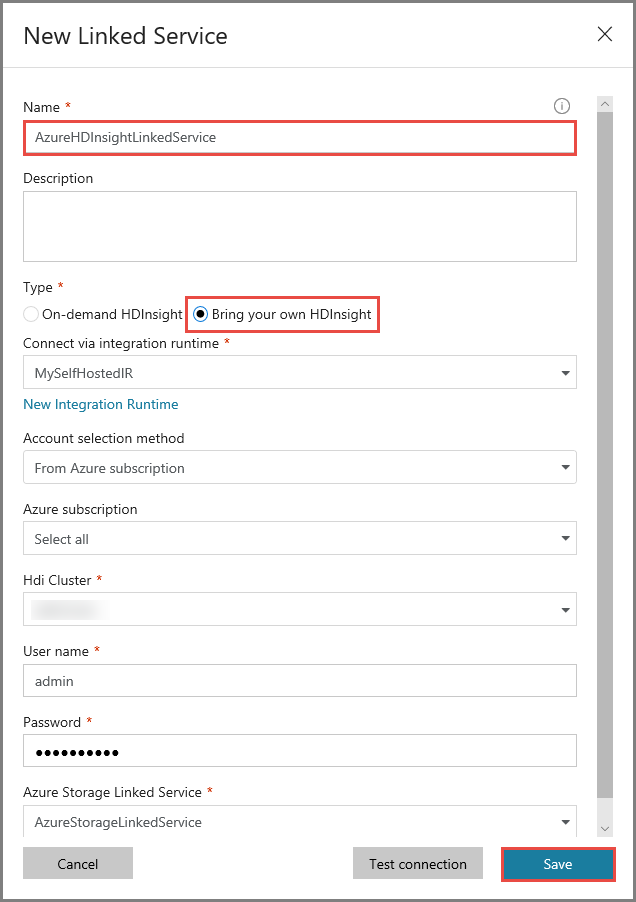
In the New Linked Service window, do the following steps:
Enter AzureHDInsightLinkedService for Name.
Select Bring your own HDInsight.
Select your HDInsight cluster for Hdi cluster.
Enter the user name for the HDInsight cluster.
Enter the password for the user.
This article assumes that you have access to the cluster over the internet. For example, that you can connect to the cluster at https://clustername.azurehdinsight.cn. This address uses the public gateway, which is not available if you have used network security groups (NSGs) or user-defined routes (UDRs) to restrict access from the internet. For Data Factory to be able to submit jobs to HDInsight cluster in Azure Virtual Network, you need to configure your Azure Virtual Network such a way that the URL can be resolved to the private IP address of gateway used by HDInsight.
From Azure portal, open the Virtual Network the HDInsight is in. Open the network interface with name starting with
nic-gateway-0. Note down its private IP address. For example, 10.6.0.15.If your Azure Virtual Network has DNS server, update the DNS record so the HDInsight cluster URL
https://<clustername>.azurehdinsight.cncan be resolved to10.6.0.15. If you don't have a DNS server in your Azure Virtual Network, you can temporarily work around by editing the hosts file (C:\Windows\System32\drivers\etc) of all VMs that registered as self-hosted integration runtime nodes by adding an entry similar to the following one:10.6.0.15 myHDIClusterName.azurehdinsight.cn
Create a pipeline
In this step, you create a new pipeline with a Hive activity. The activity executes Hive script to return data from a sample table and save it to a path you defined.
Note the following points:
- scriptPath points to path to Hive script on the Azure Storage Account you used for MyStorageLinkedService. The path is case-sensitive.
- Output is an argument used in the Hive script. Use the format of
wasbs://<Container>@<StorageAccount>.blob.core.chinacloudapi.cn/outputfolder/to point it to an existing folder on your Azure Storage. The path is case-sensitive.
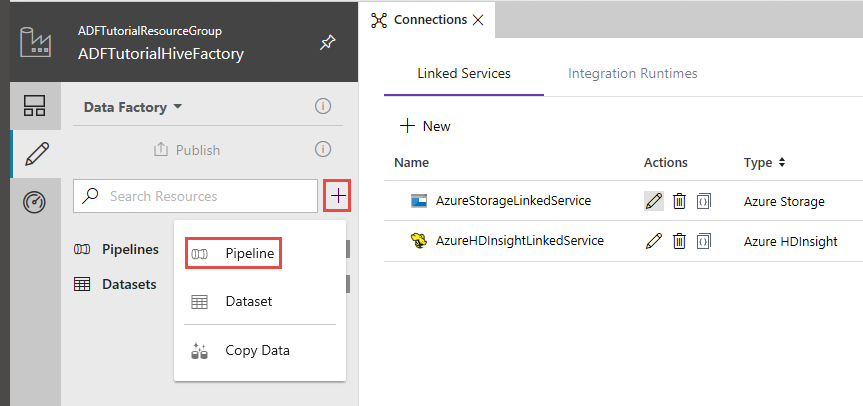
In the Data Factory UI, click + (plus) in the left pane, and click Pipeline.
In the Activities toolbox, expand HDInsight, and drag-drop Hive activity to the pipeline designer surface.
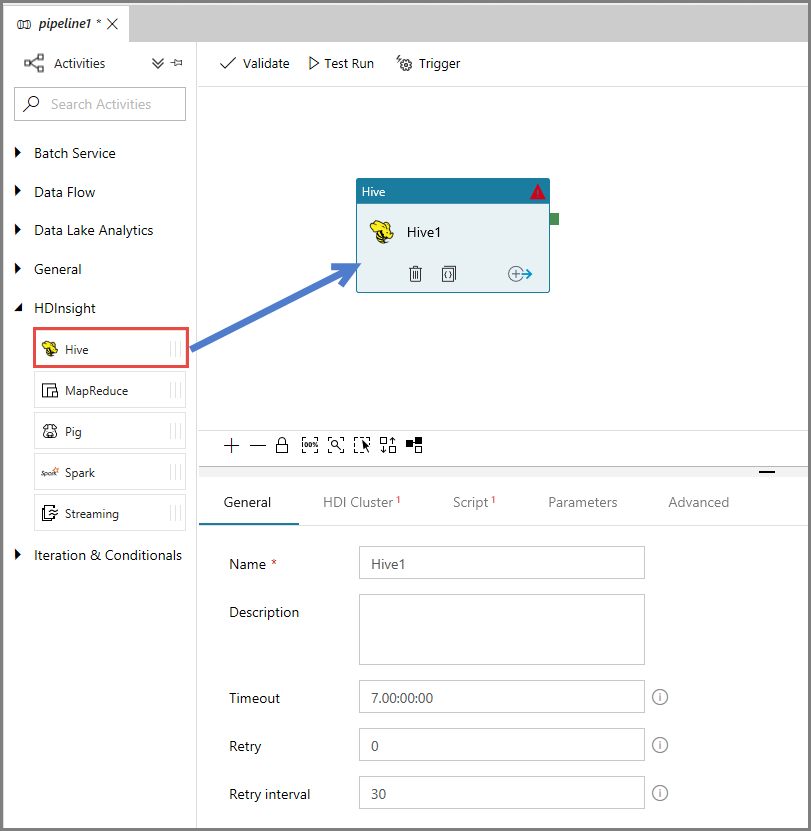
In the properties window, switch to the HDI Cluster tab, and select AzureHDInsightLinkedService for HDInsight Linked Service.

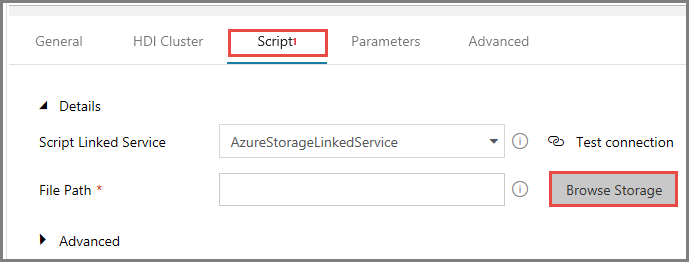
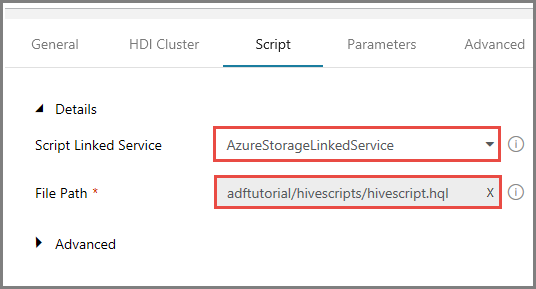
Switch to the Scripts tab, and do the following steps:
Select AzureStorageLinkedService for Script Linked Service.
For File Path, click Browse Storage.
In the Choose a file or folder window, navigate to hivescripts folder of the adftutorial container, select hivescript.hql, and click Finish.
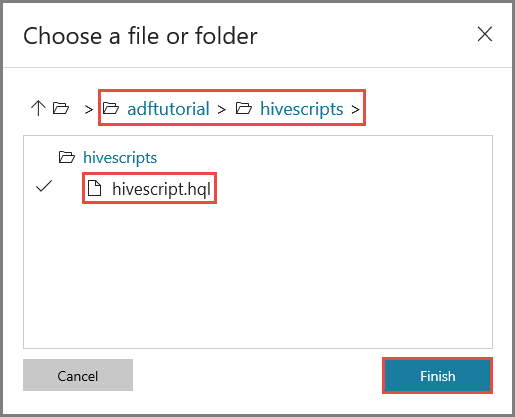
Confirm that you see adftutorial/hivescripts/hivescript.hql for File Path.
In the Script tab, expand Advanced section.
Click Auto-fill from script for Parameters.
Enter the value for the Output parameter in the following format:
wasbs://<Blob Container>@<StorageAccount>.blob.core.chinacloudapi.cn/outputfolder/. For example:wasbs://adftutorial@mystorageaccount.blob.core.chinacloudapi.cn/outputfolder/.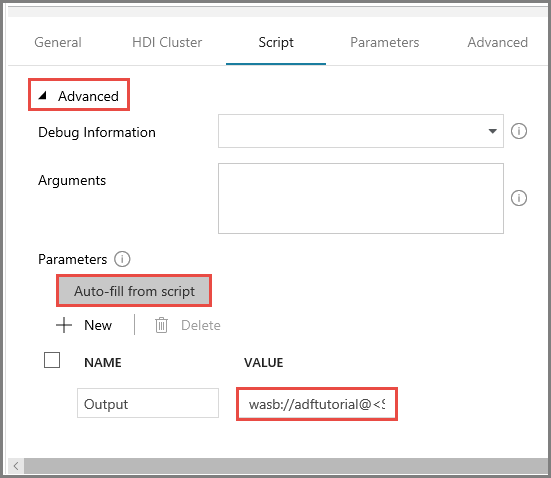
To publish artifacts to Data Factory, click Publish.

Trigger a pipeline run
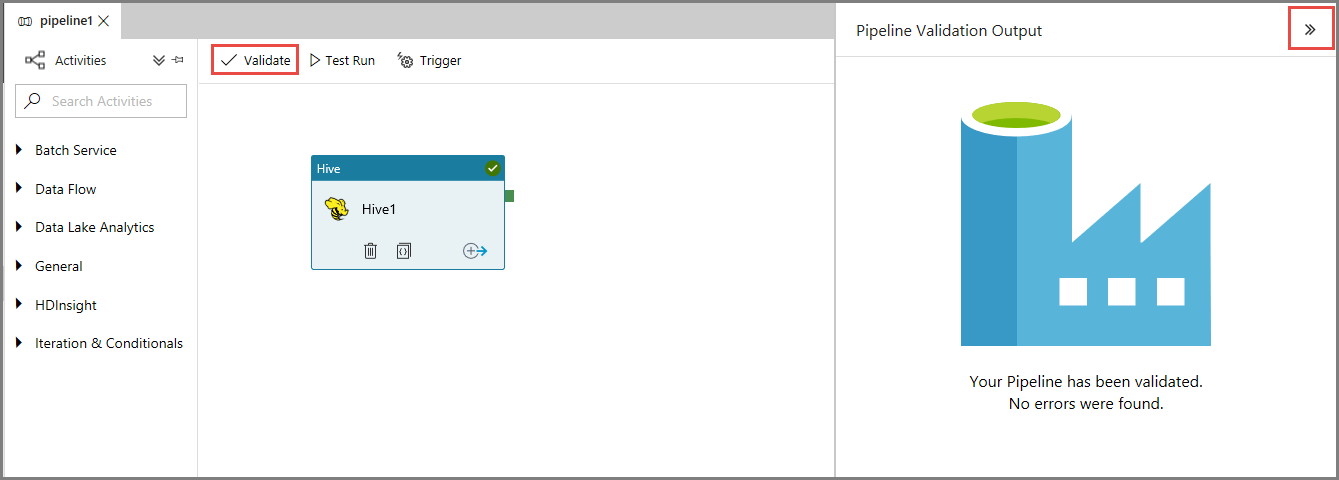
First, validate the pipeline by clicking the Validate button on the toolbar. Close the Pipeline Validation Output window by clicking right-arrow (>>).
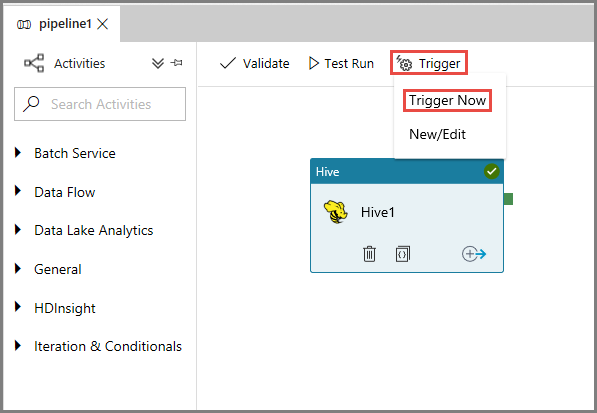
To trigger a pipeline run, click Trigger on the toolbar, and click Trigger Now.
Monitor the pipeline run
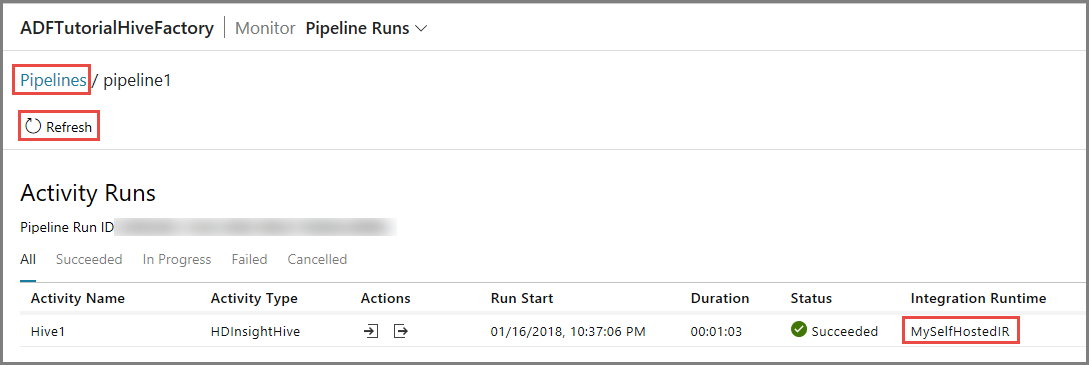
Switch to the Monitor tab on the left. You see a pipeline run in the Pipeline Runs list.

To refresh the list, click Refresh.
To view activity runs associated with the pipeline runs, click View activity runs in the Action column. Other action links are for stopping/rerunning the pipeline.

You see only one activity run since there is only one activity in the pipeline of type HDInsightHive. To switch back to the previous view, click Pipelines link at the top.
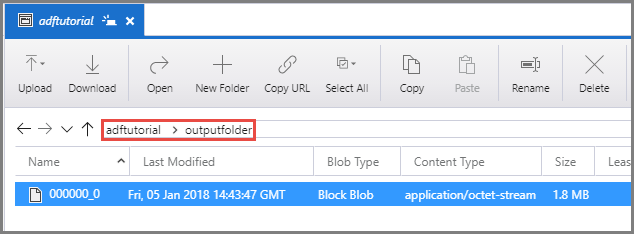
Confirm that you see an output file in the outputfolder of the adftutorial container.
Related content
You performed the following steps in this tutorial:
- Create a data factory.
- Create a self-hosted integration runtime
- Create Azure Storage and Azure HDInsight linked services
- Create a pipeline with Hive activity.
- Trigger a pipeline run.
- Monitor the pipeline run
- Verify the output
Advance to the following tutorial to learn about transforming data by using a Spark cluster on Azure: