Get started with Azure Cloud Services (classic) and ASP.NET
Overview
Important
Cloud Services (classic) is now deprecated for all customers as of September 1st, 2024. Any existing running deployments will be stopped and shut down by Microsoft and the data will be permanently lost starting October 2024. New deployments should use the new Azure Resource Manager based deployment model Azure Cloud Services (extended support).
This tutorial shows you how to create a multi-tier .NET application with an ASP.NET Model-View-Controller (MVC) front-end and deploy it to an Azure cloud service. The application uses Azure SQL Database, the Azure Blob service, and the Azure Queue service. You can download the Visual Studio project from the Microsoft Developer Network (MSDN) Code Gallery.
The tutorial shows you how to build and run the application locally, how to deploy it to Azure and run in the cloud, and how to build it from scratch. You can start by building from scratch and then do the test and deploy steps afterward if you prefer.
Contoso Ads application
The application is an advertising bulletin board. Users create an ad by entering text and uploading an image. They can see a list of ads with thumbnail images, and they can see the full-size image when they select an ad to see the details.

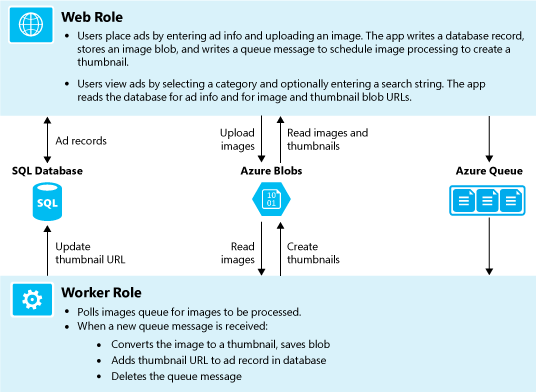
The application uses the queue-centric work pattern to off-load the CPU-intensive work of creating thumbnails to a back-end process.
Alternative architecture: App Service and WebJobs
This tutorial shows how to run both front-end and back-end in an Azure cloud service. An alternative is to run the front-end in Azure App Service and use the WebJobs feature for the back-end. For a tutorial that uses WebJobs, see Get Started with the Azure WebJobs SDK. For information about how to choose the services that best fit your scenario, see Azure App Service, Cloud Services, and virtual machines comparison.
Learning goals
- How to enable your machine for Azure development by installing the Azure SDK.
- How to create a Visual Studio cloud service project with an ASP.NET MVC web role and a worker role.
- How to test the cloud service project locally, using the Azure Storage Emulator.
- How to publish the cloud project to an Azure cloud service and test using an Azure storage account.
- How to upload files and store them in the Azure Blob service.
- How to use the Azure Queue service for communication between tiers.
Prerequisites
The tutorial assumes that you understand basic concepts about Azure cloud services such as web role and worker role terminology. It also assumes that you know how to work with ASP.NET MVC or Web Forms projects in Visual Studio. The sample application uses MVC, but most of the tutorial also applies to Web Forms.
You can run the app locally without an Azure subscription, but you'll need one to deploy the application to the cloud. If you don't have an account, you can sign up for a trial.
The tutorial instructions work with any of the following products:
- Visual Studio 2013
- Visual Studio 2015
- Visual Studio 2017
- Visual Studio 2019
If you don't have one of these, Visual Studio may be installed automatically when you install the Azure SDK.
Application architecture
The app stores ads in an SQL database, using Entity Framework Code First to create the tables and access the data. For each ad, the database stores two URLs, one for the full-size image and one for the thumbnail.
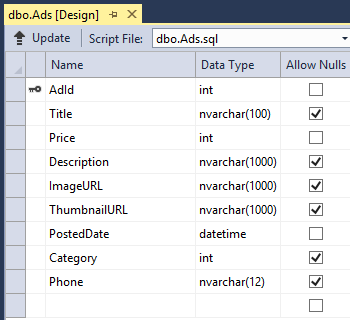
When a user uploads an image, the front-end running in a web role stores the image in an Azure blob, and it stores the ad information in the database with a URL that points to the blob. At the same time, it writes a message to an Azure queue. A back-end process running in a worker role periodically polls the queue for new messages. When a new message appears, the worker role creates a thumbnail for that image and updates the thumbnail URL database field for that ad. The following diagram shows how the parts of the application interact.
Set up the development environment
To start, set up your development environment with Visual Studio and the Azure SDK.
Visual Studio 2019 includes the Azure SDK. If you're using Visual Studio 2019, no additional setup is needed for the development environment.
For Visual Studio 2015, click the following link to install the Azure SDK for Visual Studio 2015.
For Visual Studio 2013, click the following link to install the Azure SDK for Visual Studio 2013.
If you don't have Visual Studio installed, use the following to install Visual Studio 2019 with the Azure SDK.
Note
Depending on the number of the SDK dependencies already on your machine, installing the SDK could take a long time, from several minutes to a half hour or more.
Download and run the completed solution
Download and unzip the completed solution.
Start Visual Studio.
From the File menu choose Open Project, navigate to where you downloaded the solution, and then open the solution file.
To build the solution, press CTRL+SHIFT+B.
By default, Visual Studio automatically restores the NuGet package content, which wasn't included in the .zip file. If the packages don't restore, install them manually by going to the Manage NuGet Packages for Solution dialog box and clicking the Restore button at the top right.
In Solution Explorer, make sure that ContosoAdsCloudService is selected as the startup project.
If you're using Visual Studio 2015 or higher, change the SQL Server connection string in the application Web.config file of the ContosoAdsWeb project and in the ServiceConfiguration.Local.cscfg file of the ContosoAdsCloudService project. In each case, change "(localdb)\v11.0" to "(localdb)\MSSQLLocalDB".
To run the application, press CTRL+F5.
When you run a cloud service project locally, Visual Studio automatically invokes the Azure compute emulator and Azure storage emulator. The compute emulator uses your computer's resources to simulate the web role and worker role environments. The storage emulator uses a SQL Server Express LocalDB database to simulate Azure cloud storage.
The first time you run a cloud service project, it takes a minute or so for the emulators to start up. When emulator startup is finished, the default browser opens to the application home page.

Select Create an Ad.
Enter some test data and select a .jpg image to upload, and then select Create.

The app goes to the Index page, but it doesn't show a thumbnail for the new ad because that processing has yet to happen.
Wait a moment and then refresh the Index page to see the thumbnail.

Select Details for your ad to see the full-size image.

You've been running the application entirely on your local computer, with no connection to the cloud. The storage emulator stores the queue and blob data in a SQL Server Express LocalDB database, and the application stores the ad data in another LocalDB database. Entity Framework Code First automatically created the ad database the first time the web app tried to access it.
In the following section, you configure the solution to use Azure cloud resources for queues, blobs, and the application database when it runs in the cloud. If you wanted to continue to run locally but use cloud storage and database resources, you could do that. It's just a matter of setting connection strings, which you see how to do.
Deploy the application to Azure
You do the following steps to run the application in the cloud:
- Create an Azure cloud service.
- Create a database in Azure SQL Database.
- Create an Azure storage account.
- Configure the solution to use your database when it runs in Azure.
- Configure the solution to use your Azure storage account when it runs in Azure.
- Deploy the project to your Azure cloud service.
Create an Azure cloud service
An Azure cloud service is the environment the application runs in.
In your browser, open the Azure portal.
Select Create a resource > Compute > Cloud Service.
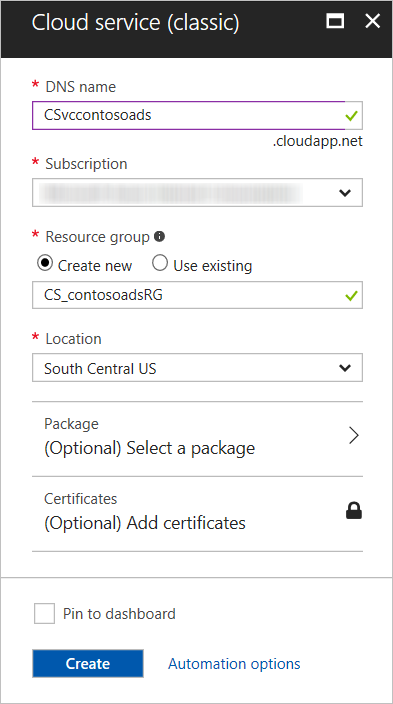
In the Domain Name System (DNS) name input box, enter a URL prefix for the cloud service.
This URL has to be unique. You get an error message if the prefix you choose is already in use.
Specify a new Resource group for the service. Select Create new and then type a name in the Resource group input box, such as CS_contososadsRG.
Choose the region where you want to deploy the application.
This field specifies which datacenter your cloud service is hosted in. For a production application, you'd choose the region closest to your customers. For this tutorial, choose the region closest to you.
Select Create.
In the following image, a cloud service is created with the URL CSvccontosoads.chinacloudapp.cn.
Create a database in Azure SQL Database
When the app runs in the cloud, it uses a cloud-based database.
In the Azure portal, select Create a resource > Databases > SQL Database.
In the Database Name box, enter contosoads.
In the Resource group, choose Use existing and select the resource group used for the cloud service.
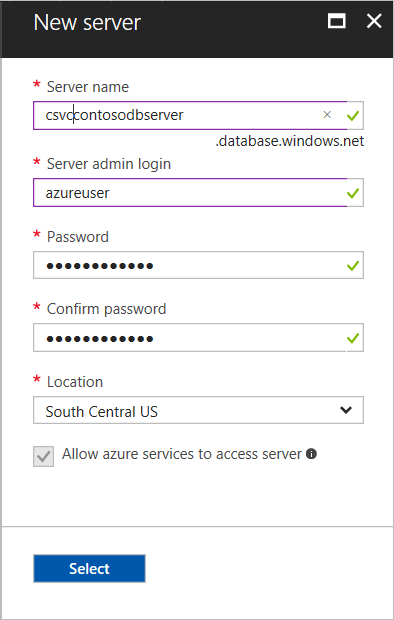
In the following image, select Server - Configure required settings and Create a new server.
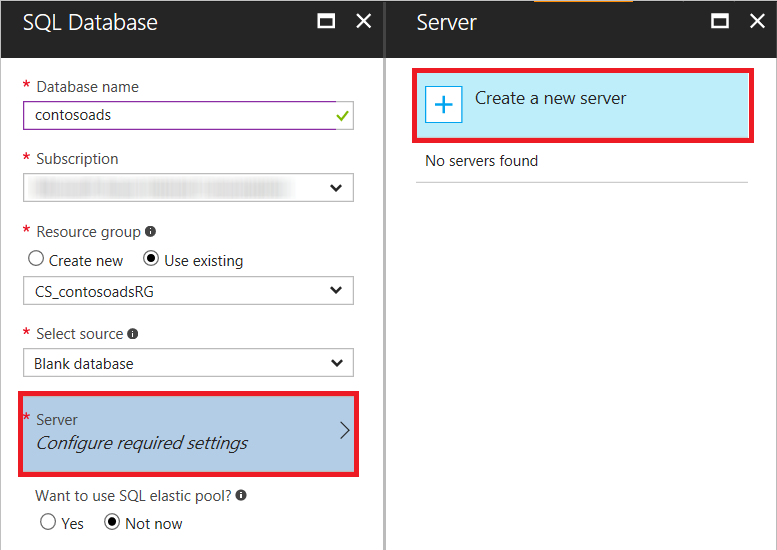
Alternatively, if your subscription already has a server, you can select that server from the drop-down list.
In the Server name box, enter csvccontosodbserver.
Enter an administrator Login Name and Password.
If you selected Create a new server, you aren't entering an existing name and password here. You're entering a new name and password that you're defining now to use later when you access the database. If you selected a server that you created previously, the portal prompts you for the password to the administrative user account you already created.
Choose the same Location that you chose for the cloud service.
When the cloud service and database are in different datacenters (different regions), latency increases and you incur charges for bandwidth outside the data center. Bandwidth within a data center is free.
Check Allow azure services to access server.
Select Select for the new server.
Choose Create.
Create an Azure storage account
An Azure storage account provides resources for storing queue and blob data in the cloud.
In a real-world application, you would typically create separate accounts for application data versus logging data, and separate accounts for test data versus production data. For this tutorial, you use just one account.
In the Azure portal, select Create a resource > Storage > Storage account - blob, file, table, queue.
In the Name box, enter a URL prefix.
This prefix plus the text you see under the box is the unique URL to your storage account. If the prefix you enter is already in use by someone else, choose a different prefix.
Set the Deployment model to Classic.
Set the Replication drop-down list to Locally redundant storage.
When geo-replication is enabled for a storage account, the stored content is replicated to a secondary datacenter to enable failover if a major disaster occurs in the primary location. Geo-replication can incur additional costs. For test and development accounts, you generally don't want to pay for geo-replication. For more information, see Create, manage, or delete a storage account.
In the Resource group, select Use existing and select the resource group used for the cloud service.
Set the Location drop-down list to the same region you chose for the cloud service.
When the cloud service and storage account are in different datacenters (different regions), latency increases and you incur charges for bandwidth outside the data center. Bandwidth within a data center is free.
Azure affinity groups provide a mechanism to minimize the distance between resources in a data center, which can reduce latency. This tutorial doesn't use affinity groups. For more information, see How to Create an Affinity Group in Azure.
Choose Create.
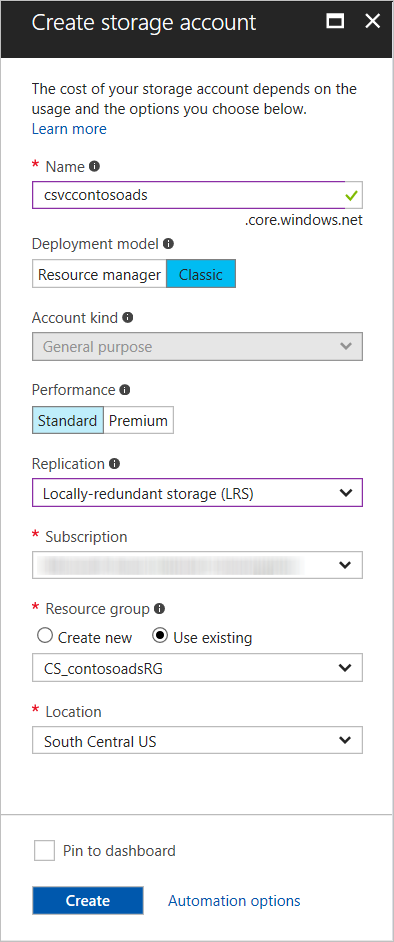
In the image, a storage account is created with the URL
csvccontosoads.core.chinacloudapi.cn.
Configure the solution to use your database in Azure SQL Database when it runs in Azure
The web project and the worker role project each has its own database connection string, and each needs to point to the database in Azure SQL Database when the app runs in Azure.
You use a Web.config transform for the web role and a cloud service environment setting for the worker role.
Note
In this section and the next section, you store credentials in project files. Don't store sensitive data in public source code repositories.
In the ContosoAdsWeb project, open the Web.Release.config transform file for the application Web.config file, delete the comment block that contains a
<connectionStrings>element, and paste the following code in its place.<connectionStrings> <add name="ContosoAdsContext" connectionString="{connectionstring}" providerName="System.Data.SqlClient" xdt:Transform="SetAttributes" xdt:Locator="Match(name)"/> </connectionStrings>Leave the file open for editing.
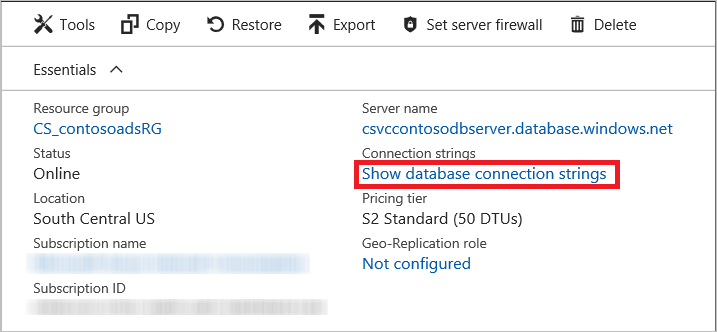
In the Azure portal, choose SQL Databases in the left pane, select the database you created for this tutorial, and then select Show connection strings.
The portal displays connection strings, with a placeholder for the password.
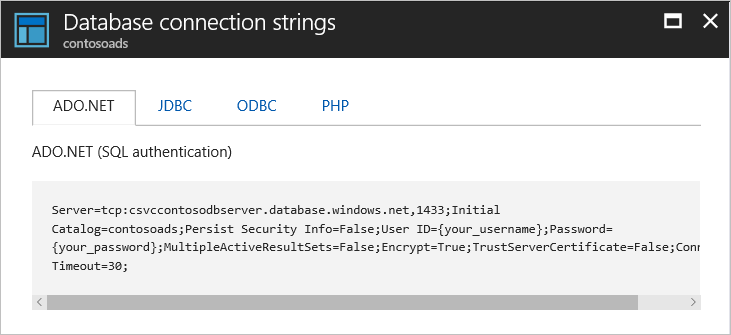
In the Web.Release.config transform file, delete
{connectionstring}and paste in its place the ADO.NET connection string from the Azure portal.In the connection string that you pasted into the Web.Release.config transform file, replace
{your_password_here}with the password you created for the new SQL database.Save the file.
Select and copy the connection string (without the surrounding quotation marks) for use in the following steps for configuring the worker role project.
In Solution Explorer, under Roles in the cloud service project, right-click ContosoAdsWorker and then select Properties.
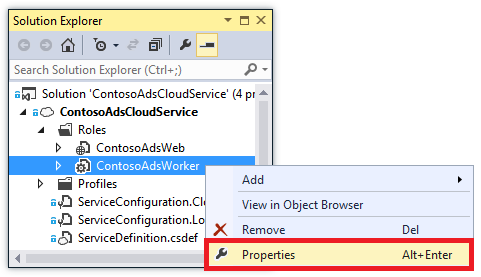
Choose the Settings tab.
Change Service Configuration to Cloud.
Select the Value field for the
ContosoAdsDbConnectionStringsetting, and then paste the connection string that you copied from the previous section of the tutorial.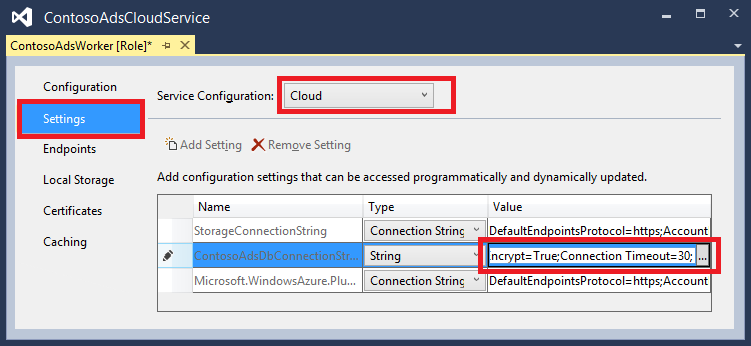
Save your changes.
Configure the solution to use your Azure storage account when it runs in Azure
Azure storage account connection strings for both the web role project and the worker role project are stored in environment settings in the cloud service project. For each project, there's a separate set of settings to be used when the application runs locally and when it runs in the cloud. You update the cloud environment settings for both web and worker role projects.
In Solution Explorer, right-click ContosoAdsWeb under Roles in the ContosoAdsCloudService project, and then select Properties.
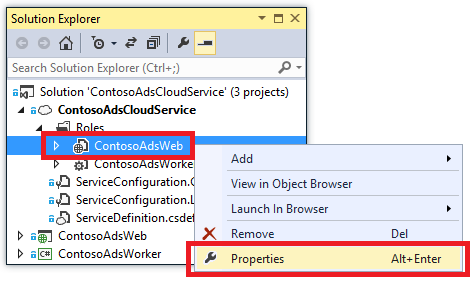
Choose the Settings tab. In the Service Configuration drop-down box, choose Cloud.

Select the StorageConnectionString entry, and you see an ellipsis (...) button at the right end of the line. Choose the ellipsis button to open the Create Storage Connection String dialog box.
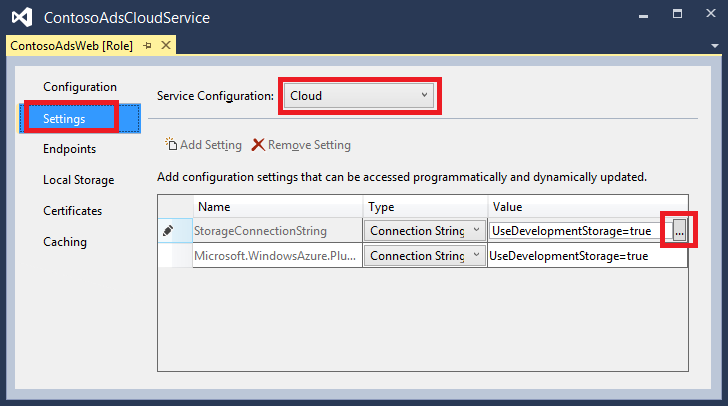
In the Create Storage Connection String dialog box, select Your subscription, choose the storage account that you created earlier, and then select OK. The explorer prompts you for your Azure account credentials if you still need to sign in.
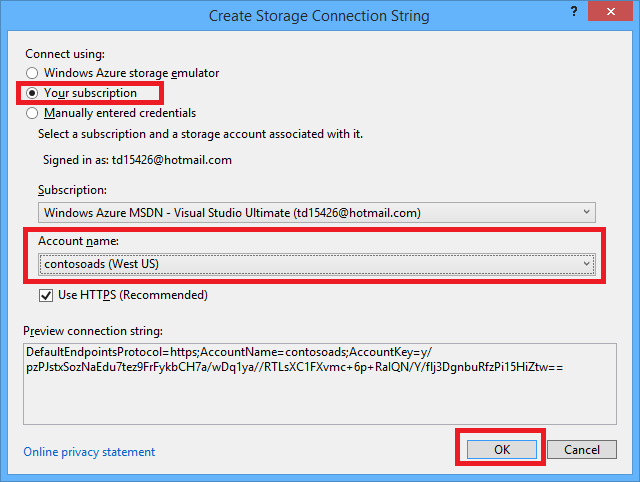
Save your changes.
Follow the same procedure that you used for the
StorageConnectionStringconnection string to set theMicrosoft.WindowsAzure.Plugins.Diagnostics.ConnectionStringconnection string.This connection string is used for logging.
Follow the same procedure that you used for the ContosoAdsWeb role to set both connection strings for the ContosoAdsWorker role. Don't forget to set Service Configuration to Cloud.
The role environment settings that you configured using the Visual Studio UI are stored in the following files in the ContosoAdsCloudService project:
- ServiceDefinition.csdef - Defines the setting names.
- ServiceConfiguration.Cloud.cscfg - Provides values for when the app runs in the cloud.
- ServiceConfiguration.Local.cscfg - Provides values for when the app runs locally.
For example, the ServiceDefinition.csdef includes the following definitions:
<ConfigurationSettings>
    <Setting name="StorageConnectionString" />
    <Setting name="ContosoAdsDbConnectionString" />
</ConfigurationSettings>
And the ServiceConfiguration.Cloud.cscfg file includes the values you entered for those settings in Visual Studio.
<Role name="ContosoAdsWorker">
    <Instances count="1" />
    <ConfigurationSettings>
        <Setting name="StorageConnectionString" value="{yourconnectionstring}" />
        <Setting name="ContosoAdsDbConnectionString" value="{yourconnectionstring}" />
        <!-- other settings not shown -->

    </ConfigurationSettings>
    <!-- other settings not shown -->

</Role>
The <Instances> setting specifies the number of virtual machines that Azure runs the worker role code on. The Next steps section includes links to more information about scaling out a cloud service,
Deploy the project to Azure
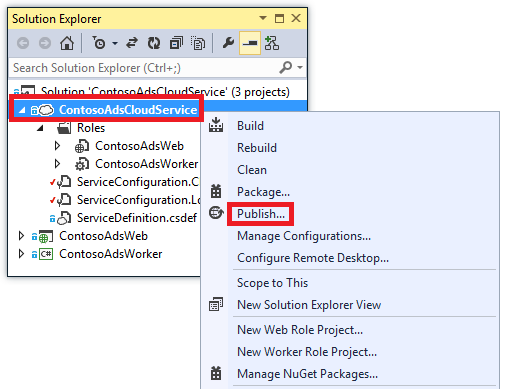
In Solution Explorer, right-click the ContosoAdsCloudService cloud project and then select Publish.
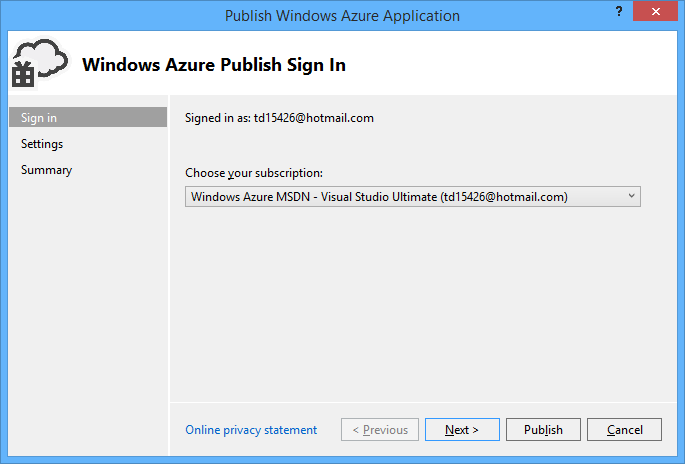
In the Sign in step of the Publish Azure Application wizard, select Next.
In the Settings step of the wizard, select Next.
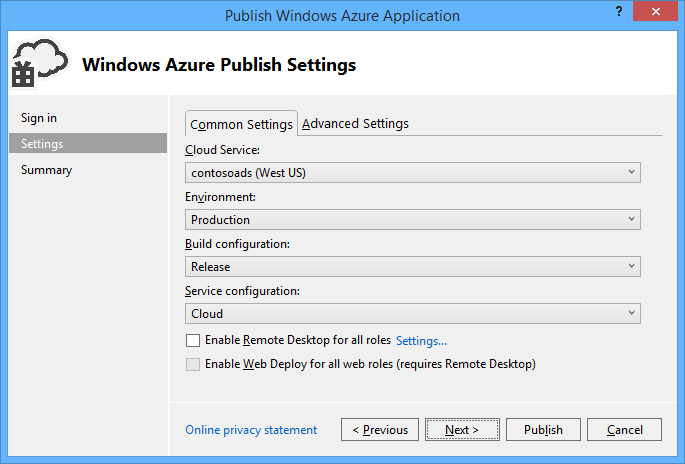
The default settings in the Advanced tab are fine for this tutorial. For information about the advanced tab, see Publish Azure Application Wizard.
In the Summary step, select Publish.
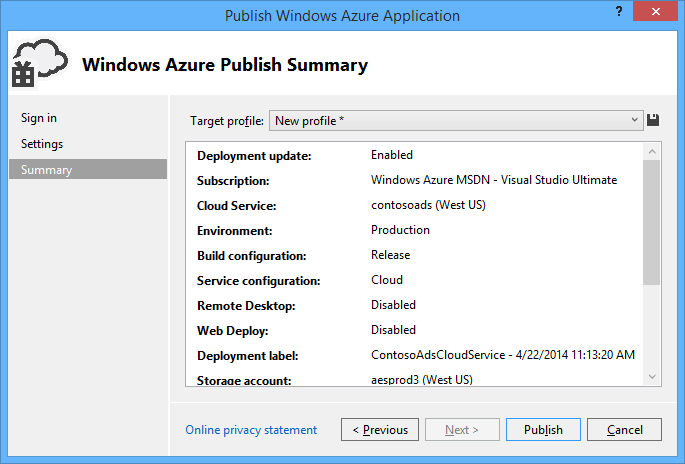
The Azure Activity Log window opens in Visual Studio.
Choose the right arrow icon to expand the deployment details.
The deployment can take up to 5 minutes or more to complete.
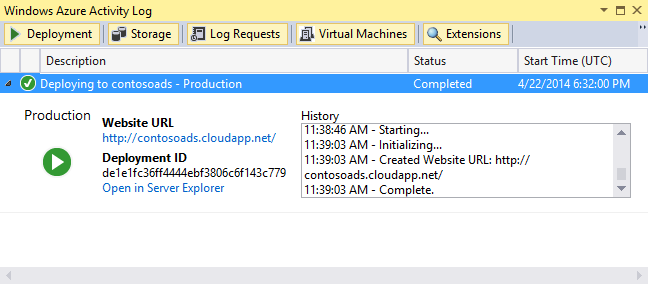
When the deployment status is complete, select the Web app URL to start the application.
You can now test the app by creating, viewing, and editing some ads, as you did when you ran the application locally.
Note
When you're finished testing, delete or stop the cloud service. Even if you're not using the cloud service, it's accruing charges because virtual machine resources are reserved for it. And if you leave it running, anyone who finds your URL can create and view ads. In the Azure portal, go to the Overview tab for your cloud service, and then click the Delete button at the top of the page. If you just want to temporarily prevent others from accessing the site, click Stop instead. In that case, charges will continue to accrue. You can follow a similar procedure to delete the SQL database and storage account when you no longer need them.
Create the application from scratch
If you still need to download the completed application, do that now. Copy the files from the downloaded project into the new project.
Creating the Contoso Ads application involves the following steps:
- Create a cloud service Visual Studio solution.
- Update and add NuGet packages.
- Set project references.
- Configure connection strings.
- Add code files.
After the solution is created, you'll review the code that is unique to cloud service projects and Azure blobs and queues.
Create a cloud service Visual Studio solution
In Visual Studio, choose New Project from the File menu.
In the left pane of the New Project dialog box, expand Visual C# and choose Cloud templates, and then choose the Azure Cloud Service template.
Name the project and solution ContosoAdsCloudService, and then select OK.

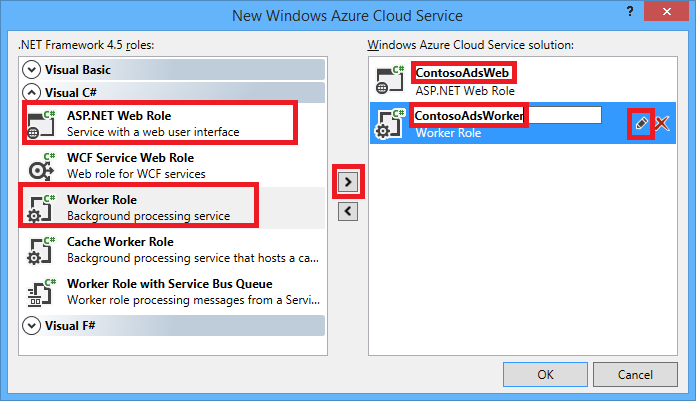
In the New Azure Cloud Service dialog box, add a web role and a worker role. Name the web role ContosoAdsWeb, and name the worker role ContosoAdsWorker. (Use the pencil icon in the right-hand pane to change the default names of the roles.)
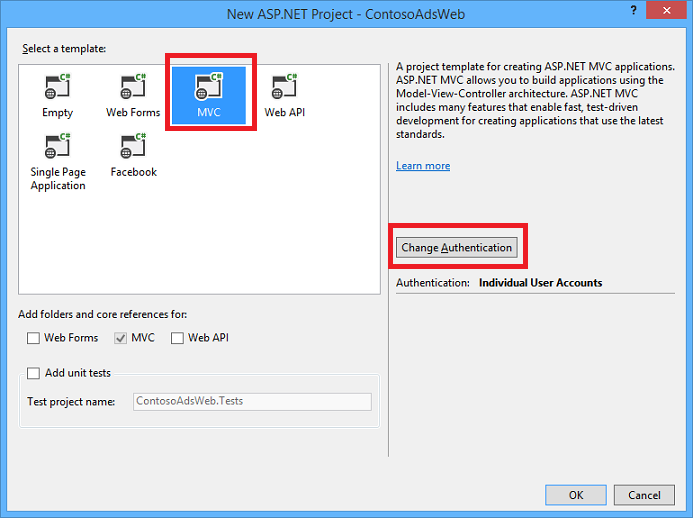
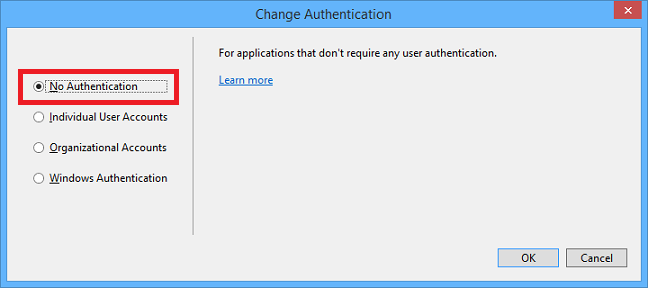
When you see the New ASP.NET Project dialog box for the web role, choose the MVC template, and then select Change Authentication.
In the Change Authentication dialog box, choose No Authentication, and then select OK.
In the New ASP.NET Project dialog, select OK.
In Solution Explorer, right-click the solution (not one of the projects), and choose Add - New Project.
In the Add New Project dialog box, choose Windows under Visual C# in the left pane, and then select the Class Library template.
Name the project ContosoAdsCommon, and then select OK.
You need to reference the Entity Framework context and the data model from both web and worker role projects. As an alternative, you could define the EF-related classes in the web role project and reference that project from the worker role project. But in the alternative approach, your worker role project would have a reference to web assemblies that it doesn't need.
Update and add NuGet packages
Open the Manage NuGet Packages dialog box for the solution.
At the top of the window, select Updates.
Look for the WindowsAzure.Storage package, and if it's in the list, select it and select the web and worker projects to update it in, and then select Update.
The storage client library is updated more frequently than Visual Studio project templates, so you may find that the version in a newly created project needs to be updated.
At the top of the window, select Browse.
Find the EntityFramework NuGet package, and install it in all three projects.
Find the Microsoft.WindowsAzure.ConfigurationManager NuGet package, and install it in the worker role project.
Set project references
In the ContosoAdsWeb project, set a reference to the ContosoAdsCommon project. Right-click the ContosoAdsWeb project, and then select References - Add References. In the Reference Manager dialog box, select Solution - Projects in the left pane, select ContosoAdsCommon, and then select OK.
In the ContosoAdsWorker project, set a reference to the ContosoAdsCommon project.
ContosoAdsCommon contains the Entity Framework data model and context class, which uses both the front-end and back-end.
In the ContosoAdsWorker project, set a reference to
System.Drawing.This assembly is used by the back-end to convert images to thumbnails.
Configure connection strings
In this section, you configure Azure Storage and SQL connection strings for testing locally. The deployment instructions earlier in the tutorial explain how to set up the connection strings for when the app runs in the cloud.
In the ContosoAdsWeb project, open the application Web.config file, and insert the following
connectionStringselement after theconfigSectionselement.<connectionStrings> <add name="ContosoAdsContext" connectionString="Data Source=(localdb)\v11.0; Initial Catalog=ContosoAds; Integrated Security=True; MultipleActiveResultSets=True;" providerName="System.Data.SqlClient" /> </connectionStrings>If you're using Visual Studio 2015 or higher, replace "v11.0" with "MSSQLLocalDB".
Save your changes.
In the ContosoAdsCloudService project, right-click ContosoAdsWeb under Roles, and then select Properties.

In the ContosoAdsWeb [Role] properties window, select the Settings tab, and then select Add Setting.
Leave Service Configuration set to All Configurations.
Add a setting named StorageConnectionString. Set Type to ConnectionString, and set Value to UseDevelopmentStorage=true.

Save your changes.
Follow the same procedure to add a storage connection string in the ContosoAdsWorker role properties.
While still in the ContosoAdsWorker [Role] properties window, add another connection string:
Name: ContosoAdsDbConnectionString
Type: String
Value: Paste the same connection string you used for the web role project. (The following example is for Visual Studio 2013. Don't forget to change the Data Source if you copy this example and you're using Visual Studio 2015 or higher.)
Data Source=(localdb)\v11.0; Initial Catalog=ContosoAds; Integrated Security=True; MultipleActiveResultSets=True;
Add code files
In this section, you copy code files from the downloaded solution into the new solution. The following sections show and explain key parts of this code.
To add files to a project or a folder, right-click the project or folder and select Add - Existing Item. Select the files you want and then select Add. If asked whether you want to replace existing files, select Yes.
In the ContosoAdsCommon project, delete the Class1.cs file and add in its place the Ad.cs and ContosoAdscontext.cs files from the downloaded project.
In the ContosoAdsWeb project, add the following files from the downloaded project.
- Global.asax.cs.
- In the Views\Shared folder: _Layout.cshtml.
- In the Views\Home folder: Index.cshtml.
- In the Controllers folder: AdController.cs.
- In the Views\Ad folder (create the folder first): five .cshtml files.
In the ContosoAdsWorker project, add WorkerRole.cs from the downloaded project.
You can now build and run the application as instructed earlier in the tutorial, and the app uses local database and storage emulator resources.
The following sections explain the code related to working with the Azure environment, blobs, and queues. This tutorial doesn't explain how to create MVC controllers and views using scaffolding, how to write Entity Framework code that works with SQL Server databases, or the basics of asynchronous programming in ASP.NET 4.5. For information about these topics, see the following resources:
- Get started with MVC 5
- Get started with EF 6 and MVC 5
- Introduction to asynchronous programming in .NET 4.5.
ContosoAdsCommon - Ad.cs
The Ad.cs file defines an enum for ad categories and a POCO entity class for ad information.
public enum Category
{
    Cars,
    [Display(Name="Real Estate")]
    RealEstate,
    [Display(Name = "Free Stuff")]
    FreeStuff
}

public class Ad
{
    public int AdId { get; set; }

    [StringLength(100)]
    public string Title { get; set; }

    public int Price { get; set; }

    [StringLength(1000)]
    [DataType(DataType.MultilineText)]
    public string Description { get; set; }

    [StringLength(1000)]
    [DisplayName("Full-size Image")]
    public string ImageURL { get; set; }

    [StringLength(1000)]
    [DisplayName("Thumbnail")]
    public string ThumbnailURL { get; set; }

    [DataType(DataType.Date)]
    [DisplayFormat(DataFormatString = "{0:yyyy-MM-dd}", ApplyFormatInEditMode = true)]
    public DateTime PostedDate { get; set; }

    public Category? Category { get; set; }
    [StringLength(12)]
    public string Phone { get; set; }
}
ContosoAdsCommon - ContosoAdsContext.cs
The ContosoAdsContext class specifies that the Ad class is used in a DbSet collection, which Entity Framework stores in an SQL database.
public class ContosoAdsContext : DbContext
{
    public ContosoAdsContext() : base("name=ContosoAdsContext")
    {
    }
    public ContosoAdsContext(string connString)
        : base(connString)
    {
    }
    public System.Data.Entity.DbSet<Ad> Ads { get; set; }
}
The class has two constructors. The first of them is used by the web project, and specifies the name of a connection string that is stored in the Web.config file. The second constructor enables you to pass in the actual connection string used by the worker role project, since it doesn't have a Web.config file. You saw earlier where this connection string was stored. Later, you see how the code retrieves the connection string when it instantiates the DbContext class.
ContosoAdsWeb - Global.asax.cs
Code that is called from the Application_Start method creates an images blob container and an images queue if they don't already exist. This code ensures that whenever you use a new storage account or use the storage emulator on a new computer, the code automatically creates the required blob container and queue.
The code gets access to the storage account by using the storage connection string from the .cscfg file.
var storageAccount = CloudStorageAccount.Parse
    (RoleEnvironment.GetConfigurationSettingValue("StorageConnectionString"));
Then it gets a reference to the images blob container, creates the container if it doesn't already exist, and sets access permissions on the new container. By default, new containers only allow clients with storage account credentials to access blobs. The website needs the blobs to be public so that it can display images using URLs that point to the image blobs.
var blobClient = storageAccount.CreateCloudBlobClient();
var imagesBlobContainer = blobClient.GetContainerReference("images");
if (imagesBlobContainer.CreateIfNotExists())
{
    imagesBlobContainer.SetPermissions(
        new BlobContainerPermissions
        {
            PublicAccess =BlobContainerPublicAccessType.Blob
        });
}
Similar code gets a reference to the images queue and creates a new queue. In this case, no permissions change is needed.
CloudQueueClient queueClient = storageAccount.CreateCloudQueueClient();
var imagesQueue = queueClient.GetQueueReference("images");
imagesQueue.CreateIfNotExists();
ContosoAdsWeb - _Layout.cshtml
The _Layout.cshtml file sets the app name in the header and footer, and creates an "Ads" menu entry.
ContosoAdsWeb - Views\Home\Index.cshtml
The Views\Home\Index.cshtml file displays category links on the home page. The links pass the integer value of the Category enum in a querystring variable to the Ads Index page.
<li>@Html.ActionLink("Cars", "Index", "Ad", new { category = (int)Category.Cars }, null)</li>
<li>@Html.ActionLink("Real estate", "Index", "Ad", new { category = (int)Category.RealEstate }, null)</li>
<li>@Html.ActionLink("Free stuff", "Index", "Ad", new { category = (int)Category.FreeStuff }, null)</li>
<li>@Html.ActionLink("All", "Index", "Ad", null, null)</li>
ContosoAdsWeb - AdController.cs
In the AdController.cs file, the constructor calls the InitializeStorage method to create Azure Storage Client Library objects that provide an API for working with blobs and queues.
Then the code gets a reference to the images blob container as you saw earlier in Global.asax.cs. While doing that it sets a default retry policy appropriate for a web app. The default exponential backoff retry policy could cause the web app to stop responding for longer than a minute on repeated retries for a transient fault. The retry policy specified here waits three seconds after each try for up to three tries.
var blobClient = storageAccount.CreateCloudBlobClient();
blobClient.DefaultRequestOptions.RetryPolicy = new LinearRetry(TimeSpan.FromSeconds(3), 3);
imagesBlobContainer = blobClient.GetContainerReference("images");
Similar code gets a reference to the images queue.
CloudQueueClient queueClient = storageAccount.CreateCloudQueueClient();
queueClient.DefaultRequestOptions.RetryPolicy = new LinearRetry(TimeSpan.FromSeconds(3), 3);
imagesQueue = queueClient.GetQueueReference("images");
Most of the controller code is typical for working with an Entity Framework data model using a DbContext class. An exception is the HttpPost Create method, which uploads a file and saves it in blob storage. The model binder provides an HttpPostedFileBase object to the method.
[HttpPost]
[ValidateAntiForgeryToken]
public async Task<ActionResult> Create(
    [Bind(Include = "Title,Price,Description,Category,Phone")] Ad ad,
    HttpPostedFileBase imageFile)
If the user selected a file to upload, the code uploads the file, saves it in a blob, and updates the Ad database record with a URL that points to the blob.
if (imageFile != null && imageFile.ContentLength != 0)
{
    blob = await UploadAndSaveBlobAsync(imageFile);
    ad.ImageURL = blob.Uri.ToString();
}
The code that does the upload is in the UploadAndSaveBlobAsync method. It creates a GUID name for the blob, uploads and saves the file, and returns a reference to the saved blob.
private async Task<CloudBlockBlob> UploadAndSaveBlobAsync(HttpPostedFileBase imageFile)
{
    string blobName = Guid.NewGuid().ToString() + Path.GetExtension(imageFile.FileName);
    CloudBlockBlob imageBlob = imagesBlobContainer.GetBlockBlobReference(blobName);
    using (var fileStream = imageFile.InputStream)
    {
        await imageBlob.UploadFromStreamAsync(fileStream);
    }
    return imageBlob;
}
After the HttpPost Create method uploads a blob and updates the database, it creates a queue message to inform that back-end process that an image is ready for conversion to a thumbnail.
string queueMessageString = ad.AdId.ToString();
var queueMessage = new CloudQueueMessage(queueMessageString);
await queue.AddMessageAsync(queueMessage);
The code for the HttpPost Edit method is similar except that if the user selects a new image file any blobs that already exist must be deleted.
if (imageFile != null && imageFile.ContentLength != 0)
{
    await DeleteAdBlobsAsync(ad);
    imageBlob = await UploadAndSaveBlobAsync(imageFile);
    ad.ImageURL = imageBlob.Uri.ToString();
}
The next example shows the code that deletes blobs when you delete an ad.
private async Task DeleteAdBlobsAsync(Ad ad)
{
    if (!string.IsNullOrWhiteSpace(ad.ImageURL))
    {
        Uri blobUri = new Uri(ad.ImageURL);
        await DeleteAdBlobAsync(blobUri);
    }
    if (!string.IsNullOrWhiteSpace(ad.ThumbnailURL))
    {
        Uri blobUri = new Uri(ad.ThumbnailURL);
        await DeleteAdBlobAsync(blobUri);
    }
}
private static async Task DeleteAdBlobAsync(Uri blobUri)
{
    string blobName = blobUri.Segments[blobUri.Segments.Length - 1];
    CloudBlockBlob blobToDelete = imagesBlobContainer.GetBlockBlobReference(blobName);
    await blobToDelete.DeleteAsync();
}
ContosoAdsWeb - Views\Ad\Index.cshtml and Details.cshtml
The Index.cshtml file displays thumbnails with the other ad data.
<img src="@Html.Raw(item.ThumbnailURL)" />
The Details.cshtml file displays the full-size image.
<img src="@Html.Raw(Model.ImageURL)" />
ContosoAdsWeb - Views\Ad\Create.cshtml and Edit.cshtml
The Create.cshtml and Edit.cshtml files specify form encoding that enables the controller to get the HttpPostedFileBase object.
@using (Html.BeginForm("Create", "Ad", FormMethod.Post, new { enctype = "multipart/form-data" }))
An <input> element tells the browser to provide a file selection dialog.
<input type="file" name="imageFile" accept="image/*" class="form-control fileupload" />
ContosoAdsWorker - WorkerRole.cs - OnStart method
The Azure worker role environment calls the OnStart method in the WorkerRole class when the worker role is getting started, and it calls the Run method when the OnStart method finishes.
The OnStart method gets the database connection string from the .cscfg file and passes it to the Entity Framework DbContext class. The SQLClient provider is used by default, so the provider doesn't have to be specified.
var dbConnString = CloudConfigurationManager.GetSetting("ContosoAdsDbConnectionString");
db = new ContosoAdsContext(dbConnString);
After that, the method gets a reference to the storage account and creates the blob container and queue if they don't exist. The code for that is similar to what you already saw in the web role Application_Start method.
ContosoAdsWorker - WorkerRole.cs - Run method
The Run method is called when the OnStart method finishes its initialization work. The method executes an infinite loop that watches for new queue messages and processes them when they arrive.
public override void Run()
{
    CloudQueueMessage msg = null;

    while (true)
    {
        try
        {
            msg = this.imagesQueue.GetMessage();
            if (msg != null)
            {
                ProcessQueueMessage(msg);
            }
            else
            {
                System.Threading.Thread.Sleep(1000);
            }
        }
        catch (StorageException e)
        {
            if (msg != null && msg.DequeueCount > 5)
            {
                this.imagesQueue.DeleteMessage(msg);
            }
            System.Threading.Thread.Sleep(5000);
        }
    }
}
After each iteration of the loop, if no queue message was found, the program sleeps for a second. This sleep prevents the worker role from incurring excessive CPU time and storage transaction costs. The Microsoft Customer Advisory Team tells a story about a developer who forgot to include this sleep function, deployed to production, and left for vacation. When they got back, their oversight cost more than the vacation.
Sometimes the content of a queue message causes an error in processing. This kind of message is called a poison message. If you merely logged an error and restarted the loop, you could endlessly try to process that message. Therefore, the catch block includes an if statement that checks to see how many times the app tried to process the current message. If the count is higher than five times, the message is deleted from the queue.
ProcessQueueMessage is called when a queue message is found.
private void ProcessQueueMessage(CloudQueueMessage msg)
{
    var adId = int.Parse(msg.AsString);
    Ad ad = db.Ads.Find(adId);
    if (ad == null)
    {
        throw new Exception(String.Format("AdId {0} not found, can't create thumbnail", adId.ToString()));
    }

    CloudBlockBlob inputBlob = this.imagesBlobContainer.GetBlockBlobReference(ad.ImageURL);

    string thumbnailName = Path.GetFileNameWithoutExtension(inputBlob.Name) + "thumb.jpg";
    CloudBlockBlob outputBlob = this.imagesBlobContainer.GetBlockBlobReference(thumbnailName);

    using (Stream input = inputBlob.OpenRead())
    using (Stream output = outputBlob.OpenWrite())
    {
        ConvertImageToThumbnailJPG(input, output);
        outputBlob.Properties.ContentType = "image/jpeg";
    }

    ad.ThumbnailURL = outputBlob.Uri.ToString();
    db.SaveChanges();

    this.imagesQueue.DeleteMessage(msg);
}
This code reads the database to get the image URL, converts the image to a thumbnail, saves the thumbnail in a blob, updates the database with the thumbnail blob URL, and deletes the queue message.
Note
The code in the ConvertImageToThumbnailJPG method uses classes in the System.Drawing namespace for simplicity. However, the classes in this namespace were designed for use with Windows Forms. They are not supported for use in a Windows or ASP.NET service. For more information about image-processing options, see Dynamic Image Generation and Deep Inside Image Resizing.
Troubleshooting
In case something doesn't work while you're following the instructions in this tutorial, here are some common errors and how to resolve them.
ServiceRuntime.RoleEnvironmentException
The RoleEnvironment object is provided by Azure when you run an application in Azure or when you run locally using the Azure Compute Emulator. If you get this error when you're running locally, make sure that you set the ContosoAdsCloudService project as the startup project. This setting makes the project run using the Azure Compute Emulator.
One of the things the application uses the Azure RoleEnvironment for is to get the connection string values that are stored in the .cscfg files, so another cause of this exception is a missing connection string. Make sure that you created the StorageConnectionString setting for both Cloud and Local configurations in the ContosoAdsWeb project, and that you created both connection strings for both configurations in the ContosoAdsWorker project. If you do a Find All search for StorageConnectionString in the entire solution, you should see it nine times in six files.
Can't override to port xxx. New port below minimum allowed value 8080 for protocol http
Try changing the port number used by the web project. Right-click the ContosoAdsWeb project, and then select Properties. Choose the Web tab, and then change the port number in the Project Url setting.
For another alternative that might resolve the problem, see the following section.
Other errors when running locally
By default new cloud service projects use the Azure Compute Emulator express to simulate the Azure environment. The Azure Compute Emulator is a lightweight version of the full compute emulator, and under some conditions the full emulator works when the express version doesn't.
To change the project to use the full emulator, right-click the ContosoAdsCloudService project, and then select Properties. In the Properties window, select the Web tab, and then select the Use Full Emulator radio button.
In order to run the application with the full emulator, you have to open Visual Studio with administrator privileges.
Next steps
The Contoso Ads application is intentionally made simple for a getting-started tutorial. For example, it doesn't implement dependency injection or the repository and unit of work patterns. It doesn't use an interface for logging, it doesn't use EF Code First Migrations to manage data model changes or EF Connection Resiliency to manage transient network errors, and so forth.
For general information about developing for the cloud, see Building Real-World Cloud Apps with Azure.
For more information, see the following resources: