Note
Access to this page requires authorization. You can try signing in or changing directories.
Access to this page requires authorization. You can try changing directories.
This tutorial shows you how to back up SAP HANA databases running on Azure VMs to an Azure Backup Recovery Services vault. In this article you'll learn how to:
- Create and configure a vault
- Discover databases
- Configure backups
Here are all the scenarios that we currently support.
Prerequisites
Make sure you do the following before configuring backups:
- Identify or create a Recovery Services vault in the same region and subscription as the VM running SAP HANA.
- Allow connectivity from the VM to the internet, so that it can reach Azure, as described in the set up network connectivity section.
- Ensure that the combined length of the SAP HANA Server VM name and the Resource Group name doesn't exceed 84 characters for Azure Resource Manager (ARM_ VMs (and 77 characters for classic VMs). This limitation is because some characters are reserved by the service.
- A key should exist in the hdbuserstore that fulfills the following criteria:
- It should be present in the default hdbuserstore. The default is the
<sid>admaccount under which SAP HANA is installed. - For MDC, the key should point to the SQL port of NAMESERVER. For SDC, it should point to the SQL port of INDEXSERVER
- It should have credentials to add and delete users
- Note that this key can be deleted after running the pre-registration script successfully
- It should be present in the default hdbuserstore. The default is the
- You could also choose to create a key for the existing HANA SYSTSEM user in hdbuserstore instead of creating a custom key as listed in the step above.
- Run the SAP HANA backup configuration script (pre-registration script) in the virtual machine where HANA is installed, as the root user. This script gets the HANA system ready for backup and requires the key you have created in the above steps to be passed as input. To understand how this input is to be passed as a parameter to the script, refer to the What the pre-registration script does section. It also details about what the pre-registration script does.
- If your HANA setup uses Private Endpoints, run the pre-registration script with the -sn or --skip-network-checks parameter.
Note
The preregistration script installs the compat-unixODBC234 for SAP HANA workloads running on RHEL (7.4, 7.6 and 7.7) and unixODBC for RHEL 8.1. This package is located in the RHEL for SAP HANA (for RHEL 7 Server) Update Services for SAP Solutions (RPMs) repo. For an Azure Marketplace RHEL image the repo would be rhui-rhel-sap-hana-for-rhel-7-server-rhui-e4s-rpms.
Understanding the backup and restore throughput performance
The backups (log and non-log) in SAP HANA Azure VMs provided via Backint are streams to Azure Recovery Services vaults (which internally use Azure Storage Blob) and so it's important to understand this streaming methodology.
The Backint component of HANA provides the 'pipes' (a pipe to read from and a pipe to write into), connected to underlying disks where database files reside, which are then read by the Azure Backup service and transported to Azure Recovery Services vault, which is a remote Azure Storage Account. The Azure Backup service also performs a checksum to validate the streams, in addition to the Backint native validation checks. These validations will make sure that the data present in Azure Recovery Services vault is indeed reliable and recoverable.
Since the streams primarily deal with disks, you need to understand the disk performance for read and network performance to transfer backup data to gauge the backup and restore performance. Refer to this article for an in-depth understanding of disk/network throughput and performance in Azure VMs. These are also applicable to the backup and restore performance.
The Azure Backup service attempts to achieve upto ~420 MBps for non-log backups (such as full, differential and incremental) and upto 100 MBps for log backups for HANA. As mentioned above, these aren't guaranteed speeds and depend on following factors:
- Maximum Uncached disk throughput of the VM - read from data or log area.
- Underlying disk type and its throughput - read from data or log area.
- VM’s maximum network throughput - write to Recovery Services vault.
- If the VNET has NVA/firewall, it's network throughput
- If the data/log on Azure NetApp Files - both read from ANF and write to Vault consume VM’s network.
Important
In smaller VMs, where the uncached disk throughput is very close to or lesser than 400 MBps, you may be concerned that the entire disk IOPSs are consumed by the backup service which may affect SAP HANA's operations related to read/write from the disks. In that case, if you want to throttle or limit the backup service consumption to the maximum limit, you can refer to the next section.
Limiting backup throughput performance
If you want to throttle backup service disk IOPS consumption to a maximum value, then perform the following steps.
Go to the "opt/msawb/bin" folder
Create a new JSON file named "ExtensionSettingsOverrides.JSON"
Add a key-value pair to the JSON file as follows:
{
"MaxUsableVMThroughputInMBPS": 120
}
Change the permissions and ownership of the file as follows:
chmod 750 ExtensionSettingsOverrides.json
chown root:msawb ExtensionSettingsOverrides.json
No restart of any service is required. The Azure Backup service will attempt to limit the throughput performance as mentioned in this file.
Note
If the changes aren't applied, restart the databases.
What the pre-registration script does
Running the pre-registration script performs the following functions:
- Based on your Linux distribution, the script installs or updates any necessary packages required by the Azure Backup agent.
- It performs outbound network connectivity checks with Azure Backup servers and dependent services like Microsoft Entra ID and Azure Storage.
- It logs into your HANA system using the custom user key or SYSTEM user key mentioned as part of the prerequisites. This is used to create a backup user (AZUREWLBACKUPHANAUSER) in the HANA system and the user key can be deleted after the pre-registration script runs successfully. Note that the SYSTEM user key must not be deleted.
- It checks and warns if the /opt/msawb folder is placed in the root partition and the root partition is 2 GB in size. The script recommends that you increase the root partition size to 4 GB or move the /opt/msawb folder to a different location where it has space to grow to a maximum of 4 GB in size. Note that if you place the /opt/msawb folder in the root partition of 2 GB size, this could lead to root partition getting full and causing the backups to fail.
- AZUREWLBACKUPHANAUSER is assigned these required roles and permissions:
- For MDC: DATABASE ADMIN and BACKUP ADMIN (from HANA 2.0 SPS05 onwards): to create new databases during restore.
- For SDC: BACKUP ADMIN: to create new databases during restore.
- CATALOG READ: to read the backup catalog.
- SAP_INTERNAL_HANA_SUPPORT: to access a few private tables. Only required for SDC and MDC versions below HANA 2.0 SPS04 Rev 46. This isn't required for HANA 2.0 SPS04 Rev 46 and above since we're getting the required information from public tables now with the fix from HANA team.
- The script adds a key to hdbuserstore for AZUREWLBACKUPHANAUSER for the HANA backup plug-in to handle all operations (database queries, restore operations, configuring and running backup).
- Alternatively, you could choose to create your own custom Backup user. Ensure that this user is assigned the following required roles and permissions:
- For MDC: DATABASE ADMIN and BACKUP ADMIN (from HANA 2.0 SPS05 onwards): to create new databases during restore.
- For SDC: BACKUP ADMIN: to create new databases during restore.
- CATALOG READ: to read the backup catalog.
- SAP_INTERNAL_HANA_SUPPORT: to access a few private tables. Only required for SDC and MDC versions below HANA 2.0 SPS04 Rev 46. This isn't required for HANA 2.0 SPS04 Rev 46 and above as we're getting the required information from public tables now with the fix from HANA team.
- Then add a key to hdbuserstore for your custom Backup user for the HANA backup plug-in to handle all operations (database queries, restore operations, configuring, and running backup). Pass this custom Backup user key to the script as a parameter:
-bk CUSTOM_BACKUP_KEY_NAMEor-backup-key CUSTOM_BACKUP_KEY_NAME. Note that the password expiry of this custom backup key could lead to backup and restore failures. - If your HANA
<sid>admuser is an Active Directory (AD) user, create a msawb group in your AD and add the<sid>admuser to this group. You must now specify that<sid>admis an AD user in the pre-registration script using the parameters:-ad <SID>_ADM_USER or --ad-user <SID>_ADM_USER.
Note
To learn what other parameters the script accepts, use the command bash msawb-plugin-config-com-sap-hana.sh --help
To confirm the key creation, run the HDBSQL command on the HANA machine with SIDADM credentials:
hdbuserstore list
The command output should display the {SID}{DBNAME} key, with the user shown as AZUREWLBACKUPHANAUSER.
Note
Make sure you have a unique set of SSFS files under /usr/sap/{SID}/home/.hdb/. There should be only one folder in this path.
Here's a summary of steps required for completing the pre-registration script run. Note that in this flow we're providing the SYSTEM user key as an input parameter to the pre-registration script.
| Who | From | What to run | Comments |
|---|---|---|---|
<sid>adm (OS) |
HANA OS | Read the tutorial and download the pre-registration script. | Tutorial: Back up HANA databases in Azure VM Download the pre-registration script |
<sid>adm (OS) |
HANA OS | Start HANA (HDB start) | Before you set up, ensure that HANA is up and running. |
<sid>adm (OS) |
HANA OS | Run the command: hdbuserstore Set |
hdbuserstore Set SYSTEM <hostname>:3<Instance#>13 SYSTEM <password> Note Ensure that you use hostname instead of IP address/FQDN. |
<sid>adm (OS) |
HANA OS | Run the command:hdbuserstore List |
Check if the result includes the default store as below: KEY SYSTEM ENV : <hostname>:3<Instance#>13 USER : SYSTEM |
| Root (OS) | HANA OS | Run the Azure Backup HANA pre-registration script. | ./msawb-plugin-config-com-sap-hana.sh -a --sid <SID> -n <Instance#> --system-key SYSTEM |
<sid>adm (OS) |
HANA OS | Run the command: hdbuserstore List |
Check if result includes new lines as below: KEY AZUREWLBACKUPHANAUSER ENV : localhost: 3<Instance#>13 USER: AZUREWLBACKUPHANAUSER |
| Azure Contributor | Azure portal | Configure NSG, NVA, Azure Firewall, and so on to allow outbound traffic to Azure Backup service, Microsoft Entra ID, and Azure Storage. | Set up network connectivity |
| Azure Contributor | Azure portal | Create or open a Recovery Services vault and then select HANA backup. | Find all the target HANA VMs to back up. |
| Azure Contributor | Azure portal | Discover HANA databases and configure backup policy. | For example: Weekly backup: Every Sunday 2:00 AM, retention of weekly 12 weeks, monthly 12 months, yearly 3 years Differential or incremental: Every day, except for Sunday Log: every 15 minutes retained for 35 days |
| Azure Contributor | Azure portal | Recovery Service vault - Backup Items - SAP HANA | Check backup jobs (Azure Workload). |
| HANA Admin | HANA Studio | Check Backup Console, Backup catalog, backup.log, backint.log, and globa.ini | Both SYSTEMDB and Tenant database. |
After running the pre-registration script successfully and verifying, you can then proceed to check the connectivity requirements and then configure backup from Recovery services vault
Create a Recovery Services vault
A Recovery Services vault is a management entity that stores recovery points that are created over time, and it provides an interface to perform backup-related operations. These operations include taking on-demand backups, performing restores, and creating backup policies.
To create a Recovery Services vault:
Sign in to the Azure portal.
Search for Backup center, and then go to the Backup center dashboard.

On the Overview pane, select Vault.
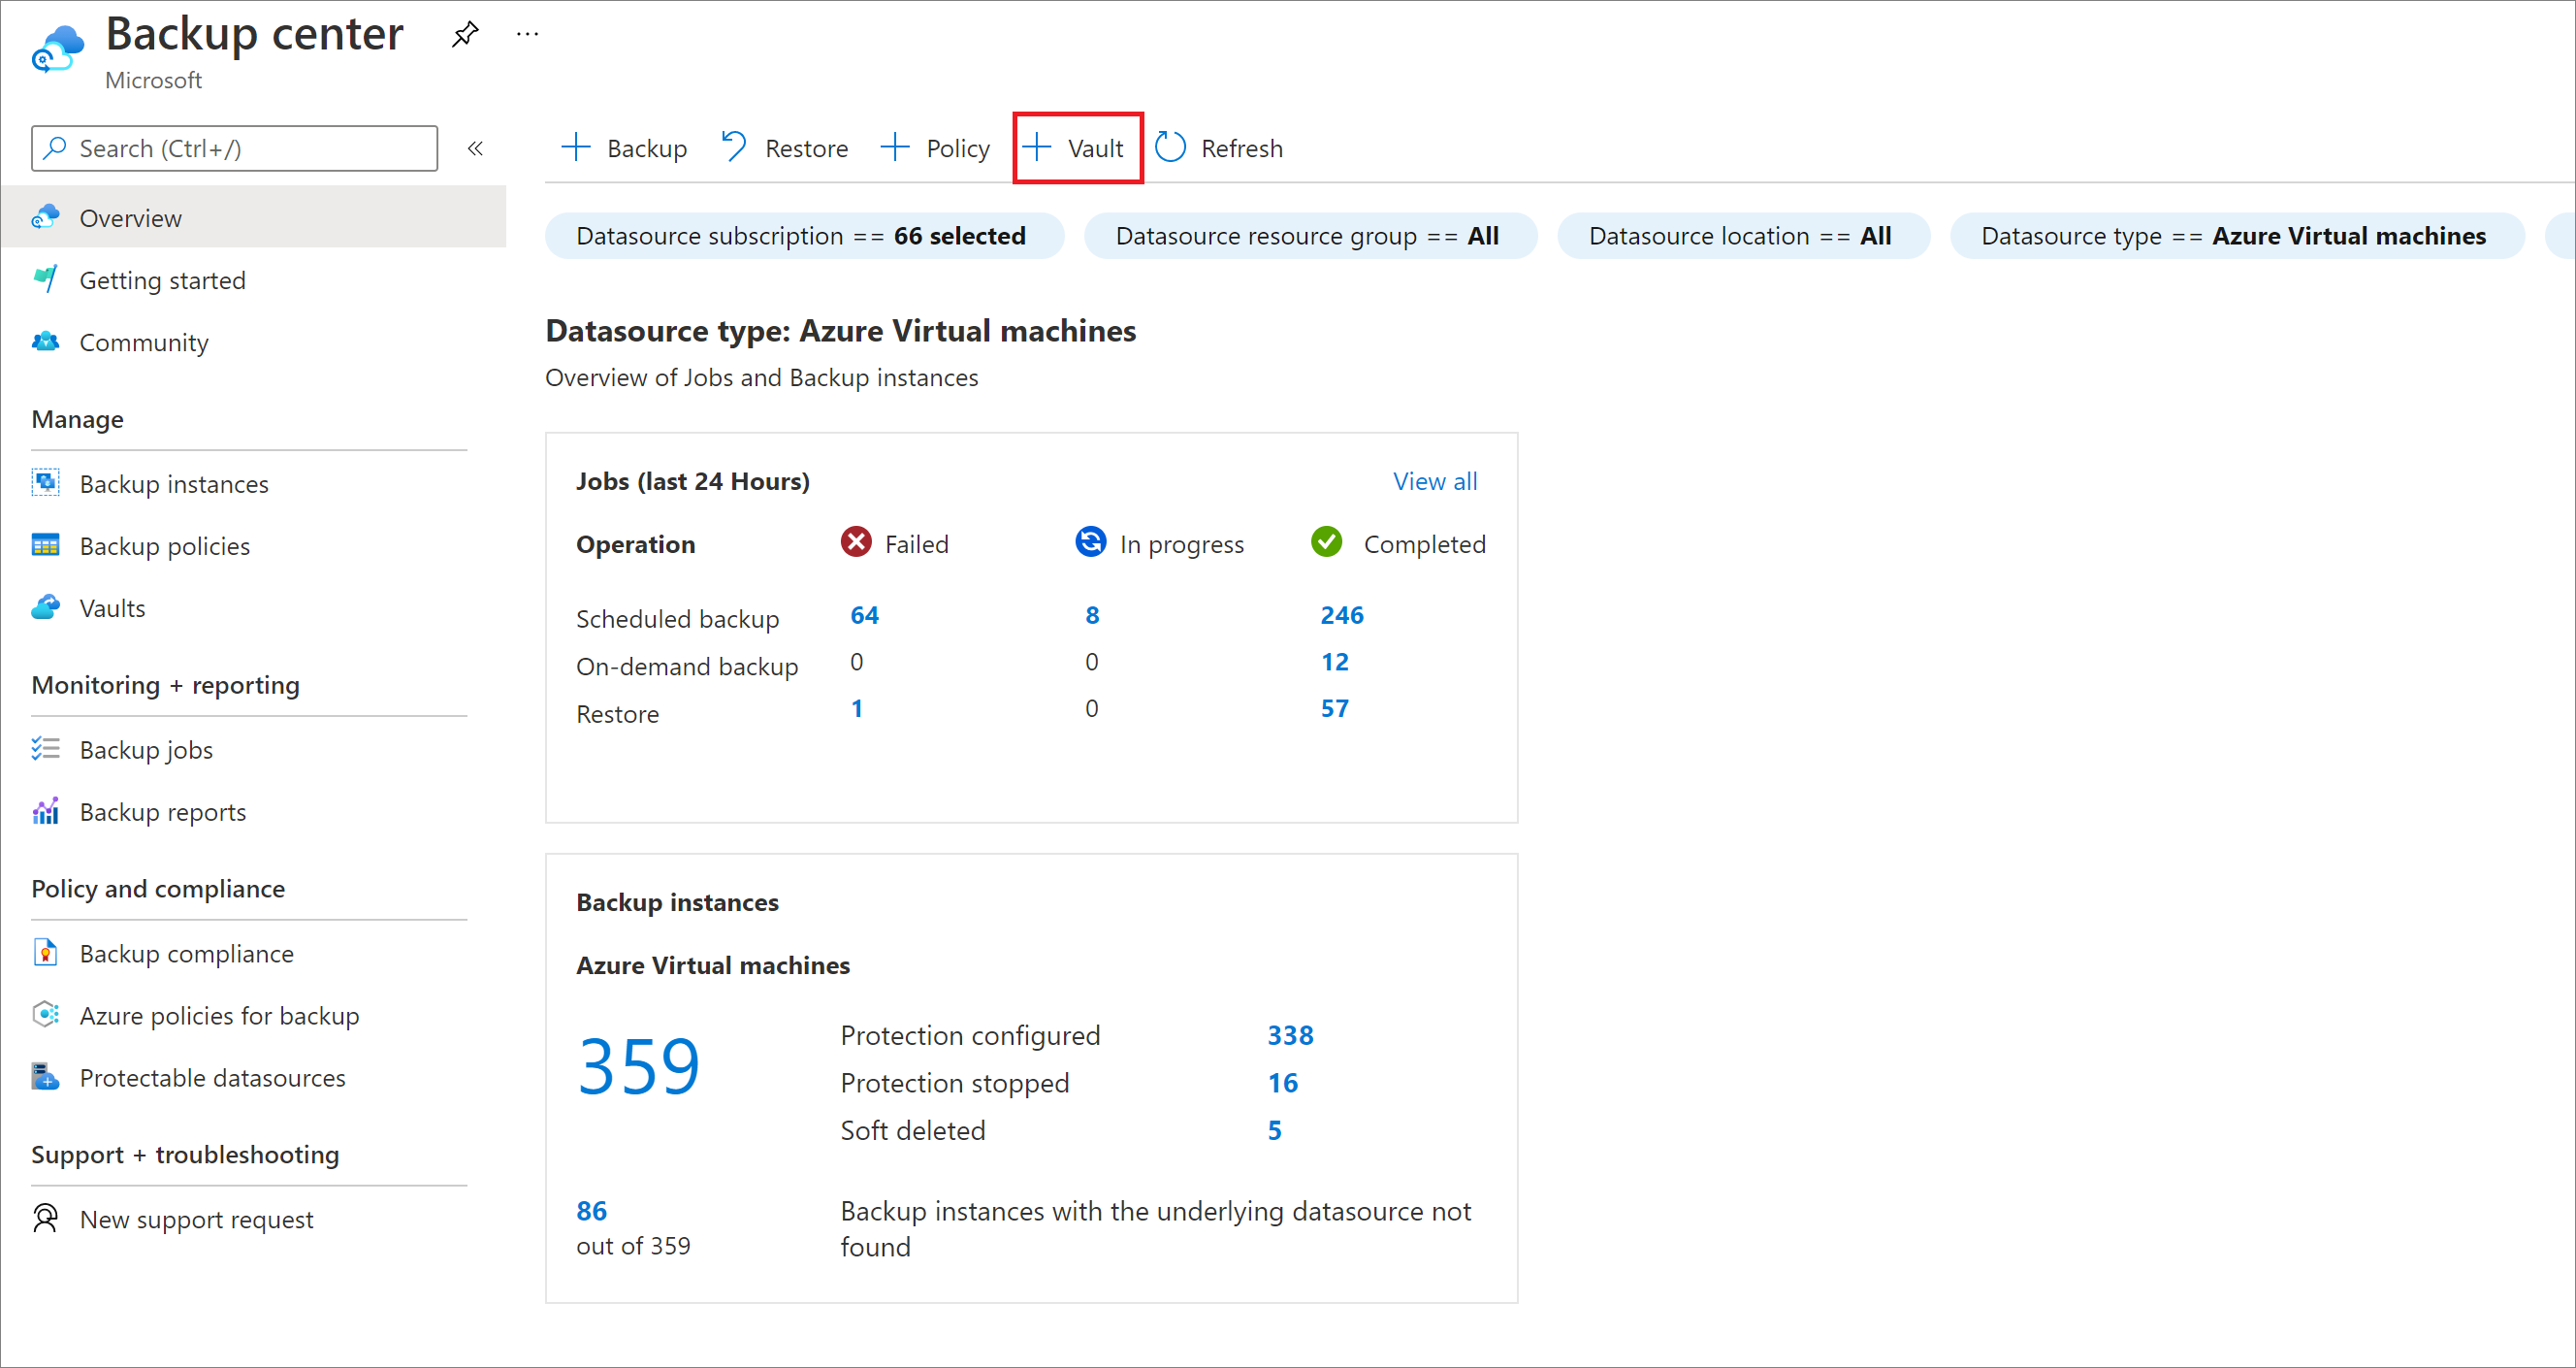
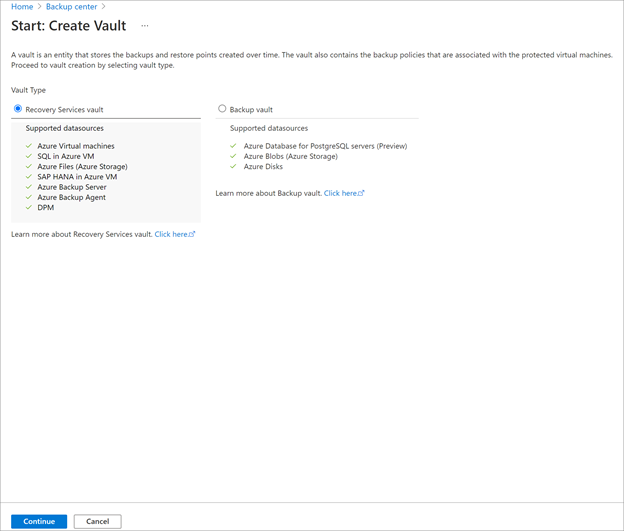
Select Recovery Services vault > Continue.
On the Recovery Services vault pane, enter the following values:
Subscription: Select the subscription to use. If you're a member of only one subscription, you'll see that name. If you're not sure which subscription to use, use the default subscription. There are multiple choices only if your work or school account is associated with more than one Azure subscription.
Resource group: Use an existing resource group or create a new one. To view a list of available resource groups in your subscription, select Use existing, and then select a resource in the dropdown list. To create a new resource group, select Create new, and then enter the name. For more information about resource groups, see Azure Resource Manager overview.
Vault name: Enter a friendly name to identify the vault. The name must be unique to the Azure subscription. Specify a name that has at least 2 but not more than 50 characters. The name must start with a letter and consist only of letters, numbers, and hyphens.
Region: Select the geographic region for the vault. For you to create a vault to help protect any data source, the vault must be in the same region as the data source.
Important
If you're not sure of the location of your data source, close the window. Go to the list of your resources in the portal. If you have data sources in multiple regions, create a Recovery Services vault for each region. Create the vault in the first location before you create a vault in another location. There's no need to specify storage accounts to store the backup data. The Recovery Services vault and Azure Backup handle that automatically.
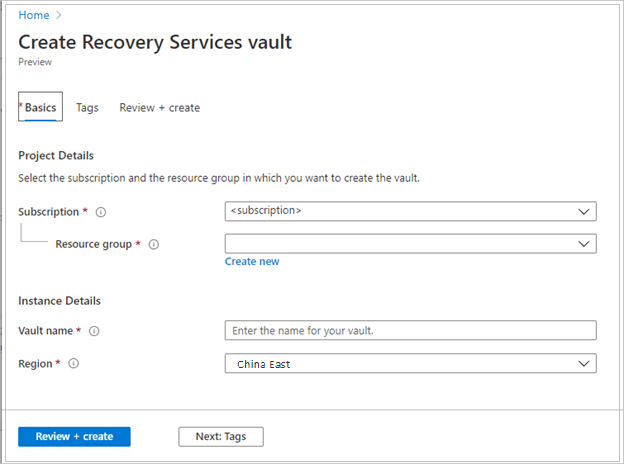
After providing the values, select Review + create.
To finish creating the Recovery Services vault, select Create.
It can take a while to create the Recovery Services vault. Monitor the status notifications in the Notifications area at the upper right. After the vault is created, it appears in the list of Recovery Services vaults. If the vault doesn't appear, select Refresh.

Note
Azure Backup now supports immutable vaults that help you ensure that recovery points once created can't be deleted before their expiry as per the backup policy. You can make the immutability irreversible for maximum protection to your backup data from various threats, including ransomware attacks and malicious actors. Learn more.
The Recovery Services vault is now created.
Enable Cross Region Restore
At the Recovery Services vault, you can enable Cross Region Restore. Learn about how to turn on Cross Region Restore.
Learn more about Cross Region Restore.
Discover the databases
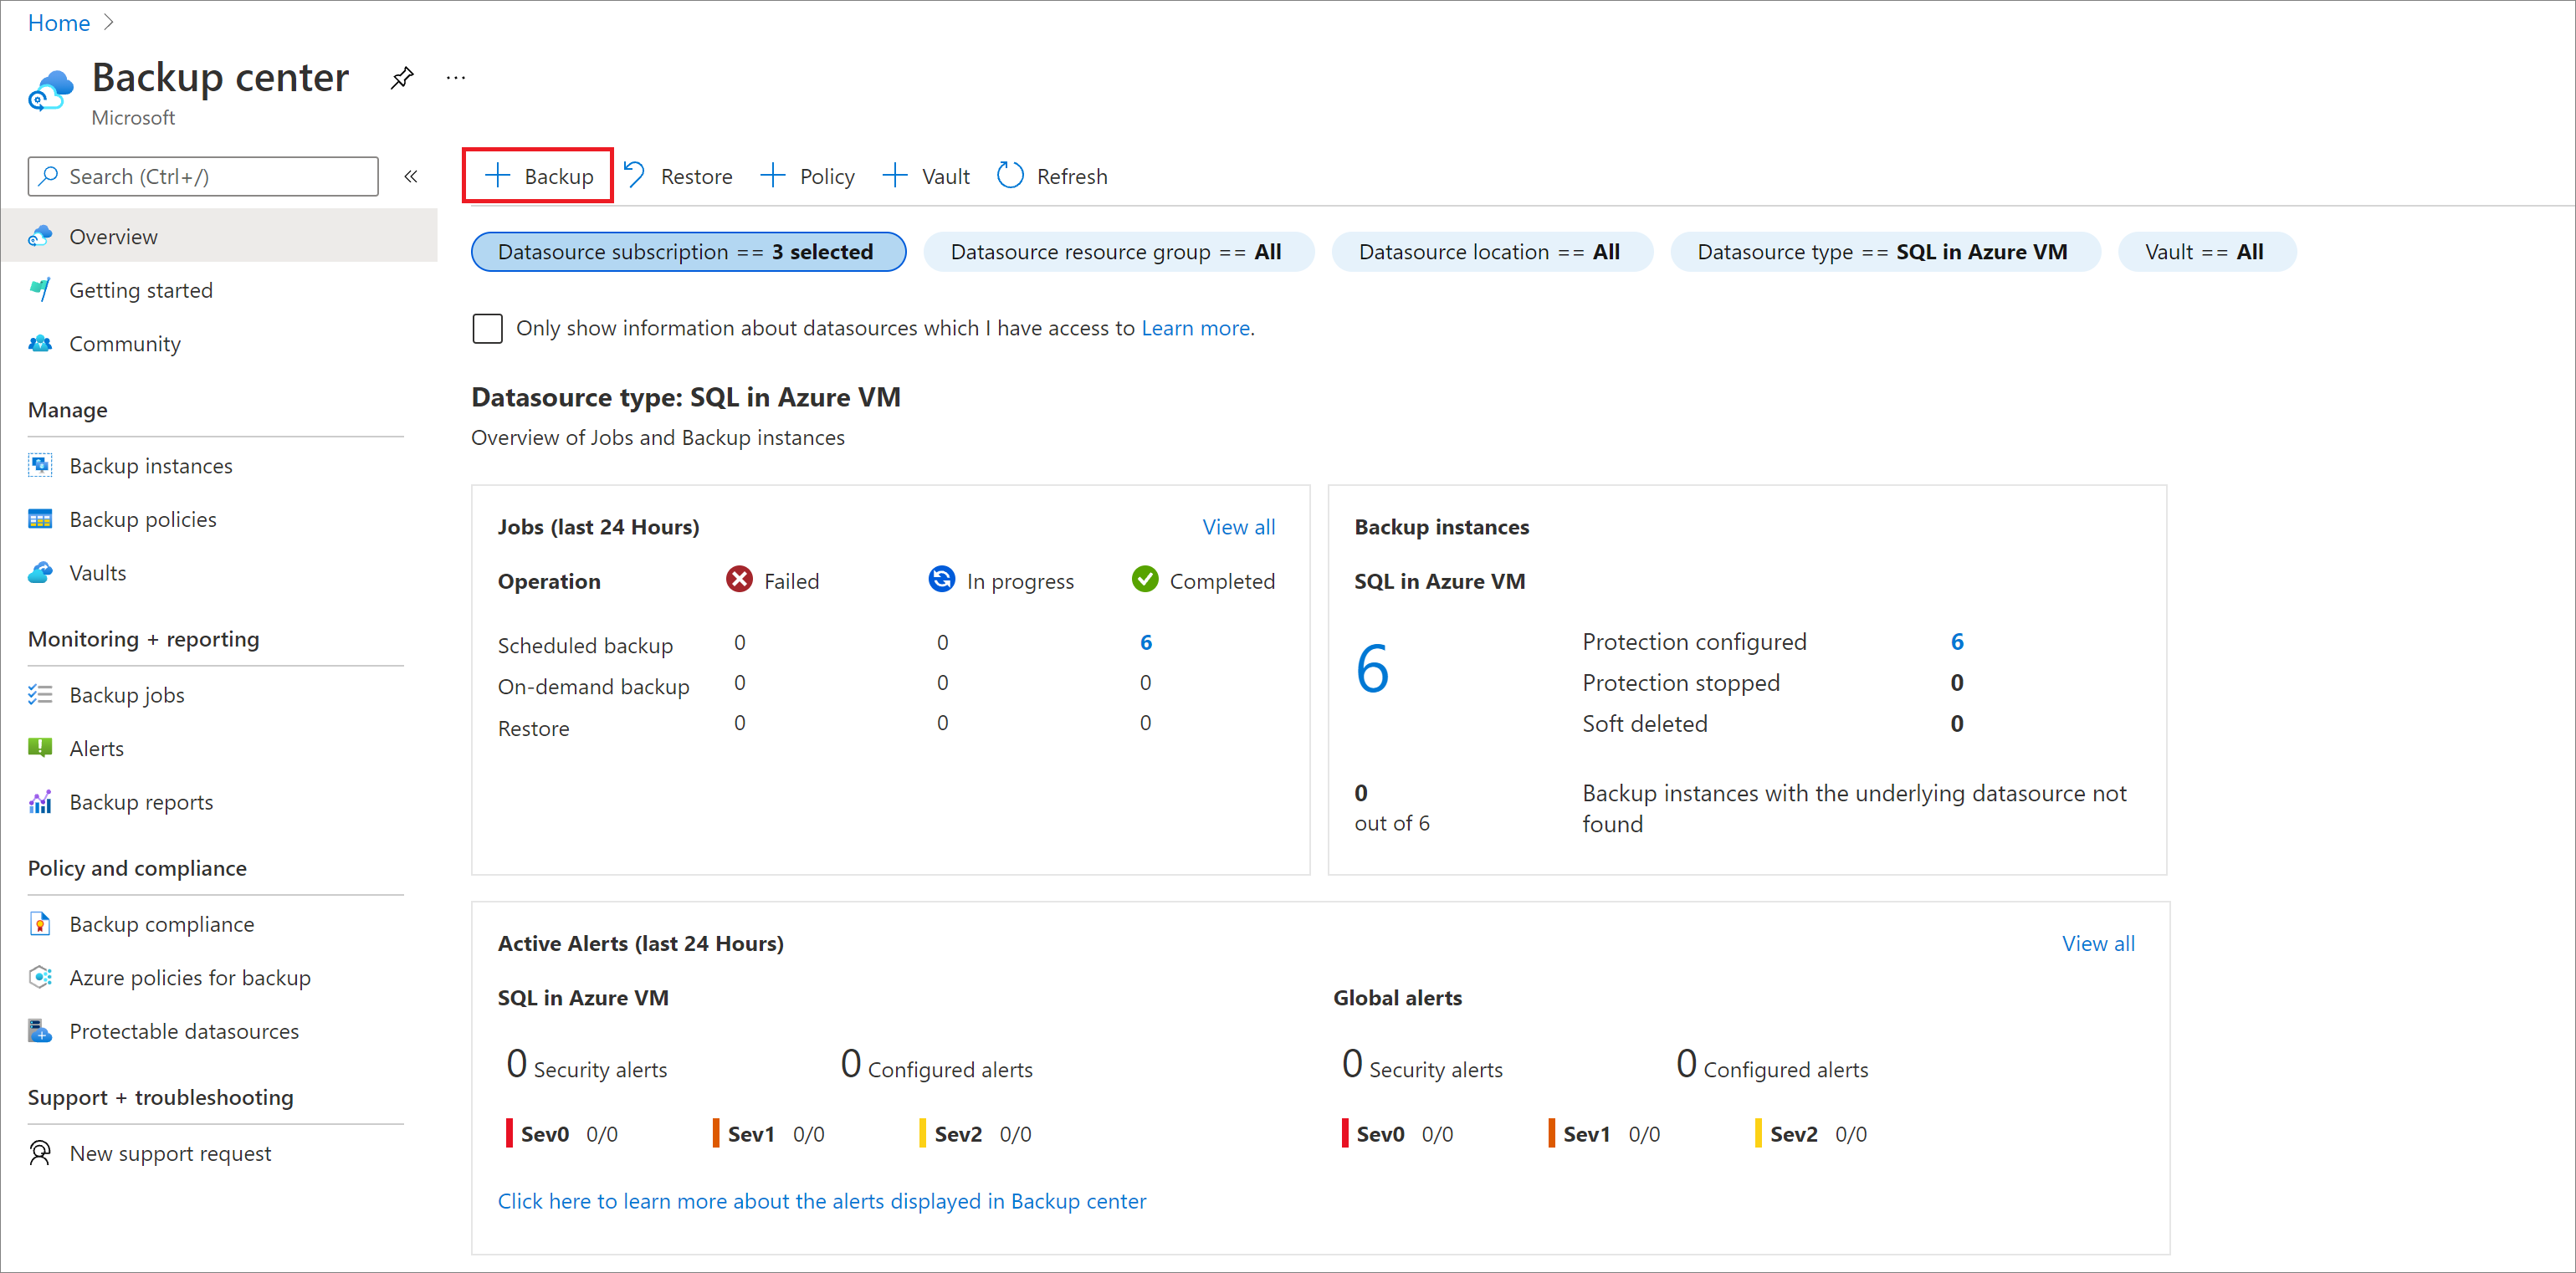
In the Azure portal, go to Backup center and click +Backup.
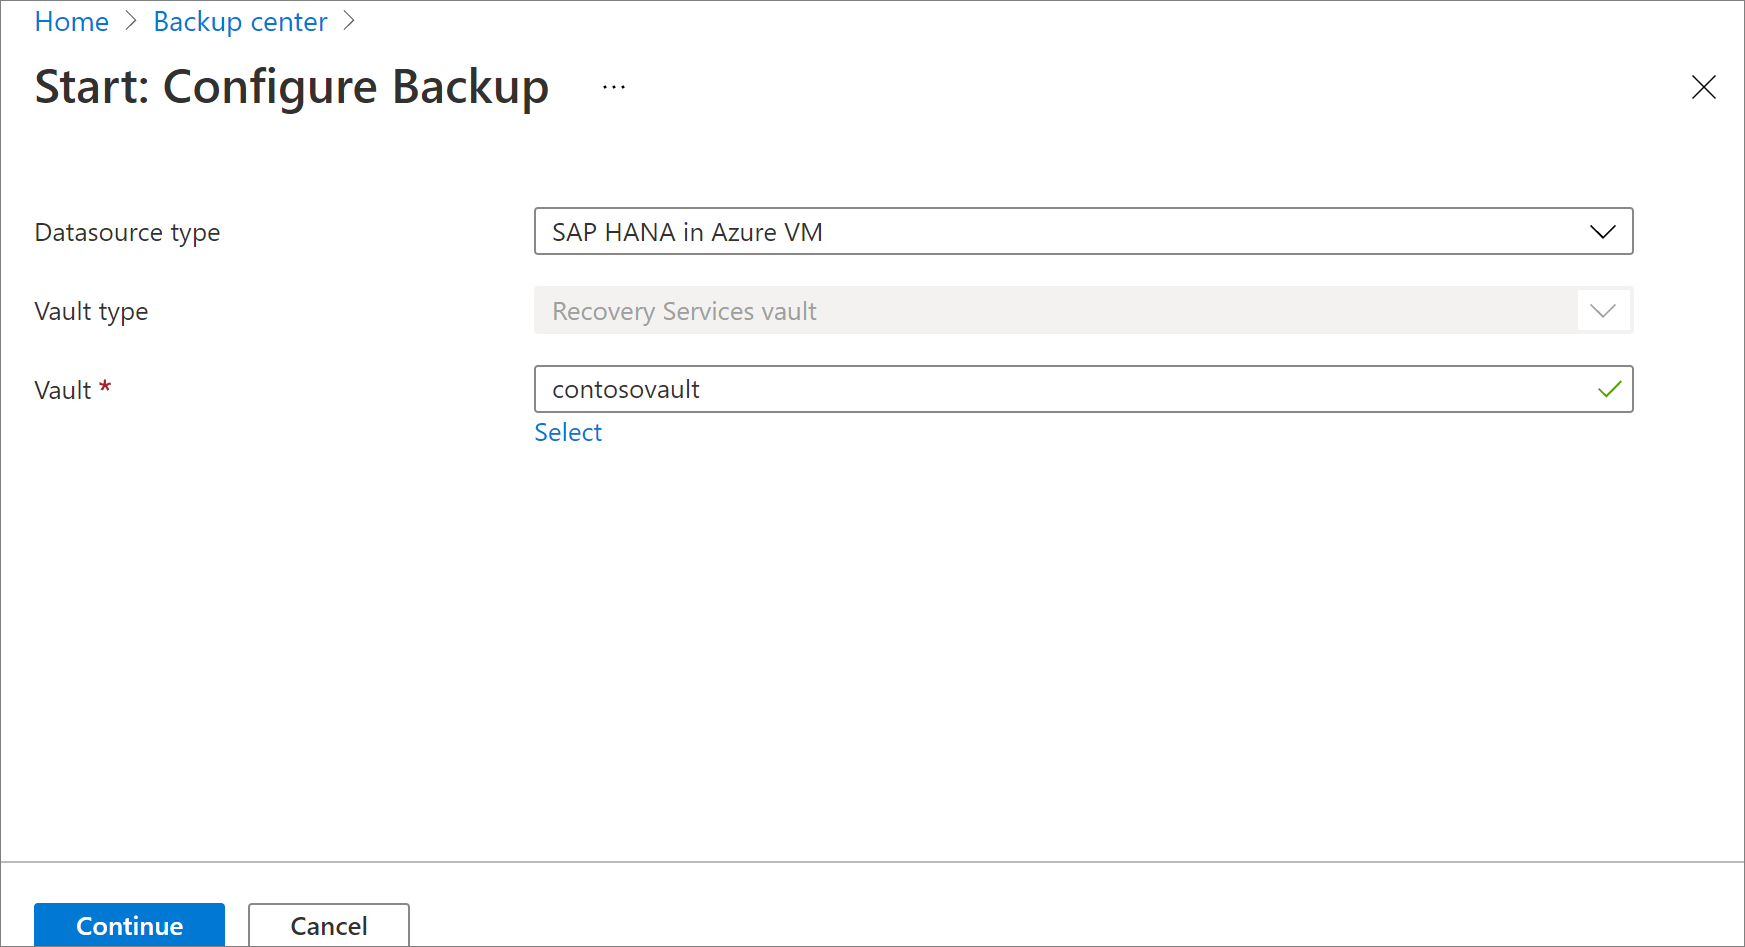
Select SAP HANA in Azure VM as the datasource type, select a Recovery Services vault to use for backup, and then click Continue.
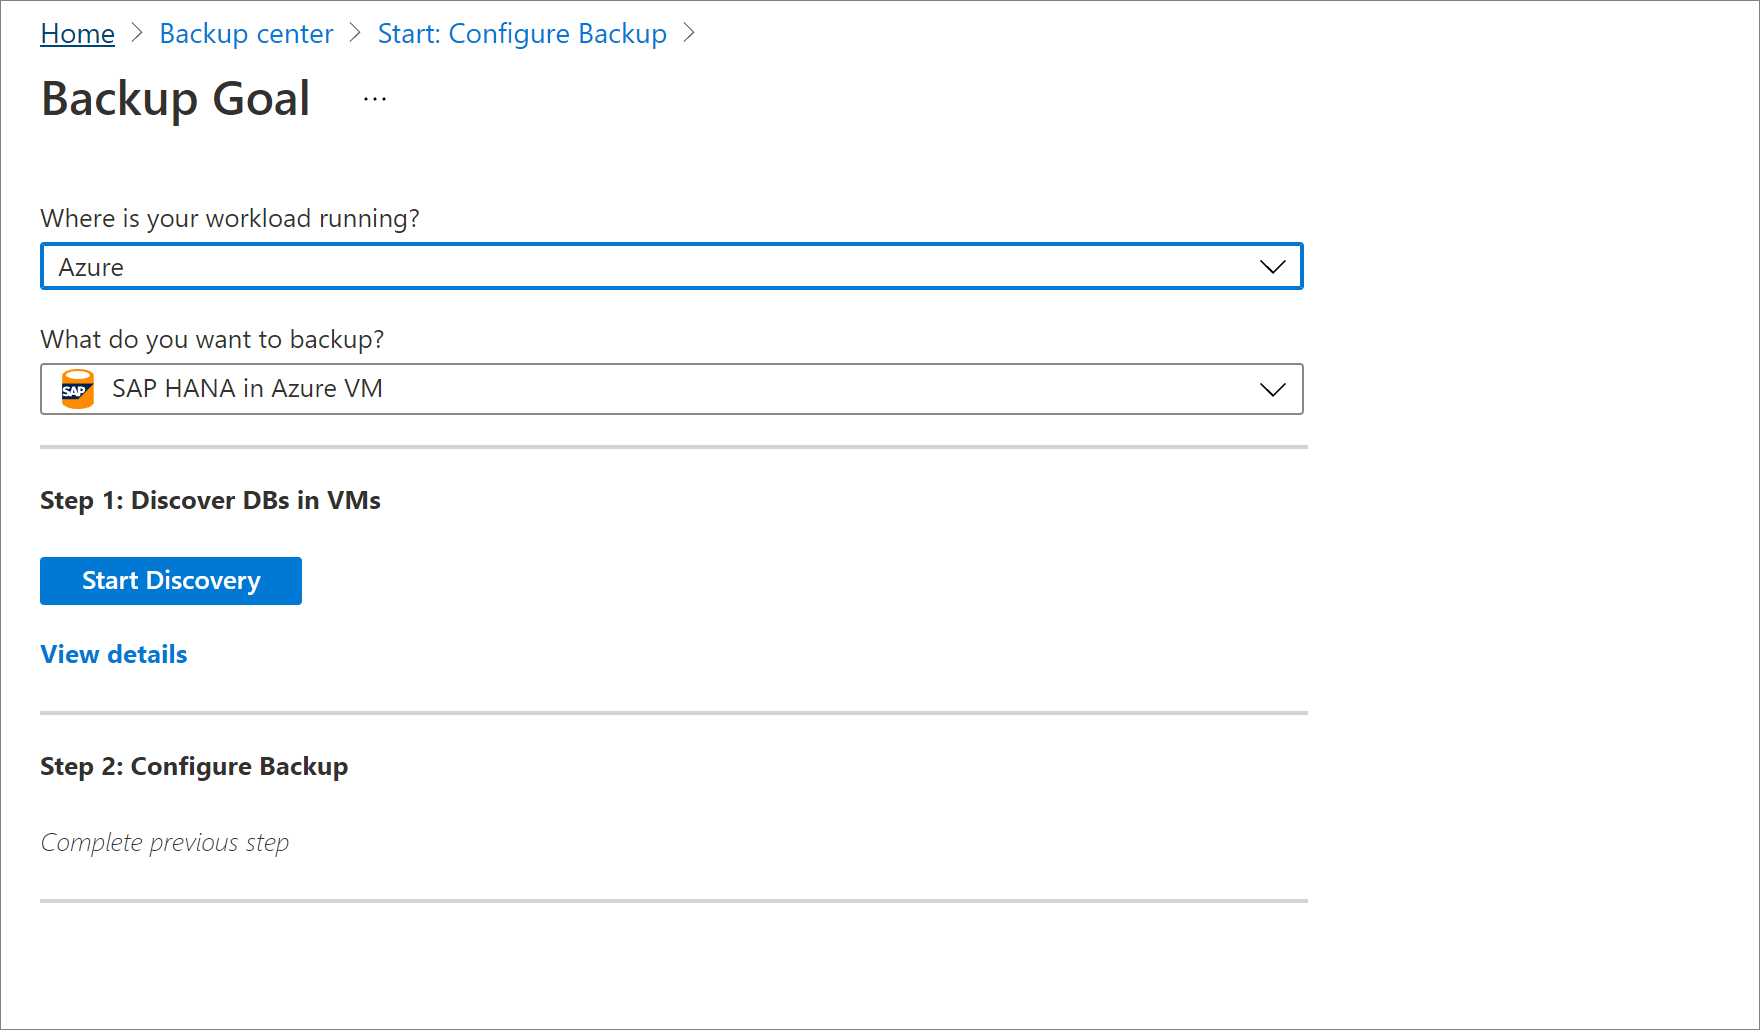
Select Start Discovery. This initiates discovery of unprotected Linux VMs in the vault region.
- After discovery, unprotected VMs appear in the portal, listed by name and resource group.
- If a VM isn't listed as expected, check whether it's already backed up in a vault.
- Multiple VMs can have the same name but they belong to different resource groups.
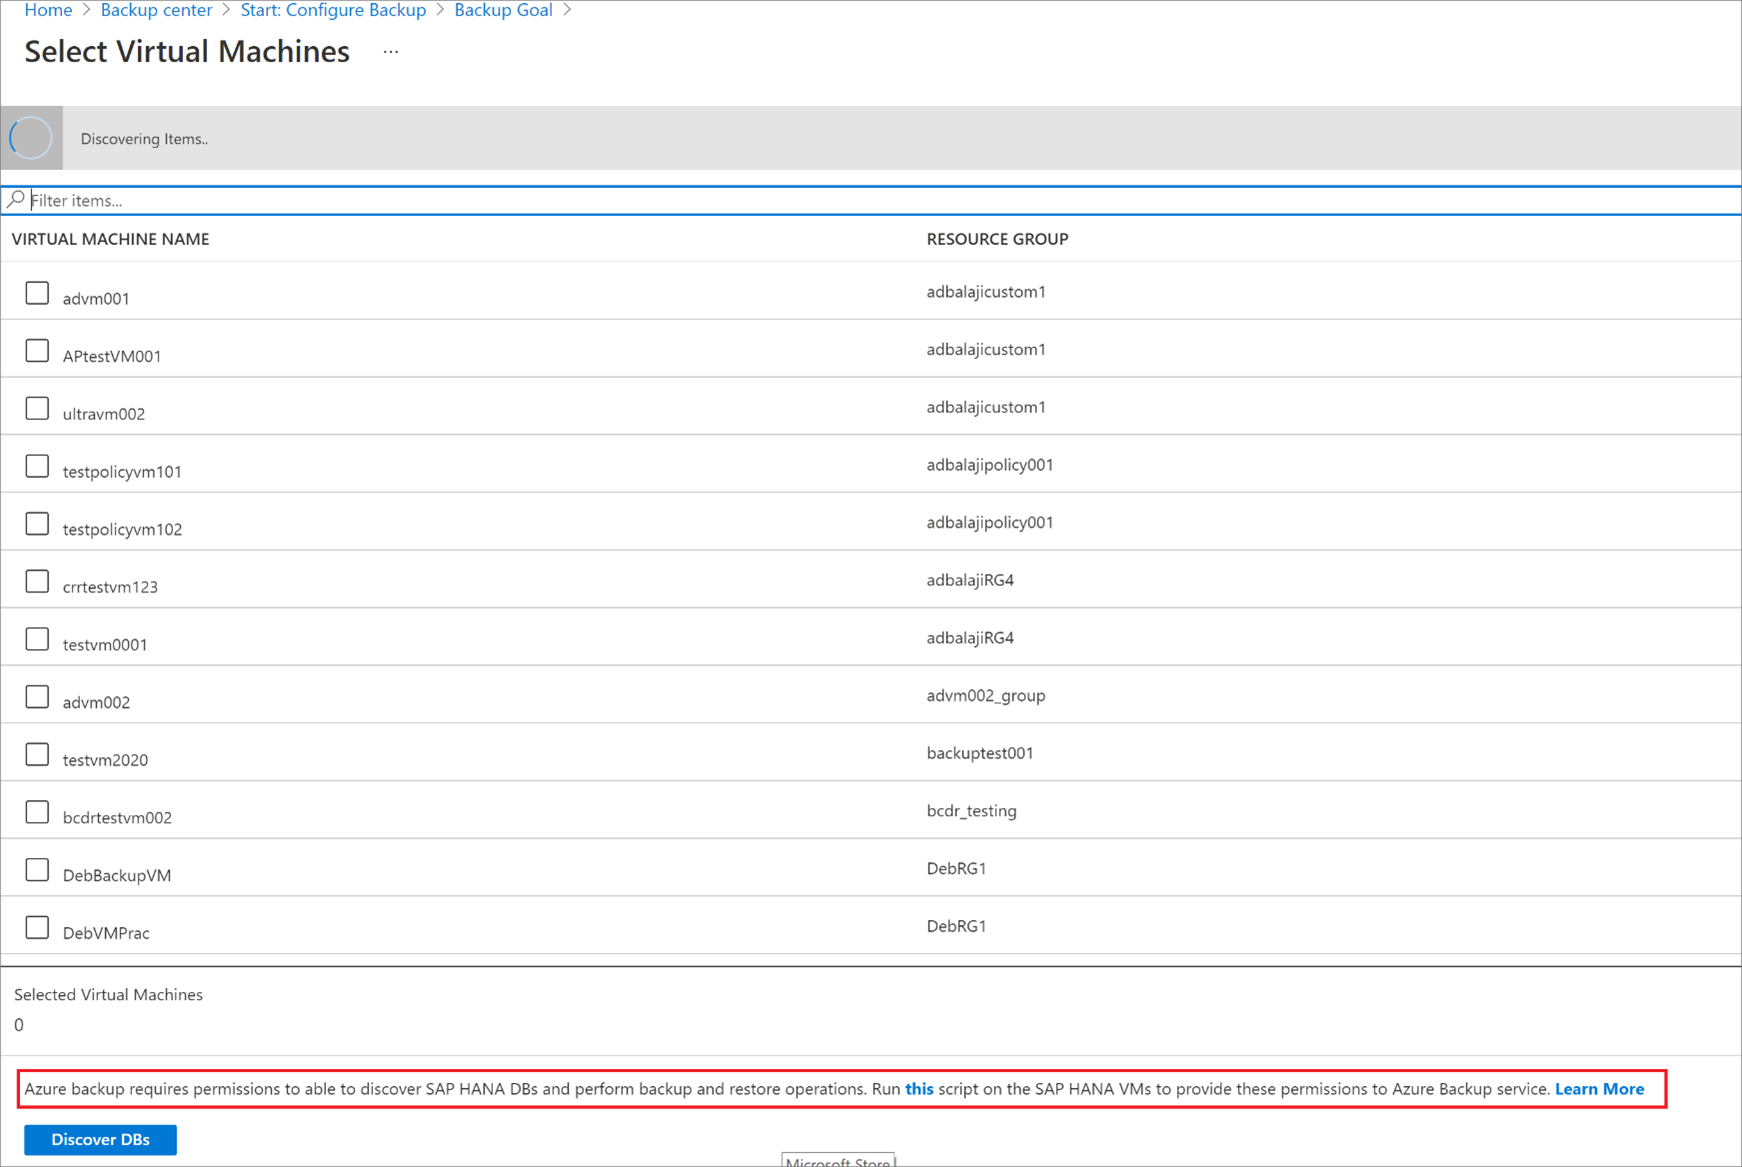
In Select Virtual Machines, select the link to download the script that provides permissions for the Azure Backup service to access the SAP HANA VMs for database discovery.
Run the script on each VM hosting SAP HANA databases that you want to back up.
After running the script on the VMs, in Select Virtual Machines, select the VMs. Then select Discover DBs.
Azure Backup discovers all SAP HANA databases on the VM. During discovery, Azure Backup registers the VM with the vault, and installs an extension on the VM. No agent is installed on the database.
Configure backup
Now enable backup.
In Step 2, select Configure Backup.
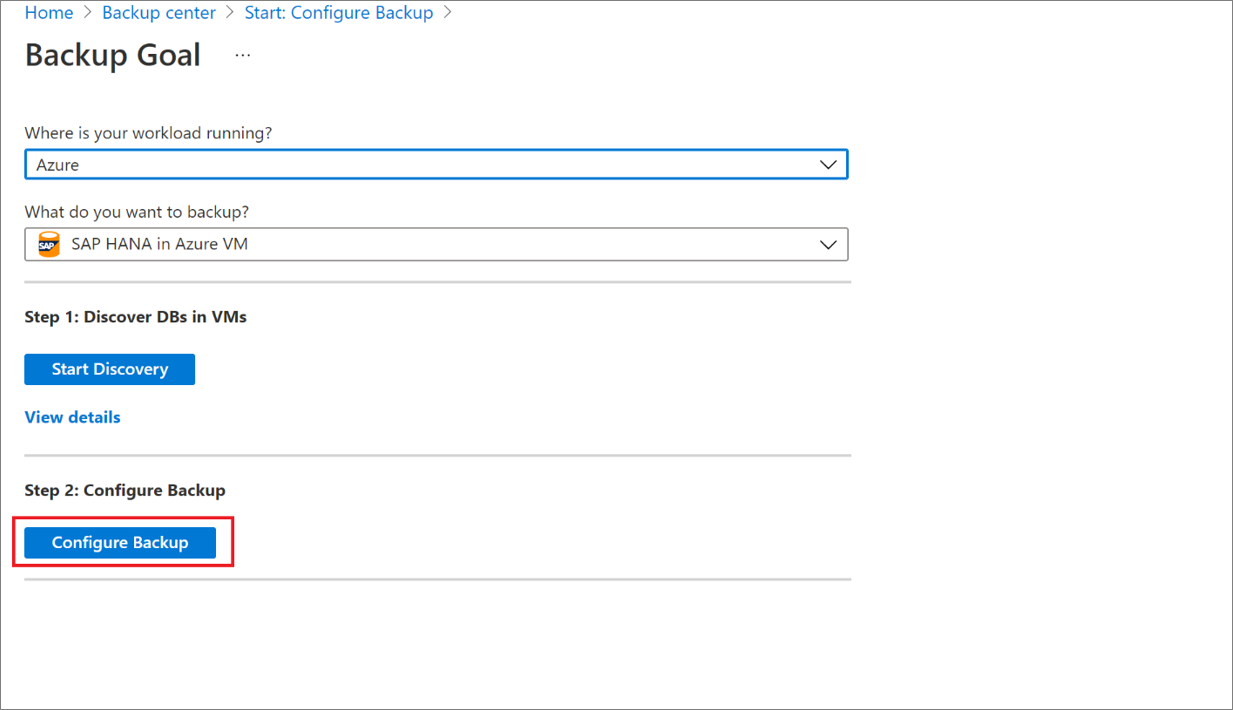
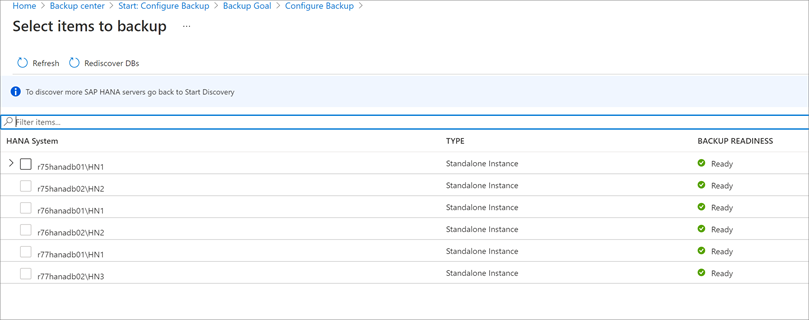
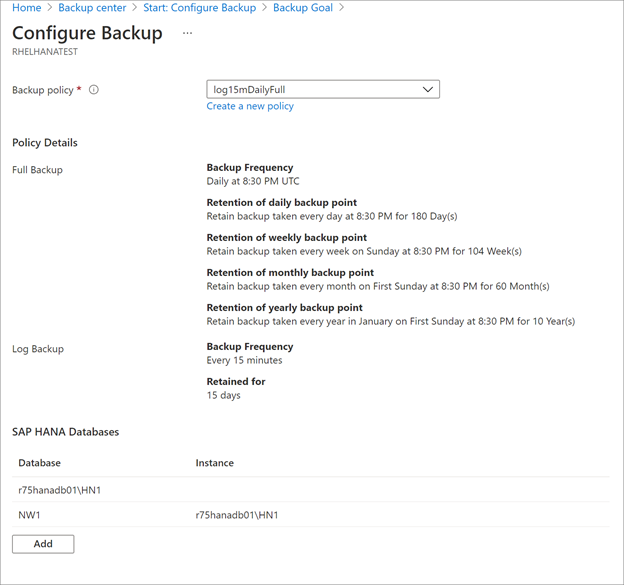
In Select items to back up, select all the databases you want to protect > OK.
In Backup Policy > Choose backup policy, create a new backup policy for the databases, in accordance with the instructions below.
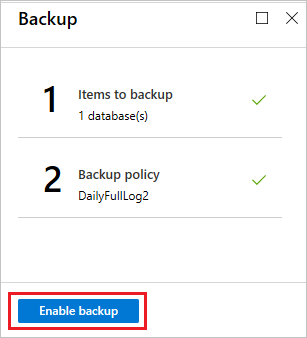
After creating the policy, on the Backup menu, select Enable backup.
Creating a backup policy
A backup policy defines when backups are taken, and how long they're retained.
- A policy is created at the vault level.
- Multiple vaults can use the same backup policy, but you must apply the backup policy to each vault.
Note
Azure Backup doesn’t automatically adjust for daylight saving time changes when backing up an SAP HANA database running in an Azure VM.
Modify the policy manually as needed.
Specify the policy settings as follows:
In Policy name, enter a name for the new policy. In this case, enter SAPHANA.
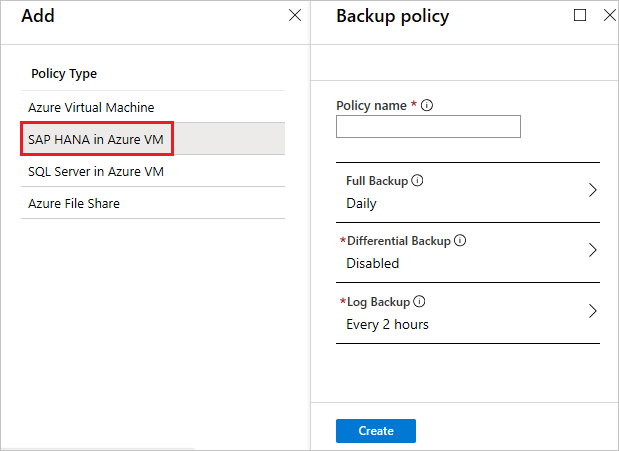
In Full Backup policy, select a Backup Frequency. You can choose Daily or Weekly. For this tutorial, we chose the Daily backup.
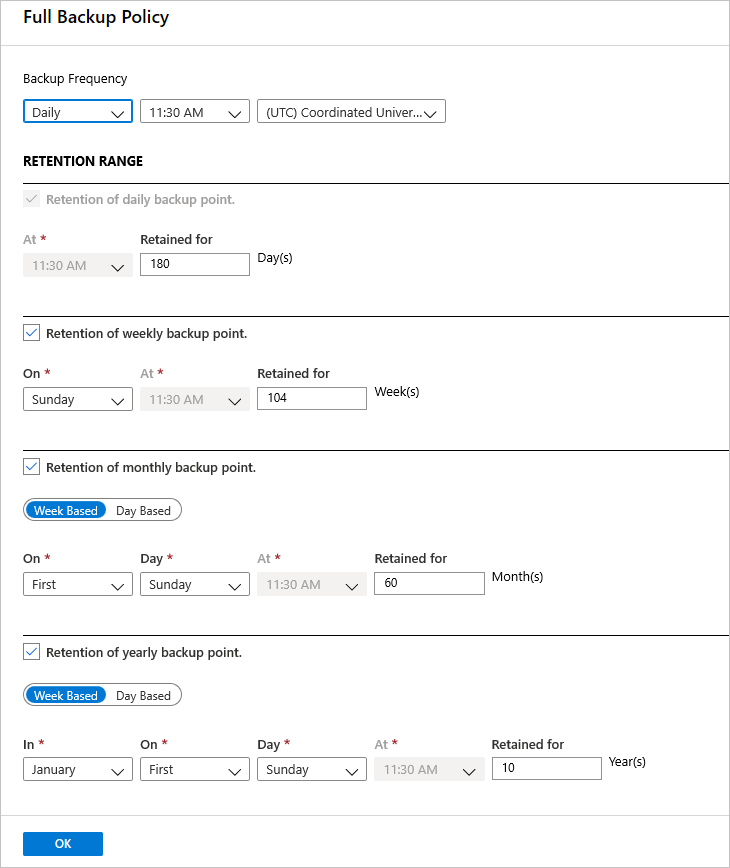
In Retention Range, configure retention settings for the full backup.
- By default, all options are selected. Clear any retention range limits you don't want to use and set those that you do.
- The minimum retention period for any type of backup (full/differential/log) is seven days.
- Recovery points are tagged for retention based on their retention range. For example, if you select a daily full backup, only one full backup is triggered each day.
- The backup for a specific day is tagged and retained based on the weekly retention range and setting.
- The monthly and yearly retention ranges behave in a similar way.
In the Full Backup policy menu, select OK to accept the settings.
Then select Differential Backup to add a differential policy.
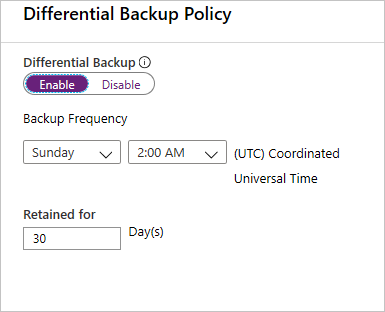
In Differential Backup policy, select Enable to open the frequency and retention controls. We've enabled a differential backup every Sunday at 2:00 AM, which is retained for 30 days.
Note
You can choose either a differential or an incremental as a daily backup but not both.
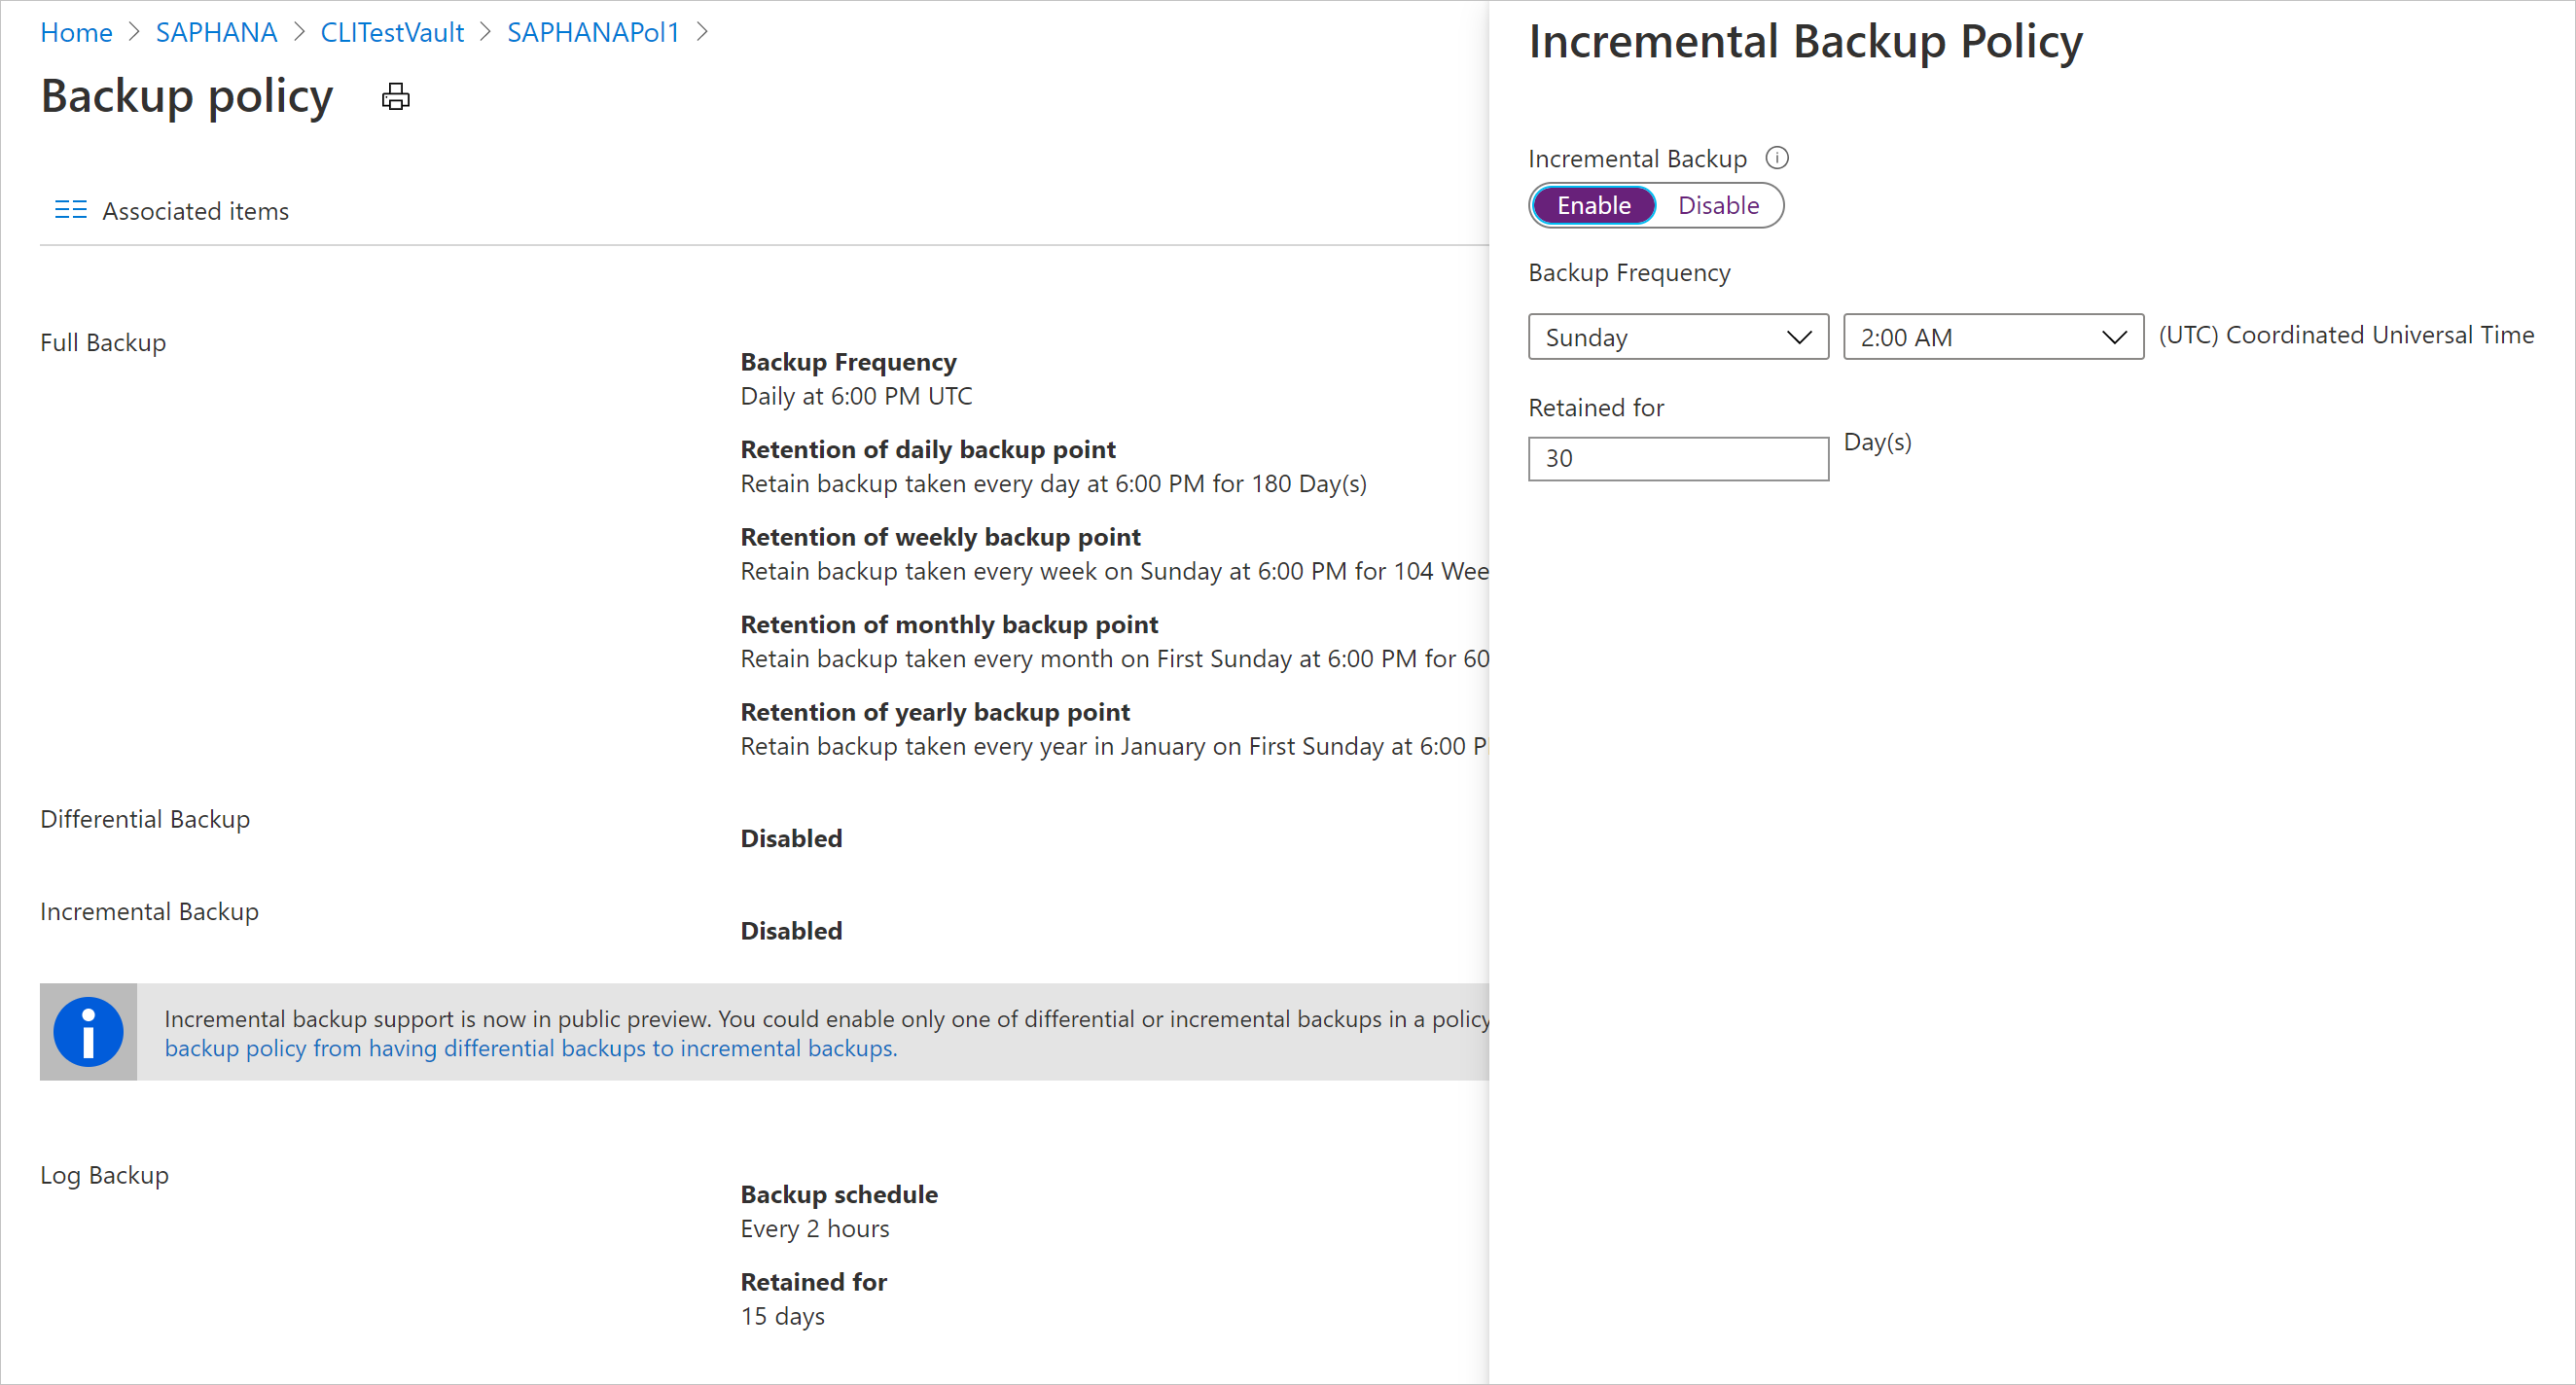
In Incremental Backup policy, select Enable to open the frequency and retention controls.
- At most, you can trigger one incremental backup per day.
- Incremental backups can be retained for a maximum of 180 days. If you need longer retention, you must use full backups.
Select OK to save the policy and return to the main Backup policy menu.
Select Log Backup to add a transactional log backup policy,
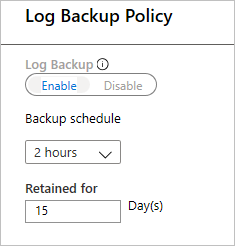
- Log Backup is by default set to Enable. This can't be disabled as SAP HANA manages all log backups.
- We've set 2 hours as the Backup schedule and 15 days of retention period.
Note
Log backups only begin to flow after one successful full backup is completed.
Select OK to save the policy and return to the main Backup policy menu.
After you finish defining the backup policy, select OK.
You've now successfully configured backup(s) for your SAP HANA database(s).
