Note
Access to this page requires authorization. You can try signing in or changing directories.
Access to this page requires authorization. You can try changing directories.
Applies to:
Azure SQL Database
In this tutorial you learn how to:
- Create server-level and database-level firewall rules
- Configure a Microsoft Entra administrator
- Manage user access with SQL authentication, Microsoft Entra authentication, and secure connection strings
- Enable security features, such as Microsoft Defender for SQL, auditing, data masking, and encryption
Note
Microsoft Entra ID was previously known as Azure Active Directory (Azure AD).
Azure SQL Database secures data by allowing you to:
- Limit access using firewall rules
- Use authentication mechanisms that require identity
- Use authorization with role-based memberships and permissions
- Enable security features
Note
Azure SQL Managed Instance is secured using network security rules and private endpoints as described in Azure SQL Managed Instance and connectivity architecture.
To learn more, see the Azure SQL Database security overview and capabilities articles.
Tip
This free Learn module shows you how to Secure your database in Azure SQL Database.
Prerequisites
To complete the tutorial, make sure you have the following prerequisites:
- SQL Server Management Studio
- A server and a single database
- Create them with the Azure portal, CLI, or PowerShell
If you don't have an Azure subscription, create a Trial Subscription before you begin.
Sign in to the Azure portal
For all steps in the tutorial, sign in to the Azure portal
Create firewall rules
Databases in SQL Database are protected by firewalls in Azure. By default, all connections to the server and database are rejected. To learn more, see server-level and database-level firewall rules.
Set Allow access to Azure services to OFF for the most secure configuration. Then, create a reserved IP (classic deployment) for the resource that needs to connect, such as an Azure VM or cloud service, and only allow that IP address access through the firewall. If you're using the Resource Manager deployment model, a dedicated public IP address is required for each resource.
Note
SQL Database communicates over port 1433. If you're trying to connect from within a corporate network, outbound traffic over port 1433 might not be allowed by your network's firewall. If so, you can't connect to the server unless your administrator opens port 1433.
Set up server-level firewall rules
Server-level IP firewall rules apply to all databases within the same server.
To set up a server-level firewall rule:
In the Azure portal, select SQL databases from the left-hand menu, and select your database on the SQL databases page.
Note
Be sure to copy your fully qualified server name (such as yourserver.database.chinacloudapi.cn) for use later in the tutorial.
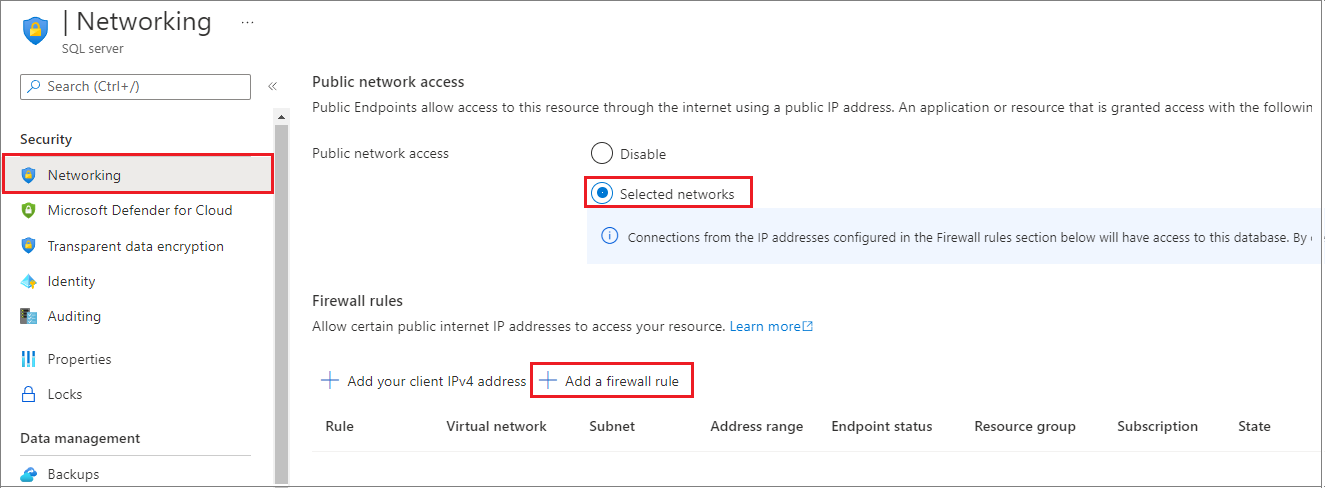
Select Networking under Settings. Choose the Public Access tab, and then select Selected networks under Public network access to display the Firewall rules section.
Select Add client IP on the toolbar to add your current IP address to a new IP firewall rule. An IP firewall rule can open port 1433 for a single IP address or a range of IP addresses.
Select OK to save your firewall settings.
You can now connect to any database in the server with the specified IP address or IP address range.
Setup database firewall rules
Database-level firewall rules only apply to individual databases. The database will retain these rules during a server failover. Database-level firewall rules can only be configured using Transact-SQL (T-SQL) statements, and only after you've configured a server-level firewall rule.
To set up a database-level firewall rule:
Connect to the database, for example using SQL Server Management Studio.
In Object Explorer, right-click the database and select New Query.
In the query window, add this statement and modify the IP address to your public IP address:
EXECUTE sp_set_database_firewall_rule N'Example DB Rule','0.0.0.4','0.0.0.4';On the toolbar, select Execute to create the firewall rule.
Note
You can also create a server-level firewall rule in SSMS by using the sp_set_firewall_rule command, though you must be connected to the master database.
Create a Microsoft Entra admin
Make sure you're using the appropriate Microsoft Entra ID (formerly Azure Active Directory) managed domain. To select your domain, use the upper-right corner of the Azure portal. This process confirms the same subscription is used for both Microsoft Entra ID and the logical server hosting your database or data warehouse.
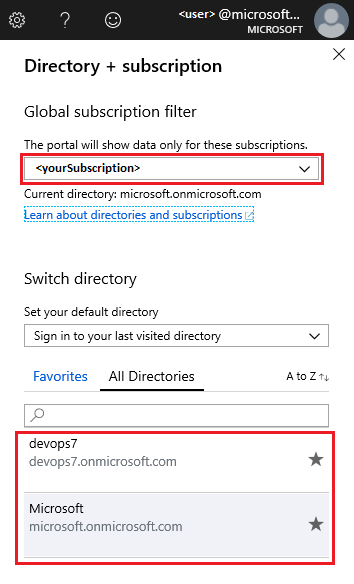
To set the Microsoft Entra administrator:
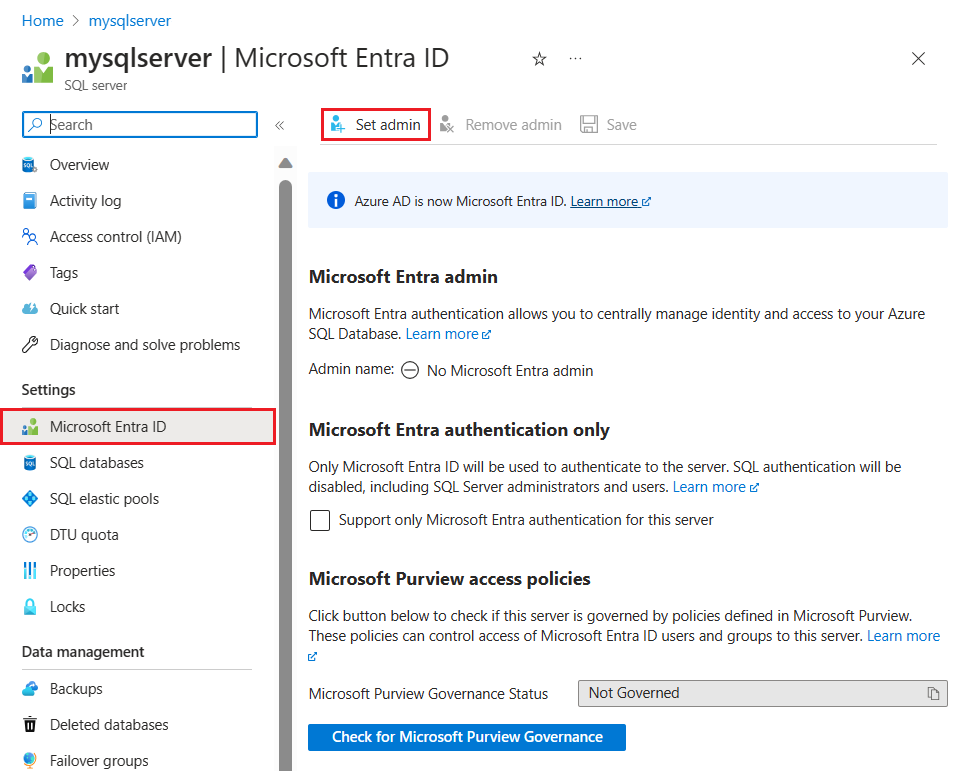
In the Azure portal, on the SQL server page, select Microsoft Entra ID from the resource menu, then select Set admin to open the Microsoft Entra ID pane.
Important
You need to be a Privileged Role Administrator or higher role to perform this task.
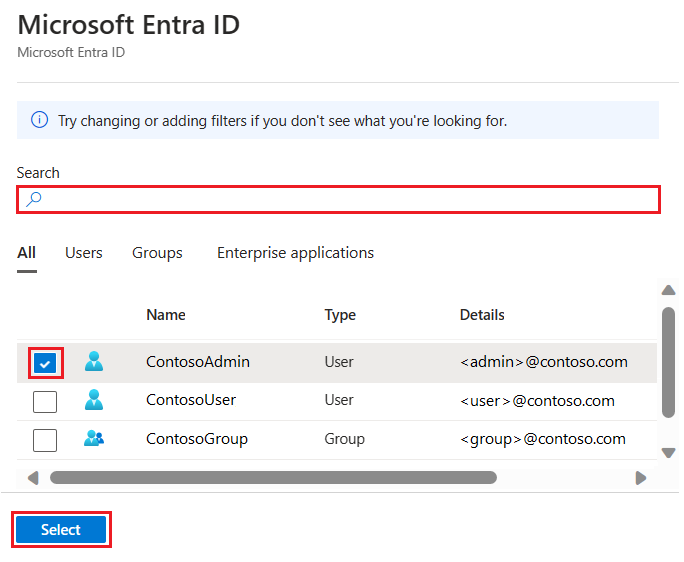
On the Microsoft Entra ID pane, search and select the Microsoft Entra user or group and choose Select. All members and groups of your Microsoft Entra organization are listed, and entries grayed out are not supported as Microsoft Entra administrators.
Important
Azure role-based access control (Azure RBAC) only applies to the portal and isn't propagated to SQL Server.
At the top of the Microsoft Entra admin page, select Save.
The process of changing an administrator might take several minutes. The new administrator will appear in the Microsoft Entra admin field.
Note
When setting a Microsoft Entra admin, the new admin name (user or group) cannot exist as a login or user in the master database. If present, the setup will fail and roll back changes, indicating that such an admin name already exists. Since the server login or user is not part of Microsoft Entra ID, any effort to connect the user using Microsoft Entra authentication fails.
For information about configuring Microsoft Entra ID, see:
- Integrate your on-premises identities with Microsoft Entra ID
- Add your own domain name to Microsoft Entra ID
- Federation with Microsoft Entra ID
- Administer your Microsoft Entra directory
- Manage Microsoft Entra ID using PowerShell
- Hybrid identity required ports and protocols
Manage database access
Manage database access by adding users to the database, or allowing user access with secure connection strings. Connection strings are useful for external applications. To learn more, see Manage logins and user accounts and Microsoft Entra authentication.
To add users, choose the database authentication type:
SQL authentication, use a username and password for logins and are only valid in the context of a specific database within the server
Microsoft Entra authentication, use identities managed by Microsoft Entra ID
SQL authentication
To add a user with SQL authentication:
Connect to the database, for example using SQL Server Management Studio.
In Object Explorer, right-click the database and choose New Query.
In the query window, enter the following command:
CREATE USER ApplicationUser WITH PASSWORD = 'YourStrongPassword1';On the toolbar, select Execute to create the user.
By default, the user can connect to the database, but has no permissions to read or write data. To grant these permissions, execute the following commands in a new query window:
ALTER ROLE db_datareader ADD MEMBER ApplicationUser;
ALTER ROLE db_datawriter ADD MEMBER ApplicationUser;
Note
Create non-administrator accounts at the database level, unless they need to execute administrator tasks like creating new users.
Microsoft Entra authentication
Because Azure SQL Database doesn't support Microsoft Entra server principals (logins), database users created with Microsoft Entra accounts are created as contained database users. A contained database user is not associated to a login in the master database, even if there exists a login with the same name. The Microsoft Entra identity can either be for an individual user or a group. For more information, see Contained database users, make your database portable and review the Microsoft Entra tutorial on how to authenticate using Microsoft Entra ID.
Note
Database users (excluding administrators) cannot be created using the Azure portal. Microsoft Entra roles do not propagate to SQL servers, databases, or data warehouses. They are only used to manage Azure resources and do not apply to database permissions.
For example, the SQL Server Contributor role does not grant access to connect to a database or data warehouse. This permission must be granted within the database using T-SQL statements.
Important
Special characters like colon : or ampersand & are not supported in user names in the T-SQL CREATE LOGIN and CREATE USER statements.
To add a user with Microsoft Entra authentication:
Connect to your server in Azure using a Microsoft Entra account with at least the ALTER ANY USER permission.
In Object Explorer, right-click the database and select New Query.
In the query window, enter the following command and modify
<Azure_AD_principal_name>to the principal name of the Microsoft Entra user or the display name of the Microsoft Entra group:CREATE USER [<Azure_AD_principal_name>] FROM EXTERNAL PROVIDER;
Note
Microsoft Entra users are marked in the database metadata with type E (EXTERNAL_USER) and type X (EXTERNAL_GROUPS) for groups. For more information, see sys.database_principals.
Secure connection strings
To ensure a secure, encrypted connection between the client application and SQL Database, a connection string must be configured to:
- Request an encrypted connection
- Not trust the server certificate
The connection is established using Transport Layer Security (TLS) and reduces the risk of a man-in-the-middle attack. Connection strings are available per database and are pre-configured to support client drivers such as ADO.NET, JDBC, ODBC, and PHP. For information about TLS and connectivity, see TLS considerations.
To copy a secure connection string:
In the Azure portal, select SQL databases from the left-hand menu, and select your database on the SQL databases page.
On the Overview page, select Show database connection strings.
Select a driver tab and copy the complete connection string.

Enable security features
Azure SQL Database provides security features that are accessed using the Azure portal. These features are available for both the database and server, except for data masking, which is only available on the database. To learn more, see Microsoft Defender for SQL, Auditing, Dynamic data masking, and Transparent data encryption.
Microsoft Defender for SQL
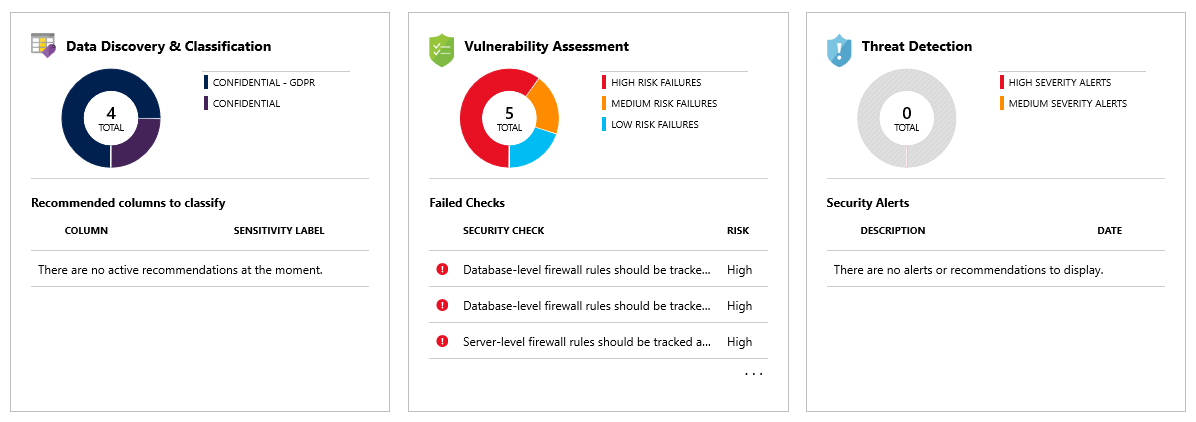
The Microsoft Defender for SQL feature detects potential threats as they occur and provides security alerts on anomalous activities. Users can explore these suspicious events using the auditing feature, and determine if the event was to access, breach, or exploit data in the database. Users are also provided a security overview that includes a vulnerability assessment and the data discovery and classification tool.
Note
An example threat is SQL injection, a process where attackers inject malicious SQL into application inputs. An application can then unknowingly execute the malicious SQL and allow attackers access to breach or modify data in the database.
To enable Microsoft Defender for SQL:
In the Azure portal, select SQL databases from the left-hand menu, and select your database on the SQL databases page.
On the Overview page, select the Server name link. The server page will open.
On the SQL server page, find the Security section and select Defender for Cloud.
Select ON under Microsoft Defender for SQL to enable the feature. Choose a storage account for saving vulnerability assessment results. Then select Save.
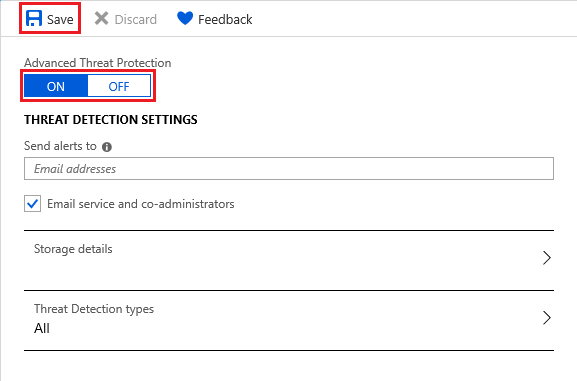
You can also configure emails to receive security alerts, storage details, and threat detection types.
Return to the SQL databases page of your database and select Defender for Cloud under the Security section. Here you'll find various security indicators available for the database.
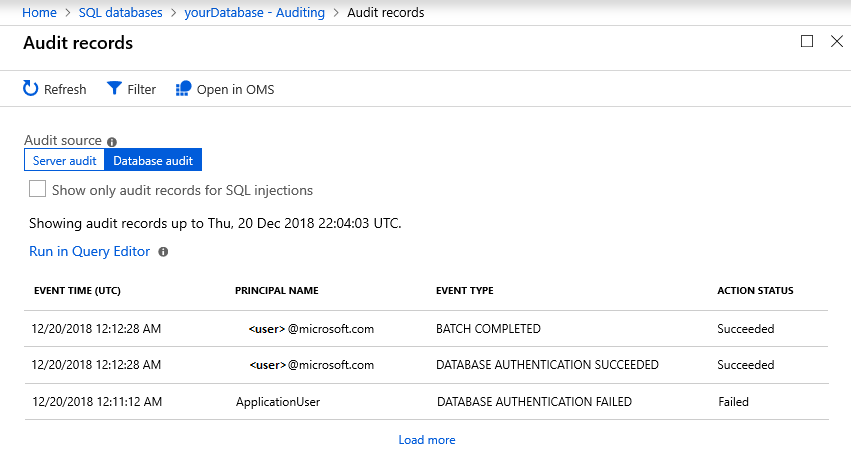
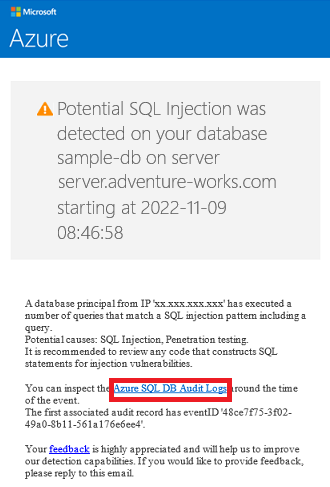
If anomalous activities are detected, you receive an email with information on the event. This includes the nature of the activity, database, server, event time, possible causes, and recommended actions to investigate and mitigate the potential threat. If such an email is received, select the Azure SQL Auditing Log link to launch the Azure portal and show relevant auditing records for the time of the event.
Auditing
The auditing feature tracks database events and writes events to an audit log in either Azure storage, Azure Monitor logs, or to an event hub. Auditing helps maintain regulatory compliance, understand database activity, and gain insight into discrepancies and anomalies that could indicate potential security violations.
To enable auditing:
In the Azure portal, select SQL databases from the left-hand menu, and select your database on the SQL databases page.
In the Security section, select Auditing.
Under Auditing settings, set the following values:
Set Auditing to ON.
Select Audit log destination as any of the following:
Storage, an Azure storage account where event logs are saved and can be downloaded as .xel files
Tip
Use the same storage account for all audited databases to get the most from auditing report templates.
Log Analytics, which automatically stores events for query or further analysis
Note
A Log Analytics workspace is required to support advanced features such as analytics, custom alert rules, and Excel or Power BI exports. Without a workspace, only the query editor is available.
Event Hub, which allows events to be routed for use in other applications
Select Save.
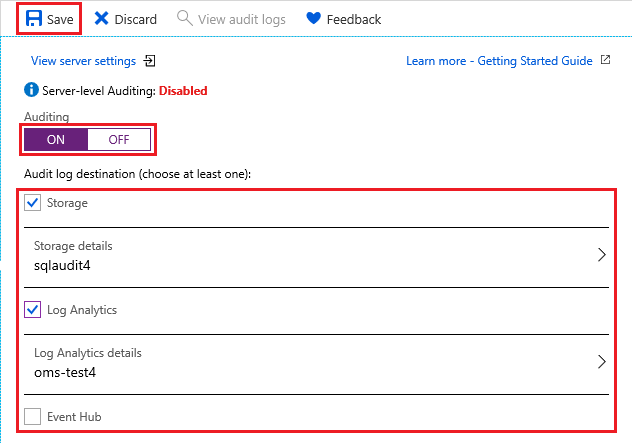
Now you can select View audit logs to view database events data.
Important
See SQL Database auditing on how to further customize audit events using PowerShell or REST API.
Dynamic data masking
The data masking feature will automatically hide sensitive data in your database.
To enable data masking:
In the Azure portal, select SQL databases from the left-hand menu, and select your database on the SQL databases page.
In the Security section, select Dynamic Data Masking.
Under Dynamic data masking settings, select Add mask to add a masking rule. Azure will automatically populate available database schemas, tables, and columns to choose from.
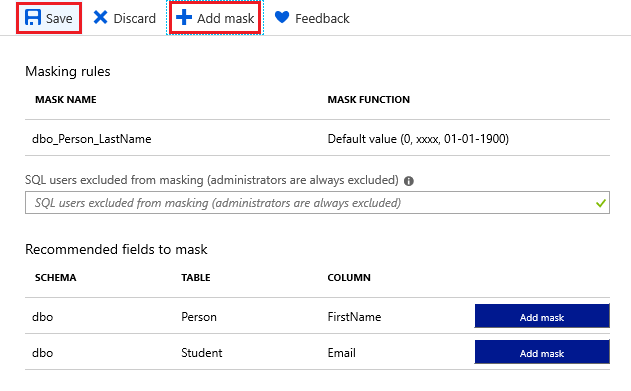
Select Save. The selected information is now masked for privacy.
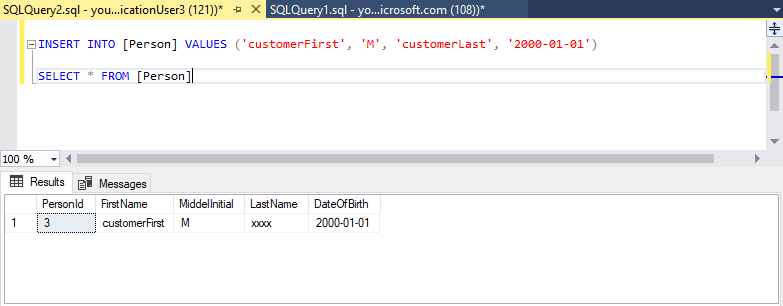
Transparent data encryption
The encryption feature automatically encrypts your data at rest, and requires no changes to applications accessing the encrypted database. For new databases, encryption is on by default. You can also encrypt data using SSMS and the Always encrypted feature.
To enable or verify encryption:
In the Azure portal, select SQL databases from the left-hand menu, and select your database on the SQL databases page.
In the Security section, select Transparent data encryption.
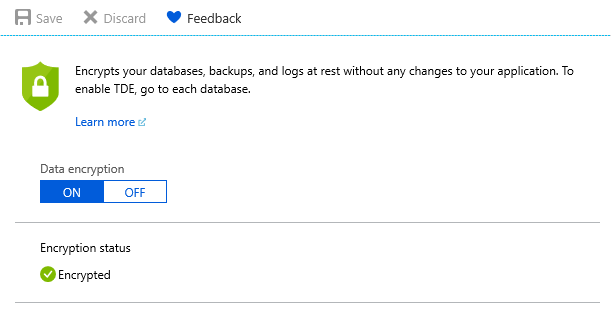
If necessary, set Data encryption to ON. Select Save.
Note
To view encryption status, connect to the database using SSMS and query the encryption_state column of the sys.dm_database_encryption_keys view. A state of 3 indicates the database is encrypted.
Note
Some items considered customer content, such as table names, object names, and index names, might be transmitted in log files for support and troubleshooting by Azure.
Related content
Tip
Ready to start developing an .NET application? This free Learn module shows you how to Develop and configure an ASP.NET application that queries an Azure SQL Database, including the creation of a simple database.
Next step
Advance to the next tutorial to learn how to implement geo-distribution.

