Note
Access to this page requires authorization. You can try signing in or changing directories.
Access to this page requires authorization. You can try changing directories.
Applies to: Azure Stack HCI, version 22H2
This article describes how to install, monitor, and troubleshoot updates on multi-node clusters. To update single-node clusters, see Updating single-node clusters.
When updating Azure Stack HCI clusters, the goal is to maintain availability by updating only one server in the cluster at a time. Many operating system updates require taking the server offline, for example, to do a restart or to update software such as the network stack. We recommend using Cluster-Aware Updating (CAU), a feature that makes it easy to install updates on every server in your cluster while keeping your applications running. Cluster-Aware Updating automates taking the server in and out of maintenance mode while installing updates and restarting the server, if necessary. Cluster-Aware Updating is the default updating method used by Windows Admin Center; it can also be initiated using PowerShell.
Important
Azure Stack HCI, version 22H2 has entered general availability (GA) and is available as a feature update. To update your cluster to version 22H2 and access new features, see Install feature updates using Windows Admin Center.
If you're using Microsoft System Center to manage Azure Stack HCI clusters, you can use Virtual Machine Manager (VMM) to orchestrate rolling upgrades across your clusters and move from Azure Stack HCI, version 20H2 (original release) to version 21H2. This is the same feature in VMM which allows upgrading from Windows Server 2019 to Windows Server 2022.
If you're currently using System Center 2019, do not install feature updates to Azure Stack HCI yet. Upgrade to System Center 2022 before updating to Azure Stack HCI, version 21H2. After you've upgraded to System Center 2022, you can update to Azure Stack HCI, version 21H2 using any available option: Windows Admin Center, PowerShell or the cluster rolling upgrade feature in Virtual Machine Manager.
This article focuses on operating system and feature updates. If you need to take a server offline to perform maintenance on the hardware, see Failover cluster maintenance procedures.
Install operating system and hardware updates using Windows Admin Center
Windows Admin Center makes it easy to update a cluster and apply quality updates using a simple user interface. If you've purchased an integrated system from a Microsoft hardware partner, it's easy to get the latest drivers, firmware, and other updates directly from Windows Admin Center by installing the appropriate partner update extension(s). If your hardware wasn't purchased as an integrated system, firmware and driver updates may need to be performed separately, following the hardware vendor's recommendations.
Warning
If you begin the update process using Windows Admin Center, continue using the wizard until updates complete. Do not attempt to use the Cluster-Aware Updating tool or update a cluster with PowerShell after partially completing the update process in Windows Admin Center. If you wish to use PowerShell to perform the updates instead of Windows Admin Center, skip ahead to Update a cluster using PowerShell.
Follow these steps to install updates:
When you connect to a cluster, the Windows Admin Center dashboard will alert you if one or more servers have updates ready to be installed and provide a link to update now. Alternatively, you can select Updates from the Tools menu at the left.
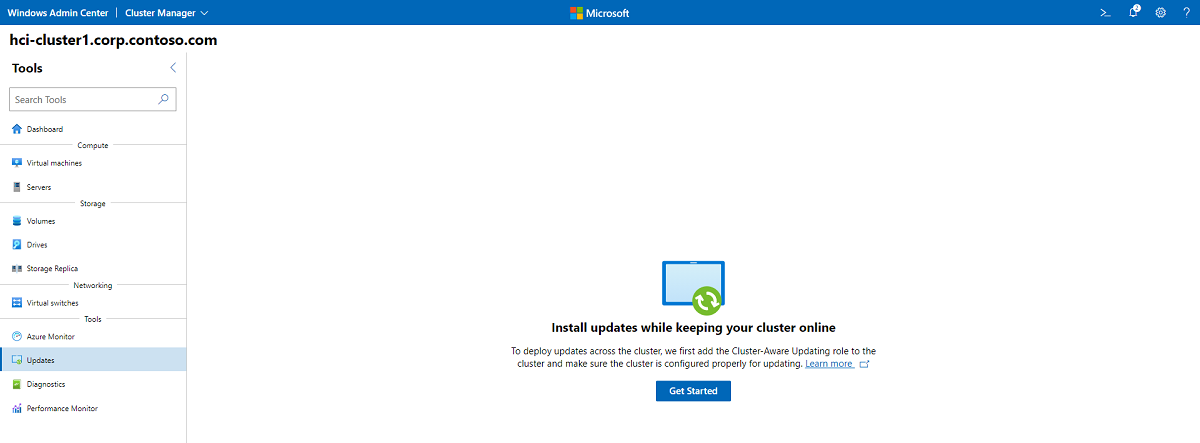
If you are updating your cluster for the first time, Windows Admin Center will check if the cluster is properly configured to run Cluster-Aware Updating and, if needed, ask if you'd like Windows Admin Center to configure CAU for you, including installing the CAU cluster role and enabling the required firewall rules. To begin the update process, click Get Started.
Note
To use the Cluster-Aware updating tool in Windows Admin Center, you must enable Credential Security Service Provider (CredSSP) and provide explicit credentials. If you are asked if CredSSP should be enabled, click Yes. Specify your username and password, and click Continue.
The cluster's update status will be displayed; click Check for updates to get a list of the operating system updates available for each server in the cluster. You may need to supply administrator credentials. If no operating system updates are available, click Next: hardware updates and proceed to step 8.
Important
Feature updates require additional steps. If Windows Admin Center indicates that a feature update is available for your cluster, see Install feature updates using Windows Admin Center.
If you navigate away from the Updates screen while an update is in progress, there may be unexpected behavior, such as the history section of the Updates page not populating correctly until the current run is finished. We recommend opening Windows Admin Center in a new browser tab or window if you wish to continue using the application while the updates are in progress.
Select Next: Install to proceed to install the operating system updates, or click Skip to exclude them.
Note
If you're installing updates on a cluster that has Kernel Soft Reboot enabled, you'll see a Disable Kernel Soft Reboot for this run checkbox. Checking the box disables Kernel Soft Reboot only for that particular updating run. This makes it possible to disable Kernel Soft Reboot when an updating run requires a full reboot, such as BIOS updates.
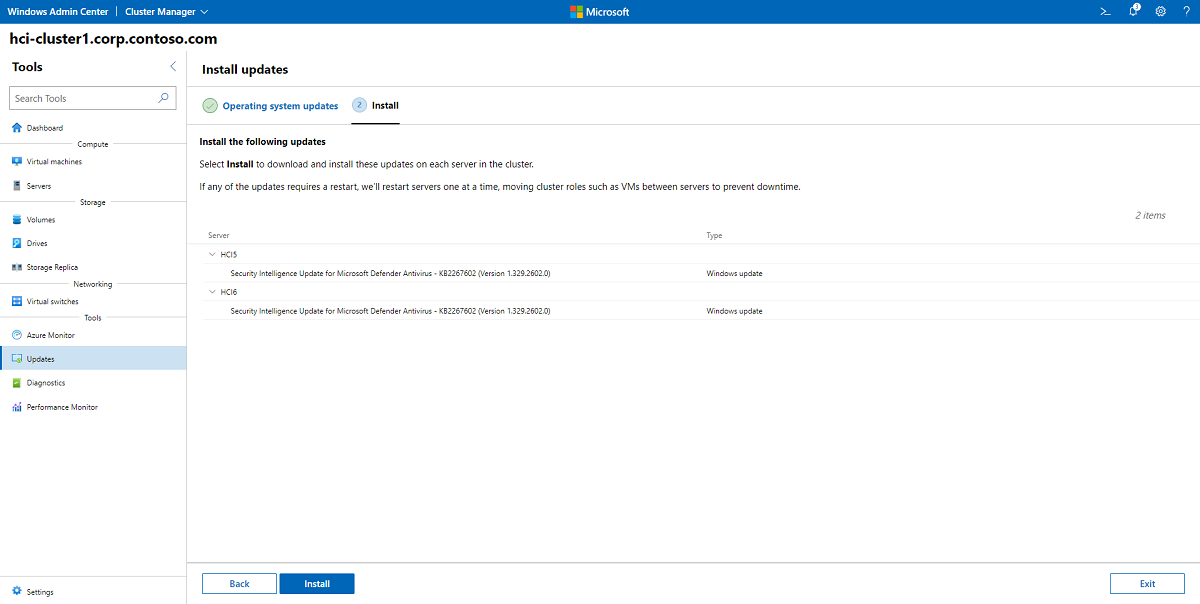
Select Install to install the operating system updates. One by one, each server will download and apply the updates. You'll see the update status change to "installing updates." If any of the updates requires a restart, servers will be restarted one at a time, moving cluster roles such as virtual machines between servers to prevent downtime. Depending on the updates being installed, the entire updating run can take anywhere from a few minutes to several hours. You may be asked to supply your login credentials to Windows Admin Center multiple times.
Note
If the updates appear to fail with a Couldn't install updates or Couldn't check for updates warning or if one or more servers indicates couldn't get status during the updating run, try waiting a few minutes and refreshing your browser. You can also use
Get-CauRunto check the status of the updating run with PowerShell.When operating system updates are complete, the update status will change to "succeeded." Click Next: hardware updates to proceed to the hardware updates screen.
Important
After applying operating system updates, you may see a message that "storage isn't complete or up-to-date, so we need to sync it with data from other servers in the cluster." This is normal after a server restarts. Don't remove any drives or restart any servers in the cluster until you see a confirmation that the sync is complete.
If the cluster is not connected to Windows Update and the Azure Stack HCI install media is available on a local share, CAU can also be used to upgrade the cluster:
When the cluster nodes are not connected to Windows Update after installing the latest quality updates and the setup media has been copied to a share that is accessible to the cluster nodes:
Invoke-CauRun –ClusterName <cluster_name> -CauPluginName Microsoft.RollingUpgradePlugin -CauPluginArguments @{ 'WuConnected'='false';'PathToSetupMedia'='\some\path\'; 'UpdateClusterFunctionalLevel'='true'; } -ForceWindows Admin Center will check the cluster for installed extensions that support your specific server hardware. Click Next: install to install the hardware updates on each server in the cluster. If no extensions or updates are found, click Exit.
To improve security, disable CredSSP as soon as you're finished installing the updates:
- In Windows Admin Center, under All connections, select the first server in your cluster and then select Connect.
- On the Overview page, select Disable CredSSP, and then, on the Disable CredSSP pop-up window, select Yes.
Install feature updates using Windows Admin Center
Azure recommends installing new feature updates as soon as possible, using the following steps.
Important
There are known issues in Windows Admin Center when upgrading a cluster from Azure Stack HCI, version 20H2 to version 21H2. See Known issues at the end of this article.
In Windows Admin Center, select Updates from the Tools pane at the left. Any new feature updates will be displayed.
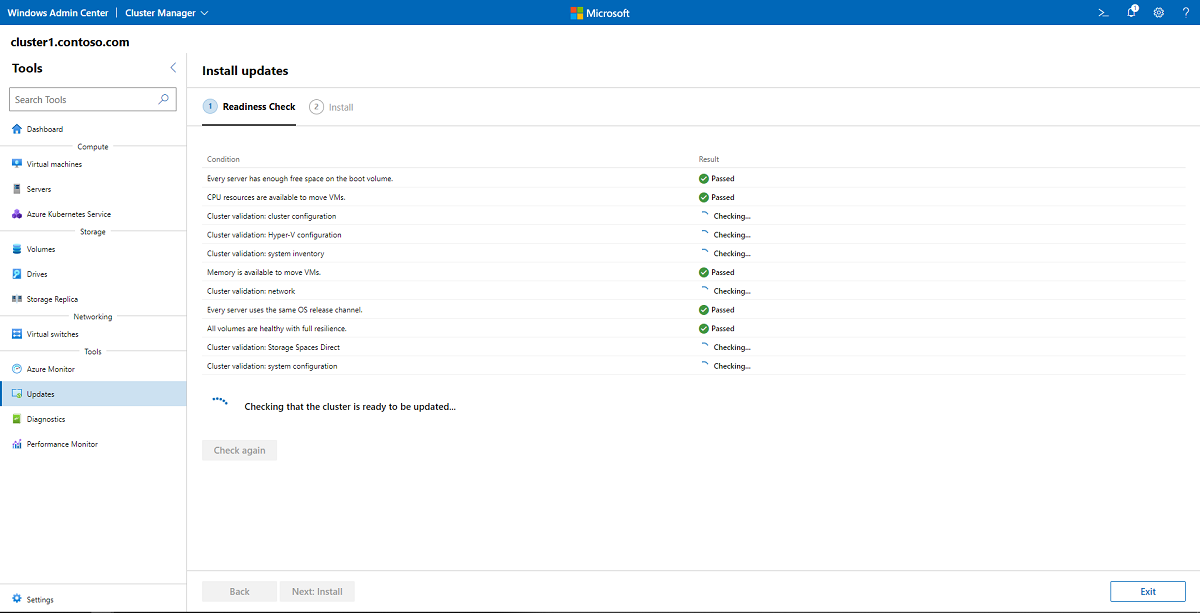
Select Install. A readiness check will be displayed. If any of the condition checks fail, resolve them before proceeding.
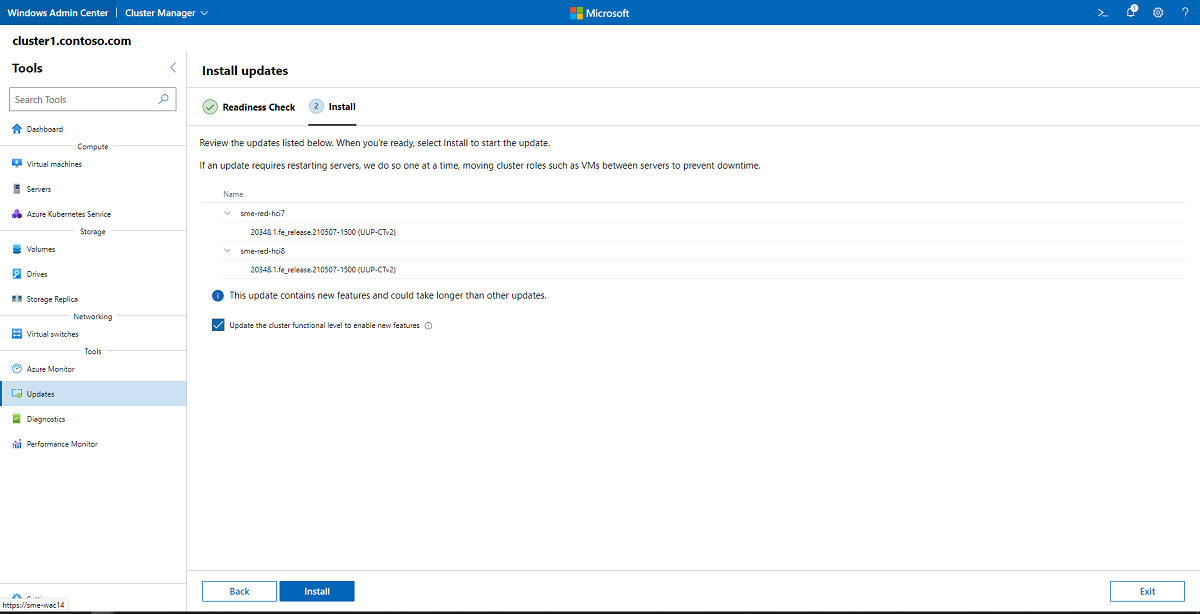
When the readiness check is complete, you're ready to install the updates. Unless you want the ability to roll back the updates, check the optional Update the cluster functional level to enable new features checkbox; otherwise, you can update the cluster functional level post-installation using PowerShell. Review the updates listed and select Install to start the update.
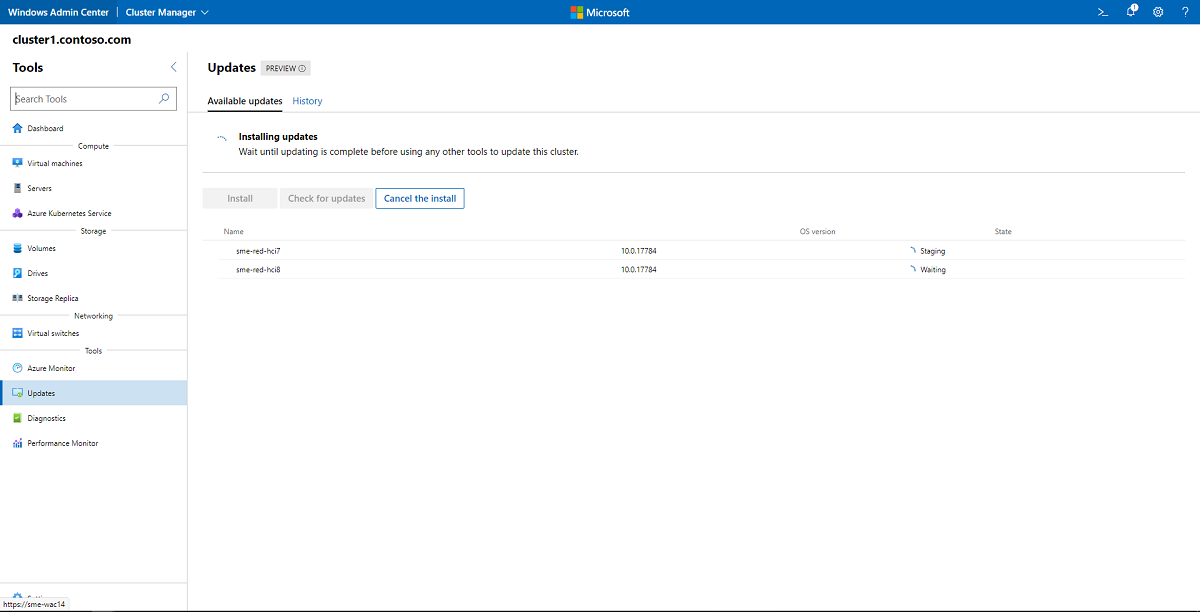
You'll be able to see the installation progress as in the screenshot below. Because you're updating the operating system with new features, the updates may take a while to complete. You may be asked to supply your login credentials to Windows Admin Center multiple times.
Note
If the updates appear to fail with a Couldn't install updates or Couldn't check for updates warning or if one or more servers indicates couldn't get status during the updating run, try waiting a few minutes and refreshing your browser. You can also use
Get-CauRunto check the status of the updating run with PowerShell.When the feature updates are complete, check if any further updates are available and install them.
Perform post-installation steps using PowerShell. These steps are critical to the stability of your cluster.
Update a cluster using PowerShell
Before you can update a cluster using Cluster-Aware Updating, you first need to install the Failover Clustering Tools, which are part of the Remote Server Administration Tools (RSAT) and include the Cluster-Aware Updating software. If you're updating a cluster that's running a newer version of Azure Stack HCI, these tools may already be installed.
To test whether a failover cluster is properly set up to apply software updates using Cluster-Aware Updating, run the Test-CauSetup PowerShell cmdlet, which performs a Best Practices Analyzer (BPA) scan of the failover cluster and network environment and alerts you of any warnings or errors:
Test-CauSetup -ClusterName Cluster1
If you need to install features, tools, or roles, see the next sections. Otherwise, skip ahead to Check for updates with PowerShell.
Install Failover Clustering and Failover Clustering tools using PowerShell
To check if a cluster or server has the Failover Clustering feature and Failover Clustering tools already installed, issue the Get-WindowsFeature PowerShell cmdlet from your management PC (or run it directly on the cluster or server, omitting the -ComputerName parameter):
Get-WindowsFeature -Name Failover*, RSAT-Clustering* -ComputerName Server1
Make sure "Install State" says Installed and that an X appears before both Failover Clustering and Failover Cluster Module for Windows PowerShell:
Display Name                                            Name                       Install State
------------                                            ----                       -------------
[X] Failover Clustering                                 Failover-Clustering            Installed
        [X] Failover Clustering Tools                   RSAT-Clustering                Installed
            [X] Failover Cluster Module for Windows ... RSAT-Clustering-Powe...        Installed
            [ ] Failover Cluster Automation Server      RSAT-Clustering-Auto...        Available
            [ ] Failover Cluster Command Interface      RSAT-Clustering-CmdI...        Available
If the Failover Clustering feature is not installed, install it on each server in the cluster with the Install-WindowsFeature cmdlet using the -IncludeAllSubFeature and -IncludeManagementTools parameters:
Install-WindowsFeature –Name Failover-Clustering -IncludeAllSubFeature –IncludeManagementTools -ComputerName Server1
This command will also install the Failover Cluster Module for PowerShell, which includes PowerShell cmdlets for managing failover clusters, and the Cluster-Aware Updating module for PowerShell for installing software updates on failover clusters.
If the Failover Clustering feature is already installed but the Failover Cluster Module for Windows PowerShell isn't, install it on each server in the cluster with the Install-WindowsFeature cmdlet:
Install-WindowsFeature –Name RSAT-Clustering-PowerShell -ComputerName Server1
Choose a CAU updating mode
Cluster-Aware Updating (CAU) can coordinate the complete cluster updating operation in two modes:
Self-updating mode For this mode, the Cluster-Aware Updating clustered role is configured as a workload on the failover cluster that is to be updated and an associated update schedule that is defined. The cluster updates itself at scheduled times by using a default or custom updating run profile. During the updating run, the Cluster-Aware Updating Update Coordinator process starts on the node that currently owns the Cluster-Aware Updating clustered role, and the process sequentially performs updates on each cluster node. To update the current cluster node, the Cluster-Aware Updating clustered role fails over to another cluster node, and a new Update Coordinator process on that node assumes control of the updating run. In self-updating mode, Cluster-Aware Updating can update the failover cluster by using a fully automated, end-to-end updating process. An administrator can also trigger updates on-demand in this mode or simply use the remote-updating approach if desired.
Remote updating mode For this mode, a remote management computer (usually a Windows 10 PC) that has network connectivity to the failover cluster but is not a member of the failover cluster is configured with the Failover Clustering Tools. From the remote management computer, called the Update Coordinator, the administrator triggers an on-demand updating run by using a default or custom updating run profile. Remote updating mode is useful for monitoring real-time progress during the updating run and for clusters that are running on Server Core installations.
Note
Starting with Windows 10 October 2018 Update, RSAT is included as a set of "Features on Demand" right from Windows 10. For versions older than Windows 10 22H2, simply go to Settings > Apps > Apps & features > Optional features > Add a feature > RSAT: Failover Clustering Tools, and select Install. For Windows 10 22H2 and Windows 11, go to Settings > System > Optional features > Add a feature > RSAT: Failover Clustering Tools, and select Add. To see operation progress, click the Back button to view status on the "Manage optional features" page. The added feature will persist across Windows 10 version upgrades. To install RSAT for Windows 10 prior to the October 2018 Update, download an RSAT package.
Add CAU cluster role to the cluster
The Cluster-Aware Updating cluster role is required for self-updating mode. If you're using Windows Admin Center to perform the updates, the cluster role will automatically be added.
The Get-CauClusterRole cmdlet displays the configuration properties of the Cluster-Aware Updating cluster role on the specified cluster.
Get-CauClusterRole -ClusterName Cluster1
If the role isn't yet configured on the cluster, you'll see the following error message:
Get-CauClusterRole : The current cluster is not configured with a Cluster-Aware Updating clustered role.
To add the Cluster-Aware Updating cluster role for self-updating mode using PowerShell, use the Add-CauClusterRole cmdlet and supply the appropriate parameters, as in the following example:
Add-CauClusterRole -ClusterName Cluster1 -MaxFailedNodes 0 -RequireAllNodesOnline -EnableFirewallRules -VirtualComputerObjectName Cluster1-CAU -Force -CauPluginName Microsoft.WindowsUpdatePlugin -MaxRetriesPerNode 3 -CauPluginArguments @{ 'IncludeRecommendedUpdates' = 'False' } -StartDate "3/2/2020 3:00:00 AM" -DaysOfWeek 4 -WeeksOfMonth @(3) -verbose
Note
The previous command must be run from a management PC or domain controller.
Enable firewall rules to allow remote restarts
Allow the servers to restart remotely during the update process. If you're using Windows Admin Center to perform the updates, Windows Firewall rules will automatically be updated on each server to allow remote restarts. If you're updating with PowerShell, either enable the Remote Shutdown firewall rule group in Windows Firewall or pass the -EnableFirewallRules parameter to the cmdlet, such as in the example above.
Check for updates using PowerShell
You can use the Invoke-CAUScan cmdlet to scan servers for applicable updates and get a list of the initial set of updates that are applied to each server in a specified cluster:
Invoke-CauScan -ClusterName Cluster1 -CauPluginName Microsoft.WindowsUpdatePlugin -Verbose
Generation of the list can take a few minutes to complete. The preview list includes only an initial set of updates; it doesn't include updates that might become applicable after the initial updates are installed.
Install operating system updates using PowerShell
To scan servers for operating system updates and perform a full updating run on the specified cluster, use the Invoke-CAURun cmdlet:
Invoke-CauRun -ClusterName Cluster1 -CauPluginName Microsoft.WindowsUpdatePlugin -MaxFailedNodes 1 -MaxRetriesPerNode 3 -RequireAllNodesOnline -EnableFirewallRules -Force
This command performs a scan and a full updating run on the cluster named Cluster1. This cmdlet uses the Microsoft.WindowsUpdatePlugin plug-in and requires that all cluster nodes be online before running this cmdlet. In addition, this cmdlet allows no more than three retries per node before marking the node as failed and allows no more than one node to fail before marking the entire updating run as failed. It also enables firewall rules to allow the servers to restart remotely. Because the command specifies the Force parameter, the cmdlet runs without displaying confirmation prompts.
The updating run process includes the following:
- Scanning for and downloading applicable updates on each server in the cluster
- Moving currently running clustered roles off each server
- Installing the updates on each server
- Restarting the server if required by the installed updates
- Moving the clustered roles back to the original server
The updating run process also includes ensuring that quorum is maintained, checking for additional updates that can only be installed after the initial set of updates are installed, and saving a report of the actions taken is completed.
Install feature updates using PowerShell
To install feature updates using PowerShell, follow these steps. If your cluster is running Azure Stack HCI, version 20H2, be sure to apply the May 20, 2021 preview update (KB5003237) via Windows Update, or the Set-PreviewChannel cmdlet won't work.
Run the following cmdlets on every server in the cluster:
Set-WSManQuickConfig
Enable-PSRemoting
Set-NetFirewallRule -Group "@firewallapi.dll,-36751" -Profile Domain -Enabled true
To test whether the cluster is properly set up to apply software updates using Cluster-Aware Updating (CAU), run the
Test-CauSetupcmdlet, which will notify you of any warnings or errors:Test-CauSetup -ClusterName Cluster1Validate the cluster's hardware and settings by running the
Test-Clustercmdlet on one of the servers in the cluster. If any of the condition checks fail, resolve them before proceeding to step 4.Test-ClusterCheck for the feature update:
Invoke-CauScan -ClusterName <ClusterName> -CauPluginName "Microsoft.RollingUpgradePlugin" -CauPluginArguments @{'WuConnected'='true';} -Verbose | fl *Inspect the output of the above cmdlet and verify that each server is offered the same Feature Update, which should be the case.
You'll need a separate server or VM outside the cluster to run the
Invoke-CauRuncmdlet from. Important: The system on which you runInvoke-CauRunmust be running either Windows Server 2022, Azure Stack HCI, version 21H2, or Azure Stack HCI, version 20H2 with the May 20, 2021 preview update (KB5003237) installed.Invoke-CauRun -ClusterName <ClusterName> -CauPluginName "Microsoft.RollingUpgradePlugin" -CauPluginArguments @{'WuConnected'='true';} -Verbose -EnableFirewallRules -ForceCheck for any further updates and install them.
You're now ready to perform post-installation steps for feature updates.
Check on the status of an updating run
An administrator can get summary information about an updating run in progress by running the Get-CauRun cmdlet:
Get-CauRun -ClusterName Cluster1
Here's some sample output:
RunId                   : 834dd11e-584b-41f2-8d22-4c9c0471dbad
RunStartTime            : 10/13/2019 1:35:39 PM
CurrentOrchestrator     : NODE1
NodeStatusNotifications : {
Node      : NODE1
Status    : Waiting
Timestamp : 10/13/2019 1:35:49 PM
}
NodeResults             : {
Node                     : NODE2
Status                   : Succeeded
ErrorRecordData          :
NumberOfSucceededUpdates : 0
NumberOfFailedUpdates    : 0
InstallResults           : Microsoft.ClusterAwareUpdating.UpdateInstallResult[]
}
Post-installation steps for feature updates
Once the feature updates are installed, you'll need to update the cluster functional level and update the storage pool version using PowerShell in order to enable new features.
Important
Azure Stack HCI clusters running Storage Replica will require each server to be restarted a second time after the 21H2 Feature update is complete before performing the post-installation steps. This is a known issue.
Update the cluster functional level.
We recommend updating the cluster functional level as soon as possible. If you installed the feature updates with Windows Admin Center and checked the optional Update the cluster functional level to enable new features checkbox, you can skip this step.
Run the following cmdlet on any server in the cluster:
Update-ClusterFunctionalLevel='true';You'll see a warning that you can't undo this operation. Confirm Y that you want to continue.
Warning
After you update the cluster functional level, you can't roll back to the previous operating system version.
Update the storage pool.
After the cluster functional level has been updated, use the following cmdlet to update the storage pool. Run
Get-StoragePoolto find the FriendlyName for the storage pool representing your cluster. In this example, the FriendlyName is S2D on hci-cluster1:Update-StoragePool -FriendlyName "S2D on hci-cluster1"You'll be asked to confirm the action. At this point, new cmdlets will be fully operational on any server in the cluster.
Upgrade VM configuration levels (optional).
You can optionally upgrade VM configuration levels by stopping each VM using the
Update-VMVersioncmdlet and then starting the VMs again.Verify that the upgraded cluster functions as expected.
Roles should fail over correctly and, if VM live migration is used on the cluster, VMs should successfully live migrate.
Validate the cluster.
Run the
Test-Clustercmdlet on one of the servers in the cluster and examine the cluster validation report.
Perform a manual feature update of a Failover Cluster using SCONFIG
To do a manual feature update of a failover cluster, use the SCONFIG tool and Failover Clustering PowerShell cmdlets. To reference the SCONFIG document, see Configure a Server Core installation of Windows Server and Azure Stack HCI with the Server Configuration tool (SConfig)
For each node in the cluster, run these commands on the target node:
Suspend-ClusterNode -Node<node> -DrainCheck suspend using
Get-ClusterGroup--nothing should be running on the target node.Run the SCONFIG option 6.3 on the target node.
After the target node has rebooted, wait for the storage repair jobs to complete by running
Get-Storage-Jobuntil there are no storage jobs or all storage jobs are completed.Resume-ClusterNode -Node <nodename> -Failback
When all nodes have been upgraded, run these two cmdlets:
Update-ClusterFunctional Level
Update-StoragePool
Perform a fast, offline update of all servers in a cluster
This method allows you to take all the servers in a cluster down at once and update them all at the same time. This saves time during the updating process, but the trade-off is downtime for the hosted resources.
If there is a critical security update that you need to apply quickly or you need to ensure that updates complete within your maintenance window, this method may be for you. This process brings down the Azure Stack HCI cluster, updates the servers, and brings it all up again.
- Plan your maintenance window.
- Take the virtual disks offline.
- Stop the cluster to take the storage pool offline. Run the
Stop-Clustercmdlet or use Windows Admin Center to stop the cluster. - Set the cluster service to Disabled in Services.msc on each server. This prevents the cluster service from starting up while being updated.
- Apply the Windows Server Cumulative Update and any required Servicing Stack Updates to all servers. You can update all servers at the same time: there's no need to wait because the cluster is down.
- Restart the servers and ensure everything looks good.
- Set the cluster service back to Automatic on each server.
- Start the cluster. Run the
Start-Clustercmdlet or use Windows Admin Center. - Give it a few minutes. Make sure the storage pool is healthy.
- Bring the virtual disks back online.
- Monitor the status of the virtual disks by running the
Get-VolumeandGet-VirtualDiskcmdlets.
Known issues
The following are known issues in Windows Admin Center when upgrading a cluster from Azure Stack HCI, version 20H2 to version 21H2.
Couldn't install updates
This error message is seen when Windows Admin Center loses connectivity to the managed servers, so it's likely that the updates are actually being installed. Simply wait a few minutes and refresh your browser, and you should see the true update status. You can also use Get-CauRun to check the status of the updating run with PowerShell, and then refresh your browser when the run is complete.
Couldn't check for updates
This error message is seen when Windows Admin Center loses connectivity to the managed servers, so it's likely that the updates are actually being installed. Simply wait a few minutes and refresh your browser, and you should see the true update status. You can also use Get-CauRun to check the status of the updating run with PowerShell and then refresh your browser when the run is complete.
This message is also seen when the clustered servers have mixed versions of patches installed. This causes the Invoke_CAUScan command with RollingUpgrade plugin to return multiple feature updates. To mitigate this issue, apply the May 20, 2021 preview update (KB5003237) to all servers in the cluster before attempting to update the cluster.
Multiple prompts for login credentials
In older versions of Windows Admin Center, you may be prompted to authenticate multiple times during an updating run. Either authenticate each time when prompted or go back to Connections and re-connect to the cluster.
Cluster readiness check doesn't complete
At times, the readiness check remains in Checking status for the cluster validation tests and never finishes. This is predominantly seen in non-English Azure Stack HCI clusters due to localization issues.
When Test-Cluster finishes on the machines (usually after a couple of minutes), Windows Admin Center may not recognize that the checks have completed. Because Test-Cluster does succeed behind the scenes in this scenario, you can download the Test-Cluster report file directly from the servers to validate cluster health before continuing with the updating run. Alternatively, run Test-Cluster using PowerShell on any of the servers in the cluster.
CredSSP credentials error
In older versions of Windows Admin Center, you may encounter the error message "You can't use Cluster Aware Updating without enabling CredSSP and providing explicit credentials" when you've already done so. This issue is fixed in Windows Admin Center version 2110.
CredSSP session endpoint permissions issue
During an updating run, you may see a notification to enable CredSSP, along with an error message: "Couldn't enable CredSSP delegation. Connecting to the remote server failed."
This CredSSP error is seen when Windows Admin Center is running on a local PC and when the Windows Admin Center user is not the same user who installed Windows Admin Center on the machine.
To mitigate this problem, Microsoft has introduced a Windows Admin Center CredSSP administrators group. Add your user account to the Windows Admin Center CredSSP Administrators group on your local PC and then sign back in, and the error should go away.
Next steps
For related information, see also:
