Quickstart: Use Azure Redis with an ASP.NET web app
In this quickstart, you use Visual Studio 2019 to create an ASP.NET web application that connects to Azure Cache for Redis to store and retrieve data from the cache. You then deploy the app to Azure App Service.
Skip to the code on GitHub
Clone the repo https://github.com/Azure-Samples/azure-cache-redis-samples/tree/main/quickstart/aspnet on GitHub.
Prerequisites
- Azure subscription - create one
- Visual Studio 2019 with the ASP.NET and web development and Azure development workloads.
- .NET Framework 4 or higher is required by the StackExchange.Redis client.
Create an Azure Cache for Redis instance
To create a cache, sign in to the Azure portal and select Create a resource.

On the Get Started page, type Azure Cache for Redis in the search box. Then, select Create.
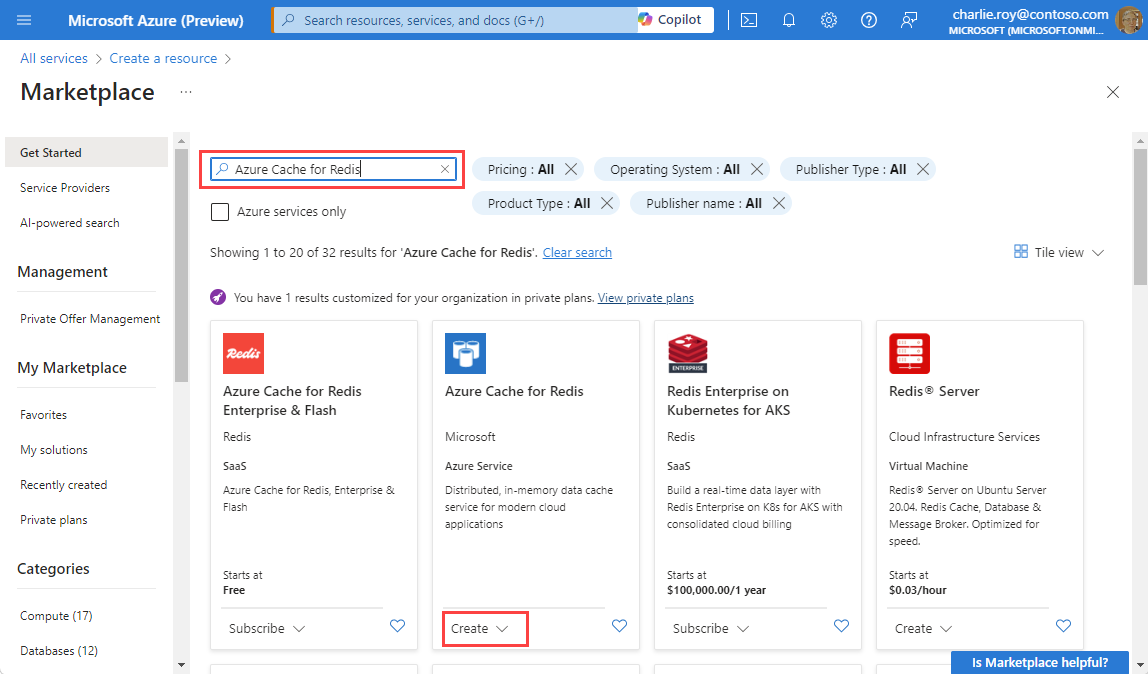
On the New Redis Cache page, configure the settings for your cache.
Setting Choose a value Description Subscription Drop down and select your subscription. The subscription under which to create this new Azure Cache for Redis instance. Resource group Drop down and select a resource group, or select Create new and enter a new resource group name. Name for the resource group in which to create your cache and other resources. By putting all your app resources in one resource group, you can easily manage or delete them together. DNS name Enter a unique name. The cache name must be a string between 1 and 63 characters that contain only numbers, letters, or hyphens. The name must start and end with a number or letter, and can't contain consecutive hyphens. Your cache instance's host name is <DNS name>.redis.cache.chinacloudapi.cn. Location Drop down and select a location. Select a region near other services that use your cache. Cache SKU Drop down and select a SKU. The SKU determines the size, performance, and features parameters that are available for the cache. For more information, see Azure Cache for Redis Overview. Cache size Drop down and select a size of your cache For more information, see Azure Cache for Redis Overview. Select the Networking tab or select the Networking button at the bottom of the page.
In the Networking tab, select your connectivity method.
Select the Next: Advanced tab or select the Next: Advanced button on the bottom of the page to see the Advanced tab.
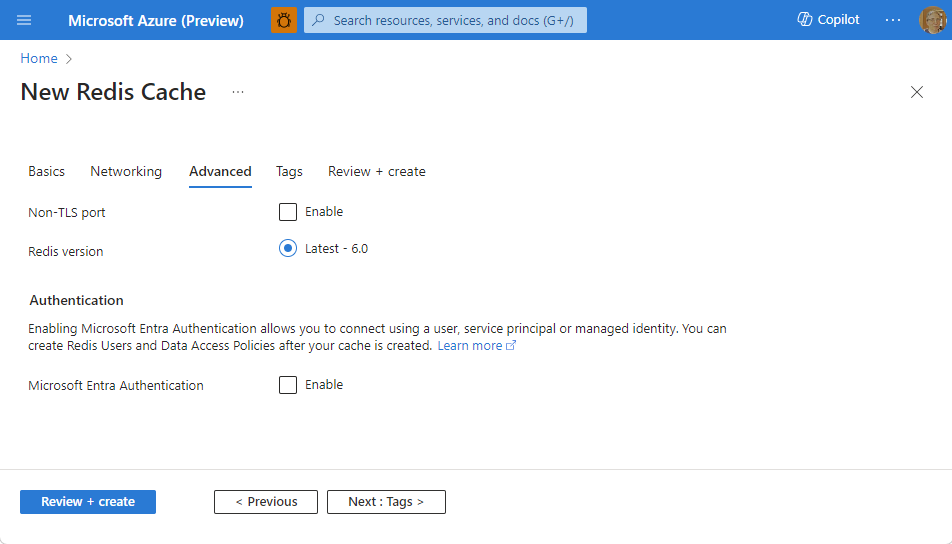
- For Basic or Standard caches, toggle the selection for a non-TLS port. You can also select if you want to enable Microsoft Entra Authentication.
- For a Premium cache, configure the settings for non-TLS port, clustering, managed identity, and data persistence. You can also select if you want to enable Microsoft Entra Authentication.
Select the Next: Tags tab or select the Next: Tags button at the bottom of the page.
Optionally, in the Tags tab, enter the name and value if you wish to categorize the resource.
Select Review + create. You're taken to the Review + create tab where Azure validates your configuration.
After the green Validation passed message appears, select Create.
It takes a while for a cache to create. You can monitor progress on the Azure Cache for Redis Overview page. When Status shows as Running, the cache is ready to use.
Microsoft Entra ID Authentication (recommended)
Use Microsoft Entra ID authentication on your cache
Azure Redis caches have Microsoft Entra Authentication enabled by default. Access keys are disabled by default.
Important
Microsoft recommends using Microsoft Entra ID authentication for the most secure authentication experience instead of using passwords or access keys. The authentication described in this section of the article uses access keys, which require a very high degree of trust in the application and carries risks not present when using Microsoft Entra ID. Use the approach in this document only when Microsoft Entra ID authentication is not viable.
In the Azure portal, select the cache where you'd like to use Microsoft Entra token-based authentication.
Select Authentication from the Resource menu.
Select Select member and enter the name of a valid user. The user you enter is automatically assigned Data Owner Access Policy by default when you select Save. You can also enter a managed identity or service principal to connect to your cache instance.
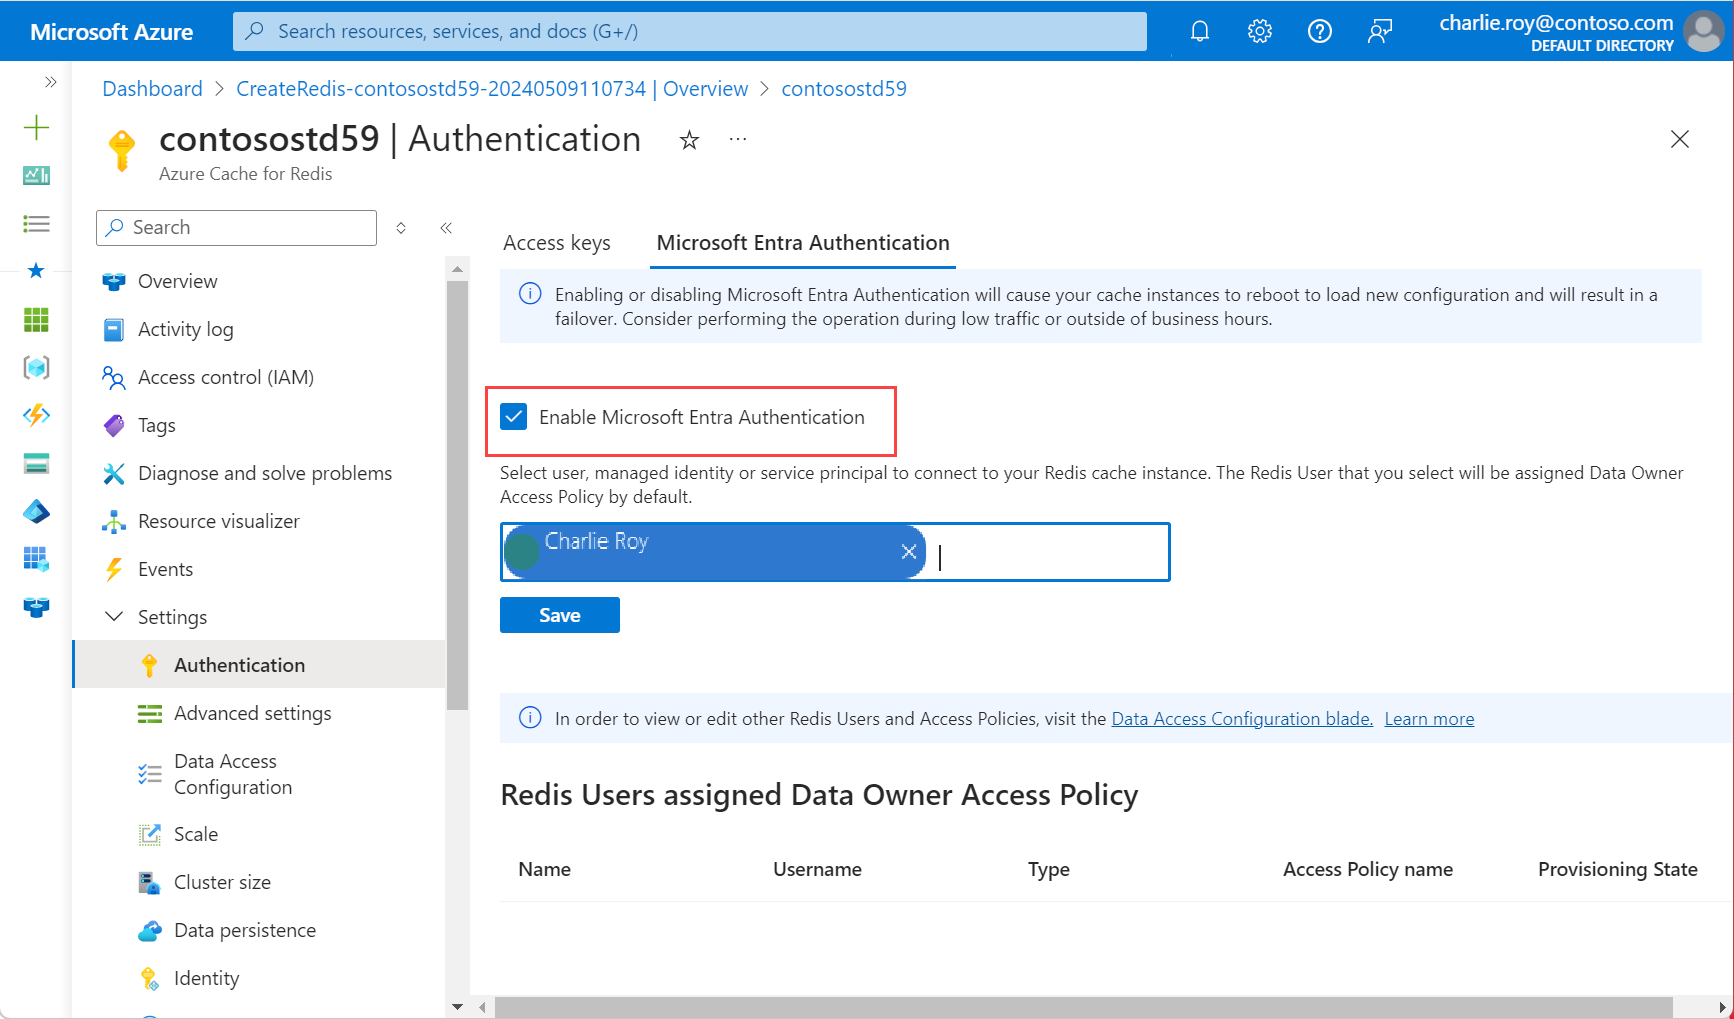
For information on using Microsoft Entra ID with Azure CLI, see the reference pages for identity.
Install the library for using Microsoft Entra ID Authentication
The Azure.StackExchange.Redis library contains the Microsoft using Microsoft Entra ID authentication method for connecting to Azure Redis services using Microsoft Entra ID. It's applicable to all Azure Cache for Redis.
Open your project in Visual Studio
Right click on the project, choose Manage NuGet Packages...
Search for
Microsoft.Azure.StackExchangeRedisClick Install button to install
Accept all prompted content to finish installation
Connect to the cache using Microsoft Entra ID
Include the libraries in your code
using Azure.Identity;
using StackExchange.Redis
Using the default Azure credentials to authenticate the client connection. This enables your code to use the signed-in user credential when running locally, and an Azure managed identity when running in Azure without code change.
var configurationOptions = await ConfigurationOptions.Parse($"{_redisHostName}").ConfigureForAzureWithTokenCredentialAsync(new DefaultAzureCredential());
ConnectionMultiplexer _newConnection = await ConnectionMultiplexer.ConnectAsync(configurationOptions);
IDatabase Database = _newConnection.GetDatabase();
To edit the web.config file
Edit the Web.config file by adding the following content:
<appSettings>
    <add key="RedisHostName" value="<cache-hostname-with-portnumber>"/>
</appSettings>
Replace
<cache-hostname>with your cache host name as it appears in the Overview on the Resource menu in Azure portal.For example with Azure Cache for Redis, my-redis.chinanorth.chinacloudapi.cn:6380
Save the file.
For more information, see StackExchange.Redis and the code in a GitHub repo.
Run the app locally
By default, the project is configured to host the app locally in IIS Express for testing and debugging.
To run the app locally
In Visual Studio, select Debug > Start Debugging to build and start the app locally for testing and debugging.
In the browser, select Azure Cache for Redis Test on the navigation bar.
In the following example, the
Messagekey previously had a cached value, which was set by using the Azure Cache for Redis console in the portal. The app updated that cached value. The app also executed thePINGandCLIENT LISTcommands.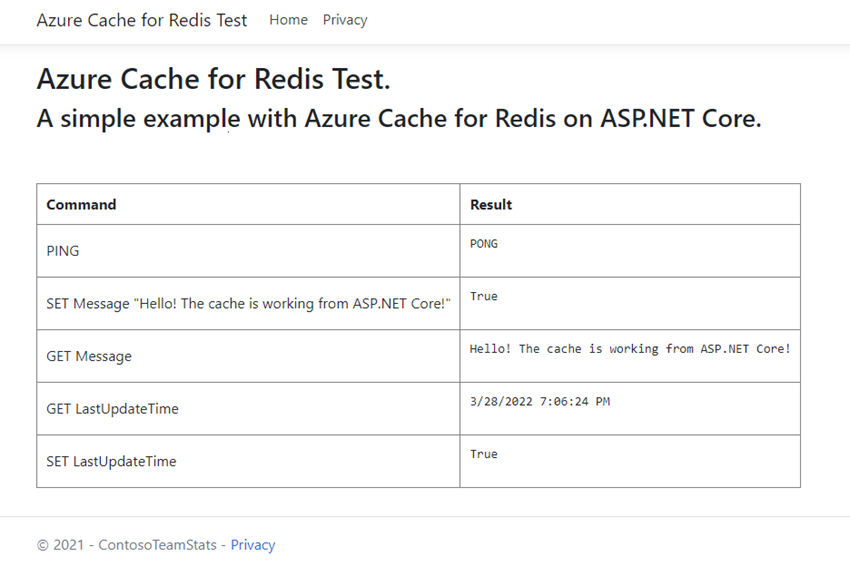
Publish and run in Azure
After you successfully test the app locally, you can deploy the app to Azure and run it in the cloud.
To publish the app to Azure
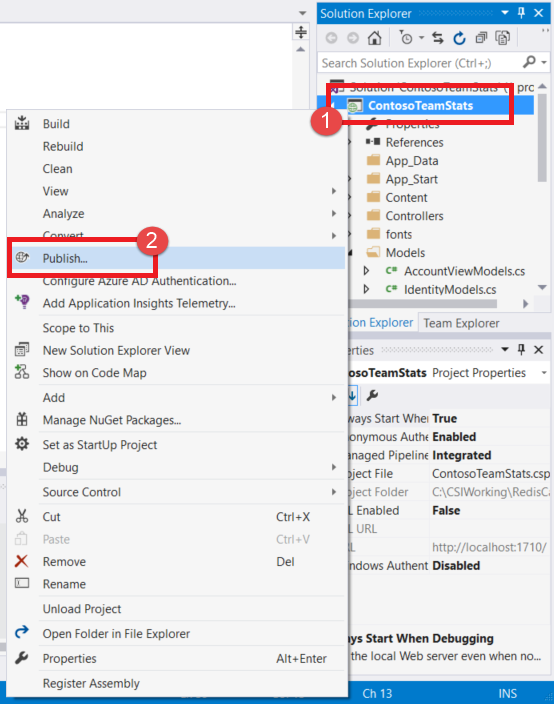
In Visual Studio, right-click the project node in Solution Explorer. Then select Publish.
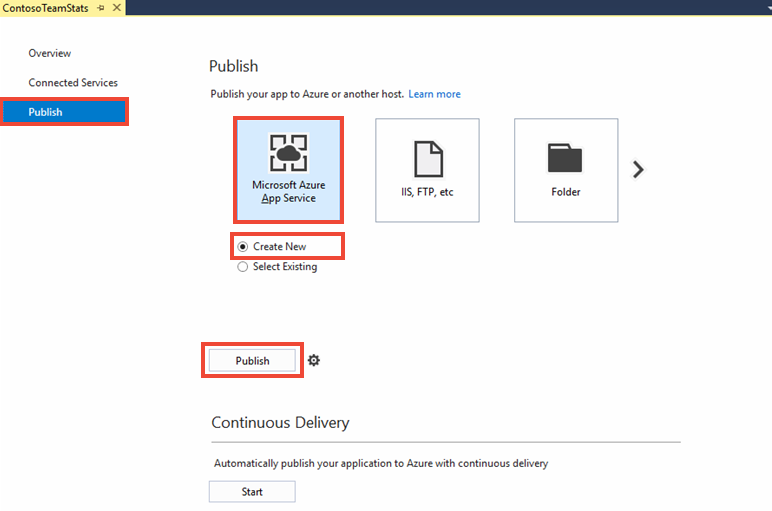
Select Microsoft Azure App Service, select Create New, and then select Publish.
In the Create App Service dialog box, make the following changes:
Setting Recommended value Description App name Use the default. The app name is the host name for the app when deployed to Azure. The name might have a timestamp suffix added to it to make it unique if necessary. Subscription Choose your Azure subscription. This subscription is charged for any related hosting costs. If you have multiple Azure subscriptions, verify that the subscription that you want is selected. Resource group Use the same resource group where you created the cache (for example, TestResourceGroup). The resource group helps you manage all resources as a group. Later, when you want to delete the app, you can just delete the group. App Service plan Select New, and then create a new App Service plan named TestingPlan.
Use the same Location you used when creating your cache.
Choose Free for the size.An App Service plan defines a set of compute resources for a web app to run with. 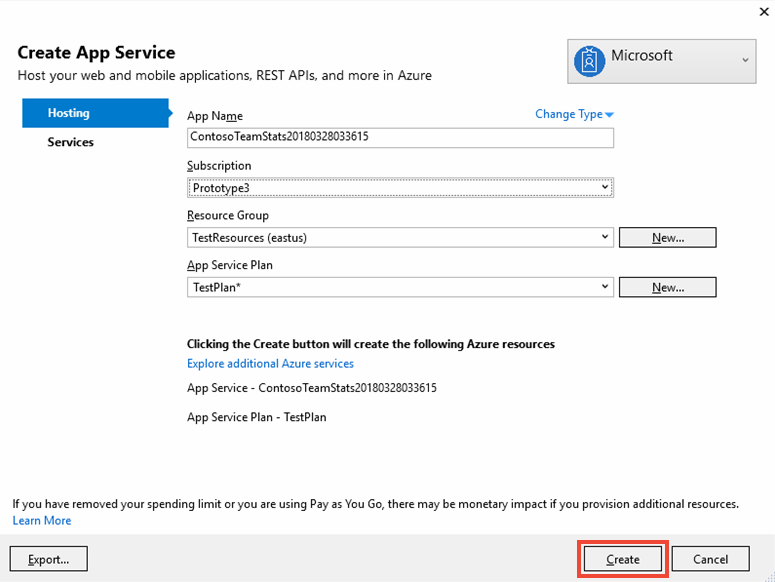
After you configure the App Service hosting settings, select Create.
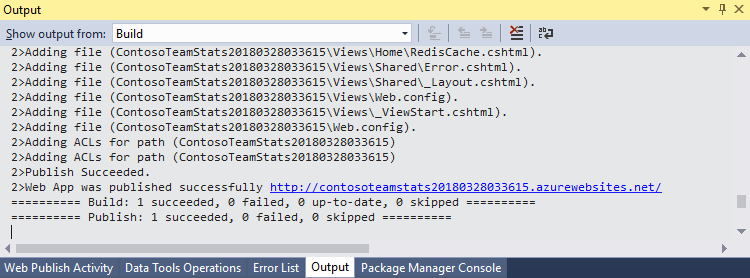
Monitor the Output window in Visual Studio to see the publishing status. After the app is published, the URL for the app is logged:
Add the app setting for the cache
After the new app is published, add a new app setting. This setting is used to store the cache connection information.
To add the app setting
To find the new app you created, type the app name in the search bar at the top of the Azure portal.
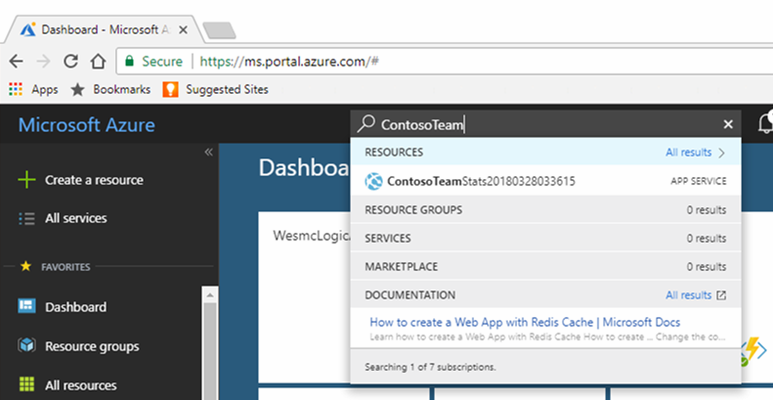
Add a new app setting named CacheConnection for the app to use to connect to the cache. Use the same value you configured for
RedisHostNamein your web.config file.
Run the app in Azure
In your browser, go to the URL for the app. The URL appears in the results of the publishing operation in the Visual Studio output window. The URL is also provided in the Azure portal on the overview page of the app you created.
Select Azure Cache for Redis Test on the navigation bar to test cache access as you did with the local version.
Clean up resources
If you want to continue to use the resources you created in this article, keep the resource group.
Otherwise, if you're finished with the resources, you can delete the Azure resource group that you created to avoid charges.
Important
Deleting a resource group is irreversible. When you delete a resource group, all the resources in it are permanently deleted. Make sure that you do not accidentally delete the wrong resource group or resources. If you created the resources inside an existing resource group that contains resources you want to keep, you can delete each resource individually instead of deleting the resource group.
To delete a resource group
Sign in to the Azure portal, and then select Resource groups.
Select the resource group you want to delete.
If there are many resource groups, use the Filter for any field... box, type the name of your resource group you created for this article. Select the resource group in the results list.
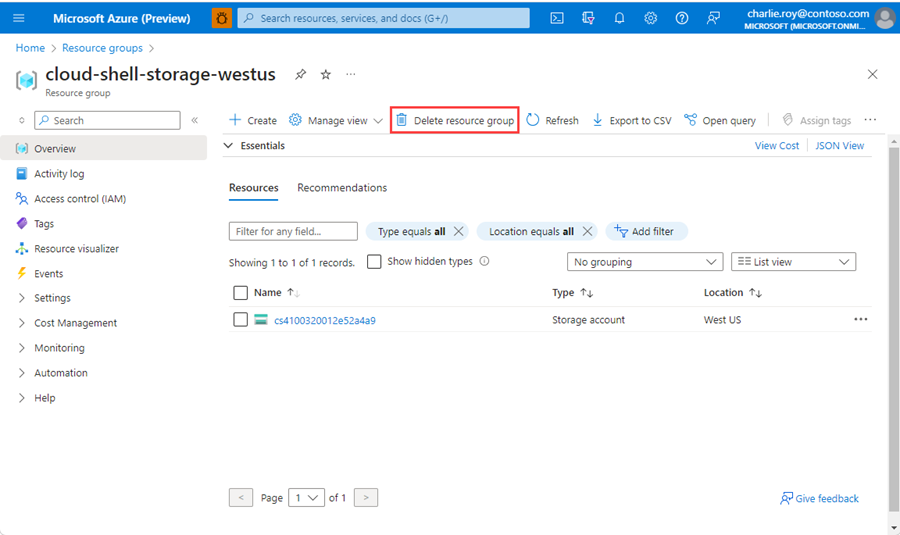
Select Delete resource group.
You're asked to confirm the deletion of the resource group. Type the name of your resource group to confirm, and then select Delete.
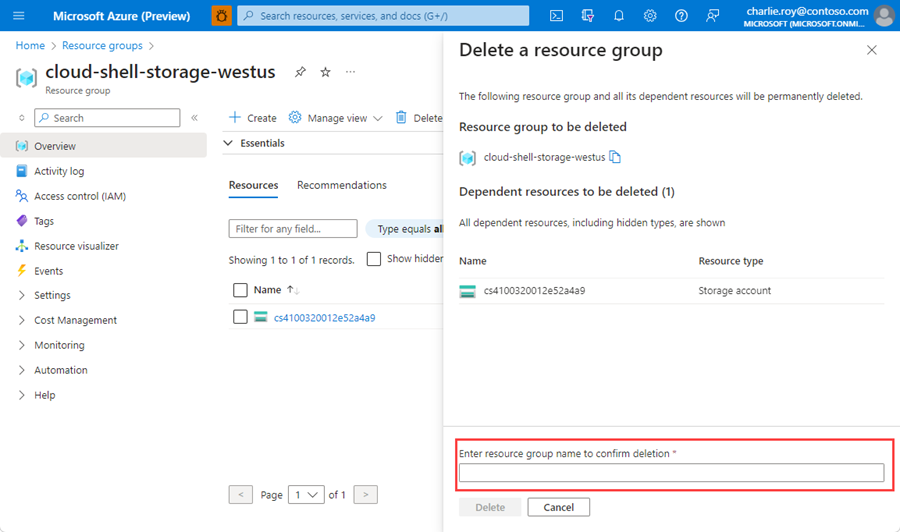
After a few moments, the resource group and all of its resources are deleted.