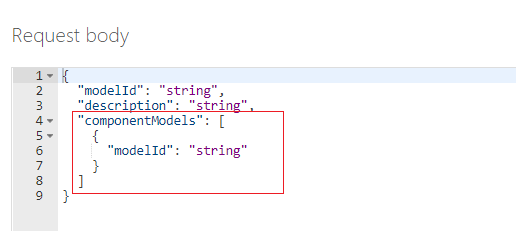
Compose custom models
emphasis styleThis content applies to: ![]() v2.1
v2.1
Important
Model compose behavior is changed for api-version=2024-11-30 (GA). For more information refer to composed custom models. The following behavior only applies to v3.1 and previous versions.
A composed model is created by taking a collection of custom models and assigning them to a single model ID. You can assign up to 200 trained custom models to a single composed model ID. When a document is submitted to a composed model, the service performs a classification step to decide which custom model accurately represents the form presented for analysis. Composed models are useful when you train several models and want to group them to analyze similar form types. For example, your composed model might include custom models trained to analyze your supply, equipment, and furniture purchase orders. Instead of manually trying to select the appropriate model, you can use a composed model to determine the appropriate custom model for each analysis and extraction.
To learn more, see Composed custom models.
In this article, you learn how to create and use composed custom models to analyze your forms and documents.
Prerequisites
To get started, you need the following resources:
An Azure subscription. You can create a Azure subscription.
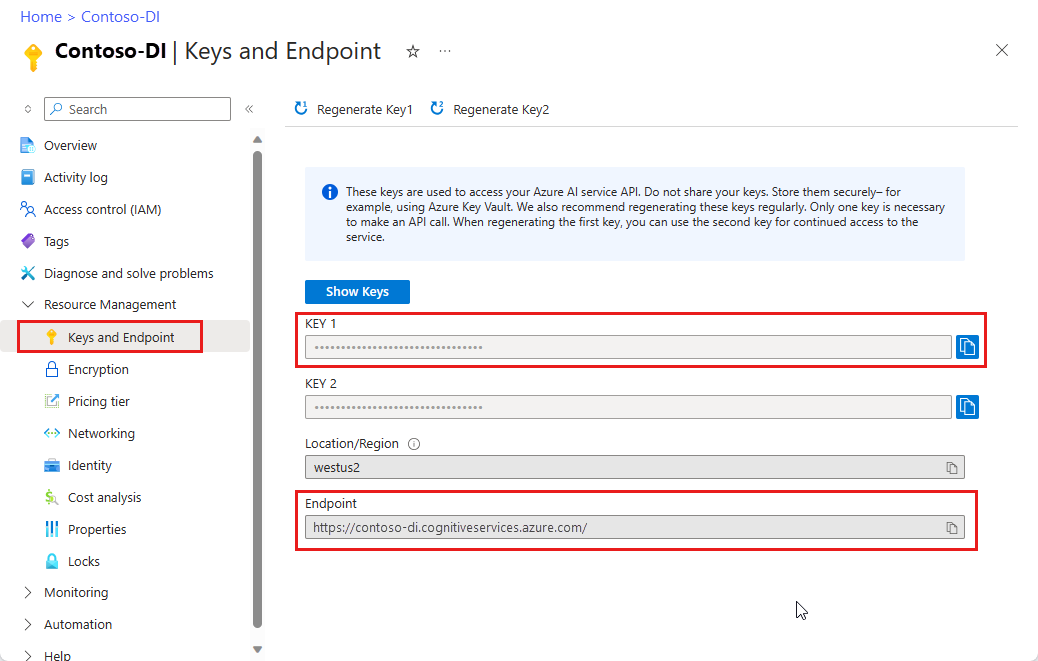
A Document Intelligence instance. Once you have your Azure subscription, create a Document Intelligence resource in the Azure portal to get your key and endpoint. If you have an existing Document Intelligence resource, navigate directly to your resource page. You can use the free pricing tier (F0) to try the service, and upgrade later to a paid tier for production.
After the resource deploys, select Go to resource.
Copy the Keys and Endpoint values from the Azure portal and paste them in a convenient location, such as Microsoft Notepad. You need the key and endpoint values to connect your application to the Document Intelligence API.
Tip
For more information, see create a Document Intelligence resource.
- An Azure storage account. If you don't know how to create an Azure storage account, follow the Azure Storage quickstart for Azure portal. You can use the free pricing tier (F0) to try the service, and upgrade later to a paid tier for production.
Create your custom models
First, you need a set of custom models to compose. You can use the Document Intelligence Studio, REST API, or client libraries. The steps are as follows:
- Assemble your training dataset
- Upload your training set to Azure blob storage
- Train your custom models
Assemble your training dataset
Building a custom model begins with establishing your training dataset. You need a minimum of five completed forms of the same type for your sample dataset. They can be of different file types (jpg, png, pdf, tiff) and contain both text and handwriting. Your forms must follow the input requirements for Document Intelligence.
Tip
Follow these tips to optimize your data set for training:
- If possible, use text-based PDF documents instead of image-based documents. Scanned PDFs are handled as images.
- For filled-in forms, use examples that have all of their fields filled in.
- Use forms with different values in each field.
- If your form images are of lower quality, use a larger data set (10-15 images, for example).
See Build a training data set for tips on how to collect your training documents.
Upload your training dataset
Once you gather a set of training documents, you need to upload your training data to an Azure blob storage container.
If you want to use manually labeled data, you have to upload the .labels.json and .ocr.json files that correspond to your training documents.
Train your custom model
When you train your model with labeled data, the model uses supervised learning to extract values of interest, using the labeled forms you provide. Labeled data results in better-performing models and can produce models that work with complex forms or forms containing values without keys.
Document Intelligence uses the prebuilt-layout model API to learn the expected sizes and positions of typeface and handwritten text elements and extract tables. Then it uses user-specified labels to learn the key/value associations and tables in the documents. We recommend that you use five manually labeled forms of the same type (same structure) to get started with training a new model. Then, add more labeled data, as needed, to improve the model accuracy. Document Intelligence enables training a model to extract key-value pairs and tables using supervised learning capabilities.
To create custom models, start with configuring your project:
From the Studio homepage, select Create new from the Custom model card.
Use the ➕ Create a project command to start the new project configuration wizard.
Enter project details, select the Azure subscription and resource, and the Azure Blob storage container that contains your data.
Review, submit your settings, and create the project.

While creating your custom models, you might need to extract data collections from your documents. The collections may appear one of two formats. Using tables as the visual pattern:
Dynamic or variable count of values (rows) for a given set of fields (columns)
Specific collection of values for a given set of fields (columns and/or rows)
Create a composed model
Note
the create compose model operation is only available for custom models trained with labels. Attempting to compose unlabeled models will produce an error.
With the create compose model operation, you can assign up to 100 trained custom models to a single model ID. When analyze documents with a composed model, Document Intelligence first classifies the form you submitted, then chooses the best matching assigned model, and returns results for that model. This operation is useful when incoming forms may belong to one of several templates.
Once the training process is successfully completed, you can begin to build your composed model. Here are the steps for creating and using composed models:
- Gather your custom model IDs
- Compose your custom models
- Analyze documents
- Manage your composed models
Gather your model IDs
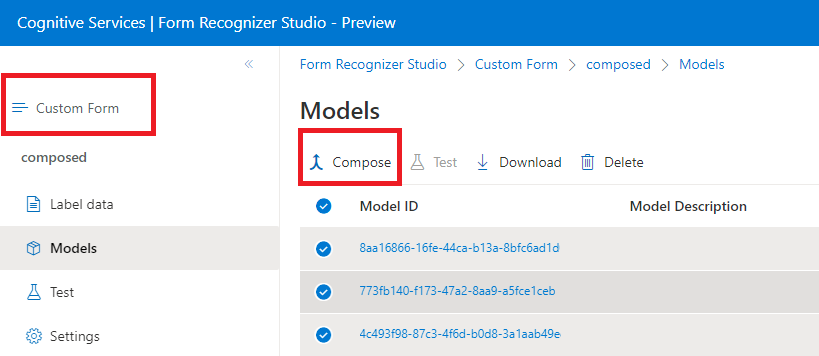
When you train models using the Document Intelligence Studio, the model ID is located in the models menu under a project:
Compose your custom models
Select a custom models project.
In the project, select the
Modelsmenu item.From the resulting list of models, select the models you wish to compose.
Choose the Compose button from the upper-left corner.
In the pop-up window, name your newly composed model and select Compose.
When the operation completes, your newly composed model appears in the list.
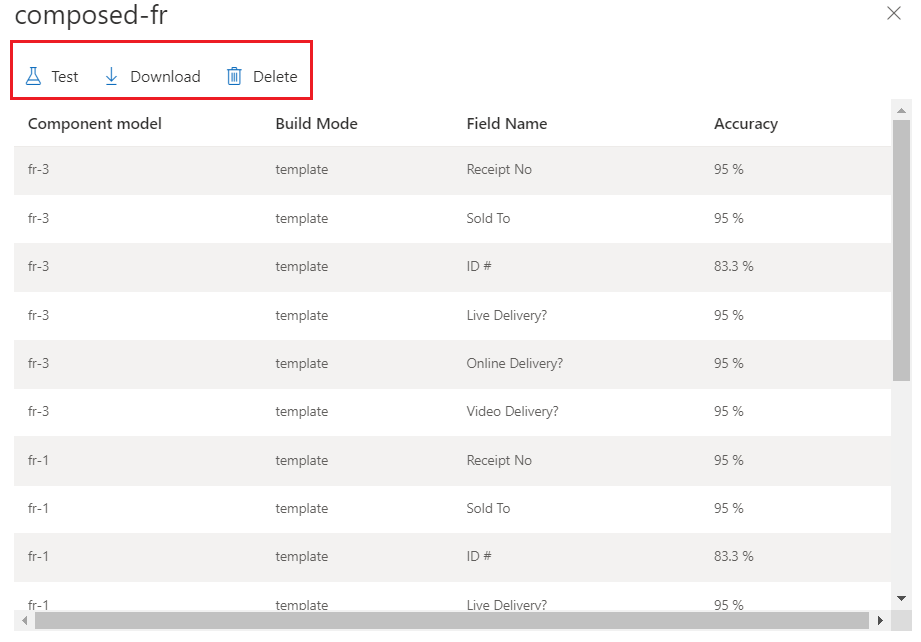
Once the model is ready, use the Test command to validate it with your test documents and observe the results.
Analyze documents
The custom model Analyze operation requires you to provide the modelID in the call to Document Intelligence. You should provide the composed model ID for the modelID parameter in your applications.

Manage your composed models
You can manage your custom models throughout life cycles:
- Test and validate new documents.
- Download your model to use in your applications.
- Delete your model when its lifecycle is complete.
Great! You learned the steps to create custom and composed models and use them in your Document Intelligence projects and applications.
Next steps
Try one of our Document Intelligence quickstarts:
Document Intelligence uses advanced machine-learning technology to detect and extract information from document images and return the extracted data in a structured JSON output. With Document Intelligence, you can train standalone custom models or combine custom models to create composed models.
Custom models. Document Intelligence custom models enable you to analyze and extract data from forms and documents specific to your business. Custom models are trained for your distinct data and use cases.
Composed models. A composed model is created by taking a collection of custom models and assigning them to a single model that encompasses your form types. When a document is submitted to a composed model, the service performs a classification step to decide which custom model accurately represents the form presented for analysis.
In this article, learn how to create Document Intelligence custom and composed models using our Document Intelligence Sample Labeling tool, REST APIs, or client libraries.
Sample Labeling tool
Try extracting data from custom forms using our Sample Labeling tool. You need the following resources:
An Azure subscription—you can create one for trial
A Document Intelligence instance in the Azure portal. You can use the free pricing tier (
F0) to try the service. After your resource deploys, select Go to resource to get your key and endpoint.

In the Document Intelligence UI:
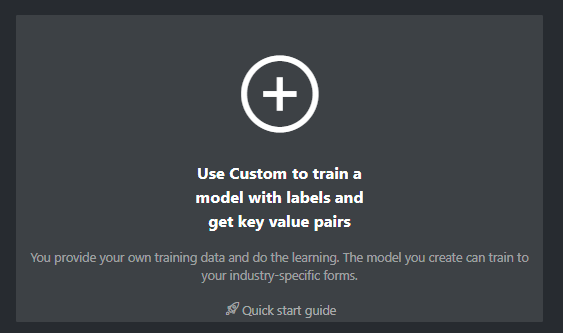
- Select Use Custom to train a model with labels and get key value pairs.
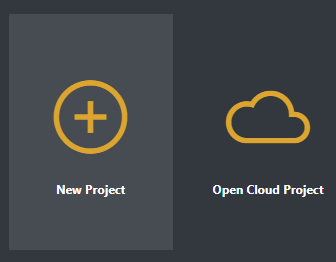
- In the next window, select New project:
Create your models
The steps for building, training, and using custom and composed models are as follows:
- Assemble your training dataset
- Upload your training set to Azure blob storage
- Train your custom model
- Compose custom models
- Analyze documents
- Manage your custom models
Assemble your training dataset
Building a custom model begins with establishing your training dataset. You need a minimum of five completed forms of the same type for your sample dataset. They can be of different file types (jpg, png, pdf, tiff) and contain both text and handwriting. Your forms must follow the input requirements for Document Intelligence.
Upload your training dataset
You need to upload your training data to an Azure blob storage container. If you don't know how to create an Azure storage account with a container, see Azure Storage quickstart for Azure portal. You can use the free pricing tier (F0) to try the service, and upgrade later to a paid tier for production.
Train your custom model
You train your model with labeled data sets. Labeled datasets rely on the prebuilt-layout API, but supplementary human input is included such as your specific labels and field locations. Start with at least five completed forms of the same type for your labeled training data.
When you train with labeled data, the model uses supervised learning to extract values of interest, using the labeled forms you provide. Labeled data results in better-performing models and can produce models that work with complex forms or forms containing values without keys.
Document Intelligence uses the Layout API to learn the expected sizes and positions of typeface and handwritten text elements and extract tables. Then it uses user-specified labels to learn the key/value associations and tables in the documents. We recommend that you use five manually labeled forms of the same type (same structure) to get started when training a new model. Add more labeled data as needed to improve the model accuracy. Document Intelligence enables training a model to extract key value pairs and tables using supervised learning capabilities.
Get started with Train with labels
Create a composed model
Note
Model Compose is only available for custom models trained with labels. Attempting to compose unlabeled models will produce an error.
With the Model Compose operation, you can assign up to 200 trained custom models to a single model ID. When you call Analyze with the composed model ID, Document Intelligence classifies the form you submitted first, chooses the best matching assigned model, and then returns results for that model. This operation is useful when incoming forms may belong to one of several templates.
Using the Document Intelligence Sample Labeling tool, the REST API, or the client libraries, follow the steps to set up a composed model:
Gather your custom model IDs
Once the training process is successfully completed, your custom model is assigned a model ID. You can retrieve a model ID as follows:
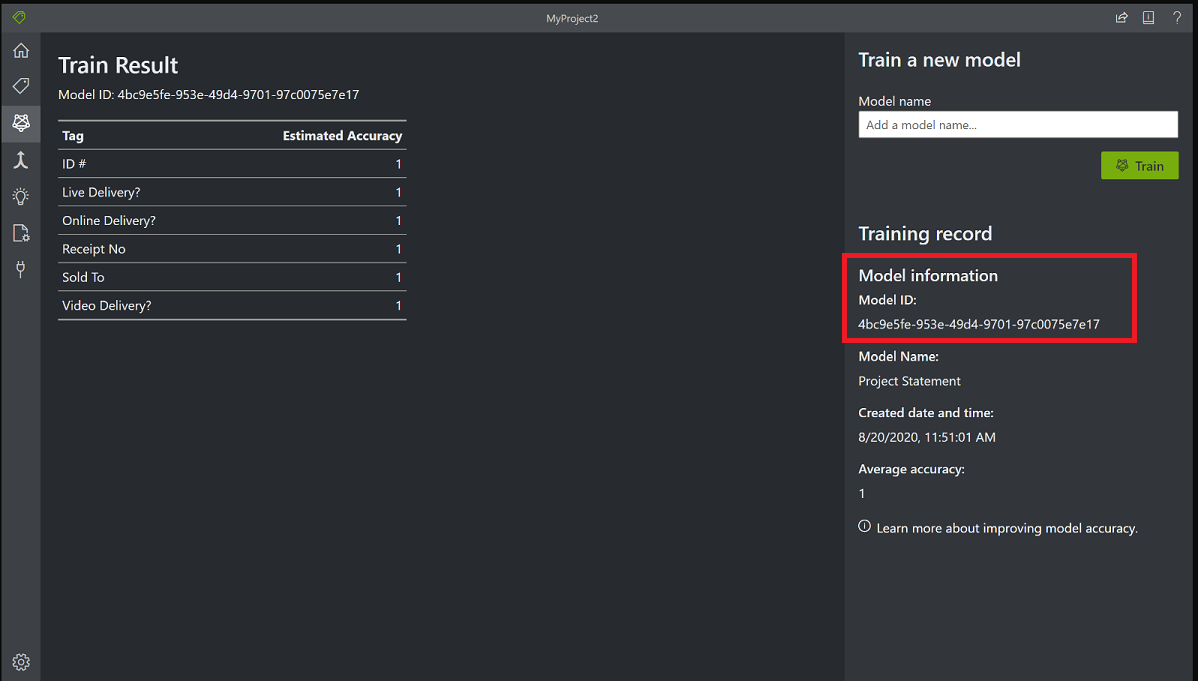
When you train models using the Document Intelligence Sample Labeling tool, the model ID is located in the Train Result window:
Compose your custom models
After you gather your custom models that correspond to a single form type, you can compose them into a single model.
The Sample Labeling tool enables you to quickly get started training models and composing them to a single model ID.
After training is complete, compose your models as follows:
On the left rail menu, select the Model Compose icon (merging arrow).
In the main window, select the models you wish to assign to a single model ID. Models with the arrows icon are already composed models.
Choose the Compose button from the upper-left corner.
In the pop-up window, name your newly composed model and select Compose.
When the operation completes, your newly composed model appears in the list.
Analyze documents with your custom or composed model
The custom form Analyze operation requires you to provide the modelID in the call to Document Intelligence. You can provide a single custom model ID or a composed model ID for the modelID parameter.
On the tool left-pane menu, select the
Analyzeicon (light bulb).Choose a local file or image URL to analyze.
Select the Run Analysis button.
The tool applies tags in bounding boxes and reports the confidence percentage for each tag.
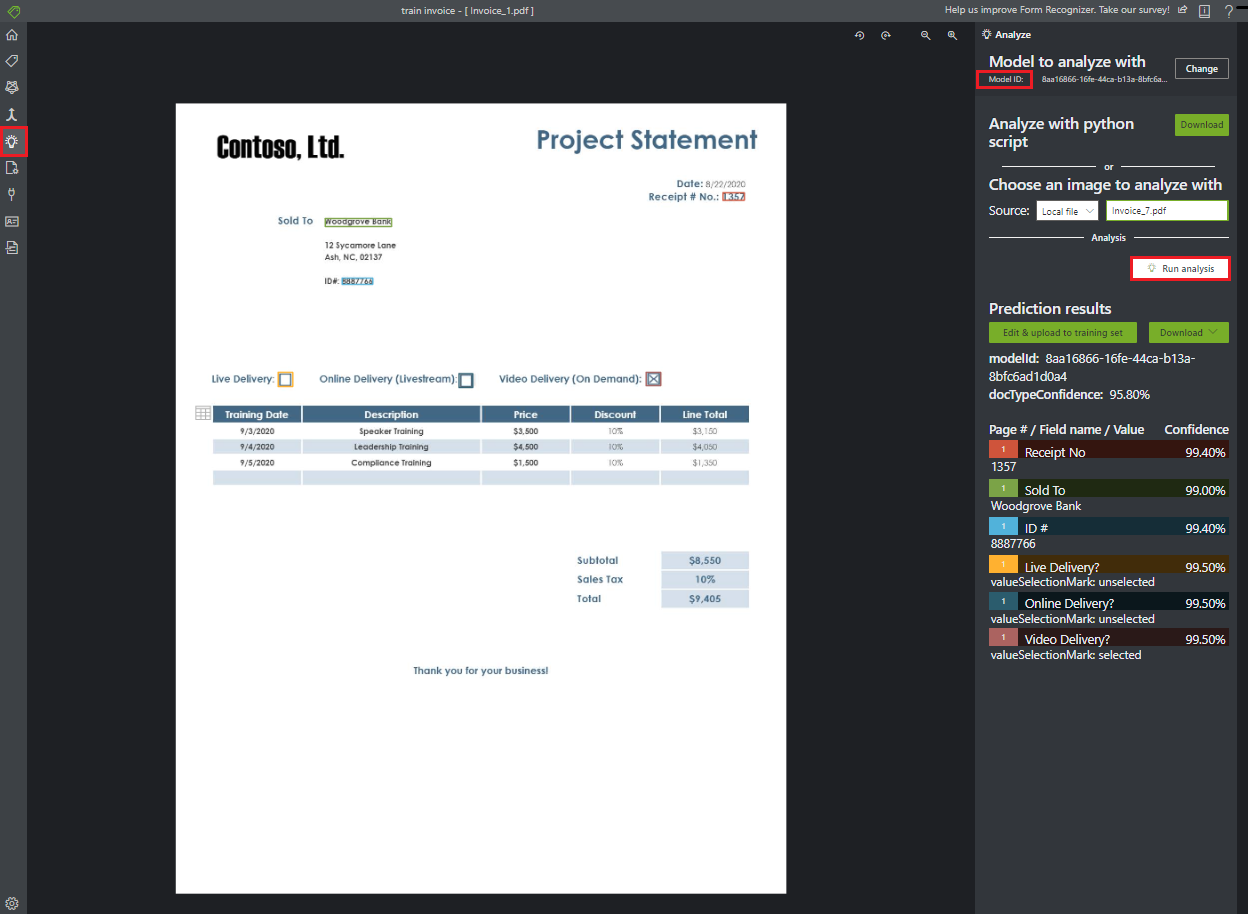
Test your newly trained models by analyzing forms that weren't part of the training dataset. Depending on the reported accuracy, you might want to do further training to improve the model. You can continue further training to improve results.
Manage your custom models
You can manage your custom models throughout their lifecycle by viewing a list of all custom models under your subscription, retrieving information about a specific custom model, and deleting custom models from your account.
Great! You learned the steps to create custom and composed models and use them in your Document Intelligence projects and applications.
Next steps
Learn more about the Document Intelligence client library by exploring our API reference documentation.

